Table of Contents

Related Manuals for Powermatic 511


Summary of Contents for Powermatic 511
- Page 1 Operating Instructions and Parts Manual Vertical Panel Saw Model 511 WMH TOOL GROUP 2420 Vantage Drive Elgin, Illinois 60123 Part No. M-0460280 Ph.: 800-274-6848 Revision D 1/05 www.wmhtoolgroup.com Copyright © WMH Tool Group...
-
Page 2: Warranty And Service
This manual has been prepared for the owner and operators of a Powermatic Model 511 Panel Saw. Its purpose, aside from machine operation, is to promote safety using accepted operating and maintenance procedures. To obtain maximum life and efficiency from your panel saw and to aid in using it safely, please read this manual thoroughly and follow the instructions carefully. -
Page 3: Table Of Contents
511 Panel Saw, Motor with Pushbutton Assembly 2475002 ...26 511 Panel Saw Dust Collection System ...27 Electrical Connections...28 S-B Factory Service Centers ...29 Parts List: Skilsaw, Model 586, Type 2 (511 Panel Saw)...30 Short Panel Fence (Optional Accessory)...32 Installation of Short Panel Fence ...32 Optional Accessories ...34... -
Page 4: Warning
4. This panel saw is designed and intended for use by properly trained and experienced personnel only. If you are not familiar with the proper and safe operation of a panel saw, do not use until proper training and knowledge have been obtained. -
Page 5: Save These Instructions
29. Remove loose items and unnecessary work pieces from the area before starting the machine. 30. Use common sense; keep hands away from and out from under saw carriage at all times. 31. Do not attempt to disassemble or repair counter-balance. - Page 6 Familiarize yourself with the location and content of these decals on your machine.
-
Page 7: General Operating Instructions
Panels being cut horizontally (ripping) must always be fed against the rotation of the saw blade. Do not force the saw. It will perform better and can be more easily controlled if allowed to work at the rate for which it was designed. -
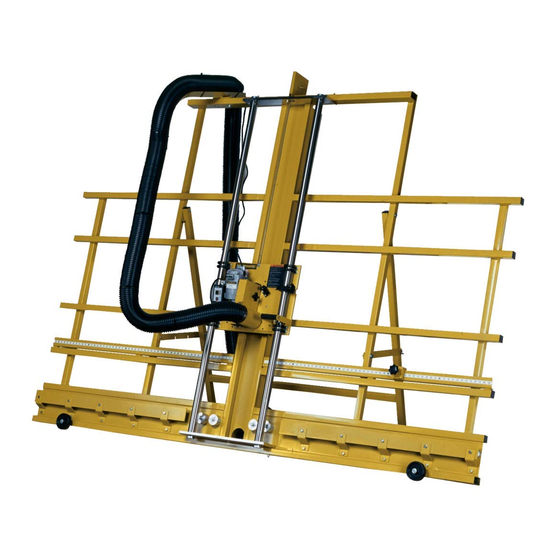
Page 8: 511 Panel Saw Features
511 Panel Saw Features... -
Page 9: Introduction
Introduction This manual is provided by Powermatic covering the safe operation and maintenance procedures for a Model 511 Vertical Panel Saw. This manual contains instructions on installation, safety precautions, general operating procedures, maintenance instructions and parts breakdown. This machine has been designed and constructed to provide years of trouble free operation if used in accordance with instructions set forth in this manual. -
Page 10: Installation Of Panel Saw
See Figure 3. Tighten the locking knob securely. 3. At the back of the panel saw, on top of the counterweight housing, lift up on the wood block and cut the three cables attached to the block. -
Page 11: Extension Cords
Operation Crosscut rulers: The panel saw comes with one rip (vertical) ruler and two crosscut (horizontal) rulers. The rip ruler is preset at the factory. The crosscut rulers should be checked and, if necessary, adjusted before operating the saw. -
Page 12: Operating Tips
A crosscut is a vertical cut that is made from the top to the bottom of the workpiece. See Figure Do not place hands on or under the carriage or in path of saw blade. For safety and accuracy, the workpiece must be supported least crosscutting. -
Page 13: Ripcutting
9. Once the cut is complete, turn off the motor and wait for the blade to come to a full stop (NOTE: A coasting saw blade can mar the edge of a freshly cut workpiece). Remove the workpieces, return the carriage to the top of the guides, and lock the carriage. -
Page 14: Adjustments
Lock the carriage. Adjustments The 511 Panel Saw is preset at the factory, so no adjustments should be necessary at first. However, certain alignments should be checked, and as the saw gets more use adjustments may be needed. -
Page 15: Adjusting Crosscut Rulers
3. Using a square that measures at least 14" on one side, line up one edge of the square with the tips of the saw blade, and the other edge with the crosscut ruler. See Figure 16. 4. If these are out of square, loosen the three bolts that hold the angle bracket to which the scale is attached. -
Page 16: Alignment
Alignment If the saw ever needs realignment, it should be performed in the following order: 1. Align rollers. 2. Align guides perpendicular to rollers. 3. Align blade parallel to guides. To ensure accuracy over the full movement of the saw, construct a test square as follows,... - Page 17 Step 2: Align Guides Disconnect saw from power source before aligning the guides. If the saw does not cut at 90 degrees, the guides may not be perpendicular to the rollers. Adjust as follows: 1. Make sure the rollers are aligned.
-
Page 18: Maintenance
Daily: Use a mild soap and a damp cloth to clean the machine. Before using the saw each time, clean dust from the motor housing vents. Keep the handles clean, dry and free from oil or grease. - Page 19 SAE 70 or 80 gear oil to proper level. The gear oil should be changed at least once a year, or more frequently if the panel saw receives heavy use. Every six months: 1. Examine the motor brushes, and replace as necessary.
-
Page 20: Replacement Parts
Replacement Parts Replacements parts are listed on the following pages.To order parts or reach our service department, call 1-800-274-6848 between 7:30 a.m. and 6:00 p.m. (CST), Monday through Friday. Having the Model Number and Serial Number of your machine available when you call will allow us to serve you quickly and accurately. -
Page 21: Parts List: 511 Panel Saw
Index No. Part No..2078021 ...Carriage Assembly (Items 15, 17 & 24) ..1 1 ... 2218033 ...Frame Assembly ..1 2 ... 2423020 ...Leg Assembly ..1 3 ... 3064715 ...Leg Fold Out Bracket ..2 4 ... - Page 22 Index No. Part No. Description Size 56 ... 6813142 ...Spring ..1 57 ... 6430050 ...Locking Knob ..1 58 ... 6716218 ...Hex Head Screw ...3/8-16 X 5 ... 1 59 ... 2063181 ...Motor Bracket Strain Relief Assembly..1 60 ...
- Page 23 Index No. Part No. Description Size 117 ... 6940064 ...Cable Tie ..7 118 ... JW1317 ...Hose Clamp ...4" (2-Ring)... 1 119 ... JW1015 ...Y Fitting...4" ... 1 120 ... JW1022 ...Hose Clamp (Worm Drive)...4” ... 4 121 ... 3064748 ...Hose Bracket ..1 122 ...
-
Page 24: 511 Panel Saw
511 Panel Saw refer to parts list, pages 21-23... -
Page 26: 511 Panel Saw, Motor With Pushbutton Assembly 2475002
511 Panel Saw, Motor with Pushbutton Assembly 2475002 refer to parts list, pages 21-23... -
Page 27: 511 Panel Saw Dust Collection System
511 Panel Saw Dust Collection System refer to parts list, pages 21-23... -
Page 28: Electrical Connections
Electrical Connections refer to parts list, pages 21-23... -
Page 29: S-B Factory Service Centers
CITY TELEPHONE# Phoenix (602) 272-1121 Anaheim (714) 630-3244 Onlano (909) 390-8877 Sacramento (916) 451-8473 San Diego (619) 268-8335 Santa Clara (408) 727-9444 Denver (303) 893-5123 Jacksonville (904) 398-0728 Hialeah (Miami) (305) 624-9011 Tampa (813) 289-3770 Atlanta (770) 452-8192 Honolulu (808) 848-8665 Chicago (773) 774-0600 Chicago(Addison) -
Page 30: Parts List: Skilsaw, Model 586, Type 2 (511 Panel Saw)
Parts List: Skilsaw, Model 586, Type 2 (511 Panel Saw) NOTE: For all parts and service on the Skil worm drive motor, please contact the Skil service center near you from the list on page 29. Index No. Part No. - Page 31 Index No. Part No. Description Powermatic Part No. 54 ...320881 ...Cord and Plug 55 ...5970...Strain Relief 56 ...27039 ...Set Screw (2) 57 ...320391 ...Brush and Spring (2)...6861260 58 ...306278 ...Brush Cap (2) ...6861261 59 ...315286 ...Stud 60 ...350005 ...Plug Button 61 ...23334 ...Gasket...
-
Page 32: Short Panel Fence (Optional Accessory)
The Short Panel Fence is designed as an aid in cutting short panels by bringing the panel up to waist height. The Fence fits on both the left and right sides of the panel saw which gives support when cutting. Figure 23 shows the components of the Short Panel Fence. - Page 33 Figure 26 Step 4: Once the mounting bracket has been secured, return to the front of the panel saw and secure the right end of the fence bracket to the mounting bracket with the mounting screws provided.
-
Page 34: Optional Accessories
6819003 ... Adjustable Stop (RH) 6819004 ... Adjustable Stop (LH) Adjustable Stop (Optional Accessory) The Adjustable Stop has a 66” scale and is available in right hand or left hand versions. It mounts to the bottom rail of the panel saw as shown. - Page 36 WMH Tool Group 2420 Vantage Drive Elgin, Illinois 60123 Phone: 800-274-6848 www.wmhtoolgroup.com...