Table of Contents
Advertisement
Advertisement
Table of Contents

Related Manuals for NCR RealPOS 40


Summary of Contents for NCR RealPOS 40
- Page 1 NCR RealPOS 40 (7600) Release 1.0 User Guide B005‐0000‐1974 Issue A ...
- Page 2 The product described in this book is a licensed product of NCR Corporation. NCR is a registered trademark of NCR Corporation. NCR RealPOS is a trademark of NCR Corporation in the United States and/or other countries. Other product names mentioned in this publication may be trademarks or registered trademarks of their respective companies and are hereby acknowledged. Where creation of derivative works, modifications or copies of this NCR copyrighted documentation is permitted under the terms and conditions of an agreement you have with NCR, NCRʹs copyright notice must be included. It is the policy of NCR Corporation (NCR) to improve products as new technology, components, software, and firmware become available. NCR, therefore, reserves the right to change specifications without prior notice. All features, functions, and operations described herein may not be marketed by NCR in all parts of the world. In some instances, photographs are of equipment prototypes. Therefore, before using this document, consult with your NCR representative or NCR office for information that is applicable and current. To maintain the quality of our publications, we need your comments on the accuracy, clarity, organization, and value of this book. Address correspondence to: Manager, Information Solutions Group NCR Corporation Discovery Centre, 3 Fulton Road Dundee, DD2 4SW Scotland Internet Address: http://www.info.ncr.com/eFeedback.cfm Copyright © 2010 By NCR Corporation Duluth, GA U.S.A. All Rights Reserved ...
- Page 3 Preface Audience This book is written for hardware installer/service personnel, system integrators, and field engineers. Notice: This document is NCR proprietary information and is not to be disclosed or reproduced without consent. Safety Requirements The NCR RealPOS 40 conforms to all applicable legal requirements. To view the compliance statements see the NCR RealPOS Terminals Safety and Regulatory Statements (B005‐0000‐1589). Caution: The on/off switch is a logic switch only. The AC line voltage primaries are live at all times when the power cord is connected. Therefore, disconnect the AC power cord before opening the unit to install features or service this terminal. Caution: This product does not contain user serviceable parts. Servicing should only be performed by a qualified service technician. Fuse Replacement Warning: For continued protection against risk of fire, replace only with the same type and ratings of fuse. Attention: Pour prévenir et vous protéger contre un risque de feu, remplacer la fusible avec une autre fusible de même type, seulement. Lithium Battery Warning Warning: Danger of explosion if battery is incorrectly replaced. Replace only with the same or equivalent type as recommended by the manufacturer. Discard used batteries according to the manufacturerʹs instructions. Attention: Il y a danger dʹexplosion sʹil y a remplacement incorrect de la batterie. Remplacer uniquement avec une batterie du même type ou dʹun type recommandé par le constructeur. Mettre au rébut les batteries usagées conformément aux instructions du fabricant. Battery Disposal (Switzerland) Refer to Annex 4.10 of SR814.013 for battery disposal. ...
- Page 4 Peripheral Usage This terminal should only be used with peripheral devices that are certified by the appropriate safety agency for the country of installation (UL, CSA, TUV, VDE) or those which are recommended by NCR Corporation. Warning: DO NOT connect or disconnect the transaction printer while the terminal is connected to AC power. This can result in system or printer damage. Warning: DO NOT connect or disconnect any serial peripherals while the terminal is connected to AC power. This can result in system or printer damage. Grounding Instructions In the event of a malfunction or breakdown, grounding provides a path of least resistance for electric current to reduce the risk of electric shock. This product is equipped with an electric cord having an equipment‐grounding conductor and a grounding plug. The plug must be plugged into a matching outlet that is properly installed and grounded in accordance with all local codes and ordinances. Do not modify the plug provided – if it will not fit the outlet, have the proper outlet installed by a qualified electrician. Improper connection of the equipment‐grounding conductor can result in a risk of electric shock. The conductor with insulation having an outer surface that is green with or without yellow stripes is the equipment‐grounding conductor. If repair or replacement of the electric cord or plug is necessary, do not connect the equipment‐grounding conductor to a live terminal. Check with a qualified electrician or service personnel if the grounding instructions are not completely understood, or if you are in doubt as to whether the product is properly grounded. Use only 3‐wire extension cords that have 3‐prong grounding plugs and 3‐pole receptacles that accept the product’s plug. Repair or replace damaged or worn cords immediately. References NCR RealPOS 40 Site Preparation Guide (B005‐0000‐1975) NCR RealPOS 40 Hardware Service Manual (B005‐0000‐1976) NCR RealPOS 40 Parts Identification Manual (B005‐0000‐1977) ...
-
Page 5: Table Of Contents
More Information about Energy Star............1‐5 Configurations ......................1‐6 Operator Controls....................1‐8 LED Diagnostic Indicators................1‐8 Cabinet Security....................1‐10 Serial Number/Model Number Label..............1‐11 Features........................1‐12 7600 Processor Board..................1‐12 Storage Media....................1‐12 Power Supply ....................1‐12 Operating Systems..................1‐12 Power Management .....................1‐13 G3 Mechanical Off ..................1‐13 G2/S5 Soft Off ....................1‐13 G1 Sleeping .....................1‐13 G0 Working.....................1‐13 ACPI Sleep States (S0 – S5) ................1‐14 Enabling Wake on LAN ................1‐16 Windows 7....................1‐16 Windows XP....................1‐19 ACPI Processor C‐States ................1‐21 Operator Displays ....................1‐22 NCR 5954 15‐Inch DynaKey.................1‐22 5942 12.1‐Inch Color LCD ................1‐23 5942 15‐Inch Color LCD ................1‐23 5964 15‐Inch Touch Screen................1‐24 5965 15‐Inch Touch Screen................1‐25 5966 15‐Inch Touch Screen................1‐26... - Page 6 NCR 5982 6.5‐Inch LCD Display ..............1‐27 Keyboards......................1‐28 5932 Keyboards ....................1‐28 Keyboard Power ..................1‐28 NCR 64‐Key PS/2 POS Keyboard (5932‐2xxx) ........1‐29 NCR 5932‐5xxx USB Alphanumeric Big Ticket Keyboard.......1‐31 Features .......................1‐31 NCR 5932‐65xx PS/2 Programmable POS Keyboard ........1‐32 NCR 5932‐66xx USB Programmable POS Keyboard ........1‐33 NCR 5975 2x20 VFD Customer Display .............1‐34 Features ......................1‐34 Character Sets ....................1‐35 NCR 7167 Printer ...................1‐36 7168 Printer .....................1‐37 7197 Printer .....................1‐38 NCR 7198 Printer ...................1‐38 Chapter 2: Hardware Installation Installation Restrictions ..................2‐1 Installing the Terminal...................2‐2 Installing the Keyboard and Mouse ..............2‐3 Connecting AC Power..................2‐5 Installing the Transaction Printer ..............2‐7 USB Installation ...................2‐7 RS‐232 Installation ..................2‐8...
- Page 7 Dual Display Clone..................2‐23 Extended Desktop Dual Display ..............2‐24 Single Display Mode ..................2‐25 Intel Graphics Controller Hot Keys.............2‐25 Installing a Cash Drawer..................2‐26 Installing Two Cash Drawers ................2‐27 Replacing the Hard Disk Drive ................2‐28 Chapter 3: Setup Entering Setup ......................3‐1 How to Select Menu Options................3‐1 Restoring Factory Settings..................3‐1 BIOS Default Values....................3‐2 Main Menu......................3‐2 Advanced Menu....................3‐2 Boot Menu......................3‐5 Security Menu ....................3‐5 Chipset Menu ....................3‐6 Chapter 4: Operating System Recovery Introduction......................4‐1 Prerequisites .....................4‐1 OS Recovery Procedures for Windows XP ............4‐1 OS Recovery Procedures for Windows 7 Professional........4‐3 Chapter 5: BIOS Updating Procedures Introduction......................5‐1 Prerequisites .....................5‐1 Creating the Bootable Media ................5‐2 Creating a Bootable CD...................5‐2 Creating a Bootable USB Memory Drive ............5‐2 BIOS Updating Procedures ...................5‐3 Chapter 6: Solid State Drive Optimization Introduction......................6‐1...
- Page 8 ® System Configuration Requirements for the Intel SSD Optimizer ..6‐3 Known Issues....................6‐3 Setup.........................6‐4 Toolbox Description ....................6‐6 Main Screen ......................6‐6 Scheduling an Optimization Session.............6‐7 Screen Button Definitions................6‐7 Running the Scheduled Optimization Session ........6‐11 View Drive Information................6‐13 SMART Attributes....................6‐16 Fast Diagnostic Scan.....................6‐19 Error Messages ....................6‐21 Full Diagnostic Scan.....................6‐22 Error Messages ....................6‐24 Frequently Asked Questions ................6‐25 Appendix A: Powered Serial Port Settings Appendix B: DOS Memory Settings Appendix C: Disabling USB Ports for Security Purposes Revision Record Issue Date Remarks A Oct 2010 First issue ...
-
Page 9: Introduction
Product Overview Chapter 1: Introduction The NCR RealPOS 40 (also known as NCR 7600) is a compact POS solution that combines the reliability and security of a retail‐hardened POS terminal with the performance and flexibility of industry‐standard PC technology. With an open architecture and Mobile Intel® processor, the NCR RealPOS 40 supports the latest POS applications for Windows® to help you service your customers quickly and efficiently. And, it all fits in a small footprint that helps conserve valuable space at the Checkstand. To complete your POS solution, choose from NCR’s extensive line of peripherals, including printers, displays, keyboards and scanners. The NCR RealPOS 40 enables you to protect your investment in legacy serial devices or choose from the growing list of USB peripherals. The powered peripheral ports and 24V printer interface simplify cable management and reduce potential points of failure. Product IDs Major Model 7600‐1000 RealPOS 40, Intel Atom N270 1.6G Hz Celeron, 1 GB DDR2 533 MHz, 2.5” 160GB SATA HDD 7600‐1010 RealPOS 40, Intel Atom N270 1.6G Hz Celeron, 1 GB DDR2 533 MHz, 2.5” 40GB SATA SSD ... -
Page 10: Realpos 40 Base Model Comparison
Chapter 1: Product Overview RealPOS 40 Base Model Comparison Model 7600-1000 7600-1010 Chipset Intel Atom 945 GSE Intel Atom 945 GSE Intel Atom N270 Intel Atom N270 Clock Speed 1.6 GHz 1.6 GHz Front-Side Bus 533 MHz 533 MHz Level 2 Cache... -
Page 11: Energy Star
Chapter 1: Product Overview Energy Star ENERGY STAR® qualified products and practices help you save money and reduce greenhouse gas emissions by meeting strict energy efficiency guidelines set by the U.S. Environmental Protection Agency (EPA) and the U.S. Department of Energy. You can help reduce electricity usage and its environmental impact by power managing your POS product when it is not in use for extended periods of time. What are the potential benefits of the new Energy Star Specification? ® Desktops (including POS terminals), Notebooks, and Workstations manufactured after July 1, 2009 that display the ENERGY STAR label meet the more stringent 5.0 ® requirements. Because of these requirements, your computer has a highly efficient power supply and other hardware specific features that, based on EPA estimates, could annually: Save you up to 115 kWh of electricity per unit. Prevent up to 200 lbs of green house gas emissions per unit Moreover, ENERGY STAR compliant computers can save even more energy by ® using ENERGY STAR power management features, which allow the computer to ® enter a very low power mode when not in use for a specified period of time. The EPA ... - Page 12 Chapter 1: Product Overview b. Select Device Manager in the System Tools section. Expand Mice and other pointing devices and then right‐mouse click on USB Touch Screen Controller. Select the Power Management tab. The Allow this device to bring the computer out of standby option is active by default. Un‐check the check box. ...
-
Page 13: More Information About Energy Star
Chapter 1: Product Overview 2. The POS cannot be awakened from Standby Mode via Touch if the Touch device is connected to a +12V USB port. Power is removed from the +12V USB and without power Touch events cannot be detected. 3. After waking from Standby (via keyboard, mouse, or power switch), touch will not respond for approximately 30 seconds. This delay can be reduced significantly by changing disabling the Allow this device to bring the computer out of standby option as discussed in Step #1 above. 4. If wake from standby via Touch is required, the Touch Display must be powered from an independent source such as a power brick. If the Touch Display is powered by power brick, issues noted in 1), 2), and 3) no longer apply. More Information about Energy Star ENERGY STAR compliant systems combined with power management settings can ® provide NCR customers the greatest TCO (total cost of ownership) savings ! Go to to learn more about power www.energystar.gov/powermanagement management. For more information on ENERGY STAR go to www.energystar.gov ... -
Page 14: Configurations
Chapter 1: Product Overview Configurations The NCR RealPOS 40 is an affordable, retail‐ready POS solution that provides outstanding value for any size retailer. It supports a broad range of certified NCR peripherals and applications. The RealPOS 40 features the smallest form factor in its class and offers versatile configuration and mounting options. Choose from NCR’s extensive line of peripherals, including printers, displays, keyboards and scanners. The RealPOS 40 provides flexible connectivity options to power peripherals as well as dual display support for customer‐facing advertising and messaging. The system can be configured modularly or stacked on an NCR 2181 Cash Drawer in an integrated fashion. Modular Configuration... - Page 15 Chapter 1: Product Overview Stacked Configuration An optional stand is available to mount the terminal vertically. Vertical Stand Configuration...
-
Page 16: Operator Controls
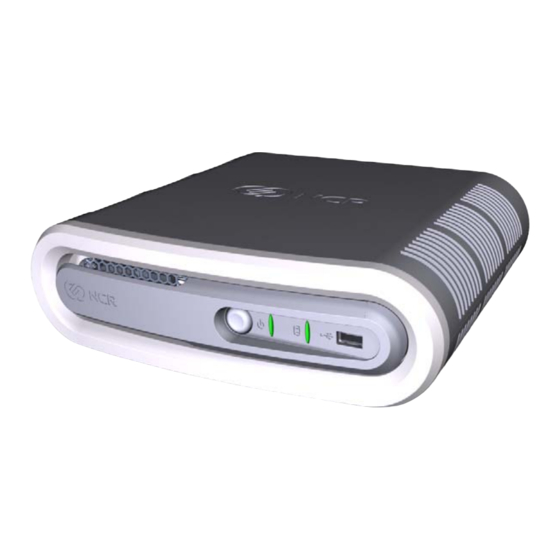
Chapter 1: Product Overview Operator Controls Disk Activity LED Power Switch Power ON LED USB Port 25861 LED Diagnostic Indicators The two front panel LEDs also function as diagnostic indicators, defined as follows. Note: The cell colors indicate the color of the LED at that particular time. Current System Suspect System State Power LED Disk Activity Corrective Action Operation Component Normal N/A System ON ON ... - Page 17 Chapter 1: Product Overview Current System Suspect System State Power LED Disk Activity Corrective Action Operation Component ‐ OFF Power System ‐ OFF OFF OFF 1. Check AC power to P/S 2. Check P/S ‐ AC Present ‐ Not in 3. Check connection between Standby unit and P/S ‐ External P/S 4. Check power connection ON. ...
-
Page 18: Cabinet Security
1-10 Chapter 1: Product Overview Current System Suspect System State Power LED Disk Activity Corrective Action Operation Component Boot Time Boot media ON OFF HDD is Boot Device: (HDD, LAN) 1. Check HDD status in BIOS Setup 2. Check connections between HDD and Motherboard 3. Replace or re‐image HDD 4. Replace Motherboard LAN is Boot Device: 1. Check for LAN link and activity LEDs on the Back Panel 2. -
Page 19: Serial Number/Model Number Label
Chapter 1: Product Overview 1-11 Serial Number/Model Number Label The serial number and model number are included on the Certification Label located on bottom of the terminal. A Microsoft Certificate of Authenticity (COA) label is included if the terminal is ordered and shipped with a pre‐installed Microsoft Operating System. There are two types of Microsoft COA stickers. Depending on the Microsoft Operating System ordered the label is located on either the Bottom Cover for XP Professional and Windows 7 OR next to the Certification Label for XP Embedded, WEPOS, POSReady 2009, and POSReady 7. Model/Serial Number Label Certificate of Authenticity Label 28563... -
Page 20: Features
1-12 Chapter 1: Product Overview Features 7600 Processor Board Intel’s 945GSE Chipset Intel’s Atom N270 single core mobile processor. Up to 2GB DDR2 Memory Serial ATA (SATA) Hard Drive Interface Option for single 2.5” Hard Drive High‐speed 10/100Mb Ethernet Two Type‐A USB Connectors Four Powered Serial ports DVI‐D connector VGA connector PS/2 Connector supporting Mouse and Keyboard through a Y‐cable One 12V USB+Power port One 24V USB+Power port Dual cash drawer support from one connector using Y‐cable Audio Line Out Three 12V USB+Power ports on a USB Daughter Card (Optional) ... -
Page 21: Power Management
Chapter 1: Product Overview 1-13 Power Management The BIOS supports the Advanced Configuration and Power Management Interface (ACPI) 2.0 specification. A key feature of ACPI is that the operating system, not the BIOS, configures and implements power management. The 7600 terminal supports the Global system power states defined by ACPI: G3 Mechanical Off A computer state that is entered and left by a mechanical means Example: Turning off the system’s power through the movement of a large red switch. Various government agencies and countries require this operating mode. It is implied by the entry of this off state through a mechanical means that no electrical current is running through the circuitry and that it can be worked on without damaging the hardware or endangering service personnel. The OS must be restarted to return to the Working state. No hardware context is retained. Except for the real‐time clock, power consumption is zero. G2/S5 Soft Off A computer state where the computer consumes a minimal amount of power. No user mode or system mode code is run. This state requires a large latency in order to return to the Working state. The system’s context will not be preserved by the hardware. The system must be restarted to return to the Working state. It is not safe to disassemble the machine in this state. G1 Sleeping A computer state where the computer consumes a small amount of power, user mode threads are not being executed, and the system appears to be off (from an end user’s perspective, the display is off, and so on). Latency for returning to the Working state varies on the wake environment selected prior to entry of this state (for example, whether the system should answer phone calls). Work can be resumed without rebooting the OS because large elements of system context are saved by the hardware and the rest by system software. It is not safe to disassemble the machine in this state. ... -
Page 22: Acpi Sleep States (S0 - S5)
ACPI Sleep States (S0 – S5) Under the G1 sleeping state ACPI defines levels of system sleep state support. The 7600 supports the following sleeping states: S0: Normal Powered‐On state S1 (Standby): The S1 sleeping state is a low wake latency sleeping state. In this state, no system context is lost (CPU or chip set) and hardware maintains all system contexts. Note: The 7600 does not support S1 state. Turning off the backlight and hard drives provides the equivalent power savings (due to Intel’s processor C‐states feature) at nearly zero latency. S2: Not supported S3 (Suspend to Ram): The S3 sleeping state is a low wake latency sleeping state. This state is similar to the S1 sleeping state except that the CPU and system cache context is lost (the OS is responsible for maintaining the caches and CPU context). Control starts from the processor’s reset vector after the wake event. In NCR systems, during S3, power is only provided to the on‐board USB ports. Note: When the terminal resumes from an S3 state, all the USB devices re‐ enumerate. This causes speaker tones as if they were disconnected and then reconnected. This does not present a problem and the USB devices will continue to operate correctly. Requirements for S3 support: – O/S must be built on a system with S3 enabled in the BIOS – Some peripherals may not be S3 capable, which can prevent the system from entering S3 state. S4 (Suspend to Disk): The S4 state is the lowest power, longest wake latency sleeping state supported by ACPI. In order to reduce power to a minimum, it is assumed that the hardware platform has powered off all devices. Platform context is maintained. Requirements for S4 support: ... - Page 23 Chapter 1: Product Overview 1-15 Peripherals: ACPI defines power states for peripherals which are separate from the system power state. The device power states range from D0 (fully‐on) to D3 (off) It is the responsibility of the driver developer for each peripheral to define and support the available power states. **S3 **S5 Power State Standby Suspend to Working Hibernate Soft Off Supported: Y / N Description Fully -Video back -Video back -Video back Functional light off light off light off Note:Some devices -HDD off -HDD off -HDD off...
-
Page 24: Enabling Wake On Lan
1-16 Chapter 1: Product Overview Enabling Wake on LAN In order for Wake on LAN to function the Network driver must be enabled (factory default). The procedure for enabling the driver depends on which operating system you are using. Windows 7 Select Start → Computer → System Properties Tab → Device Manager Select Network adapters and then 3. Right‐mouse click the Realtek PCIe FE Family Controller driver and then select Properties. ... - Page 25 Chapter 1: Product Overview 1-17 4. Under the Advanced tab both Wake on Magic Packet and Wake on Pattern Match should be Enabled. Select OK after making any changes. ...
- Page 26 1-18 Chapter 1: Product Overview Under the Power Management tab all option boxes should be checked. Select OK after making any changes. ...
-
Page 27: Windows Xp
Chapter 1: Product Overview 1-19 Windows XP Select Start → Control Panel → Hardware Tab → Device Manager button. Select Network adapters and then 3. Right‐mouse click the Realtek PCIe FE Family Controller driver and the select Properties. ... - Page 28 1-20 Chapter 1: Product Overview 4. Under the Advanced tab the Wake on Magic Packet should be Enabled. Select OK after making any changes. Under the Power Management tab the option boxes as shown below should be checked. Select OK after making any changes. ...
-
Page 29: Acpi Processor C-States
Chapter 1: Product Overview 1-21 ACPI Processor C-States ACPI defines the power state of system processors while in the G0 working state as being either active (executing) or sleeping (not executing). Processor power states are designated C0, C1, C2, C3, …Cn. The C0 power state is an active power state where the CPU executes instructions. The C1 through Cn power states are processor sleeping states where the processor consumes less power and dissipates less heat than leaving the processor in the C0 state. While in a sleeping state, the processor does not execute any instructions. Each processor sleeping state has a latency associated with entering and exiting that corresponds to the power savings. In general, the longer the entry/exit latency, the greater the power savings when in the state. To conserve power, OSPM places the processor into one of its supported sleeping states when idle. While in the C0 state, ACPI allows the performance of the processor to be altered through a defined “throttling” process and through transitions into multiple performance states (P‐states). Note: The 7600 Atom N270 Processor supports C0 and C1 states. Support of deeper sleep states is not required due to its inherently low power consumption. ... -
Page 30: Operator Displays
1-22 Chapter 1: Product Overview Operator Displays NCR 5954 15-Inch DynaKey The NCR RealPOS 5954 USB DynaKey is a Point‐of‐Sale (POS) keypad with a built‐ in 15‐inch flat panel Liquid Crystal Display (LCD). Unique to the DynaKey is a set of ATM‐style keys (DynaKeys), which are located beside the display. The functions of these keys change depending on the software application appearing on the LCD. Note: USB DynaKey requires Windows XP/XPe. The combined display and keypad is designed to reduce operator training time, simplify complex POS transactions and improve associate/cashier productivity. Combined with the appropriate applications software, the DynaKey can virtually eliminate the need for an operator to memorize function key locations and sequence. The USB DynaKey interfaces with the host terminal via two cables. Digital Video Interface (DVI) cable for video Powered Universal Serial Bus (USB) for data and power The DynaKey is available in two color schemes. Light Gray (G11) Charcoal Gray (CG1) ... -
Page 31: 5942 12.1-Inch Color Lcd
Chapter 1: Product Overview 1-23 5942 12.1-Inch Color LCD The 5942 12.1‐Inch LCD is designed for customers who desire a color display and prefer the small footprint and ergonomic packaging of LCD technology versus traditional CRT’s. Depending on the customer’s requirements, this LCD display can be used either as an operator display or a customer information display (CID). The 5942 Display features a 12.1‐Inch Active Matrix Color LCD with support for SVGA and XGA resolution. 5942 15-Inch Color LCD ... -
Page 32: 5964 15-Inch Touch Screen
1-24 Chapter 1: Product Overview The 5942 15‐Inch LCD features a high brightness dual‐backlight active matrix LCD with analog interface which plugs directly into the standard VGA (CRT) port on the RealPOS 80c terminal. It includes a 1.5 meter VGA cable and built‐in power supply with standard IEC connector. Mount and power cable must be ordered separately. 5964 15-Inch Touch Screen The NCR 5964‐8xxx is a 15‐inch XGA (1024x768) Liquid Crystal Display with either a resistive or capacitive Touch Screen for operator input. Features 15” LCD XGA (1024x768) native resolution, 350 nit typical brightness (also supports VGA, SVGA, SXGA) Dual Bulb, adjustable brightness Capacitive or 5‐wire resistive touch options, USB interface. Video ‐ VGA, standard 15 pin female. Integrated stereo speakers‐volume controlled via the OSD. One standard USB port in addition to the powered USB port. Optional MSR‐ field installable, USB interface. Energy Star, ACPI and VESA DPM compliance Choice of integrated or remote mounts ... -
Page 33: 5965 15-Inch Touch Screen
Chapter 1: Product Overview 1-25 5965 15-Inch Touch Screen The NCR 5965 is a 15‐inch TFT Liquid Crystal Display with a capacitive Touch Screen. The display accepts industry‐standard RGB video images from a PC motherboard and dynamically resizes VGA (640 480), SVGA (800 600), XGA (1024 768) & SXGA (1280 x 1024) @ 60Hz images to fill the entire viewable area. Display size ‐ 15” (diagonal) LCD Technology ‐ TFT Native Format ‐ XGA (1024 768) resolution Pixel Configuration ‐ RGB vertical stripe Supported Colors ‐ 16.2 Million (6 bits + FRC) Display text modes supported ‐ SVGA (800 600 pixel), XGA (1024 768 pixel), VGA (640 480 pixel) & SXGA (1280 x 1024) images to full screen size. Moisture & dust sealed display (between touchscreen & display) OSD controls to allow display adjustments Auto selection DC voltage input to allow connection of 12V or 24v option. VGA Interface DVI Interface Three standard USB‐A ports (downstream) ... -
Page 34: 5966 15-Inch Touch Screen
1-26 Chapter 1: Product Overview 5966 15-Inch Touch Screen The NCR 5966 is a 15‐inch low cost XGA (1024x768) Liquid Chrystal Display with a 5‐ wire resistive touch screen for operator input. It is available in Beige (G11) and Charcoal (CG1). Features 15’ LCD XGA (1024x768) Native Resolution, 160 nit Brightness Dual Bulb TFT LCD (also supports VGA, SVGA Resolutions) 5‐Wire Resistive Touch, USB Interface Video ‐ VGA, Standard 15‐Pin Female Integrated Stereo Speakers Power Supplied via AC Line Input or 12 DC Power Brick VGA, Touch, Speaker and Power Cables Remote Table Top Mount Optional MSR‐ Field Installable, USB Interface VESA standard 75mm mounting pattern on the back of the enclosure Uses NCR’s industry standard OPOS and JavaPOS drivers, supporting most applications and standard NCR supported retail Windows and Linux operating systems. ... -
Page 35: Ncr 5982 6.5-Inch Lcd Display
Chapter 1: Product Overview 1-27 NCR 5982 6.5-Inch LCD Display The 5982 LCD Display is a terminal‐powered color 6.5‐Inch VGA LCD. ... -
Page 36: Keyboards
1-28 Chapter 1: Product Overview Keyboards 5932 Keyboards The NCR 5932 Keyboards are intended for harsh retail environments and contain an internal membrane to protect against objects such as paper clips, staple wires, pins, and so forth, from falling between the keys and damaging the electronics. This technology improves overall reliability not typically found in standard PC keyboards or many retail keyboards. The RealPOS 40 supports the following NCR 5932 Keyboards: NCR 64‐Key PS/2 POS Keyboard (5932‐2xxx) NCR USB Alphanumeric Big Ticket Keyboard (5932‐5xxx) NCR 5932‐66xx 104‐Key Programmable POS Keyboard Keyboard Power The RealPOS 80 supplies power to the PS/2 keyboard even when in the OFF state. This is for configurations that require the terminal to turn on when a key is pressed. Most NCR PS/2 keyboards have a Power ON LED which stays illuminated, indicating power is present in the keyboard. Pressing a key may also cause tones to be sounded, but unless the terminal is configured to power up when a key is press, nothing happens. ... - Page 37 Chapter 1: Product Overview 1-29 NCR 64-Key PS/2 POS Keyboard (5932-2xxx) The NCR 64‐Key POS Keyboard, designed for checkout environments where alpha entry is not required, includes 55 assignable function keys and a numeric keypad with 11 keys. Keylock Status Indicator 19746 Features Keylock Speaker Scanner System Status Indicator LED 68‐Inch PS/2Keyboard Cable Note: Configure a NCR 5932‐2xxx if you need an MSR feature. The Wedge controller handles the operations of the user‐programmable speaker, Magnetic Stripe Reader (MSR), keylock, and scanner connector. Please refer to the Wedge Software User’s Guide (BD20‐1368‐A) for detailed information about interfacing and configuring these devices. Keylock The Big Ticket and 64‐key keyboards have a four‐position keylock switch. The table following explains the keylock positions. Abbreviation Position Description Ex ...
- Page 38 1-30 Chapter 1: Product Overview Speaker A programmable speaker generates key clicks and error tones. Buzzer The buzzer is an internal on board Buzzer. System Status Indicator LED The system status indicator is a two‐color LED. The green color indicates the keyboard has power. Red indicates an error condition. When the system is off, the LED does not light up. When the 64‐key keyboard is in the special PC setup mode, the LED flashes red/green. The status and condition indicated by the LED are as follows: Status Condition Green Power on Red Wedge controller reporting an error condition Flashing red/green Keypad of 64‐key keyboard in PC Setup mode Off System off (see Keyboard Power section) Note: For more information about the Wedge controller, refer to Wedge Software User’s Guide (BST0‐1368‐B). MSR (Magnetic Stripe Reader) The MSR is an optional feature that provides support for reading magnetically coded data cards. The keyboards support two different types of MSR: ISO Tracks 1, 2, and 3 JIS‐II and ISO Track 2 (Big Ticket and full‐featured 64‐key keyboards only) ...
-
Page 39: Ncr 5932-5Xxx Usb Alphanumeric Big Ticket Keyboard
Chapter 1: Product Overview 1-31 NCR 5932-5xxx USB Alphanumeric Big Ticket Keyboard Keylock 19586 The NCR USB Alphanumeric Big Ticket Keyboard is a multifunction keyboard that is two keyboards built into one. The keyboard consists of two major sections: 38‐key POS keyboard Industry‐standard alphanumeric PC keyboard The keyboard contains the key matrix and other POS‐specific functions such as keylock, speaker, system status indicator, and magnetic stripe reader (MSR). This 5932 keyboard also has a USB port to connect a Scanner or other USB device. Features The NCR 5932 USB Keyboard supports the following features: Integrated Touch Pad, Keylock, Speaker, 3‐Track Magnetic Stripe Reader (MSR) Keyboard Status LEDs USB cable Additional external USB ports No language characteristics Note: Refer to NCR 5932 USB Keyboard User’s Guide (B005‐0000‐1395) for further detailed information. ... -
Page 40: Ncr 5932-65Xx Ps/2 Programmable Pos Keyboard
1-32 Chapter 1: Product Overview NCR 5932-65xx PS/2 Programmable POS Keyboard The NCR 5932 PS/2 Programmable POS Keyboard is a multifunctional keyboard that is two keyboards built into one. The keyboard consists of two major sections: 32‐key Point‐Of‐Sale Keyboard PC type Alphanumeric Keyboard Keylock Glide Pad 29168 The keyboard includes the following features: Keylock Tone Indicator Keyboard Status Indicator Magnetic Stripe Card Reader (MSR) Glide Pad ... -
Page 41: Ncr 5932-66Xx Usb Programmable Pos Keyboard
Chapter 1: Product Overview 1-33 NCR 5932-66xx USB Programmable POS Keyboard The NCR 5932 PS/2 Programmable POS Keyboard is a multifunctional keyboard that is two keyboards built into one. The keyboard consists of two major sections: 32‐key Point‐Of‐Sale Keyboard PC type Alphanumeric Keyboard The keyboard includes the following features: Keylock Tone Indicator Keyboard Status Indicator Magnetic Stripe Card Reader (MSR) Glide Pad ... -
Page 42: Ncr 5975 2X20 Vfd Customer Display
1-34 Chapter 1: Product Overview NCR 5975 2x20 VFD Customer Display The NCR 5975 Customer Display is designed to be an optional display device for the NCR retail terminals. It can also serve as a display for any industry‐standard PC. It is a Vacuum Fluorescent Display (VFD). 5975‐1000 2x20 VFD (G11) 5975‐1001 2X20 VFD (CG1) There are four post options, available in 4 inch increments. Features Display – 2X20 Character Vacuum Fluorescent Display (VFD) – 7X9 pixel characters – Character height – Minimum ‐ 9mm – Maximum ‐ 11mm PCB – Microcontroller – EIA 232 Interface support – USB 2.0 Interface support ... -
Page 43: Character Sets
Chapter 1: Product Overview 1-35 Cabinet – UV Stable Material – Available in NCR Light Gray (G‐11) and NCR Charcoal Gray (CG1) Connectors – 9 pin D sub – Powered USB Cables – Powered EIA‐232 – Powered USB Cable – Unpowered EIA‐232 Cable with Y‐Connection for Power Brick – Unpowered USB Cable with Y‐Connection for Power Brick – 1m and 4m Lengths Power Supply – Universal Power Supply (12V, 12W output) – 8 pin Molex Connector EIA‐232 or USB 2.0 I/F support – The components for both interfaces are populated on a single printed circuit board. Both interfaces are active, though only one interface can be physically ... -
Page 44: Ncr 7167 Printer
1-36 Chapter 1: Product Overview NCR 7167 Printer The NCR 7167 Printer is a fast, quiet, relatively small and very reliable multi‐function printer. It prints receipts, validates and prints checks, and prints on a variety of single or multiple part forms. There is not journal as it is kept electronically by the host terminal. The printer can connect through a USB port or a serial port. It can receive power from a power supply or through a USB+ power cable. ... -
Page 45: 7168 Printer
Chapter 1: Product Overview 1-37 7168 Printer The 7168 printer is a fast, quiet, relatively small and very reliable multiple‐function printer with front and back printing on the receipt paper capability. It prints receipts, validates and prints checks, and prints on a variety of single‐ or multiple‐part forms. There is no journal as it is kept electronically by the host computer. The industry‐standard RS‐232C communication interface allows the 7168 to be connected to any host computer that uses RS‐232C or USB communication interface. The receipt station uses thermal printing technology. Therefore, there is no ribbon cassette to change and paper loading is extremely simple. Printing on single‐ or multiple‐part forms, validating checks, and printing checks is also easy in the accommodating slip station. Another feature is the Magnetic Ink Character Recognition (MICR) check reader with parsing, which reads account numbers on checks for easy verification. An extended slip table is available for handling large forms and is standard with the MICR option. ... -
Page 46: 7197 Printer
1-38 Chapter 1: Product Overview 7197 Printer The NCR 7197 Printer is a fast, quiet, relatively small and very reliable printer with front and back printing capability. The printer can connect through a USB port or a serial port. It receives power from the 24V connector on the terminal or from an external power supply. NCR 7198 Printer The NCR 7198 printer is a fast, quiet, relatively small and very reliable printer with front and back printing on the receipt paper capability. The printer can connect through a USB port or a serial port. It can receive power from a power supply or through a USB+ power cable. ... -
Page 47: Chapter 2: Hardware Installation
Hardware Installation Chapter 2: This chapter explains how to install the RealPOS 40 hardware, including out‐of‐box installation and how to install the optional peripheral devices. The 7600 is very flexible to install. This document discusses a typical configuration. Your configuration may require adjustments to the procedures. Installation Restrictions Before installing the RealPOS 40, read and follow the guidelines in the RealPOS 40 Site Preparation Guide (B005‐0000‐1552) and the NCR Workstation and Peripheral AC Wiring Guide (BST0‐2115‐53). Install the RealPOS 40 near an electrical outlet that is easily accessible. Use the power cord as a power disconnect device. Do not permit any object to rest on the power cord. Do not locate the RealPOS 40 where the power cord can be walked on. Use a grounding strap or touch a grounded metal object to discharge any static electricity from your body before servicing the RealPOS 40. Caution: This unit contains hazardous voltages and should only be serviced by qualified service personnel. Caution: Do not connect or disconnect the transaction printer while the terminal is on. This can result in system or printer damage. ... -
Page 48: Installing The Terminal
Chapter 2: Hardware Installation Installing the Terminal 1. Unpack the terminal in the desired location. 2. Connect the external cables to the connectors located on the rear of the unit. There is also a USB connector on the Front Panel. See the following sections for each component. E 12V F 12V C 24V 28047... -
Page 49: Installing The Keyboard And Mouse
Chapter 2: Hardware Installation Installing the Keyboard and Mouse The 7600 supports USB and PS/2 type keyboards. Only USB mice are supported. See the following examples of supported configurations. 28572 USB Keyboard and USB Mouse 28573a PS/2 Keyboard and USB Mouse Note: PS/2 Extension Cables cannot be used with a PS/2 Keyboard that has a Glide Pad. ... - Page 50 Chapter 2: Hardware Installation 28575 USB Keyboard w/Glide Pad...
-
Page 51: Connecting Ac Power
Chapter 2: Hardware Installation Connecting AC Power The 7600 power supply is an external 24 V power brick. Caution: The 7600 requires the NCR 24 V power supply that is shipped with the terminal. Use of other power bricks may cause damage to the unit. 1. Connect the Power Supply cable to the DC Power connector on the terminal. 2. Connect the AC Power Cord to the Power Supply and to an AC outlet. AC Power Cord (Country Specific) 28689 ... - Page 52 Chapter 2: Hardware Installation Disconnecting the Power Cable The Power Cable connector locks into position when connected to the terminal and cannot be removed by simply pulling on the cable. You must grasp the connector and slide the outside housing out from the terminal to unlock it from the terminal connector. Terminal Power Cable 28690...
-
Page 53: Installing The Transaction Printer
Chapter 2: Hardware Installation Installing the Transaction Printer The printers can connect through a USB connector or an RS‐232 connector. USB Installation Connect the Powered USB Printer Interface Cable to the USB Connector and Power Connector on the printer and to the 24 V Powered USB Connector on the terminal. 497-0441177 - 1 m (1432-C088-0010) 497-0473052 - 4 m (1432-C404-0040) 24V USB Power 28576... -
Page 54: Rs-232 Installation
Chapter 2: Hardware Installation RS-232 Installation 1. Connect the RS‐232 Printer Interface Cable to the RS‐232 connector on the printer and to a non‐powered RS‐232 connector on the terminal. Note: The factory default setting for the RS‐232 ports is powered. See the Appendix: Powered Serial Port Settings. 2. Connect the Powered USB Printer Interface Cable to the Power Connector on the printer and to the 24V Powered USB Connector on the terminal. RS-232 24V USB RS-232 Power 497-0441156 - 1m (1432-C092-0010) 497-0441157 - 4 m (1432-C092-0040) 28577 ... -
Page 55: Installing A 5942 15-Inch Lcd Monitor
Chapter 2: Hardware Installation Installing a 5942 15-Inch LCD Monitor The 5942 15‐Inch LCD Monitor receives video through the VGA interface. Power is received from an AC power source. AC Power Cord (Country Specific) 28598 1. Connect the Video Cable from the 5942 to the VGA connector on the RealPOS 40 terminal. 2. Connect the AC Power Cable to the 5944 and to an AC power source. ... -
Page 56: Installing A 5942 12-Inch Monitor
2-10 Chapter 2: Hardware Installation Installing a 5942 12-Inch Monitor Note: The 5942 LCD Monitors receive video through the VGA interface. Power is received from the terminal using a powered USB cable. Power 497-0428512 - 4 m (1416-C851-0040) 28581 3. Connect the Video Cable to the VGA connectors on the 5942 monitor and RealPOS 40 terminal. 4. Connect the Powered USB Cable to the 5942 and to the Powered 12V USB connector on the terminal. ... -
Page 57: Installing A 5964 15-Inch Lcd Touch Monitor
Chapter 2: Hardware Installation 2-11 Installing a 5964 15-Inch LCD Touch Monitor There are two cables required to configure a 5964 15‐Inch Touch LCD. DVI or VGA cable for video Power Universal Serial Bus (USB) for data and power DVI Connections (Video) 1. Connect the DVI Cable to the DVI connectors on both the 5964 Touch Monitor and the RealPOS 40 terminal. 497-0446721 - 1.0 m (1432-C191-0010) 497-0446722 - 4.0 m (1432-C191-0040) 28670... -
Page 58: Vga Connections (Video)
2-12 Chapter 2: Hardware Installation VGA Connections (Video) 1. Connect the VGA Cable to the VGA connectors on both the 5964 Touch Monitor and the RealPOS 40 terminal. 497-0435044 - 1m (1416-C972-0009) 497-0435045 - 4m (1416-C972-0040) 28578... -
Page 59: Powered Usb Cable Connections (Data And Power)
Chapter 2: Hardware Installation 2-13 Powered USB Cable Connections (Data and Power) 1. Connect the Powered USB Cable to the 5964 and to one of the 12V Powered USB connectors on the RealPOS 40 terminal. USB/Power 12V USB 497-0445076 - 1 m (1432-C156-0010) 497-0445077 - 4 m (1432-C156-0040) 28672 ... -
Page 60: Ncr 5954 Usb Dynakey Cable Connections
2-14 Chapter 2: Hardware Installation NCR 5954 USB DynaKey Cable Connections The DynaKey connects to the terminal via two cables. Digital Video Interface (DVI) or VGA cable for video Powered Universal Serial Bus (USB) for data and power ... -
Page 61: Dvi Cable Connections
Chapter 2: Hardware Installation 2-15 DVI Cable Connections Connect the cable to the DVI connectors on the DynaKey and terminal. 497-0446721 - 1.0 m (1432-C191-0010) 497-0446722 - 4.0 m (1432-C191-0040) 28675 ... -
Page 62: Vga Cable Connections
2-16 Chapter 2: Hardware Installation VGA Cable Connections Connect the cable to the VGA connectors on the DynaKey and terminal. 497-0435044 - 1m (1416-C972-0009) 497-0435045 - 4m (1416-C972-0040) 28676 ... -
Page 63: Powered Usb Cable Connections
Chapter 2: Hardware Installation 2-17 Powered USB Cable Connections Connect the Powered USB Cable to the DynaKey and to one of the Powered USB connectors on the terminal. USB/Power 497-0445076 - 1 m (1432-C156-0010) 12V USB 497-0445077 - 4 m (1432-C156-0040) 28677... -
Page 64: Installing A 5982 6.5-Inch Lcd
2-18 Chapter 2: Hardware Installation Installing a 5982 6.5-Inch LCD 1. Remove the Base from the Display (2 screws). Screws 23162 ... - Page 65 Chapter 2: Hardware Installation 2-19 2. Route the VGA and Power cables up through the bottom of the Base and connect them to the Display. Note: The power cable can be either an External Power Supply or a Powered USB cable. Power VGA 23435 3. Install the Base to the Display (2 screws). 4. Route the cables out the rear of the Base. ...
- Page 66 2-20 Chapter 2: Hardware Installation 5. Connect the Power Cable: External Power Supply a. Connect the AC Cord to the Power Supply. AC Cord 28673 b. Connect the VGA cable to the VGA port on the host terminal. c. Connect the power cable to an AC source. ...
- Page 67 Chapter 2: Hardware Installation 2-21 Terminal Powered (7446-30303131) a. Connect the Power Cable to the Powered 12V USB port on the host terminal. 12V USB 28674...
-
Page 68: Installing A Secondary Display (Dual Display)
2-22 Chapter 2: Hardware Installation Installing a Secondary Display (Dual Display) The 7600 Motherboard uses an integrated video controller with the Intel 945GSE GMCH chipset. This controller provides a Monitor port (VGA) and a Digital Display port (DVI) on the motherboard connector row. These two ports provide a single display mode (DVI or VGA) or a dual display mode (DVI and VGA). Dual display mode can be a clone (same video data displayed on both displays) or an extended desktop (the desktop spans across both displays). The dual mode is configured using the Intel® Graphics Media Accelerator control panel. 1. Power down the system. 2. Connect the secondary display. Note: Both displays must be connected to the 7600 before powering up the system. 3. Apply power to the system. 4. Right click the Desktop and then select Graphics Properties from the menu to start the control panel. The following screen indicates the system was previously configured with a single VGA display. ... -
Page 69: Dual Display Clone
Chapter 2: Hardware Installation 2-23 Dual Display Clone From the Operating Mode drop‐down menu select Intel(R) Dual Display Clone. Select the Primary Device: Monitor or Digital Display. Select the Secondary Device: Digital Display or Monitor. 4. Select . Apply 5. Select within 15 seconds to accept the new settings. 6. Select to close the Control Panel. ... -
Page 70: Extended Desktop Dual Display
2-24 Chapter 2: Hardware Installation Extended Desktop Dual Display 1. Select Extended Desktop Select Primary Device: Monitor or Digital Display. (This display has the Start button and Taskbar) Select Secondary Device: Digital Display or Monitor. (This display is the desktop extension) You can re‐position the displays as desired by dragging the 1 or 2 icons in the Position box. 4. Select . Apply 5. Select within 15 seconds to accept the new settings. 6. Select to close the Control Panel. ... -
Page 71: Single Display Mode
Chapter 2: Hardware Installation 2-25 Single Display Mode 1. Select (or . Monitor Digital Display) 2. Select . Apply 3. Select within 15 seconds to accept the new settings. 4. Select to close the Control Panel. Intel Graphics Controller Hot Keys Hot Keys provide the same functionality as the Intel Graphics Control Panel with specific keystrokes on the keyboard. These hotkeys are listed in the Intel Control Panel under the Hot Keys tab. The most useful Hot Keys are: [CTRL][ALT][F1] ‐ Monitor in single display mode [CTRL][ALT][F4] ‐ Digital Display in single display mode Note: The Hot Keys can be used to recover from a blank display in Windows. This is true only if Windows Desktop loads completely; meaning, if Windows is waiting for a login/password entry or if Plug and Play is waiting for operator input, the Hotkeys ... -
Page 72: Installing A Cash Drawer
2-26 Chapter 2: Hardware Installation Installing a Cash Drawer The small dimension of the RealPOS 40 permits the terminal to rest directly on most cash drawers. However, other peripherals like the keyboard or printer may or may not fit. The Cash Drawer can connect to the Cash Drawer connector or to the transaction printer. Note: The 7600 is not designed for integration with any current NCR cash drawer. The 7600 supports the following Cash Drawers: 2185 Flip Top Drawer 2186 Compact Cash Drawer 2189 Full‐size Cash Drawer The Cash Drawer can be connected to the Back Panel on the 7600 or to the Cash Drawer Connector on the transacation printer. Cash Drawer Connector 28582... -
Page 73: Installing Two Cash Drawers
Chapter 2: Hardware Installation 2-27 Installing Two Cash Drawers The 7600 supports a 2‐drawer configuration with a Y‐cable (1416‐C372‐0006). 28583... -
Page 74: Replacing The Hard Disk Drive
2-28 Chapter 2: Hardware Installation Replacing the Hard Disk Drive The Hard Disk Drive (HDD) is mounted on the inside of the Top Cover and is easily accessed. 1. Slide the Cover Latch located on the bottom of the unit forward to unlock the Top Cover. Note: First remove the Security Lock on the rear if present. Cover Latch 28591 2. Pivot the Top Cover open and gently rest it on the table surface. Caution: When opening the cover, do not allow it to drop onto the table surface. The mechanical shock can damage the HDD. 28592 ... - Page 75 Chapter 2: Hardware Installation 2-29 3. Squeeze the latches on the HDD Bracket as shown to unlock the bracket from the Top Cover and slide the HDD Bracket as shown until you see Unlocked displayed in the opening in the HDD Bracket. HDD Bracket 28593 4. Remove the HDD from the Top Cover Bracket and disconnect the cables. HDD Data/Power Connector 28596 5. Install the new HDD using the reverse procedure. ...
- Page 76 2-30 Chapter 2: Hardware Installation ...
-
Page 77: Chapter 3: Setup
Setup Chapter 3: Entering Setup 1. Connect an alphanumeric USB keyboard to the terminal. 2. Apply power to the terminal. 3. When you see the NCR logo displayed press [Del]. How to Select Menu Options The following keyboard controls are used to select the various menu options and to make changes to their values. Use the arrow keys to select (highlight) options and menu screens. Use the [Enter] key to select a submenu. Use the [+] and [-] keys to change field values. To view help information on the possible selections for the highlighted item, press [F1]. To save the changes, move the cursor to the Exit Menu, select either Save Changes & Exit or Save Changes, and press [Enter]. Restoring Factory Settings To reset all values to their default settings for the current screen, press [F9] and then [Enter] when the confirmation message is displayed. The terminal automatically loads the BIOS default values. To reset all BIOS settings to their default settings go to the Exit menu, press F9, select either Save Changes & Exit or Save Changes, and press [Enter]. Note: The 7600 Motherboard is used on other products and has a jumper that is used ... -
Page 78: Bios Default Values
Chapter 3: Setup BIOS Default Values NCR BIOS Version: 1.1.8.0 Main Menu System Time (variable) System Date (variable) Advanced Menu CPU Configuration Max CPUID Value Limit [Disabled] Execute‐Disable Bit Compatibility [Enabled] Intel (R) SpeedStep(tm) tech [Enabled] Intel (R) C‐STATE tech [Enabled] Enhanced C‐States [Enabled] IDE Configuration ATA/IDE Configuration ... - Page 79 Chapter 3: Setup DMA Mode [Auto] S.M.A.R.T. [Auto] 32Bit Data Transfer [Enabled] SuperIO Configuration Serial Port A/1 Address [3F8] Serial Port A/1 IRQ [4] Serial Port B/2 Address [2F8] Serial Port B/2 IRQ [3] Serial Port C/3 Address [3E8] Serial Port C/3 IRQ [11] Serial Port D/4 Address [2E8] ...
- Page 80 Chapter 3: Setup Advanced Resume Event Controls LAN Wake Up From S5 [Enabled] Resume On Ring [Disabled] Resume On RTC Alarm [Disabled] USB Configuration Legacy USB Support [Enabled] Port 64/60 Emulation [Disabled] USB 2.0 Controller Mode [HiSpeed] BIOSEHCI Hand‐Off [Enabled] Legacy USB1.1 HC Support [Enabled] ...
-
Page 81: Boot Menu
Chapter 3: Setup Boot Menu Boot Settings Configuration Quick Boot [Disabled] Display POST Logo [Enabled] LAN Boot ROM [Enabled] Bootup Num=Lock [On] PS/2 Mouse Support [Auto] Interrupt 19 Capture [Disabled] BBS Menu [Enabled] Boot Order Defaults [LAN First] Boot Device Priority Boot Device [Network:Realtek PX] ... -
Page 82: Chipset Menu
Chapter 3: Setup Chipset Menu NorthBridge Configuration Internal Graphics Mode Select [Enabled, 8MB] Video Function Configuration Boots Graphic adapter Priority [PEG/PCI] DUMT Mode Select [DUMT Mode] DUMT/FIXED Memory [128MB] PAVP Mode [Disabled] Boot Display Device [Auto‐Detect] South Bridge Configuration USB 2.0 Controller ... -
Page 83: Chapter 4: Operating System Recovery
Select USB:[name of device]. 6. You should see a message during boot, indicating that the device has been recognized. 7. At the menu, enter 1 to select the image restore function and press [Enter]. #################################### NCR Partition Image Application #################################### Select an option 1 – Process Image/Script CD 2 – View Partition Image Documentation on CD 3 – Interactive Create/Restore Via Network/USB 4 - Exit and reboot 8. - Page 84 Chapter 4: Operating System Recovery 9. Press [A] at the following prompt to accept the arguments and to begin the restore process. Press [Enter]. Confirm Pending Operation Mode is: restore 2) Drive is: USB/SATA Storage A Size: 80GB 3) Directory path is: /Images/ 4) Filename is: nnnnnaaa 5) Reboot after operation complete: yes 6) Resize last data partition if possible: no 7) Resize last data partition to: Full Disk A) Accept these arguments V) View OS Documentation...
-
Page 85: Os Recovery Procedures For Windows 7 Professional
Chapter 4: Operating System Recovery OS Recovery Procedures for Windows 7 Professional The Windows Imaging Format (WIM) application is used to deploy and capture Windows 7 images. It is available on a bootable DVD along with the operating system image for the 7600. 1. Insert the NCR WIM Image Deployment/Capture DVD (D370‐0893‐0100) into the DVD drive. 2. Connect a keyboard to the terminal. 3. Apply power to the terminal. 4. Press [F8] during boot (when you see the NCR logo) to enter the Boot Select menu. Select USB:[name of device]. 6. You should see a message during boot, indicating that the device has been recognized. At the options menu, select Deploy "NCR Official" WIM Image from D370-0893- 0100 DVD and then select Continue. ... - Page 86 Chapter 4: Operating System Recovery 8. Next, you need to select the location where the image should be deployed. Select the drop down box and then the location for the image Also select either the radio button to Reboot the terminal after the image has been installed or you can select Pause to view the statistics at the end of the image load. When you have made your choices, select Accept. ...
- Page 87 Chapter 4: Operating System Recovery 9. The WIM application then deploys the NCR Official image on to the terminal. The following displays while the terminal is loading. ...
- Page 88 Chapter 4: Operating System Recovery 10. After the image has been put on to your terminal, you are given the message ʺPress OK to Rebootʺ. Select OK. 11. Remove the DVD before the system reboots. 12. Complete the Windows 7 setup; enter the time zone, computer name, accept the license, etc. Uncheck all the Security Warning message boxes about Always ask before opening this file as they appear and click Run for each of them. ...
-
Page 89: Chapter 5: Bios Updating Procedures
Prerequisites The following are required to perform a BIOS update. Bootable USB CD‐ROM Drive Keyboard BIOS Software. Download from the NCR website: http://www.ncr.com a. At this site, select the Support tab. Select Drivers and Patches → Retail Support Files → NCR RealPOS and SelfServ Terminal and Operating Systems → NCR RealPOS 40 (7600) → BIOS. c. Select the desired BIOS File. ISO Image – Used with CD ROM boot device Disk Image – Used with Floppy Disk boot device Network Image – Used with Network boot USB Memory Key Image – Used with USB boot device d. Save the software to your local hard drive. ... -
Page 90: Creating The Bootable Media
Chapter 5: BIOS Updating Procedures Creating the Bootable Media Creating a Bootable CD The downloaded file is a CD image file (ISO) containing the files necessary to create a bootable CD. A system with a CD/DVD burner is required to perform this function. 1. Insert a writable CD in the CD/DVD burner drive. 2. Record the downloaded image file onto the CD using a utility that is capable of burning ISO files. Note: You cannot simply drop the file on the CD and burn it. You must use software capable of recording ISO images onto CDs. Creating a Bootable USB Memory Drive The downloaded file contains the files necessary to create a bootable USB Memory Drive. 1. Insert a USB drive that is formatted as FAT (or FAT32). 2. Unzip the downloaded files. 3. Copy the files to the root directory of the USB Memory Drive. 4. Open a DOS command window 5. Change directory to the USB Memory Drive. 6. -
Page 91: Bios Updating Procedures
Important: DMI information is mandatory. Interactive Method This method permits you to input/replace the Class/Model/Serial information that is stored in the BIOS. Note: DMI information that is currently stored in the BIOS is displayed during power up. Press [Tab] at the NCR Logo to remove the logo. Press [Pause] to freeze the screen. Press [Esc] to continue. 5. Make a menu selection and follow the screen prompts (Option 1 is recommended). 1 Update BIOS – No prompt for Serial/Model/Class unless invalid ***** Forced Update of Serial/Model/Class Information ***** 2 Update DMI only – Serial/Model/Class update ONLY (no BIOS or SPI Update) 3 Update BIOS –... - Page 92 Chapter 5: BIOS Updating Procedures Option 1 – Update BIOS – No prompt for Serial/Model/Class unless invalid This option automatically updates the BIOS. 1. Highlight Option 1 and press [ENTER]. 2. The Flash Program updates the BIOS and automatically reboots the terminal. Option 2 – Update DMI only ‐ Serial/Model/Class update ONLY (no BIOS or SPI Update) This option lets you enter the DMI information only. The SPI and BIOS are not updated. 1. Highlight Option 2 and press [ENTER]. 2. At the prompt press [ENTER] to enter the Class/Model/Serial Number information (DMI). Follow the onscreen format instructions. [ENTER] Example: 7610-1000-8801 [ENTER] 54-19378230 3. Press 1 to confirm the data and to continue. 4. Remove the BIOS Update media before the system boots. 5. System is ready for operation. ...
- Page 93 Chapter 5: BIOS Updating Procedures Option 3 – Update of BIOS – Always prompts for Serial/Model/Class This option prompts for Class/Model/Serial information at the beginning of the program and then updates the BIOS. 1. Highlight Option 3 and press [ENTER]. 2. At the prompt press [ENTER] to enter the Class/Model/Serial Number information (DMI). Follow the onscreen format instructions. [ENTER] Example: 7610-1000-8801 [ENTER] 54-19378230 3. Press 1 to confirm the data and to continue. 4. The Flash Program updates the BIOS and automatically reboots the terminal. Option 4 – Update BIOS – Default Serial/Model/Class information This option is for Service Personnel only. It updates the BIOS but leaves the Class/Model/Serial fields empty (erased). The DMI information is then entered when the board is installed in a terminal. 1. Highlight Option 4 and press [ENTER]. 2. The BIOS are updated and the system reboots. 3. Remove the BIOS Update media before the system boots. 4. System is ready for operation. ...
- Page 94 Chapter 5: BIOS Updating Procedures ...
-
Page 95: Chapter 6: Solid State Drive Optimization
Solid State Drive Optimization Chapter 6: Introduction When you delete a file from your system the host only deletes a pointer in the OS file system, but does not physically erase the data from the drive. While the deleted data no longer appears valid to the OS, it still appears valid to the drive firmware. Since no run time is spent by the drive to physically erase the targeted data this makes the OS operation fast. In terms of performance this method may be advantageous for traditional hard disk drives; however, it provides an unnecessary constraint for solid‐ state drives (SSDs) because they offer higher levels of performance when they hold less data. To remove this unwanted constraint, Intel provides the Intel® SSD Optimizer for its 34nm series of X25‐M and X18‐M solid‐state drives. This feature gives the ability to retain out of box performance levels over the life of the drive. Unlike traditional hard disk drives, it is advantageous to tell an SSD when you delete files. At some point every 4KB page has been written to once, and you have to start overwriting old existing data. Unlike spinning media, Flash media can not simply overwrite existing data and must first perform a 512KB block erase. To overwrite existing data, an SSD requires a longer read‐modify‐write operation which is why write performance is reduced as the drive fills. ... -
Page 96: System And Ssd Requirements
Chapter 6: Solid State Drive Optimization System and SSD Requirements All 34nm Intel® X25‐M or X18‐M solid‐state drives running firmware version 02HA or later contain support for the ATA DATA SET MANAGEMENT (trim) command. Current implementation does not support multiple Intel solid‐state drives configured as part of a RAID set. When using the latest Microsoft Windows* 7 operating system with the Microsoft AHCI storage driver, the OS will contain native support to execute the ATA Data Set Management command on an Intel SSD without any user interaction required. For users of Windows 7 using Intel® Matrix Storage Manager storage driver, or other operating systems such as Microsoft Windows XP or Vista*, Intel is offering the same ability for users to execute the ATA Data Set management command on their Intel SSD through the use of the Intel® SSD Optimizer tool. Instructions for using the Intel® SSD Optimizer can be found in the next section as well as the user manual found within the Intel® SSD Toolbox download. ® The Intel SSD Toolbox has the following installation requirements: Microsoft Windows* operating system: Windows XP, Windows Vista* or Windows 7 (32/64 bit). .NET Framework 2.0. Note: If your system does not have .NET installed, the tool will direct you to the appropriate place to obtain it. At least 10 megabytes (MB) of available space on the SSD. To determine whether the SSD has enough available space, use the following instructions: 1. Double click My Computer 2. -
Page 97: System Configuration Requirements For The Intel ® Ssd Optimizer
Chapter 6: Solid State Drive Optimization System Configuration Requirements for the Intel SSD Optimizer ® SSD Formatted with FAT32 file system: The Intel SSD Optimizer will not work on SSDs formatted with file allocation system FAT32. Disk Defragmenter Off: Intel strongly recommends disabling Disk Defragmenter to prevent the program from running. If Disk Defragmenter runs while Intel SSD Optimizer is running, the Intel SSD Optimizer will complete successfully, but the Disk Defragmenter will hang and will need to be shut down manually. Known Issues The following list describes items you should consider before using the Intel SSD Toolbox or Intel SSD Optimizer. RAID or Dynamic Disks The Intel SSD Toolbox will not work when the SSDs are in a RAID or Dynamic Disk configuration. RAID Configurations ‐ The tool will attempt various checks for RAID configurations. See the SSDs with a RAID Configuration or Encryption section to see the notification when the tool cannot determine whether the drive has RAID or encryption. The Intel SSD Optimizer will work on encrypted drives; however, there is no guaranteed way to determine in each case whether the drive has RAID or is encrypted, so the tool will prompt the user to confirm. Dynamic Disks – The Intel SSD Toolbox will not work with any form of Dynamic Disks and displays the configuration as “No Partition” in the Select a Drive box. For more information, please see the Microsoft Dynamic Drive FAQ at http://technet.microsoft.com/en‐us/library/cc737048%28WS.10%29.aspx. ... -
Page 98: Setup
Chapter 6: Solid State Drive Optimization Setup Complete the following steps before starting the installation process on the PC containing the SSD. 1. Disable the Background Disk Defragmenter and Auto‐Layout. Windows XP To disable disk defragmentation and auto‐layout in XP add the following registry keys to your run‐time image: Disable Background disk defragmentation – Change the following: Key Name:HKEY_LOCAL_MACHINE\SOFTWARE\Microsoft\Dfrg\BootOptimizeFunction\ Name: Enable Type: REG_SZ Value: N Disable Background auto-layout – Create the following: Key Name: HKEY_LOCAL_MACHINE\SOFTWARE\Microsoft\Windows\ CurrentVersion\OptimalLayout Value Name: EnableAutoLayout Type: REG_DWORD... - Page 99 Chapter 6: Solid State Drive Optimization 3. Install the Intel SSD Toolbox. a. Double‐click on the downloaded .msi file to start the Intel Solid‐State Drive Toolbox Setup Wizard. b. Click Next. c. Click Next. d. After reading the Intel Software License Agreement, click I Agree. Then click Next. e. Either accept the default location or click Browse to identify where you want to store the installation folder. Then click Next. Click Next to confirm the installation of the Intel SSD Toolbox. g. Click Close to exit the installation wizard. Once the installation finishes, the Intel SSD Toolbox will be installed at the following default location: Program Files\Intel\Intel SSD Toolbox\. ...
-
Page 100: Toolbox Description
Chapter 6: Solid State Drive Optimization Toolbox Description Main Screen Start the Intel SSD Toolbox by double‐clicking the Intel SSD Toolbox icon. When the Intel SSD Toolbox opens, it displays the name and capacity of each drive on your system and tool options. Intel SSD Management Tools – Enables monitoring and managing the SSD. View Drive Information – Displays the model number, serial number and firmware number of the SSD. It also lists the ATA and SATA capabilities for the drive. Check SMART Attributes ‐ Lists the SMART features and their respective thresholds, and, if necessary, indicates any action to take. Run Fast Diagnostic Scan – Analyzes the first 1.5 GB of the SSD to determine whether there are any READ or WRITE errors. Run Full Diagnostic Scan – Analyzes the complete SSD to determine whether there are any READ or WRITE errors or any bad blocks. Refresh – Rescans your computer, and displays the name and capacity of each drive found on your system. Export – Writes the drive information and SMART data to a .csv file on your system. Exit – Closes the Intel SSD Toolbox application. ... -
Page 101: Scheduling An Optimization Session
Chapter 6: Solid State Drive Optimization Scheduling an Optimization Session Use the Intel SSD Management Tools option to access or schedule the SSD Optimizer. 1. From the Main Screen, click on Intel SSD Management Tools. The following screen is displayed. Screen Button Definitions Schedule – Defines when/how often you want to automatically run the Intel SSD Optimizer on the selected SSD. Back – Returns to the main screen of the Intel SSD Toolbox program. Stop – Halts the running of the Intel SSD Optimizer on a selected SSD. Run – Launches the Intel SSD Optimizer on a selected SSD. 2. Click Schedule to define a schedule. ... - Page 102 Chapter 6: Solid State Drive Optimization 3. Define the schedule criteria. Interval – Determines how often to run the tool. You can select Daily, Weekly or Monthly. Depending on the option you select, the screen will change to request additional scheduling information. Time – Selects the time to run the tool. Day – Selects the day to run the tool. Apply to – Identifies whether the tool should be run only on a selected drive or on all SSDs in the system. Currently Scheduled Sessions – Lists any scheduled launches. 4. After you have entered the appropriate schedule information, click Add. ...
- Page 103 Chapter 6: Solid State Drive Optimization 5. Click Schedule in the Information screen to add the newly defined session. 6. The tool will then display the new schedule in the Currently Scheduled Sessions section. ...
- Page 104 6-10 Chapter 6: Solid State Drive Optimization Scheduling Notes: Before you attempt to define a schedule, first run the Intel SSD Optimizer Tool in manual mode. Once the manual run is successful, then set an automated scheduled operation. The first time you schedule a session, the Last Run column displays Never since there were no previously scheduled runs. After a scheduled session finishes, the Last Run column will display the date of the latest successfully completed run for that drive. The Schedule Intel SSD Optimizer screen only displays the Last Run status for scheduled sessions, not manually initiated runs. Ensure that sessions are scheduled to run when the system is on. The tool does not wake up or turn on the system to run an Intel SSD Optimizer session. Avoid running the Intel SSD Optimizer when a backup is in session. If your system uses Microsoft Windows 7 and the standard Microsoft AHCI driver (the default setup for normal configurations without RAID), the Intel SSD Optimizer will work; however, you do not need to use the Intel SSD Optimizer because Microsoft Windows 7 implements the ATA Data Set Management Command (Trim) natively. You can use the other functions offered in the Intel SSD Toolbox. If your system uses Microsoft Windows 7 and the Intel Matrix Storage Manager version 8.x (which can be used in place of the Microsoft AHCI driver), then the Intel SSD Optimizer tool is required to enable the ATA Data Set Management Command (Trim). ...
-
Page 105: Running The Scheduled Optimization Session
Chapter 6: Solid State Drive Optimization 6-11 Running the Scheduled Optimization Session When the scheduled session starts, a progress bar appears in the task tray notifying the user that the Intel SSD Optimizer is running. Upon completion the status of the operation is shown. ... - Page 106 6-12 Chapter 6: Solid State Drive Optimization Manually Running an Optimization Session 1. From the Main Screen, click on Intel SSD Management Tools. The following screen is displayed. 2. Click Run. ...
-
Page 107: View Drive Information
Chapter 6: Solid State Drive Optimization 6-13 View Drive Information Use this option to view the standard Identify Device information for the SSD. 1. From the Main Screen, click on View Information. The following screen is displayed. ... - Page 108 6-14 Chapter 6: Solid State Drive Optimization 2. Scroll down the list to find the SSD information, such as Serial Number, Firmware Version, and Model Number. ...
- Page 109 Chapter 6: Solid State Drive Optimization 6-15 Export Use this function to write the drive information and the SMART data to a .cvs file. Browse to the desired location and click Save to write the drive information. Back Click Back to return to the Intel SSD Toolbox main screen. Refresh Use this function to reissue the ATA IDENTIFY DEVICE command and redisplay the information for the selected drive. ...
-
Page 110: Smart Attributes
6-16 Chapter 6: Solid State Drive Optimization SMART Attributes Each drive operates under a predefined set of attributes and corresponding threshold values, of which the drive should not pass during normal operation. Each attribute has a raw value (defined by the manufacturer) and a normalized value. Use this option to view the standard Identify Device information for the SSD. 1. From the Main Screen, click on Check SMART Attributes. The following screen is displayed. Spin Up Time The average time it takes the spindle to spin up. Since a SSD has no moveable parts, this attribute reports a fixed raw value of zero (0) and a fixed normalized value of 100. Use the Raw value for this attribute. Start/Stop Count This type of event is not an issue for SSDs. However, hard disk drives can experience only a finite number of these events and, therefore, must be tracked. This attribute reports a fixed value of zero (0) and a fixed normalized value of 100. Use the Raw value for this attribute. ... - Page 111 Chapter 6: Solid State Drive Optimization 6-17 Re-Allocated Sector Count This attribute shows the number of retired blocks since leaving the factory (also known as a grown defect count). Power-On Hours Count This attribute reports the cumulative number of power‐on hours over the life of the device. Use the Raw value for this attribute. Note: The On/Off status of the device initiated power management (DIPM) feature will affect the number of hours reported. If DIPM is turned “On”, the recorded value for power‐on hours does not include the time that the device is in a “slumber” state. If DIPM is turned “Off”, the recorded value for power‐on hours should match the clock time, as all three device states are counted: active, idle and slumber. C – Power Cycle Count This attribute reports the cumulative number of power cycle events (power on/off cycles) over the life of the device. Use the Raw value for this attribute. C0 – Unsafe Shutdown Count This attribute reports the cumulative number of unsafe (unclean) shutdown events over the life of the device. An unsafe shutdown occurs whenever the device is powered off without STANDBY IMMEDIATE being the last command. Use the Raw ...
- Page 112 6-18 Chapter 6: Solid State Drive Optimization Once the normalized value reaches 1, the number will not decrease, although it is likely that significant additional wear can be put on the device. Use the Normalized value for this attribute. B8 – End to End Error Detection Count This attribute is only available for 34nm drives and counts the number of times errors are encountered during logical block addressing (LBA) tag checks on the data path within the drive. Use the Normalized value for this attribute. Export Use this function to write the drive information and the SMART data to a .cvs file. Browse to the desired location and click Save to write the drive information. Back Click Back to return to the Intel SSD Toolbox main screen. Refresh Use this function to reload the SMART data. ...
-
Page 113: Fast Diagnostic Scan
Chapter 6: Solid State Drive Optimization 6-19 Fast Diagnostic Scan Use this option to perform a quick check on the health of the Intel SSD. After checking 1.5 GB of the drive for READ errors, the scan creates 1 GB of random data and then compares it for data integrity. The scan takes approximately three to five minutes to run. 1. From the Main Screen, click on Run Fast Diagnostic Scan. The following screen is displayed. 2. Click Start to launch the Fast Diagnostic Scan. Diagnostic – Lists the name of the available scans. Status – Reports the progress of the scan. Initially blank, the field is populated while running the scan. Recommended Action – Identifies whether the system can use the drive for processing. Initially blank, the field is populated after each scan finishes. ... - Page 114 6-20 Chapter 6: Solid State Drive Optimization The results of the scan are indicated on the next screen. A successful scan is listed in the Recommended Action column if it is successful. ...
-
Page 115: Error Messages
Chapter 6: Solid State Drive Optimization 6-21 Error Messages If the Fast Diagnostic Scan encounters a problem, the tool displays the corresponding error message and next step information under the Recommended Action heading. Inadequate Amount of Free Space The scanned drive needs more free space before attempting to run the Fast Diagnostic Scan again. No Partition The scanned drive does not contain a partition. For the Fast Diagnostic Scan to function properly, the scan requires a partitioned area to create and validate the one gigabyte (1 GB) of random data. ... -
Page 116: Full Diagnostic Scan
6-22 Chapter 6: Solid State Drive Optimization Full Diagnostic Scan Use this option to perform an overall evaluation on the health of the Intel SSD. After checking every logical block address (LBA) for READ errors, the scan uses the free space to write random data and then reads it back to ensure data integrity. This scan can take an hour or more to run, depending on the amount of free space on the drive. 1. From the Main Screen, click on Run Full Diagnostic Scan. The following screen is displayed. 2. Click Start to launch the Full Diagnostic Scan. Diagnostic – Lists the name of the available scans. Status – Reports the progress of the scan. Initially blank, the field is populated while running the scan. Recommended Action – Identifies whether the system can use the drive for processing. Initially blank, the field is populated after each scan finishes. ... - Page 117 Chapter 6: Solid State Drive Optimization 6-23 The results of the scan are indicated on the next screen. A successful scan is listed in the Recommended Action column if it is successful. ...
-
Page 118: Error Messages
6-24 Chapter 6: Solid State Drive Optimization Error Messages If the Fast Diagnostic Scan encounters a problem, the tool displays the corresponding error message and next step information under the Recommended Action heading. Inadequate Amount of Free Space The scanned drive needs more free space before attempting to run the Full Diagnostic Scan again. No Partition The scanned drive does not contain a partition. For the Full Diagnostic Scan to function properly, the scan requires a partitioned area to create and validate the one gigabyte (1 GB) of random data. ... -
Page 119: Frequently Asked Questions
Chapter 6: Solid State Drive Optimization 6-25 Frequently Asked Questions How often should I run the Intel® SSD Optimizer on my SSD? How long does it take to complete? Can overuse cause problems? Intel recommends scheduling the Intel® SSD Optimizer to run on a weekly basis. Total execution time under Windows XP is very fast and in most cases will complete in a number of seconds. Windows Vista and Windows 7 execution times can take much longer, anywhere from a few minutes up to 30min or even longer in extreme cases. These longer run times are based on the number of system restore points that have been saved by the OS. There is no known risk of harm to the SSD due to continuous repeated use of the tool. Does the Intel®... - Page 120 6-26 Chapter 6: Solid State Drive Optimization Will my 34nm Intel SSD see a performance increase immediately after running the Intel® SSD Optimizer? Generally yes, however it will heavily depend on the prior state of the drive. If the drive is encountering slowing performance due to heavy usage, performance should quickly return to out of box levels after running the Intel® SSD Optimizer. However, if the drive has seen little usage prior to running the Intel® SDD Optimizer, you may not notice a substantial performance increase since the drive is already operating at or near optimal performance levels. Frequent use of the Intel® SSD Optimizer ensures optimal performance levels over the life of the drive. If I never delete files from my system will I see a benefit from the Intel® SSD Optimizer? While there should still be some benefit related to OS level cleanup of temp files, ...
-
Page 121: Appendix A: Powered Serial Port Settings
Powered Serial Port Settings Appendix A: The serial ports on the 7600 can be configured as powered or not. The default setting for all the ports is 12 V powered. To change the settings open the Top cover and change the jumpers on the Motherboard using the illustrations below. F 12V E 12V C 24V 28688... - Page 122 Appendix A: Powered Serial Port Settings COMB COMA COMC COMD Ring Indicator 12 V * Default setting 28687a ...
- Page 123 DOS Memory Settings Appendix B: Upper Memory Usage In order to get maximum UMB usage, the EMM386.EXE driver should be loaded in the CONFIG.SYS file with the following. DEVICE=\DOS\EMM386.EXE NOEMS i=B000-B7FF i=D000-DFFF Other memory range Considerations B800 to BFFF ‐ Standard color graphics data area (off limits) C000 to CEFF ‐ VGA BIOS area (off limits) CF00 to CFFF ‐ PXE UNDI (4K) E000 to FFFF ‐ PC BIOS area (off limits) ...
- Page 125 Disabling USB Ports for Security Purposes Appendix C: In certain environments it may desirable to disable all USB ports to protect against malicious (or inappropriate) intent to upload software via a USB key fob or other means. The following procedure can be used to disable the ports. BIOS Changes (1.2.2.0) 1. Attach a USB keyboard to a front USB port. 2. Power on the system. 3. Press DEL to access the BIOS Setup Utility. Select Chipset South Bridge Configuration. 5. Change the setting for USB 2.0 Controller to Disabled. 6. Press [F10] [Enter] to save the changes and reboot. Windows Operating System changes Select Control Panel System Device Manager. Scroll down to and expand Universal Serial Bus Controllers. 3. There are four Intel Host Controllers. ...