
Related Manuals for Yamaha Tyros5-76


Summary of Contents for Yamaha Tyros5-76
- Page 1 DIGITAL WORKSTATION Tyros5-76 Tyros5-61 Owner’s Manual Before using the instrument, be sure to read “PRECAUTIONS” on pages 6–7.
-
Page 2: Special Message Section
SPECIFICATIONS SUBJECT TO CHANGE: The information contained in this manual is believed to be cor- rect at the time of printing. However, Yamaha reserves the right to change or modify any of the specifications without notice or obligation to update existing units. -
Page 3: Important Safety Instructions
Model No. Serial No. (bottom_en_01) Tyros5-61 Tyros5-76 The name plate is located on the bottom of the unit. Tyros5 Owner’s Manual... -
Page 4: Table Of Contents
Contents PRECAUTIONS ............................6 Included Accessories ..........................9 About the Manuals ..........................10 Main Features ............................11 Panel Controls and Terminals Starting Up Power Supply............................16 Turning the Power On/Off ........................16 Playing the Demo........................... 17 Raising the Display Panel ........................18 Changing the Display Language...................... - Page 5 Songs – Recording Your Performances as MIDI Songs – Basic Procedure for Recording ......................68 Playback of Songs ..........................71 Displaying Music Notation (Score)......................73 Displaying Lyrics (Text).......................... 73 Using Song Position Markers......................... 74 Turning Each Channel of the Song On/Off .................... 75 Audio Recorder/Player –...
-
Page 6: Precautions
Yamaha cannot be held responsible for damage caused by improper use or modifications to the instrument, or data that is lost or destroyed. Always turn the power off when the instrument is not in use. -
Page 7: Saving Data
Notices and Information NOTICE To avoid the possibility of malfunction/ damage to the product, damage to data, or damage to other property, follow the notices below. Handling • Do not use the instrument in the vicinity of a TV, radio, stereo equipment, mobile phone, or other electric devices. Otherwise, the instrument, TV, or radio may generate noise. -
Page 8: About Copyrights
• This product incorporates and bundles computer programs and contents in which Yamaha owns copyrights or with respect to which it has license to use others’ copyrights. Such copyrighted materials include, without limitation, all computer software, style files, MIDI files, WAVE data, musical scores and sound recordings. -
Page 9: Included Accessories
Congratulations! You are the proud owner of an extraordinary electronic keyboard. The Yamaha Tyros5 combines the most advanced tone generation technology with state-of-the-art digital electronics and features to give you stunning sound quality with maximum musical versatility. In order to make the most of your Tyros5’s features and vast performance potential, we urge you to read the manual thoroughly while trying out the various features described. -
Page 10: About The Manuals
Computer-related Operations (page 103) Includes instructions on connecting the instrument to a computer, and operations related to transferring song data. To obtain these materials, access the Yamaha Downloads, enter “Tyros5” to the Model Name box, then click [Search]. Yamaha Downloads http://download.yamaha.com/ •... -
Page 11: Main Features
GS was developed by the Roland Corporation. In the same way as Yamaha XG, GS is a major enhancement of the GM specifically to provide more Voices and Drum kits and their variations, as well as greater expressive control over Voices and effects. -
Page 12: Panel Controls And Terminals
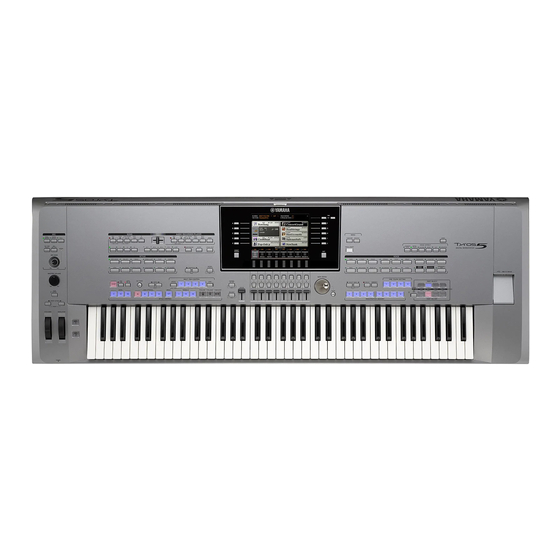
[MIC GAIN] knob ........... Page 88 The Tyros5 has two different models: a 76-key key- Adjusts the input sensitivity from the MIC jack. board and a 61-key keyboard. • Tyros5-76: E0–G6 r [MASTER VOLUME] dial ......Page 16 • Tyros5-61: C1–C6 Adjusts the overall volume. - Page 13 The illustration is of the Tyros5-61; however, the controls and terminals of the Tyros5-76 are the same. !6 TRANSPOSE buttons........Page 46 @3 LCD and related controls........ Page 20 Transposes the pitch in semitone steps. NOTE !7 [MIXING CONSOLE] button ......Page 92 Remove the transparent protective film that was applied to the display prior For controlling various aspects of the keyboard, Style to shipment from the factory.
-
Page 14: Rear Panel
@9 REGISTRATION MEMORY buttons ... Page 85 #2 PART ON/OFF buttons ........Page 38 Registers and recalls panel setups. Turns the keyboard parts on or off. #0 ONE TOUCH SETTING buttons....Page 56 #3 [USB TO DEVICE] terminal ......Page 101 Calls up the appropriate panel settings for the Style. For connecting a USB flash memory. - Page 15 $0 LINE OUT jacks ..........Page 98 $2 MIC INPUT jack ..........Page 88 For connecting audio devices such as a stereo system. Combo jack* for connecting microphone. (*: Combo jack accepts either XLR or 1/4” phone plug $1 AUX IN jacks............Page 99 connectors.) For connecting audio devices such as a portable audio $3 AC IN jack ............
-
Page 16: Starting Up
Starting Up Power Supply Connect the supplied power cord to the [AC IN] jack NOTE on the instrument’s rear panel. Before connecting the supplied power cord to the [AC IN] jack, be sure to read the “Power supply/Power cord” sec- tions on PRECAUTIONS (page 6). -
Page 17: Playing The Demo
OFF position ( ), then press the Power Switch again to the ON Tyros5-76 position ( Playing the Demo You can play a Demo recording, complete with slideshow, that showcases the realistic Voices and dynamic Styles of the instrument. -
Page 18: Raising The Display Panel
Raising the Display Panel Unfasten the lock located at the back of the panel. Lift the panel and tilt it toward you. The panel will click at four latched positions. Once you’ve set it to a satisfactory position, release the panel. It will gently fall back to the nearest latched position. To return the panel to its closed and locked position, gently pull it back toward you CAUTION until the position is vertical, then push it down until it locks into place. -
Page 19: Displaying The Program Version
Displaying the Program Version You can check the program version of this instrument. Call up the OWNER display. [FUNCTION] [H] UTILITY TAB [][] OWNER Use the [7 ]/[8 ] (VERSION) buttons. The program version and the hardware ID are shown in the display. Press the [8 ] (EXIT) button to return to the previous dis- play. -
Page 20: Basic Operations
Basic Operations Display-based Controls The LCD provides comprehensive at-a-glance information on all current settings. The displayed menu can be selected or changed by the controls surrounding the LCD. TAB [][] buttons [A]–[J] buttons [A]–[J] buttons [EXIT] button [DIRECT ACCESS] button (page 23) [1 ]–[8 ] buttons [ASSIGN] slider [1]–[8] sliders... - Page 21 TAB [][] buttons These buttons are used mainly to change the pages of displays that have “tabs” at the top. [ASSIGN] slider The [ASSIGN] slider is used to adjust the setting of a user-assigned NOTE function. By default, this slider is used to adjust the keyboard volume You can freely change the function assigned to the [ASSIGN] slider: directly during your performance.
- Page 22 [DATA ENTRY] dial and [ENTER] button Depending on the selected display, the [DATA ENTRY] dial can be used in the following two ways. Selecting files (Voice, Style, Song, and so on) You can use the [DATA ENTRY] dial and the [ENTER] button to select a file. Rotate the [DATA ENTRY] Press the [ENTER] button dial to move the cursor.
-
Page 23: Calling Up The Desired Display Instantly-Direct Access
Calling Up the Desired Display Instantly—Direct Access With the convenient Direct Access function, you can instantly call up the desired display—with just a single additional button press. Press the [DIRECT ACCESS] button. A message appears in the display prompting you to press the appropriate button. Press the button (or move the slider, wheel or connected pedal) corresponding to the desired setting display to instantly call up that display. -
Page 24: Main Display Configuration
Main Display Configuration The display that appears when the power is turned on is the Main display. This display shows the current basic settings such as the currently selected Voice and Style, allowing you to see them at a single glance. The Main display is the one you’ll usually see when you play the keyboard. -
Page 25: File Selection Display Configuration
!0 Vocal Harmony Type Displays the currently selected Vocal Harmony Type (page 89). !1 ASSIGN slider function Displays the function (parameter) assigned to the ASSIGN slider and its value (page 21). !2 Transpose Displays the amount of transposition in semitone units (page 46). !3 Upper Octave Displays the amount that the octave value is shifted (page 46). - Page 26 e MENU 1/MENU 2 At the bottom of the File Selection display, you can toggle the indication between MENU 1 and MENU 2 by pressing the [8 ] button. Selecting MENU 1 shows the function names related to the current file (Voice, Style, Song, etc.) while selecting MENU 2 shows the function names of the file/folder management (page 29).
- Page 27 Changing the File Selection Display View The File Selection display actually has two different view types. One is Normal View, which we’ve seen up until this point. The other is List View, which lets you open files according to their numbers. Since the Tyros5 has many files spread out over several pages, number input in List View may be quicker and more convenient—providing you know the number of the file.
- Page 28 Memorizing Song/Style paths The File Selection display for Songs and Styles lets you memorize the path of specific Song/Style to one of the panel buttons. Even if your data is scattered across the drive in a complex hierarchy of folders and paths, you can instantly call up a specific file—no matter how deeply hidden—with a single button-press.
-
Page 29: File Management
• Prot. 1: Indicates Preset Songs copied to the USER drive. These only can be copied/moved/deleted in the USER drive. • Prot. 2 Orig: Indicates Yamaha-protection-formatted Songs. These cannot be copied. These can be moved/saved only to the USER drive and USB flash memories with ID. -
Page 30: Creating A New Folder
Enter the file name. NOTE Even if you skip this step, you can rename (page 31) the file at any time after sav- If you want to cancel the Save operation, press the [8 ] (CANCEL) button ing. before step 5 below. Press the [8 ] (OK) button to actually save the file. - Page 31 Renaming a File/Folder You can rename files/folders. NOTE Files in the PRESET tab cannot be Call up the display containing the file/folder you want to renamed. rename. Make sure that MENU 2 is shown at the bottom right corner of the display.
- Page 32 Copying or Moving Files You can copy or cut files and paste them to another location (folder). You can also copy NOTE folders (but not move them) by using the same procedure. Copying of commercially available musical data including but not limited to MIDI data and/or audio data is strictly Call up the display containing the files/folders you want to copy prohibited except for your personal use.
- Page 33 Deleting Files/Folders You can delete files/folders. NOTE Files in the PRESET tab cannot be Call up the display containing the file/folder you want to delete. deleted. Make sure that MENU 2 is shown at the bottom right corner of the display. As necessary, press the [8 ] button to call up MENU 2.
-
Page 34: Entering Characters
Entering Characters This section covers how to enter characters for naming your files/folders, inputting keywords on Music Finder (page 81), etc. Entering characters should be done in the display shown below. Character Entry window Change the type of character by pressing the [1 ] button. •... -
Page 35: Restoring The Factory-Programmed Settings
Tyros5-61 The right-most key Tyros5-76 You can also restore the factory default value of specified settings or delete all files/folders in the USER drive. Call up the operation display: [FUNCTION] [H] UTILITY TAB [][] SYSTEM RESET. For details, refer to the Reference Manual on the website. -
Page 36: Voices
Voices – Playing the Keyboard – The Tyros5 features a wide variety of exceptionally realistic instrumen- tal Voices, including piano, guitar, strings, brass, wind instruments and more. Playing Preset Voices Selecting a Voice (RIGHT 1) and playing the keyboard Press the PART SELECT [RIGHT 1] button. Make sure that the PART ON/OFF [RIGHT1] button is also turned on. - Page 37 Press one of the [A]–[J] buttons to select the desired Voice. NOTE You can call up the other pages by pressing the buttons that correspond to the page The Voice type and its defining charac- teristics are indicated above the Preset numbers (P1, P2 ...) or pressing the same VOICE button several times.
- Page 38 Playing Different Voices with the Left and Right Hands (Split) Make sure that at least one of the PART ON/OFF [RIGHT 1]– [RIGHT 3] buttons are turned on. Press the PART ON/OFF [LEFT] button to turn it on. Press one of the VOICE buttons to call up the Voice Selection display for the Left part.
-
Page 39: Voice Characteristics
Holding the LEFT part Voice (Left Hold) This function causes the LEFT part Voice to be held even when the keys are released. Non- decaying Voices such as strings are held continuously, while decay-type Voices such as piano decay more slowly (as if the sustain pedal has been pressed). Voice Characteristics The Voice type and its defining characteristics are indicated above the Voice name. -
Page 40: Adding Articulation Effects To Super Articulation Voices
Adding Articulation Effects to Super Articulation Voices The Super Articulation Voices (S.Art! Voices and S.Art2! Voices) enable you to create NOTE subtle, very realistic musical expressions, by how you play. Moreover, with the [ART. 1]/ • For examples of adding effects by how you play, refer to the Voice char- [ART. - Page 41 Example 3 NOTE When an S.Art2! Voice is selected, pressing the available [ART] button and playing/ Keeping with the realistic response of the original instruments, the effects releasing a note enables you to add articulation effects, such as bend up/down, glissando applied vary depending on the range up/down, brass fall, etc.
-
Page 42: Playing Various Organ Voices (Organ World)
Playing Various Organ Voices (Organ World) The Tyros5 uses advanced digital technology to accurately and authentically reproduce the characteristic sounds of a variety of organs played throughout the world. Five basic types are provided, letting you play with full expression and true realism in various styles that feature organ sounds—from blues and jazz to classical and theatre. - Page 43 Use the [1 ]–[8 ] buttons to select the desired preset. Play the keyboard. Adjusting the Footage Levels (only for Vintage, Home and Euro) The Vintage, Home and Euro types also give you access to an unlimited combination of organ sounds, by let- ting you change the footage levels on the FOOTAGES display.
-
Page 44: Playing Ensemble Voices
Playing Ensemble Voices These are special Voice settings that feature multiple Voices, used in realistic ensemble NOTICE combinations, such as brass section and string quartet. Up to four special parts or instru- Engaging the Ensemble Voice mode erases the Voice combina- ments are provided within a single Voice. - Page 45 If you want to enjoy more Ensemble Voices: From the ENSEMBLE VOICE display, press the [J] (PRESETS) button to call up the Ensemble Voice selec- tion display, then select the desired one from various Preset Ensemble Voices (other than the eight described above).
-
Page 46: Transposing The Pitch
Transposing the Pitch Using the TRANSPOSE [-]/[+] buttons The TRANSPOSE [-]/[+] buttons transpose the overall pitch of the instrument (the key- NOTE board sound, Style playback, MIDI Song playback, and so on) in semitone steps. To The Transpose functions do not affect the Drum Kit or SFX Kit Voices. -
Page 47: Using The Wheels
Using the Wheels Using the Pitch Bend Wheel Use the PITCH BEND wheel to bend notes up (roll the wheel away from you) or down NOTE (roll the wheel toward you) while playing the keyboard. Pitch Bend is applied to all key- The effects produced by using the PITCH BEND Wheel may not be applied board parts (RIGHT 1–3 and LEFT). -
Page 48: Applying Voice Effects
Applying Voice Effects You can apply various effects to enhance or change the sound of the keyboard parts (Left, Right 1, 2 and 3). The effects can be turned on or off by using the following buttons. These effects only apply to the selected part (the PART SELECT button is on). - Page 49 Applying Harmony to Notes Played in the Right-hand Section (HARMONY/ECHO) Among the Voice effects, Harmony is one of the most dramatic and musically useful. It automatically applies appropriate harmony notes to the notes played in the Right-hand section. Turn the [HARMONY/ECHO] button on. Turn on both the [ACMP] button and [SYNC START] button NOTE (pages 51–52) and make sure that the RIGHT 1 part is on...
-
Page 50: Adding New Contents-Expansion Packs
(HD) drive, while the Waves making up the Voices will be installed to the optional Flash Memory Expansion Module. NOTE You can also expand contents other than Voices and Styles. For more information, access the Yamaha Music Soft website. Tyros5 Owner’s Manual... -
Page 51: Styles
Styles – Playing Rhythm and Accompaniment – The Tyros5 features a variety of accompaniment and rhythmic backing patterns (called “Styles”) in a variety of different musical genres including pop, jazz, and many others. The Style features Auto Accom- paniment, letting you produce automatic accompaniment playback simply by playing “chords”... - Page 52 Specifically, it retains the subtle nuances and grooves that are difficult to reproduce using the preset drum/ percussion kit. Yamaha Time Stretch Technology allows the audio to follow your tempo changes without changing pitch, so everything stays in perfect sync.
-
Page 53: Operating Style Playback
Operating Style Playback To Start/Stop Playing [START/STOP] button Starts playback of the rhythm part of the current Style. To stop playback, press the button again. Playing back both rhythm and auto accompaniment If you turn on the [ACMP] button, both the rhythm part and auto accompaniment can be played back when playing chords in the chord section during Style playback. -
Page 54: Adjusting The Tempo
MAIN VARIATION [A]–[D] buttons Press one of the MAIN VARIATION [A]–[D] buttons to select the desired Main section (the button lights in red). Each is an accompaniment pattern of a few measures or more and Press the selected it plays indefinitely. Pressing the selected MAIN VARIATION button again plays an Main section (lit in red) again. -
Page 55: Chords
Chords For users who are unfamiliar with chords, this handy chart features common chords for your quick reference. Since there are many useful chords and many different ways to use them musically, refer to commercially available chord books for further details. ... -
Page 56: Calling Up Appropriate Panel Settings For The Current Style (One Touch Setting)
Calling up Appropriate Panel Settings for the Current Style (One Touch Setting) One Touch Setting is a powerful and convenient feature that automatically calls up the NOTE most appropriate panel settings (Voices and effects, etc.) for the currently selected Style, For information on the panel settings that are called up by One Touch Setting, with the touch of a single button. -
Page 57: Searching For Suitable Songs For The Current Style (Repertoire)
Searching for Suitable Songs for the Current Style (Repertoire) You can search for music pieces and songs that are most suitable for playing with the current Style by using the Music Finder Records (page 82). You can automatically call up appropriate settings such as Voice, effect and pedal by selecting the desired music piece. -
Page 58: Calling Up Optimum Styles For Your Performance (Style Recommender)
The Drum instruments (Kick, Snare and Hi-Hat) are assigned to the left of the B1 key while the Piano sound is assigned to the right. The instruments assigned to the keys differ slightly between the keyboard with 76 and 61 keys as follows: Tyros5-76 Tyros5-61 Keys Instruments... - Page 59 Select the desired Style from the list by using the [2 ]– [7 ] buttons. Listen to the Styles by changing the sections (page 53), playing chords on the Piano section and adjusting the tempo (page 54). If the Style called up doesn’t match the song you want to play, press the [I] (RETRY) buttons, then return to step 2-2.
-
Page 60: Turning Each Channel Of The Style On/Off
Turning Each Channel of the Style On/Off Each Style contains the channels listed below. You can add variations and change the feeling of a Style by selectively turning channels on/off as the Style plays. Style channels • RHY1/2 (Rhythm 1/2)..These are the basic parts of the Style, containing the drum and percussion rhythm patterns. •... -
Page 61: Adjusting The Volume Balance Between The Parts
Adjusting the Volume Balance Between the Parts You can adjust the volume balance between the parts (entire MIDI Song, entire Style, Multi Pads, MIC, Left, Right 1–3, Audio Song, AUX IN, entire keyboard). For the CENTER parameter, refer to “Adjusting the volume balance between the MIDI Song and Audio Song”... -
Page 62: Setting The Split Point
Setting the Split Point The key which divides the keyboard into two sections is referred to as “Split Point.” These are three Split Points: Split Point (LEFT), Split Point (RIGHT 3), and Split Point (STYLE). Split Point Split Point Split Point (STYLE) (LEFT) (RIGHT 3) -
Page 63: Specifying Chords With Your Right Hand While Playing Bass With Your Left Hand
Specifying Chords with Your Right Hand while Playing Bass with Your Left Hand By changing the Chord Detection area from the left-hand section to the right-hand section, you can play the bass line with your left hand while using your right hand to control Style playback. To do this, set the CHORD DETECTION AREA value to “UPPER”... -
Page 64: Multi Pads
Multi Pads – Adding Musical Phrases to Your Performance – The Multi Pads can be used to play a number of short pre-recorded rhythmic and melodic sequences that can be used to add impact and variety to your keyboard performances. Multi Pads are grouped in Banks of four phrases each. -
Page 65: Using The Multi Pad Synchro Start Function
Using the Multi Pad Synchro Start Function While holding the MULTI PAD [SELECT] button, press the NOTE desired button or buttons from [1]–[4]. To cancel the standby status, press the same button, or press the [STOP] but- The corresponding buttons flash in red. ton to cancel the status of all Pads. -
Page 66: Creating A New Multi Pad With Wave Files (Audio Link Multi Pad)
Creating a New Multi Pad with WAVE files (Audio Link Multi Pad) You can create a new Multi Pad by making the links with WAVE files in the internal hard disk drive and USB flash mem- ory to each of the Multi Pad. The WAVE files can be the data you’ve created in the Audio Recorder (page 76) and com- mercially available ones. - Page 67 If desired, adjust the level of each WAVE file by using the [1 ]–[4 ] buttons. You can adjust the volume while hearing the Multi Pad phrases by pressing the corresponding MULTI PAD CONTROL [1]–[4] buttons. To confirm the path of the selected WAVE file By pressing the [H] (INFO.) button in the Audio Link Multi Pad display, you can confirm the path.
-
Page 68: Songs
Songs – Recording Your Performances as MIDI Songs – This instrument allows you to record your performance and save it as a MIDI file in SMF format, and play back preset Songs, commercially available MIDI music files, etc. Not only can you play back a song and listen to it, but you can also play the keyboard along with song play- back. -
Page 69: Multi Track Recording
After you finish performance, press the SONG [STOP] button to stop recording. A notice message appears here; press the [EXIT] button to close it. Press the SONG [PLAY/PAUSE] button to play back the recorded performance. Save the recorded performance. NOTICE Press one of the SONG [I]–[IV] buttons to call up the Song Selection dis- The recorded Song will be lost if you change to another Song or... - Page 70 Use the [C]/[D] buttons to assign the desired part for the chan- NOTE nel to be recorded. The use of the [C]/[D] buttons may not be necessary here, since each num- To close the window for assigning the part, press the [EXIT] button. bered channel has its own default set- ting and can be used as is.
-
Page 71: Playback Of Songs
Playback of Songs You can play back the following types of Songs. • Preset Songs (in the PRESET Page of the Song Selection display) • Your own recorded Songs (page 68) • Commercially available Song data: SMF (Standard MIDI File) If you want to play back a song in USB flash memory, connect the USB flash memory NOTE containing song data to the [USB TO DEVICE] terminal beforehand. -
Page 72: Operations During Playback
Operations During Playback • Synchro Start ..You can start playback as soon as you start playing the key- NOTE board. While playback is stopped, hold down the SONG You can have Song playback fade in/out or change the tempo (page 54). [STOP] button and press the [PLAY/PAUSE] button. -
Page 73: Displaying Music Notation (Score)
Displaying Music Notation (Score) You can view the music notation (score) of the selected Song. Select a Song (steps 1–3 on page 71). NOTE This instrument can display the music notation of your recorded MIDI Song, or Press the [SCORE] button to call up the SCORE display. commercially available MIDI file (only You can look through the entire notation by using the TAB [][] buttons when the one which allows any device to indi-... -
Page 74: Using Song Position Markers
Using Song Position Markers Song Position markers (SP 1–SP 4) can be placed in the Song data. This not only lets you navigate quickly and easily through the Song data, but also lets you set up convenient playback loops—allowing you to create dynamic Song arrangements “on the fly,”... -
Page 75: Turning Each Channel Of The Song On/Off
Using Markers in Loop Playback In this section, we’ll explain loop playback by the example of looping between markers SP 1 and SP 2. Press the [PLAY/PAUSE] button to start playback from the top of the Song. After passing the [SP 1] point, press the [LOOP] button to turn the loop function on. -
Page 76: Audio Recorder/Player
Audio Recorder/Player – Recording and Playing Audio Files – This instrument lets you record your performances as audio data to internal hard disk drive. Sounds that can be recorded: • Sounds that are generated via all the keyboard parts (Left, Right 1–3), Song parts, Style parts, and Multi Pad parts. - Page 77 Press the [PLAY/PAUSE] button to start recording. Immediately after this operation, start and record your performance. 5 4, 6 When your performance is finished, press the [STOP] button to stop recording. Recorded data is automatically saved to internal hard disk drive (HD) as a file with the name automatically set.
-
Page 78: Playing Back Audio Files
Playing Back Audio Files You can play back the following file formats on this instrument. NOTE • WAV..44.1 kHz sample rate, 16 bit resolution, stereo • DRM (Digital Rights Management) protected Audio files cannot be • MP3 ..MPEG-1 Audio Layer-3: 44.1/48.0 kHz sample rate, 64–320 kbps and vari- played back. -
Page 79: Playback-Related Operations
Playback-related Operations Operations on the panel Selecting the previous/next Audio Song ([PREV] or [NEXT] button) Press the [PREV] or [NEXT] button to select the previous/next Audio file in the same folder. Hold one of them to move backward/forward continuously through the current file (in seconds). - Page 80 Operations on the display A-B Repeat Playback (the [I] button) The specified range (between the A and B points) can be played back repeatedly. To set the A point, press the [I] button when playback reaches to the desired point.
-
Page 81: Music Finder
Music Finder function more conveniently and effectively, we recommend that you on page 101. download the Records from the Yamaha website, and load them to this instrument. On the computer, access the following website and download the Music Finder file (***.mfd) to the USB flash memory connected to the computer. -
Page 82: Selecting The Desired Record (Panel Settings)
Selecting the Desired Record (Panel Settings) Press the [MUSIC FINDER] button to call up the MUSIC FINDER display. Each entry is called a “Record.” This shows the song titles (MUSIC) and information of the Styles included. Use the [2 ]/[3 ] buttons to select the desired Record. You can also use the [DATA ENTRY] dial and the [ENTER] button. -
Page 83: Searching For Records (Panel Settings)
Searching for Records (Panel Settings) You can search the Records by specifying a song title or keyword, using the Search function of the Music Finder. In the MUSIC FINDER display, press the [6 ] (SEARCH 1) but- ton to call up the SEARCH 1 display. Enter the search criteria. -
Page 84: Registering A Midi Song, Audio Song Or Style To A Record
Registering a MIDI Song, Audio Song or Style to a Record By registering MIDI Song, Audio Song or Style files in various locations (PRESET, USER, HD and USB) into Music Finder, you can easily call up your favorite files. In the Song, Audio or Style Selection display, select the desired NOTE file. -
Page 85: Registration Memory
Registration Memory – Saving and Recalling Custom Panel Setups – The Registration Memory function allows you to save (or “register”) virtually all panel settings to a Registration Memory button, and then instantly recall your custom panel settings by simply pressing a single button. -
Page 86: Saving The Registration Memory As A Bank File
• Off: No data registered while holding the second right-most key (Tyros5-76: F#6, Tyros5-61: B5) on the keyboard. • You can also disable recall of specific Register various panel setups to other buttons by repeating group(s) when calling up the regis- steps 1–4. -
Page 87: Recalling A Registered Panel Setup
Recalling a Registered Panel Setup The saved Registration Memory Bank files can be recalled by using the REGIST BANK [-]/[+] buttons, or by using the following procedure. Press the REGIST BANK [+] and [-] buttons simultaneously to NOTE call up the REGISTRATION BANK Selection Display. •... -
Page 88: Microphone
Microphone – Adding Harmony Vocals and Synth Vocoder to Your Singing – By connecting a microphone to the [MIC INPUT] jack (accepts either XLR or standard 1/4” phone plug connectors), you can enjoy singing along with your keyboard performance or with Song playback. The instru- ment outputs your vocals through the connected speaker system (page 15). -
Page 89: Using Vocal Harmony
Adjust the volume balance between the microphone sound and the instrument sound on the BALANCE display (page 61). Disconnecting the microphone Set the [MIC GAIN] knob to the minimum position. Disconnect the microphone from the [MIC INPUT] jack. Using Vocal Harmony This section covers the Vocal Harmony Effects that can be applied to your voice via the microphone sound. - Page 90 Follow the steps below, depending on which Type (and mode) you selected. If you selected one of the Chordal Types: Turn the [ACMP] button on. NOTE If you selected a Type having an “FX” Play chords with your left hand, or play back the Song which contains chord icon, your voice will be processed with data.
-
Page 91: Using Synth Vocoder
Using Synth Vocoder These are special effects that graft the characteristics of your voice onto synthesizer and other sounds, for unusual machine‐like or robotic effects, as well as unique choir sounds, which you can control with your own singing and play- ing. -
Page 92: Mixing Console
Mixing Console – Editing the Volume and Tonal Balance – The Mixing Console gives you intuitive control over aspects of the keyboard parts and Style/MIDI Song channels, including volume bal- ance and the timbre of the sounds. It lets you adjust the levels and ste- reo position (pan) of each Voice to set the optimum balance and stereo image, and lets you set how the effects are applied. - Page 93 Use the TAB [][] buttons to call up the desired page. For details about each page, refer to the Reference Manual on the website. • VOL/VOICE ..Changes the Voice for each part and adjusts panning and volume for each part. •...
-
Page 94: Master Compressor
Master Compressor Compressor is an effect commonly used to limit and compress the dynamics (softness/loudness) of an audio signal. For signals that vary widely in dynamics, such as vocals and guitar parts, it “squeezes” the dynamic range, effectively making soft sounds louder and loud sounds softer. When used with gain to boost the overall level, this creates a more powerful, more consistently high-level sound. - Page 95 Saving Master Compressor Settings The Master Compressor settings you have edited on page 94 can be saved as the User Compressor type. Press the [I] (SAVE) button to enter the USER MASTER COM- PRESSOR display. Select the destination to which the User Master Compressor is to be saved, by using the [3 ]–[6 ] buttons.
-
Page 96: Utility
Utility – Making Global Settings – The Utility section in the Function menu provides a variety of conve- nient tools and settings for the Tyros5. These include general settings that affect the entire instrument, as well as detailed settings for specific functions. -
Page 97: Connections
For instructions on connecting a microphone, refer to page 88. Connecting Audio Devices (LINE OUT jacks, AUX IN jacks) Connecting the Optional Yamaha TRS-MS05 Speaker For instructions, refer to pages 106–107. IMPORTANT Since the Tyros5 has no built-in... - Page 98 Using External Audio Devices for Playback The [LINE OUT] jacks are used to send the Tyros5 output to a keyboard amplifier, stereo NOTE sound system or mixing console. If you are connecting the Tyros5 to a mono sound sys- You can send a specific part to any tem, use only the [L/L+R] jack.
-
Page 99: Connecting An External Monitor ([Rgb Out] Terminal)
AUX IN [L/L+R]/[R] jacks, letting you To avoid damage to the devices, hear the sound of that device through the headphones or the optional Yamaha TRS-MS05 first turn on the power to the external device, then to the speakers of the Tyros5. -
Page 100: Connecting Footswitches/Foot Controllers (Assignable Foot Pedal Jacks)
Connecting Footswitches/Foot Controllers (ASSIGNABLE FOOT PEDAL jacks) One or two optional Yamaha FC4 or FC5 Footswitches and an optional Yamaha FC7 Foot NOTE Controller can be connected to one of these ASSIGNABLE FOOT PEDAL jacks. A foot- Do not connect or disconnect the pedal when the power is on. -
Page 101: Connecting Usb Devices ([Usb To Device] Terminal)
The instrument does not necessarily support all commer- When a USB storage device is connected, a message may cially available USB devices. Yamaha cannot guarantee appear prompting you to format the USB flash memory. operation of USB devices that you purchase. Before pur- If so, execute the Format operation (page 102). -
Page 102: Connecting To An Iphone/Ipad ([Usb To Device], [Usb To Host] And Midi Terminals)
MIDI terminals via the Yamaha i-MX1 • When you use the instrument along (optional) or to the [USB TO HOST] terminal via the Yamaha i-UX1 (optional). By using with an application on your iPhone/... -
Page 103: Connecting To A Computer ([Usb To Host] Terminal)
• You can also use the MIDI [IN]/[OUT] terminals to connect to a computer. In this case, a USB-MIDI interface (such as the Yamaha UX16) is needed. For more information, refer to the owner’s manual of the USB-MIDI interface. Tyros5 Owner’s Manual... - Page 104 Accessing an Internal Hard Disk Drive on the Tyros5 from the Computer (USB Storage Mode) When the instrument is in the USB Storage Mode, Wave files and Song files can be NOTE transferred between the internal hard disk drive of the Tyros5 and the computer. When The USB Storage Mode can be used with Windows XP/Vista/7/8.
-
Page 105: Connecting External Midi Devices (Midi Terminals)
Connecting External MIDI Devices (MIDI terminals) Use the [MIDI] terminals and standard MIDI cables to connect external MIDI devices (keyboard, sequencer, etc.) • MIDI IN....Receives MIDI messages from another MIDI device. Two ports (A, B) are provided and each can receive MIDI mes- sages over 16 channels. -
Page 106: Appendix
Insert the two speaker brackets to the outside slots on the rear NOTE panel of the Tyros5. The brackets can be inserted inter- changeably to either location. Tyros5-76 has two additional sets of slots (as shown). Tyros5-76 Music Rest Music Rest Fasten the satellite speakers to the left and right brackets. - Page 107 Routing the cable On the rear panel of the Tyros5, hooks are provided for neatly routing the cable. Fixing the cable to these hooks (as shown below) prevents it from dangling loosely from the instrument. Hooks Tyros5-76 Hooks Tyros5-61 Tyros5 Owner’s Manual...
-
Page 108: Installing The Optional Flash Memory Expansion Module
• Do not use any screws other than what are installed on inside the instrument can cause improper operation or serious damage. If you the instrument. are unable to retrieve a dropped screw, consult your Yamaha dealer for • It is recommended that you wear gloves to protect your advice. - Page 109 Remove the four screws from the cover. Re-install the cover you removed in step 3, in reverse order. (Rear side) Removing Flash Memory Expansion Module Loosen both the screws with your hand as shown below. NOTE Keep the removed screws in a safe place. They will be used when reattaching the cover to the instrument after installation.
-
Page 110: Direct Access Chart
Direct Access Chart Operation: Function of the accessed LCD display [DIRECT ACCESS] button + button/controller listed below FINGERING TYPE ACMP CHORD FINGERING SETTING STYLE SETTING/ OTS LINK FUNCTION SPLIT POINT/ STYLE SETTING CHORD FINGERING FINGERING TYPE AUTO FILL IN CHORD FINGERING SETTING INTRO I VOICE... - Page 111 Operation: Function of the accessed LCD display [DIRECT ACCESS] button + button/controller listed below MIXING CONSOLE MIXING CONSOLE VOL/VOICE (PANEL) VOICE BALANCE BALANCE PAGE2/2 CHANNEL ON/OFF CHANNEL STYLE SETTING EXIT MAIN LEFT LEFT REGIST SEQUENCE/ RIGHT1 RIGHT1 PART SELECT FUNCTION FREEZE/ VOICE SET RIGHT2...
-
Page 112: Panel Button Chart
Panel Button Chart No........Corresponds to the number in the “Panel Controls and Terminals” on page 12. Button/Control....Indicates the button/controller that you should use at first for entering the corresponding func- tion. Display......Indicates the display title (and tab title) called up by operating the button/controller. Reference Manual .. - Page 113 Reference Button/Control Display Page Manual STYLE [ACMP] — — CONTROL [OTS LINK] — — [AUTO FILL IN] — — INTRO [I]–[III] — — MAIN VARIATION [A]–[D] — — [BREAK] — — ENDING/rit. [I]–[III] — — [SYNC STOP] — — [SYNC START] —...
- Page 114 Reference Button/Control Display Page Manual MENU [CREATOR] SONG CREATOR REC MODE — CHANNEL — CHORD — 1–16 — SYS/EX. — LYRICS — STYLE CREATOR BASIC — ASSEMBLY — GROOVE — CHANNEL —...
-
Page 115: Troubleshooting
Troubleshooting Overall A click or pop is heard when the power is This is normal. Electrical current is being applied to the instrument. turned on or off. The power is automatically turned off. This is normal and due to the Auto Power Off function. If necessary, set the parameter of the Auto Power Off function (page 17). - Page 116 An existing file is not shown. • The file extension (.MID, etc.) may have been changed or deleted. Manually rename the file, adding the appropriate extension, on a computer. • Data files with names of more than 50 characters cannot be handled by the instru- ment.
- Page 117 When connecting the instrument to a com- The generic driver may not be compatible with the instrument. When data communica- puter, the computer freezes. tion is unstable or some problem occurs, download the Yamaha Standard USB-MIDI driver from the following URL: http://download.yamaha.com/...
-
Page 118: Specifications
Specifications TYROS5-76 TYROS5-61 Size and Weight Dimensions [W x D x H] (without Music Rest) 1347 x 450 x 142mm 1140 x 450 x 142mm (53-1/16” x 17-11/16” x 5-9/16”) (44-7/8” x 17-11/16” x 5-9/16”) Weight (without Music Rest) 16.0 kg (35 lbs, 4 oz.) 14.0 kg (30 lbs, 14 oz.) - Page 119 * Specifications and descriptions in this owner’s manual are for information purposes only. Yamaha Corp. reserves the right to change or modify products or specifications at any time without prior notice. Since specifications, equipment or options may not be the same in every locale, please check with your Yamaha dealer.
-
Page 120: Index
Index ......... 80 ........10 ......38 A-B Repeat Data List Keyboard Parts .......... 16 ......... 33 AC IN Delete ........9 ......... 17 Accessories Demo ......55 ......23 AI Full Keyboard Direct Access ... 25 Lamp (USB READ/WRITE) ........ - Page 121 ..... 112 ..........21 Panel Button Chart ....... 12 ..........90 Panel Control Talk ........19 ..........54 Panel Lock ......... 72 ........24, 54 Pause Tempo ........... 46 ........12 Pitch Terminal ......47 ..........73 Pitch Bend Wheel Text ........
- Page 122 M E M O Tyros5 Owner’s Manual...
- Page 123 M E M O Tyros5 Owner’s Manual...
- Page 124 Tyros5 Owner’s Manual...
- Page 125 Warranty service will only be provided for defective products within the War- ranted Area. Contact your local authorized YAMAHA dealer who will advise you of the procedures to be followed. If this is not successful, contact YAMAHA at the address, telephone number or website shown below. YAMAHA may request that you send the defective product to a local authorized YAMAHA Servicer or authorize return of the defective product to YAMAHA for repair.
- Page 126 Yamaha Corporation of America or its subsidiaries. of other electronic devices. Compliance with FCC regulations does * This applies only to products distributed by YAMAHA CORPORATION OF AMERICA. (class B) COMPLIANCE INFORMATION STATEMENT...
- Page 127 Niederlassung und bei Yamaha Vertragshändlern in den jeweiligen Bestimmungsländern erhältlich. Pour plus de détails sur les produits, veuillez-vous adresser à Yamaha ou au distributeur le plus proche de vous figurant dans la liste suivante. Para detalles sobre productos, contacte su tienda Yamaha más cercana o el distribuidor autorizado que se lista debajo.
- Page 128 Yamaha Global Site http://www.yamaha.com/ Yamaha Downloads http://download.yamaha.com/ C.S.G., Digital Musical Instruments Division © 2013 Yamaha Corporation 309PO***.*-**A0 Printed in Japan ZG72800...