Konica Minolta bizhub c350 User Manual
Hide thumbs
Also See for bizhub c350:
- Service manual (640 pages) ,
- User manual (310 pages) ,
- Installation manual (12 pages)
Table of Contents
Advertisement
Quick Links
Download this manual
See also:
Service Manual
Advertisement
Table of Contents

Related Manuals for Konica Minolta bizhub c350


Summary of Contents for Konica Minolta bizhub c350
- Page 1 User’s Guide...
- Page 2 Introduction Thank you for choosing this machine. This manual contains details on the operation of the various functions of the machine, precautions on its use, and basic troubleshooting procedures. In order to ensure that this machine is used correctly and efficiently, carefully read this manual before using the machine.
-
Page 3: Table Of Contents
Contents Introduction ....................i Contents ..................... ii Making Basic Copies ................xiv Available Features .................. xvii Selecting the print color ............xvii Sorting copies ................xvii Stapling copies ................xvii Punching holes in copies ............xvii Adjusting copies to the size of the paper ......... xviii Specifying separate horizontal and vertical zoom ratios .. - Page 4 Explanation of Manual Conventions ........... xxvii ® Energy Star ................... xxix ® What is an ENERGY STAR Product? ........xxix Trademarks and Registered Trademarks..........xxix Legal Restrictions on Copying .............. xxx Installation and Operation Precautions For Safe Use ..................1-2 Warning and Precaution Symbols ..........1-2 Meaning of Symbols ..............1-2 WARNING ..................1-3 CAUTION ...................1-4...
- Page 5 Turning the Machine On and Off..........2-17 Turning On the Machine ............2-17 When the Machine Is Turned On ..........2-17 Queuing a Job During Warm-Up..........2-17 Panel Reset Timer ..............2-17 Power Save Mode..............2-18 Recovering From Power Save Mode ........2-19 Sleep Mode ................
- Page 6 Selecting Output Settings ............3-8 Non Sorting (“Non Sort” Setting) ..........3-8 Sorting (“Sort” Setting)..............3-8 Crisscross Sorting (Crisscross Feeding) ........3-9 Stapling (with finisher FS-501 installed) ........3-10 Stapling (with finisher FS-601 installed) ........3-10 Hole-Punching ................3-11 To specify Output settings ............3-12 Specifying a Zoom Setting ............3-13 Automatic Scaling (“Auto Zoom”...
- Page 7 Selecting Copy Settings ............3-37 Single-Sided Copy (“1” Setting) ..........3-38 Double-Sided Copy (“2” Setting) ..........3-38 Single-Sided 2in1 Copy (“1-2in1” Setting) ....... 3-38 Double-Sided 2in1 Copy (“2-2in1” Setting) ......3-38 Single-Sided 4in1 Copy (“1-4in1” Setting) ....... 3-39 Double-Sided 4in1 Copy (“2-4in1” Setting) ......3-39 Booklet Copy (“Booklet”...
- Page 8 Original Documents Document Feeding................5-2 Document Feeding Methods ............5-2 Appropriate Document Types (Using the Reverse Automatic Document Feeder)..............5-2 Document Precautions (Using the Reverse Automatic Document Feeder)..............5-4 Appropriate Document Types (Using the Original Glass)...5-4 Document Precautions (Using the Original Glass) .....5-5 Small-Sized Documents .............5-5 Centering ..................5-5 Additional Copy Operations Blocking Document Scan Storage...
- Page 9 Scanning the Document in Separate Batches (“Separate Scan” Function)............7-3 To use the “Separate Scan” function ......... 7-4 Printing Distribution Numbers on Copies (“Set Numbering” Function)............7-5 To use the “Set Numbering” function ......... 7-5 Making Copies for Filing (“File Margin” Function)....7-8 To use the “File Margin”...
- Page 10 Reducing the Document to Postcard Size and Printing Multiple Copies on One Page (“Postcard” Function) ......7-55 To make settings for the “Postcard” function......7-55 Managing Jobs Overview of Jobs ................8-2 Jobs ....................8-2 Multi-Job Feature................8-2 Changing the Copy Settings for a Queued Job ......8-3 Deleting a Queued Job...............8-3 Canceling a Job Being Printed ...........8-3 Job Log Screens ................8-4...
- Page 11 10 Utility Mode Operations 10.1 Utility Screen................10-2 10.2 Programming/Recalling Copy Programs ......... 10-4 Setting the “Reset Mode” Function .......... 10-4 Storing Copy Programs............10-5 Recalling a Copy Program ............10-7 10.3 Viewing Counters (“Counter List” Function) ......10-8 10.4 Specifying Default Settings (User’s Choice: 1 Functions) ...
- Page 12 Setting the “Administrator Code Change” Function....10-59 Setting the “Panel Reset Timer” Function ......10-61 Setting the “Add Prefix/Suffix” Function........10-63 Setting the “Prefix/Suffix Registration” Function.....10-65 10.9 Setting the “Gradation Adjustment” Function .......10-67 10.10 Specifying Expert User Mode Functions ........10-69 Setting the “Thick Paper and OHP Film Image Density” Function..................10-69 Setting the “Color Shift Correction (Bk)”...
- Page 13 11.4 When the Message “Misfeed detected.” Appears ....11-20 Locations of Paper Misfeeds..........11-20 Locations of Paper Misfeeds in the Enlarge Display Mode..11-21 Paper Misfeed/Staple Jam Indications........11-22 Clearing a Paper Misfeed in the Bypass Tray......11-23 Clearing a Paper Misfeed in the Automatic Duplex Unit ..11-25 Clearing a Paper Misfeed in the 1st or 2nd Drawer ....
- Page 14 13 Specifications 13.1 Specifications................13-2 Copier C350 ................13-2 Automatic Duplex Unit AD-501..........13-3 Reverse Automatic Document Feeder DF-601 ......13-4 Paper Feed Cabinet PC-101 ............13-5 Paper Feed Cabinet PC-201 ............13-5 Paper Feed Cabinet PC-401 ............13-5 Finisher FS-601 ................13-6 Finisher FS-501 ................13-7 Job Separator JS-601...............13-7 Punch Kit PK-501 ..............13-8 14 Appendix 14.1...
-
Page 15: Making Basic Copies
Making Basic Copies Making Basic Copies The procedure for making basic copies is described below. Load the document to be copied. Reference For details, refer to “Feeding the Document” on page 2-41. C350... - Page 16 Making Basic Copies Specify the necessary settings. ❍ To specify a Color setting, touch [Color]. For details, refer to “Selecting a Color Setting” on page 3-5. ❍ To specify a Output setting, touch [Output]. For details, refer to “Selecting Output Settings” on page 3-8.
- Page 17 Making Basic Copies ❍ To specify settings for the Application functions, touch [Application]. For details, refer to “Application Functions” on page 7-1. Check the setting for the number of copies. Reference For details, refer to “Specifying the Number of Copies” on page 3-2. Press the [Start] key.
-
Page 18: Available Features
Available Features Available Features Selecting the print color The color used to print copies can be specified, for example, the copy can be printed in full color or in a single color. For details, refer to “Selecting a Color Setting” on page 3-5. Sorting copies While printing multiple copies, the copies can be divided into the separate sets. -
Page 19: Adjusting Copies To The Size Of The Paper
Available Features Adjusting copies to the size of the paper The most appropriate zoom ratio can automatically be selected based on the size of the loaded document and the specified paper size. For details, refer to “Automatic Scaling (“Auto Zoom” Setting)” on page 3-13. Specifying separate horizontal and vertical zoom ratios By specifying separate horizontal and vertical zoom ratios, copies of the document can be resized as desired. -
Page 20: Copying Multiple Document Pages Onto A Single Page
Available Features Separately copying the pages of a page spread The two pages of a page spread, such as an open book, can be copied onto separate pages. For details, refer to “Books (“Book Copy” Settings)” on page 3-27. Copying multiple document pages onto a single page Multiple pages of the document can be printed together on a single copy. -
Page 21: Printing A Sample Copy
Available Features Copying a document containing various page sizes A document with various page sizes can be scanned and copied together. For details, refer to “Copying Documents of Mixed Sizes (“Mixed Original” Function)” on page 6-3. Printing a sample copy Before printing a large number of copies, a sample copy can be printed so that it can be checked. -
Page 22: Storing The Scanned Image In The Memory
Available Features Storing the scanned image in the memory The scanned document can be stored in the memory and deleted only when it is printed. For details, refer to “Storing the Scanned Image in the Memory (“Scan to Memory” Function)” on page 7-2. Scanning the document in separate batches A document can be divided and scanned in a number of batches. -
Page 23: Erasing Sections Of Copies
Available Features Erasing sections of copies Areas such as the unclean-looking frames around copies can be erased. For details, refer to “Erasing Sections of Copies (“Edge/Frame Erase” Function)” on page 7-10. Adjusting the image to fit the paper size If the document size is different from the paper size, the document image can be enlarged to fill the paper. -
Page 24: Inserting Paper Between Transparencies
Available Features Inserting paper between transparencies After each overhead transparency copy is printed, a page can be added to the stack as an overleaf. For details, refer to “Inserting Paper Between Transparencies (“OHP Interleave” Function)” on page 7-22. Copying booklet documents Booklets with the staples removed can be copied and bound at the center to make booklet copies. -
Page 25: Separating The Colors Of The Copy
Available Features Separating the colors of the copy A document can be copied with its colors separated into cyan (C), magenta (M), yellow (Y) and black (Bk). In addition, copies of the separated colors can be printed in just black. For details, refer to “To make settings for the “Color Separation”... -
Page 26: Reducing The Image And Printing Multiple Copies On One Page
Available Features Reducing the image and printing multiple copies on one page The document image can be reduced to postcard size, and four copies can be printed on a single sheet of paper. For details, refer to “Reducing the Document to Postcard Size and Printing Multiple Copies on One Page (“Postcard”... -
Page 27: Explanation Of Basic Concepts And Symbols
Explanation of Basic Concepts and Symbols Explanation of Basic Concepts and Symbols The use of words and symbols in this manual are explained below. “Width” and “Length” Whenever paper dimensions are mentioned in this manual, the first value always refers to the width of the paper (shown as “Y”... -
Page 28: Explanation Of Manual Conventions
Explanation of Manual Conventions Explanation of Manual Conventions WARNING ➜ Failure to observe instructions highlighted in this manner may result in fatal or critical injuries. ➜ Observe all warnings in order to ensure safe use of the machine. CAUTION ➜ Failure to observe instructions highlighted in this manner may result in serious injuries or property damage. - Page 29 Explanation of Manual Conventions Condition Text highlighted in this manner provides information concerning the combining of functions. ] key The names of keys on the control panel are written as shown above. xxviii C350...
-
Page 30: Energy Star
Trademarks and Registered Trademarks bizhub is a trademark of KONICA MINOLTA BUSINESS TECHNOLOGIES, INC. All other product names mentioned are trademarks or registered trademarks of their respective companies... -
Page 31: Legal Restrictions On Copying
Legal Restrictions on Copying Legal Restrictions on Copying Certain types of documents must never be copied with the purpose or intent to pass copies of such documents off as the originals. The following is not a complete list, but is meant to be used as a guide to responsible copying. -
Page 32: Installation And Operation Precautions
Installation and Operation Precautions... -
Page 33: For Safe Use
1.1 For Safe Use For Safe Use This section contains detailed instructions on the operation and maintenance of this machine. To achieve optimum utility of this device, all operators should carefully read and follow the instructions in this manual. Please keep this manual in a handy place near the machine. -
Page 34: Warning
1.1 For Safe Use WARNING • Do not modify this product, as a fire, electrical shock, or breakdown could result. If the product employs a laser, the laser beam source could cause blindness. • Do not attempt to remove the covers and panels which have been fixed to the product. Some products have a high-voltage part or a laser beam source inside that could cause an electrical shock or blindness. -
Page 35: Caution
1.1 For Safe Use CAUTION • Do not use flammable sprays, liquids, or gases near this product, as a fire could result. • Do not leave a toner unit or drum unit in a place within easy reach of children. Licking or ingesting any of these things could injure your health. -
Page 36: Precautions For Routine Use
1.1 For Safe Use Precautions for Routine Use • Do not store toner units, PC drum units, and other supplies and consumables in a place subject to direct sunlight and high temperature and humidity, as poor image quality and malfunction could result. •... -
Page 37: Led Radiation Safety
1.1 For Safe Use LED Radiation Safety This product is a copier which operates by means of a LED (light emitting diodes) exposure system. There is no possibility of danger from the LED optical radiation, because the LED optical radiation level does not exceed the accessible radiation limit of class 1 under all conditions of operation, maintenance, service and failure. -
Page 38: Installation Precautions
1.2 Installation Precautions Installation Precautions Installation Site To ensure utmost safety and prevent possible malfunctions, install the machine in a location that meets the following requirements. A location away from curtains, etc. that may catch fire and burn easily A location that is not exposed to water or other liquids A location free from direct sunlight A location out of the direct airflow of an air conditioner or heater, and not exposed to extremely high or low temperatures... -
Page 39: Space Requirements
1.2 Installation Precautions Space Requirements To ensure easy machine operation, supply replacement and maintenance, adhere to the recommended space requirements detailed below. 1251 1899 1303 Unit: mm Reminder! Be sure to allow a clearance of 100 mm or more at the back of the machine for the ventilation duct. -
Page 40: Operation Precautions
1.3 Operation Precautions Operation Precautions Operating Environment The environmental requirements for correct operation of the machine are as follows. Temperature: 10°C (50°F) to 30°C (86°F) with fluctuations of no more than 10°C (18°F) within an hour Humidity: 15% to 85% with fluctuations of no more than 20% within an hour Proper Use To ensure the optimum performance of the machine, follow the precautions listed below. -
Page 41: Transporting The Machine
1.3 Operation Precautions CAUTION If the ventilation duct on the back side of the machine is blocked, the inside of the machine will accumulate heat, resulting in a malfunction or fire. ➜ Be sure to allow a clearance of 100 mm or more at the back of the machine for the ventilation duct. -
Page 42: Storage Of Copies
1.3 Operation Precautions CAUTION Precautions for handling toner: ➜ Be careful not to spill toner inside the machine or get toner on your clothes or hands. ➜ If your hands become soiled with toner, immediately wash them with soap and water. - Page 43 1.3 Operation Precautions 1-12 C350...
-
Page 44: Before Making Copies
Before Making Copies... -
Page 45: Components And Their Functions
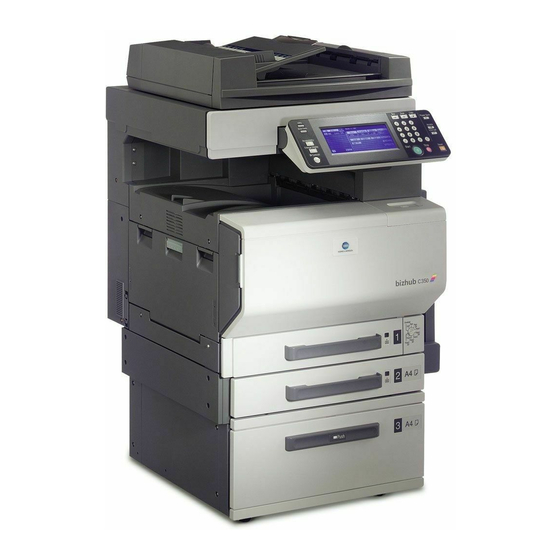
2.1 Components and Their Functions Components and Their Functions 1 Reverse Automatic 9 Job Separator Document Feeder 2 Original Cover 3 Automatic Duplex Unit 10 Main unit 16 Image Controller 8 Finisher FS-501 7 Finisher FS-601 4 Desk 5 Single/double Paper Feed Cabinet 6 Large-capacity Paper Feed Cabinet Part Name Description... - Page 46 2.1 Components and Their Functions Part Name Description Paper Feed Cabinet PC-101 Paper feed cabinet PC-101 is equipped with a single paper (optional) drawer. The top drawer can be loaded with 500 sheets of Paper Feed Cabinet PC-201 paper, and the bottom drawer can be used as storage. (optional) Referred to as the “single paper feed cabinet”...
- Page 47 2.1 Components and Their Functions Part Name Description Local Interface Kit EK-501 Used for making a parallel connection between this machine (optional)* and the computer Image Controller IC-401 External image controller that allows the machine to be used (optional)* as both a color printer and a color scanner configured into a computer network For details, refer to the manual for the image controller.
-
Page 48: Part Names And Their Functions
2.2 Part Names and Their Functions Part Names and Their Functions Outside of Machine 7 Copy output tray 1 Right-side door 6 Front door 5 1st drawer 4 2nd drawer 2 Multiple bypass tray 3 Power switch * The illustration above shows the reverse automatic document feeder and large- capacity paper feed cabinet installed. - Page 49 2.2 Part Names and Their Functions 8 Reverse automatic document feeder 13 Original glass 9 Document scales 10 Media type selection dial 12 Control panel 11 1st/2nd drawer paper-empty indicator * The illustration above shows the reverse automatic document feeder and large- capacity paper feed cabinet installed.
- Page 50 2.2 Part Names and Their Functions 14 Reverse automatic docu- ment feeder connector 19 Parallel interface connector 15 Finisher connector 16 Power cord connector 17 Power connector for the external image controller 18 Network connector *The illustration above shows the reverse automatic document feeder and large- capacity paper feed cabinet installed.
-
Page 51: Options
2.2 Part Names and Their Functions Options 1 Adjustable 2 Document document guide feed tray 3 Document 13 Feed guide output tray 14 Transport 12 Upper door guide 4 Misfeed- clearing cover 11 Paper output tray 10 Front door 5 Automatic duplex unit door 6 Right-side... - Page 52 2.2 Part Names and Their Functions Single Paper Feed Cabinet Part Name Description Right-side door release lever Used when clearing paper misfeeds 3rd drawer Holds up to 500 sheets of paper Storage drawer Can be used to store paper Double Paper Feed Cabinet Part Name Description Right-side door release lever...
- Page 53 2.2 Part Names and Their Functions 22 Upper cover 15 Job separator 21 Primary paper output tray 20 Secondary paper output tray 19 Front door 16 Right- side door 18 Drawer release 17 Large-capacity button paper feed cabinet Job Separator Part Name Description Job separator (optional)
-
Page 54: Inside Of Machine
2.2 Part Names and Their Functions Inside of Machine 1 Toner-cartridge-securing lever 5 Imaging-unit- securing lever 4 Charger- cleaning tool 2 Right-side door 3 LED- cleaning tool Part Name Description Toner-cartridge-securing Used when installing and replacing the toner cartridges lever Right-side door Opened when replacing the fusing unit or clearing misfeeds LED-cleaning tool... -
Page 55: Control Panel
2.2 Part Names and Their Functions Control Panel 6 [Copy] 1 [Utility] key 2 Touch panel 3 Keypad 4 [Box] 5 [Scan] 7 [Power Save] key 17 [Mode 8 [Access] Check] key 9 [Interrupt] 16 [Accessi bility] key 10 [Reset] 15 [Enlarge Display] 14 Contrast dial... - Page 56 2.2 Part Names and Their Functions Part Name Description [C] (clear) key Press to erase a value (such as the number of copies, a zoom ratio, or a size) entered using the keypad. [Stop] key Press the [Stop] key during copying to stop the copy operation. [Start] key •...
-
Page 57: Touch Panel
2.2 Part Names and Their Functions Touch Panel 1 Message display 2 Functions/Mode 4 Job display 3 Settings display setting display 5 Job Log screen Item Name Description Message display The current machine status, operating instructions, warnings and precautions, and other data including the number of copies selected are displayed here. -
Page 58: Operating The Touch Panel
2.2 Part Names and Their Functions Operating the Touch Panel To activate a function or to select a setting, lightly touch the desired function or setting shown on the touch panel. CAUTION Be careful not to damage the touch panel. ➜... -
Page 59: Supplies And Parts
2.2 Part Names and Their Functions Supplies and Parts 2 Image transfer 1 Imaging unit belt unit 3 Image transfer roller unit 4 Waste-toner 5 Fusing unit 6 Dust remover bottle 7 LED-cleaning 8 Toner tool cartridge 9 Ozone filter 10 Filter Part Name Description... -
Page 60: Turning The Machine On And Off
2.3 Turning the Machine On and Off Turning the Machine On and Off Turning On the Machine ➜ Set the power switch to [I]. When the Machine Is Turned On The indicator on the [Start] key lights up in orange. A screen indicating that the machine is starting up appears. -
Page 61: Power Save Mode
2.3 Turning the Machine On and Off Reference For details on the default settings, refer to “Default Settings” on page 2-21. The time until the panel reset timer operation is performed, and whether or not it is performed can be set from Administrator mode. For details, refer to “Setting the “Panel Reset Timer”... -
Page 62: Recovering From Power Save Mode
2.3 Turning the Machine On and Off Recovering From Power Save Mode Press the [Start] key. (The Power Save mode can also be canceled by pressing any key on the operation panel or by touching the touch panel.) The touch panel comes on again, and then after the machine has finished warming up, it is ready to begin printing. -
Page 63: Turning Off The Machine
2.3 Turning the Machine On and Off Turning Off the Machine Touch [Job Log] to check that no jobs are queued. If any copies or printouts remain in the output tray, remove them. Set the power switch to [O]. Reminder! Do not turn off the machine while it is making copies or printing, otherwise a paper misfeed may occur. -
Page 64: Using The Touch Panel
2.4 Using the Touch Panel Using the Touch Panel Description of the Touch Panel The screen that appears when this machine is turned on (the power switch is set to “I”) is the Basic screen. The Basic screen uses graphics and messages to show the currently selected settings, the modes and functions that can be selected, and the status of the machine. - Page 65 2.4 Using the Touch Panel Hint The language of the displays in the touch panel can be changed using the “Language Select” function on the User’s Choice: 2 screen. For details, refer to “Setting the “Language Select” Function” on page 10-16. The default settings that the machine resets all functions to can be specified using the Utility mode.
-
Page 66: Adjusting The Angle Of The Control Panel
2.5 Adjusting the Angle of the Control Panel Adjusting the Angle of the Control Panel The control panel can be adjusted to any of three angles. Adjust the control panel to the angle that allows for easy operation. ➀ Upper position (base position) ➁... -
Page 67: To Adjust The Angle Of The Control Panel
2.5 Adjusting the Angle of the Control Panel To adjust the angle of the control panel Pull the control panel release lever toward you, and then push down on the control panel. The angle of the control panel stops at the middle position. To adjust the control panel to an even steeper angle, pull the control panel release lever... - Page 68 2.5 Adjusting the Angle of the Control Panel To return the control panel to the upper position, pull the control panel release lever toward you, and then pull up on the control panel. C350 2-25...
-
Page 69: Loading Paper Into The 1St Drawer
2.6 Loading Paper Into the 1st Drawer Loading Paper Into the 1st Drawer Reference For details on specifying the paper size for the 1st drawer, refer to “To specify the size of the paper in the 1st drawer” on page 3-19. Pull out the paper drawer for the 1st drawer. - Page 70 2.6 Loading Paper Into the 1st Drawer For “A3Wide” paper, adjust the Trailing-edge Trailing-edge trailing-edge guides as shown in guide guide the illustration. Load the paper into the drawer M mark so that the side of the paper to be printed on (the side facing up when the package was unwrapped) faces up.
- Page 71 2.6 Loading Paper Into the 1st Drawer Reminder! Before loading envelopes, press them down to make sure that all air is removed, and make sure that the folds of the flaps are firmly pressed, otherwise the envelopes may become wrinkled or a paper misfeed may occur.
- Page 72 2.6 Loading Paper Into the 1st Drawer Reminder! When loading postcards, load them with the shorter side as the leading edge, as shown. Do not load postcard crosswise. Lengthwise Crosswise If paper of a non-standard size has been loaded, slide the lateral guides against the edges of the loaded paper.
- Page 73 2.6 Loading Paper Into the 1st Drawer Turn the media type selection dial to the setting for the type of paper loaded. Setting Paper Type Notes Plain Plain Paper Plain Second side of During manual a double-sided double-sided copy on plain copying paper Thick1...
-
Page 74: Loading Paper Into The 2Nd, 3Rd Or 4Th Drawer
2.7 Loading Paper Into the 2nd, 3rd or 4th Drawer Loading Paper Into the 2nd, 3rd or 4th Drawer Pull out the paper drawer. Paper-lifting plate Press down on the paper-lifting plate until it locks into place. Reminder! Be careful not to touch the film. - Page 75 2.7 Loading Paper Into the 2nd, 3rd or 4th Drawer Load the paper into the drawer M mark so that the side of the paper to be printed on (the side facing up when the package was unwrapped) faces up. Reminder! If the paper is curled, flatten it before loading it.
-
Page 76: Loading Paper Into The Large-Capacity Paper Feed Cabinet
2.8 Loading Paper Into the Large-Capacity Paper Feed Cabinet Loading Paper Into the Large-Capacity Paper Feed Cabinet Press the drawer release button. Pull out the paper drawer for the large-capacity paper feed cabinet. Reminder! If the machine is turned off, the paper drawer for the large-capacity paper feed cabinet cannot be pulled out,... - Page 77 2.8 Loading Paper Into the Large-Capacity Paper Feed Cabinet Reminder! Be careful not to touch the film. If the paper is curled, flatten it before loading it. Do not load so many pages that the top of the stack is higher than the M mark.
-
Page 78: Loading Paper Into The Bypass Tray
2.9 Loading Paper Into the Bypass Tray Loading Paper Into the Bypass Tray Paper can be fed manually through the bypass tray if you wish to copy onto paper that is not loaded into a paper drawer, or if you wish to copy onto thick paper, postcards, envelopes, overhead projector transparencies or label sheets. - Page 79 2.9 Loading Paper Into the Bypass Tray Additional Information When making manual double-sided copies, load the paper into the bypass tray so that the second side (the blank side) faces down. The image will be printed on the surface of the paper facing down when the paper is loaded into the bypass tray.
- Page 80 2.9 Loading Paper Into the Bypass Tray Reminder! Do not load more than 20 overhead projector transparencies into the bypass tray. When loading overhead projector transparencies, load them with the longer side as the leading edge, as shown. Do not load overhead projector transparencies lengthwise.
- Page 81 2.9 Loading Paper Into the Bypass Tray Reminder! Do not load more than 10 envelopes into the bypass tray. Before loading envelopes, press them down to make sure that all air is removed, and make sure that the folds of the flaps are firmly pressed, otherwise the Flap side envelopes may become...
- Page 82 2.9 Loading Paper Into the Bypass Tray Reminder! Do not load more than 20 label sheets into the bypass tray. Side to be printed on Side to be printed on C350 2-39...
- Page 83 2.9 Loading Paper Into the Bypass Tray Select the appropriate paper type settings. Hint If postcards are loaded, set the media type selection dial to “Thick2”. If label sheets are loaded, set the media type selection dial to “Thick1”. To print on the back side of previously printed plain paper or thick paper (using manual double-sided copying), select the appropriate paper type setting, and then touch [2nd-Side].
-
Page 84: Feeding The Document
2.10 Feeding the Document 2.10 Feeding the Document Loading the Document Into the Reverse Automatic Document Feeder The reverse automatic document feeder automatically feeds in, scans, then feeds out each page of a multi-page document, one page at a time. The correct type of document must be loaded in order for the reverse automatic document feeder to function properly. - Page 85 2.10 Feeding the Document Adjust the document guides to the size of the document. Reminder! Be sure to load the document correctly, otherwise the pages may not be fed in straight. Touch [Orig Ö Copy]. The Original Ö Copy screen appears. To specify the Original Direction, Margin or Thick Original settings,...
- Page 86 2.10 Feeding the Document Carefully lower the document feed tray. Lever CAUTION Do not press on the lever at the rear of the machine ➜ When closing the document feed tray, otherwise the document feed tray may close quickly and pinch your hand. C350 2-43...
-
Page 87: Placing The Document On The Original Glass
2.10 Feeding the Document Placing the Document On the Original Glass Place the document directly on the original glass for it to be scanned. Each page of the document must be positioned manually (i.e., the previous one must be removed and the next one placed on the original glass). - Page 88 2.10 Feeding the Document Align the document with the document scales. Document scale ❍ For transparent or translucent documents, place a blank sheet of paper of the same size as the document over the document. Blank sheet ❍ For bound documents spread over two facing pages, such as a book or magazine, position the top of the...
- Page 89 2.10 Feeding the Document Reminder! Do not place objects weighing more than 2 kg on the original glass. In addition, do not press down extremely hard on a document placed on the original glass, otherwise the original glass may be damaged. For thick books or large objects, make the copy without closing the original cover or reverse automatic document feeder.
- Page 90 2.10 Feeding the Document Select the desired copy settings, and then press the [Start] key. Scanning of the document begins. Additional Information When using a setting where multiple document pages are to be scanned, such as when making 2in1 copies, the message show below appears after step 6.
- Page 91 2.10 Feeding the Document 2-48 C350...
-
Page 92: Basic Copy Operations
Basic Copy Operations... -
Page 93: Specifying The Number Of Copies
3.1 Specifying the Number of Copies Specifying the Number of Copies The following procedures describe how to specify and change the setting for the number of copies. To specify the number of copies ➜ Using the keypad, specify the desired number of copies. The specified number of copies appears in the touch panel. -
Page 94: To Change The Setting For The Number Of Copies
3.1 Specifying the Number of Copies To change the setting for the number of copies Press the [C] (clear) key. The specified number of copies is cleared, and the setting for the number of copies, shown in the touch panel, is reset to “1”. Using the keypad, specify the desired number of copies. -
Page 95: Stopping Copying
3.2 Stopping Copying Stopping Copying The following procedure describes how to stop printing a copy job. Press the [Stop] key while a job is being printed. Printing stops. A screen for deleting jobs appears. If a document is being scanned for a job, scanning stops when the [Stop] key is pressed. -
Page 96: Selecting A Color Setting
3.3 Selecting a Color Setting Selecting a Color Setting Various Color settings are available for making copies. The following Color settings are available. Auto Color The scanned document is determined to be either in color or in black and white, and then the appropriate Color setting for the document is automatically selected. -
Page 97: To Select The Color Setting
3.3 Selecting a Color Setting To select the Color setting Touch [Color]. A screen appears, showing the available Color settings. Select the desired Color setting. To produce two-color copies, touch [2 Color], and then touch the key for the color to be used for the areas printed in color. - Page 98 3.3 Selecting a Color Setting Additional Information When the “Single Color” setting is selected, the following two methods for reproducing gradations in documents are available. Relative luminosity: The document will be copied using monocolor concentration variations to express color differences (color shading that can be seen with the eye) and gradation levels.
-
Page 99: Selecting Output Settings
3.4 Selecting Output Settings Selecting Output Settings Various settings for sorting and finishing copies are available. Reference The Output settings can be used together with other functions. For details, refer to the “Function Combination Table” on page 14-25. The following copy sorting and finishing methods are available. Condition The “1 Staple”... -
Page 100: Crisscross Sorting (Crisscross Feeding)
3.4 Selecting Output Settings Crisscross Sorting (Crisscross Feeding) If no finisher is installed and all of the following conditions are met, printed copies can be fed out and sorted in an alternating crisscross pattern. A4 or B5-size paper is used. Paper of the same size and type is loaded with the portrait orientation in one paper drawer and with the landscape orientation in another drawer. -
Page 101: Stapling (With Finisher Fs-501 Installed)
3.4 Selecting Output Settings Stapling (with finisher FS-501 installed) The copies are bound together with a staple in the corner. However, the pages can be stapled only if all of the following conditions are met. There are between 2 and 30 pages in the document. If standard-size paper is used, the paper sizes must be A3 L, A4 L and A4 C. -
Page 102: Hole-Punching
3.4 Selecting Output Settings Hole-Punching Holes for filing copies in binders can be punched. The position of the punched holes can be specified along the left side or along the top of the paper. However, the holes can be punched only if all of the following conditions are met. Finisher FS-601 is installed. -
Page 103: To Specify Output Settings
3.4 Selecting Output Settings To specify Output settings Condition If a stapling or hole-punching setting is selected, be sure to load the document so that it is positioned correctly. If the document is not positioned correctly, the staples or punched holes will not be positioned correctly. The correct position of the document is shown in the screen. -
Page 104: Specifying A Zoom Setting
3.5 Specifying a Zoom Setting Specifying a Zoom Setting The zoom ratio can be set in order to make a copy on paper with a size different than the document or to enlarge or reduce the size of the documents. The zoom ratio can be specified in any of the following ways. -
Page 105: Zooming
3.5 Specifying a Zoom Setting Zooming Any zoom ratio (between ×0.250 and ×4.000) can be specified. Touch to select the desired zoom ratio. Each time a key is touched, the zoom ratio is increased or decreased by an increment of ×0.001. Custom Sizing (Manual Zoom Settings) Entering the zoom ratio Any zoom ratio (between ×0.250 and ×4.000) can be specified. -
Page 106: To Enter A Manual Zoom Ratio
3.5 Specifying a Zoom Setting To enter a Manual Zoom ratio Touch [Zoom]. A screen appears, showing the available Zoom settings. Touch [Manual Zoom]. Using the keypad, type in the desired zoom ratio (between ×0.250 and ×4.000). The entered zoom ratio is displayed. Touch [Enter]. -
Page 107: To Recall A Stored Manual Zoom Ratio
3.5 Specifying a Zoom Setting To recall a stored Manual Zoom ratio Touch [Zoom]. A screen appears, showing the available Zoom settings. Touch [Manual Zoom]. Touch [Set]. Touch [1], [2] or [Minimal]. Touch [Enter]. The stored zoom ratio is recalled. 3-16 C350... -
Page 108: To Specify Different Vertical And Horizontal Scaling Proportions (X/Y Zoom Settings)
3.5 Specifying a Zoom Setting To specify different vertical and horizontal scaling proportions (X/Y Zoom settings) Touch [Zoom]. A screen appears, showing the available Zoom settings. Touch [Manual Zoom]. Touch [X/Y Zoom]. The X/Y Zoom screen appears. Make sure that [X] is selected. -
Page 109: Selecting A Paper/Size Setting
3.6 Selecting a Paper/Size Setting Selecting a Paper/Size Setting The paper used for making copies can be selected. The paper source can be selected in any of the following methods. Automatic Paper Selection (“Auto Paper Select” Setting) The most appropriate paper size is automatically selected based on the size of the loaded document and the specified zoom ratio. -
Page 110: To Select The Paper Drawer
3.6 Selecting a Paper/Size Setting To select the paper drawer Touch [Paper/Size]. A screen appears, showing the available paper drawers. Touch the key for the desired paper drawer. To specify the size of the paper in the 1st drawer Since the size of standard-sized paper loaded into the 1st drawer is automatically detected, it is usually not necessary to set the paper size. - Page 111 3.6 Selecting a Paper/Size Setting Select the setting for the size of paper that is loaded. ❍ If the desired paper size is not listed, touch [Other Sizes], and then select the paper size. Reference For details on specifying a custom paper size, refer to “To set a non-standard (custom) paper size”...
-
Page 112: To Specify The Size Of The Paper In The Bypass Tray
3.6 Selecting a Paper/Size Setting To specify the size of the paper in the bypass tray Paper can be fed manually through the bypass tray if you wish to copy onto paper that is not loaded into a paper drawer, or if you wish to copy onto special paper. Reference For details on loading the paper into the bypass tray, refer to “Loading Paper Into the Bypass Tray”... -
Page 113: To Set A Non-Standard (Custom) Paper Size
3.6 Selecting a Paper/Size Setting Select the type of paper to be loaded. Touch [Enter]. To set a non-standard (custom) paper size Non-standard-sized paper can be loaded into the 1st drawer or the bypass tray. If non-standard-sized paper is loaded, it will be necessary to enter the paper size. The following procedure describes how to specify the size of non-standard paper loaded into the 1st drawer. -
Page 114: To Store A Non-Standard (Custom) Paper Size
3.6 Selecting a Paper/Size Setting Touch [Y]. Using the keypad, type in the length of side Y. The entered length of side Y appears. Touch [Enter]. The paper size for the 1st drawer is set. To store a non-standard (custom) paper size Two non-standard paper sizes can be stored. -
Page 115: To Select A Stored Non-Standard (Custom) Paper Size
3.6 Selecting a Paper/Size Setting Touch [Size Registration]. The Size Registration screen appears. Touch either [1] or [2]. Touch [Enter], and then touch [Enter] in the Custom Size screen. The custom paper size is stored. To select a stored non-standard (custom) paper size Non-standard paper sizes that are already stored in the machine can be recalled and used. -
Page 116: To Specify The Bypass Reserve Settings For The Bypass Tray
3.6 Selecting a Paper/Size Setting Touch either [1] or [2] to select the paper size. Touch [Enter], and then touch [Enter] in the Size Input screen. The paper size for the 1st drawer is set to the recalled size. To specify the Bypass Reserve settings for the bypass tray If paper of the desired size or type is not loaded into any paper drawer or the bypass tray, the Bypass Reserve settings can be specified so that printing can begin when paper of the appropriate size is loaded into the bypass tray. - Page 117 3.6 Selecting a Paper/Size Setting Select the desired paper size. Hint Screens containing other paper sizes can be displayed by touching [Custom Size] or [Other Sizes]. Touch [Paper Type]. Select the desired paper type. Touch [Enter]. The message “Job has been stopped. To resume job press the Start Key.” appears.
-
Page 118: Selecting Original Settings
3.7 Selecting Original Settings Selecting Original Settings The type and conditions of the document that you wish to copy can be selected. Reference For details on specifying the type of copy, refer to “Selecting Copy Settings” on page 3-37. The following Original settings are available. Single-Sided Original (“1”... - Page 119 3.7 Selecting Original Settings Book Spread (“Spread” Book setting) Select this setting to make a single copy containing both of the two pages of a page spread, such as an open book or pamphlet. Book-Margin-Erasing (Frame/Center Erase settings) Select the desired settings to erase the area along the binding or around the text of copies produced from a page spread, such as an open book or pamphlet.
-
Page 120: Document Orientation (Original Direction Setting)
3.7 Selecting Original Settings The document condition can be specified in any of the following ways. Document Orientation (Original Direction Setting) The orientation of the document can be specified. Select the setting according to the document orientation. Select this setting for a portrait document with the top toward the rear of this machine. - Page 121 3.7 Selecting Original Settings Condition If no Original Direction setting is selected, documents loaded crosswise will be copied with the portrait orientation and documents loaded lengthwise will be copied with the landscape orientation. Loaded crosswise: Portrait orientation Loaded lengthwise: Landscape orientation Additional Information Portrait and landscape orientations With the portrait orientation, the paper is vertical, like with portraits or photos of...
-
Page 122: Document Binding Margin Position (Margin Setting)
3.7 Selecting Original Settings Document Binding Margin Position (Margin Setting) If a document with a binding margin is being copied, the position of the binding margin can be specified. Select the setting appropriate for the binding margin of the document. Select this setting if the document is loaded with the binding margin at the left. -
Page 123: To Specify Original Settings
3.7 Selecting Original Settings To specify Original settings Touch [Orig Ö Copy]. The Original Ö Copy screen appears. Select the Original setting appropriate for the document to be copied. To specify Book Copy settings Touch [Orig Ö Copy]. The Original Ö Copy screen appears. Touch [Book Copy]. - Page 124 3.7 Selecting Original Settings Touch [L] below the desired Frame/Center Erase setting. If the settings for frame-erasing or center- & frame-erasing are selected, touch to specify the width of the area at the book edges to be erased. The width of the area erased with the center-erasing setting cannot be changed by touching Reminder! After selecting a Frame/Center Erase setting, be sure to touch [Original...
- Page 125 3.7 Selecting Original Settings If the desired document size is not listed, touch [Other Sizes] to display a screen containing additional document sizes. ❍ Select the appropriate document size, and then touch [Enter]. To specify a photo size or a non-standard size, touch [Photo Size or Custom Size].
-
Page 126: To Specify Conditions Of The Original
3.7 Selecting Original Settings To specify conditions of the original As the factory default, no setting is selected. Condition If the “Book Copy” setting was selected, [Original Direction] is not available. Touch [Orig ÖCopy]. The Original ÖCopy screen appears. Touch [Original Direction]. - Page 127 3.7 Selecting Original Settings Touch [L] below the Original Direction setting appropriate for the document to be copied, and then touch [Enter]. Hint When copying a double-sided document or using a double-sided, 2in1 or 4in1 Copy setting, if the document orientation and document loading direction are not...
-
Page 128: Selecting Copy Settings
3.8 Selecting Copy Settings Selecting Copy Settings The desired type of copy can be selected. For details on specifying the type of original, refer to “Selecting Original Settings” on page 3-27. The following Copy settings are available. Condition Double-sided (“2” setting), double-sided 2in1 (“2-2in1” setting), double-sided 4in1 (“2-4in1”... -
Page 129: Single-Sided Copy ("1" Setting)
3.8 Selecting Copy Settings Single-Sided Copy (“1” Setting) Select this setting to produce single-sided copies. Double-Sided Copy (“2” Setting) Select this setting to use the automatic duplex unit to produce double- sided copies. With this setting, paper usage can be reduced by about half. Hint Automatic double-sided copying cannot be performed with paper other than plain paper. -
Page 130: Single-Sided 4In1 Copy ("1-4In1" Setting)
3.8 Selecting Copy Settings Single-Sided 4in1 Copy (“1-4in1” Setting) Select this setting to reduce four document pages to fit one single- sided copy page. With this setting, paper usage can be reduced by about one quarter. Hint The copy order during 4in1 copying can be specified using the “4in1 Copy Order”... -
Page 131: Booklet Copy ("Booklet" Setting)
3.8 Selecting Copy Settings Booklet Copy (“Booklet” Setting) Select this setting to lay out the document for booklet-making and copy it onto both sides of the paper. The page order differs than with the “2-2in1” setting. Example: For 8 single-sided document pages 3-40 C350... -
Page 132: Bound Booklet ("Bind" And "Center Erase" Settings)
3.8 Selecting Copy Settings Bound Booklet (“Bind” and “Center Erase” Settings) Select these setting to bind copies with staples and fold them along the center. (The copies will be made into a booklet.) If the number of pages in the document cannot be evenly divided by 4, the necessary number of blank pages are automatically added to the booklet. -
Page 133: Conditions For Making Booklets
3.8 Selecting Copy Settings Hint The copy zoom ratio during 2in1 copying, 4in1 copying and booklet binding can be specified using the “2in1, 4in1, Booklet Copy Zoom” function on the User’s Choice: 2 screen. For details, refer to “Setting the “2in1, 4in1, Booklet Copy Zoom”... -
Page 134: To Specify Copy Settings
3.8 Selecting Copy Settings To specify Copy settings Touch [Orig Ö Copy]. The Original Ö Copy screen appears. Select the desired Copy setting. ❍ To select 4in1 or double-sided 2in1 copying or booklet copying, touch [4in1/Booklet]. C350 3-43... -
Page 135: To Select The Bind Setting
3.8 Selecting Copy Settings To select the Bind setting Hint [Bind] appears only if the optional finisher FS-601 is installed. Touch [Orig Ö Copy]. The Original Ö Copy screen appears. Touch [4in1/ Booklet]. The 4in1/Booklet screen appears. Touch [Booklet] . [Bind] appears. -
Page 136: Selecting Photo/Density Settings
3.9 Selecting Photo/Density Settings Selecting Photo/Density Settings The print result can be adjusted according to the image quality of the document. The following Photo/Density settings are available. Image Types “Text&Photo” setting Select this setting when copying documents containing both text and images. -
Page 137: Background Setting Of "Density" Parameter (Manual)
3.9 Selecting Photo/Density Settings “Dot Matrix Original” setting (“Text” setting) Select this setting when copying documents consisting only of text that appears faint (such as that written with a pencil). The copied text is reproduced so that it is darker, providing text that is easy to read. -
Page 138: Glossy" Setting
3.9 Selecting Photo/Density Settings “Glossy” Setting Select this setting when copying images with a glossy finish. Screen Pattern Settings Select the appropriate setting for reducing moire patterns that occur when copying printed photographs (which contain shading) or documents containing lines. The Screen Pattern settings are available if the “Text&Photo”, “Photo Paper”, “Printed Image”... -
Page 139: To Select A Glossy Finish ("Glossy" Setting)
3.9 Selecting Photo/Density Settings When copying a document with a background color or to adjust the copy density, touch [Density]. The Density screen appears. ❍ To manually specify the density of the background color, touch the Lighter and Darker keys to adjust the Background setting. -
Page 140: To Select A Screen Pattern Setting
3.9 Selecting Photo/Density Settings To select a Screen Pattern setting If moire patterns appears in the copied paper, change the Screen Pattern setting, and then make another copy to compare the effects. Make the copies using the Screen Pattern setting that results in the least moire patterns. Touch [Photo/Density]. - Page 141 3.9 Selecting Photo/Density Settings 3-50 C350...
-
Page 142: Copy Paper
Copy Paper... -
Page 143: Paper Specifications
4.1 Paper Specifications Paper Specifications Use paper that meets the following specifications. Reference For details on loading paper into the machine, refer to corresponding sections in “Before Making Copies” on page 2-1. Paper Types Paper Type Plain Paper Thick Paper 1 Thick Paper 2 Thick Paper 3 Weight (g/m... -
Page 144: Paper Sizes
4.1 Paper Specifications If the optional automatic duplex unit is used to make double-sided copies, only certain types of paper can be used. When making double-sided copies, only use paper with a weight between 64 g/m and 90 g/m If the optional finisher is used to sort, punch holes and staple, only certain types of paper can be used. -
Page 145: Paper Capacity
4.1 Paper Specifications Paper Size A5 L A5 C B6 L A6 L Paper Source, Etc. Large-capacity paper feed — — — — cabinet* Double-sided copies — — — — Finished copies The single and double paper feed cabinets and the large-capacity paper feed cabinet are optional. - Page 146 4.1 Paper Specifications Reminder! The following types of paper should not be used, otherwise decreased print quality, paper misfeeds or damage to the machine may occur. Overhead projector transparencies that have already been fed through the machine (even if the transparency is still blank) Paper that has been printed on by a heat-transfer printer or an inkjet printer Paper that is either extremely thick or extremely thin Folded, curled, wrinkled, or torn paper...
-
Page 147: Print Area
4.2 Print Area Print Area Any part of the image within the area indicated below is not printed. A margin 5 mm from the leading edge of the paper (A) A margin 3 mm from the leading edge of the paper (B) A margin 3 mm on both sides of the paper (C) Paper output direction A: 5 mm... -
Page 148: Paper Storage
4.3 Paper Storage Paper Storage Observe the following precautions when storing the paper. Store the paper in a location that meets the following requirements. ❍ Not exposed to direct sunlight ❍ Not exposed to a flame ❍ Not exposed to high humidity ❍... -
Page 149: Automatically Selecting The Paper Source
4.4 Automatically Selecting the Paper Source Automatically Selecting the Paper Source If the selected paper drawer runs out of paper while a copy job is being printed and a different paper drawer is loaded with paper meeting the following conditions, the other paper drawer is automatically selected so printing can continue. -
Page 150: Special Paper
4.5 Special Paper Special Paper The paper loaded into the 2nd, 3rd or 4th drawer can be specified as special paper. If the paper in a drawer is specified as special paper, the paper in that drawer is not automatically selected with the “Auto Paper Select” setting. (However, that paper will automatically be selected if the “Paper Type Select”... - Page 151 4.5 Special Paper 4-10 C350...
-
Page 152: Original Documents
Original Documents... -
Page 153: Document Feeding
5.1 Document Feeding Document Feeding Document Feeding Methods The document can be fed in either of the following two ways. Be sure to position the document correctly according to the type of document being copied. Reference For details on feeding the document, refer to “Feeding the Document” on page 2-41. - Page 154 5.1 Document Feeding Thick paper Single-Sided Documents Document paper type/ Plain paper: 129 g/m to 210 g/m Weight A3 L, B4 L, A4 L/C, B5 L/C, A5 L/C, B6 L, 11 × 15, Foolscap* Document paper size Paper capacity 38 sheets (210 g/m * The default Foolscap size is 330 mm ×...
-
Page 155: Document Precautions (Using The Reverse Automatic Document Feeder)
5.1 Document Feeding Document Precautions (Using the Reverse Automatic Document Feeder) The following types of documents should not be loaded into the reverse automatic document feeder, otherwise paper misfeeds or damage to the document may occur. Instead, these types of documents should be positioned on the original glass. -
Page 156: Document Precautions (Using The Original Glass)
5.1 Document Feeding Document Precautions (Using the Original Glass) Observe the following precautions when placing the document on the original glass. Handle the documents as described. Standard-/non-standard-sized documents The paper size of documents printed on Letter C, Ledger L, 11 × 17, Foolscap paper cannot be automatically detected. - Page 157 5.1 Document Feeding C350...
-
Page 158: Additional Copy Operations
Additional Copy Operations... -
Page 159: Blocking Document Scan Storage ("Reprint Off" Function)
6.1 Blocking Document Scan Storage (“Reprint OFF” Function) Blocking Document Scan Storage (“Reprint OFF” Function) If the “Reprint” function is set to “Yes”, touching [Reprint OFF] temporarily suspends the reprint feature, preventing the scanned document from being stored in the memory. -
Page 160: Copying Documents Of Mixed Sizes ("Mixed Original" Function)
6.2 Copying Documents of Mixed Sizes (“Mixed Original” Function) Copying Documents of Mixed Sizes (“Mixed Original” Function) With the “Mixed Original” function, documents of various standard sizes can be loaded into the reverse automatic document feeder and scanned. There are two ways to copy documents of mixed page sizes. With the paper automatically selected The copies are produced using paper of the same size as the document pages. -
Page 161: To Copy Documents Of Mixed Sizes
6.2 Copying Documents of Mixed Sizes (“Mixed Original” Function) To copy documents of mixed sizes Stack the pages of the document face up as shown, making sure that all pages are aligned at the top edge and on the left side. Slide the adjustable document guides to fit the size of the largest page. - Page 162 6.2 Copying Documents of Mixed Sizes (“Mixed Original” Function) In the Basic screen, touch [Mixed Original]. ❍ To copy with the paper automatically selected, select the “×1.0” Zoom setting and the “Auto Paper Select” Paper setting. ❍ To copy with the zoom ratio automatically selected, select the...
-
Page 163: Printing Sample Copies ("Copy 1 Set" Function)
6.3 Printing Sample Copies (“Copy 1 Set” Function) Printing Sample Copies (“Copy 1 Set” Function) Before printing a large number of copies, a sample copy can be printed so that it can be checked. This allows copy errors to be corrected before a large number of copies are printed. - Page 164 6.3 Printing Sample Copies (“Copy 1 Set” Function) ❍ If the remaining number of copies cannot be printed with the current settings, touch [No]. The remaining number of copies for the job are erased. The message “Job has been done improperly.
-
Page 165: Interrupting A Copy Job (Interrupt Mode)
6.4 Interrupting a Copy Job (Interrupt Mode) Interrupting a Copy Job (Interrupt Mode) The copy job being printed can be interrupted. This is useful for pausing the current copy job in order to make a quick copy of a different document. Reference For details on interrupting a copy job when printing of the current job is finished (without interrupting the copy job being printed), refer to “Increase Priority... - Page 166 6.4 Interrupting a Copy Job (Interrupt Mode) Select the desired copy settings. Press the [Start] key. The job that printing was interrupted for is added to the queue. After the interrupting job is finished printing, press the [Interrupt] key. The indicator on the [Interrupt] key goes off and Interrupt mode is canceled. Hint When printing for the interrupting job is finished, printing of the interrupted job automatically continues.
-
Page 167: Making Copies With An Account
6.5 Making Copies With an Account Making Copies With an Account Using the Volume Track Mode (E.K.C.) The total number of copies allowed and the number of copies allowed for certain paper sizes can be set for up to 998 accounts. If the “Volume Track Mode”... - Page 168 6.5 Making Copies With an Account Press the [Access] key. The access number input screen disappears, and the Basic screen appears. Make copies using the desired copy settings. When you are finished making copies, press the [Access] key. The access number input screen appears again.
-
Page 169: Setting The "Key Repeat Start/Interval" Function (Accessibility Mode)
6.6 Setting the “Key Repeat Start/Interval” Function (Accessibility Mode) Setting the “Key Repeat Start/Interval” Function (Accessibility Mode) The length of time until a value begins to change when a touch panel key for changing the value is held down can be specified. (The default setting for the start time is 0.8 second and the default setting for the repeat interval is 0.3 second.) Condition The settings for the repeat feature are only applied in the Enlarge Display mode;... - Page 170 6.6 Setting the “Key Repeat Start/Interval” Function (Accessibility Mode) Touch [Key Repeat Start/Interval]. Touch to specify the desired length of time until the repeat feature for a key starts (between 0.1 and 3.0 seconds). Touch [Enter]. Touch [Exit]. C350 6-13...
-
Page 171: Setting The "Enlarged Display Clear Check" Function (Accessibility Mode)
6.7 Setting the “Enlarged Display Clear Check” Function (Accessibility Mode) Setting the “Enlarged Display Clear Check” Function (Accessibility Mode) When the panel reset timer operation is performed, a message requesting confirmation to cancel the Enlarge Display mode can be displayed. (The default setting is “No”.) In addition, it is possible to specify the display time for the message requesting confirmation to cancel the Enlarge Display mode. - Page 172 6.7 Setting the “Enlarged Display Clear Check” Function (Accessibility Mode) Touch [Enter]. Touch [Exit]. C350 6-15...
-
Page 173: Checking The Settings
6.8 Checking the Settings Checking the Settings From the Mode Check screens, the current settings can be check and changed if desired. There are five screens that allow you to check the settings. To check the settings Press the [Mode Check] key. The screen showing the current settings appears. - Page 174 6.8 Checking the Settings C350 6-17...
-
Page 175: To Change The Settings
6.8 Checking the Settings To change the settings Press the [Mode Check] key. Touch [Next] or [Previous] until the screen containing the setting that you wish to change appears. Touch the key for the setting that you wish to change. The corresponding screen appears. -
Page 176: Application Functions
Application Functions... -
Page 177: Storing The Scanned Image In The Memory ("Scan To Memory" Function)
7.1 Storing the Scanned Image in the Memory (“Scan to Memory” Function) Storing the Scanned Image in the Memory (“Scan to Memory” Function) This function allows the scanned image to be stored in the memory and printed only when it is deleted from the memory. This is useful, for example, when you wish to combine the job with another to print multiple jobs as one. -
Page 178: Scanning The Document In Separate Batches ("Separate Scan" Function)
7.2 Scanning the Document in Separate Batches (“Separate Scan” Function) Scanning the Document in Separate Batches (“Separate Scan” Function) A document can be divided and scanned in a number of batches, then be combined and treated as a single copy job. The maximum number of document pages that can be loaded into the reverse automatic document feeder is 100*. -
Page 179: To Use The "Separate Scan" Function
7.2 Scanning the Document in Separate Batches (“Separate Scan” Function) To use the “Separate Scan” function Touch [Application]. The Application screen appears. Touch [Separate Scan]. ❍ To cancel the “Separate Scan” function, touch [Separate Scan] again. If necessary, specify any other copy settings. Position the document(s) to be copied. -
Page 180: Printing Distribution Numbers On Copies ("Set Numbering" Function)
7.3 Printing Distribution Numbers on Copies (“Set Numbering” Function) Printing Distribution Numbers on Copies (“Set Numbering” Function) When printing multiple copies of a document, each copy set can be printed with a distribution number in the background. Document Copy Condition The “Set Numbering”... - Page 181 7.3 Printing Distribution Numbers on Copies (“Set Numbering” Function) Touch [Set Numbering]. Hint When the “Set Numbering” function is used, the “Sort” Output setting is automatically selected. If two or more copies are being printed, the distribution number increases by 1 with each consecutive copy set.
- Page 182 7.3 Printing Distribution Numbers on Copies (“Set Numbering” Function) If necessary, specify any other copy settings. Press the [Start] key. C350...
-
Page 183: Making Copies For Filing ("File Margin" Function)
7.4 Making Copies for Filing (“File Margin” Function) Making Copies for Filing (“File Margin” Function) Copies can be made with a file margin so they can easily be stored in filing binders. The following binding margin positions are available. Select the binding margin position suitable for the document. - Page 184 7.4 Making Copies for Filing (“File Margin” Function) Specify the desired binding margin position, and then specify the desired width. ❍ To cancel the “File Margin” function, touch [Cancel] in the File Margin screen. Additional Information If the document is not loaded in the direction shown in the screen, specify Ö...
-
Page 185: Erasing Sections Of Copies ("Edge/Frame Erase" Function)
7.5 Erasing Sections of Copies (“Edge/Frame Erase” Function) Erasing Sections of Copies (“Edge/Frame Erase” Function) Areas such as the unclean-looking frames around copies can be erased. The following locations for erasing the edge/frame of the document are available. Select the erasing location suitable for the document. Setting Copy Position Description... -
Page 186: To Use The "Edge/Frame Erase" Function
7.5 Erasing Sections of Copies (“Edge/Frame Erase” Function) To use the “Edge/Frame Erase” function Position the document(s) to be copied. Reference For details, refer to “Feeding the Document” on page 2-41. Touch [Application]. The Application screen appears. Touch [Edge/Frame Erase]. Select the desired area to be erased. - Page 187 7.5 Erasing Sections of Copies (“Edge/Frame Erase” Function) Additional Information The specified width of the area to be erased is the width before copying. Therefore, be careful when selecting this setting while making enlarged or reduced copies. Example) When erasing a frame around an A3-size document and copying with a zoom ratio of ×0.500 Original (A3 L) Copy (A5 L)
- Page 188 7.5 Erasing Sections of Copies (“Edge/Frame Erase” Function) Normally, the document size is automatically detected. However, if you wish to specify the document size, touch [Original Size Input]. ❍ Select the document size, and then touch [Enter]. If the desired document size is not listed, touch [Other Sizes] to display a screen containing additional document sizes.
- Page 189 7.5 Erasing Sections of Copies (“Edge/Frame Erase” Function) In the Edge/Frame Erase screen, touch [Enter]. ❍ To cancel the “Edge/Frame Erase” function, touch [Cancel] in the Edge/ Frame Erase screen. If necessary, specify any other copy settings. Press the [Start] key. 7-14 C350...
-
Page 190: Adjusting The Document Image ("Image Adjustment" Function)
7.6 Adjusting the Document Image (“Image Adjustment” Function) Adjusting the Document Image (“Image Adjustment” Function) If the document size is different from the paper size, the document image can be enlarged to fill the copy paper. The image can be adjusted in either of the following two ways. “Full Size”... -
Page 191: To Use The "Image Adjustment" Function
7.6 Adjusting the Document Image (“Image Adjustment” Function) To use the “Image Adjustment” function Place the document on the original glass. Reference For details, refer to “Feeding the Document” on page 2-41. Touch [Application]. The Application screen appears. Touch [Image Adjustment]. - Page 192 7.6 Adjusting the Document Image (“Image Adjustment” Function) Normally, the document size is automatically detected. However, if you wish to specify the document size, touch [Original Size Input]. ❍ Select the document size, and then touch [Enter]. If the desired document size is not listed, touch [Other Sizes] to display a screen containing additional document sizes.
- Page 193 7.6 Adjusting the Document Image (“Image Adjustment” Function) In the Image Adjustment screen, touch [Enter]. ❍ To cancel the “Image Adjustment” function, touch [Cancel] in the Image Adjustment screen. If necessary, specify any other copy settings. Press the [Start] key. 7-18 C350...
-
Page 194: Tiling Copy Images ("Image Repeat" Function)
7.7 Tiling Copy Images (“Image Repeat” Function) Tiling Copy Images (“Image Repeat” Function) Multiple copies of an original can be printed in a single sheet of paper. The number of copies printed in a page (the number of times the image is repeated) is set according to the document size, zoom ratio, paper size and print area settings. - Page 195 7.7 Tiling Copy Images (“Image Repeat” Function) Select either [With Margin] or [Without Margin]. ❍ To reduce the image so that it fits within the allowable print area for the paper (inside the area that excludes the margins), touch [With Margin]. ❍...
- Page 196 7.7 Tiling Copy Images (“Image Repeat” Function) To specify a photo size or a non-standard size, touch [Photo Size or Custom Size]. ❍ Select a photo size, or touch [X] and [Y], and use the keypad to specify the size of the original, and then touch [Enter].
-
Page 197: Inserting Paper Between Transparencies ("Ohp Interleave" Function)
7.8 Inserting Paper Between Transparencies (“OHP Interleave” Function) Inserting Paper Between Transparencies (“OHP Interleave” Function) After each overhead transparency is copied, a page from a different paper source can be added to the stack of transparencies as an overleaf. In order to use this function, the overhead transparencies should be loaded into the 1st drawer. - Page 198 7.8 Inserting Paper Between Transparencies (“OHP Interleave” Function) Select the paper drawer loaded with the paper for the interleaves, and then touch [Enter]. ❍ To cancel the “OHP Interleave” function, touch [Cancel] in the OHP Interleave screen. If necessary, specify any other copy settings. Press the [Start] key.
-
Page 199: Making Bound Booklets ("Booklet Original" Function)
7.9 Making Bound Booklets (“Booklet Original” Function) Making Bound Booklets (“Booklet Original” Function) Booklets with their staples removed can be copied and bound to create booklet copies. Condition The “Booklet Original” function is only available if the optional finisher FS-601 is installed. - Page 200 7.9 Making Bound Booklets (“Booklet Original” Function) When using the reverse automatic document feeder Spread out the booklet from the middle, and then load it into the reverse automatic document feeder with the front cover at the top. Reminder! Be sure to load a document consisting of 2 to 10 pages. If the document consists of too many pages, the booklet cannot be bound.
- Page 201 7.9 Making Bound Booklets (“Booklet Original” Function) According to how the document will be fed, select “Original Glass” or “Document Feeder”. Touch [Enter]. ❍ To cancel the “Booklet Original” function, touch [Cancel] in the Booklet Original screen. If necessary, specify any other copy settings. Press the [Start] key.
-
Page 202: Improving Color Copy Quality (Color Image Adjustment Parameters)
7.10 Improving Color Copy Quality (Color Image Adjustment Parameters) 7.10 Improving Color Copy Quality (Color Image Adjustment Parameters) By making various color adjustments, you can adjust the quality of color copies as desired. Reference Samples for the Color Image Adjustment parameters can be seen in the Creative Image Book. - Page 203 7.10 Improving Color Copy Quality (Color Image Adjustment Parameters) Touch select the desired setting, and then touch [Enter]. ❍ To cancel the “Brightness” function, touch [Cancel] in the Brightness screen. Additional Information A sample copy can be printed in order to check the print result with the current settings.
-
Page 204: To Adjust The "Contrast" Parameter
7.10 Improving Color Copy Quality (Color Image Adjustment Parameters) To adjust the “Contrast” parameter This parameter can be used to make the image either crisper or smoother. Touch [Application], and then touch [Color Image Adjustment]. In the Color Image Adjustment screen, touch [Contrast]. -
Page 205: To Adjust The "Saturation" Parameter
7.10 Improving Color Copy Quality (Color Image Adjustment Parameters) To adjust the “Saturation” parameter This parameter can be used to adjust the vividness of the colors in the image. Touch [Application], and then touch [Color Image Adjustment]. In the Color Image Adjustment screen, touch [Saturation]. -
Page 206: To Adjust The "Sharpness" Parameter
7.10 Improving Color Copy Quality (Color Image Adjustment Parameters) To adjust the “Sharpness” parameter This parameter emphasizes the edges of text so that they can be read more easily. In addition, this parameter can be used to make an overly sharp image softer or a blurry image clearer. -
Page 207: To Adjust The "Red" Parameter
7.10 Improving Color Copy Quality (Color Image Adjustment Parameters) To adjust the “Red” parameter This parameter is used to adjust the level of red in the image. Touch [Application], and then touch [Color Image Adjustment]. In the Color Image Adjustment screen, touch [Red]. -
Page 208: To Adjust The "Green" Parameter
7.10 Improving Color Copy Quality (Color Image Adjustment Parameters) To adjust the “Green” parameter This parameter can be used to adjust the level of green in the image. Touch [Application], and then touch [Color Image Adjustment]. In the Color Image Adjustment screen, touch [Green]. -
Page 209: To Adjust The "Blue" Parameter
7.10 Improving Color Copy Quality (Color Image Adjustment Parameters) To adjust the “Blue” parameter This parameter is used to adjust the level of blue in the image. Touch [Application], and then touch [Color Image Adjustment]. In the Color Image Adjustment screen, touch [Blue]. -
Page 210: To Adjust The "Color Balance" Parameter
7.10 Improving Color Copy Quality (Color Image Adjustment Parameters) To adjust the “Color Balance” parameter This parameter can be used to adjust the individual concentrations of cyan (C), magenta (M), yellow (Y), and black (Bk). To increase the red tinge: Increase the amount of yellow and magenta. - Page 211 7.10 Improving Color Copy Quality (Color Image Adjustment Parameters) In the Color Image Adjustment screen, touch [Color Balance]. Touch the key for the color that you wish to adjust, and then touch specify the desired setting. Touch [Enter]. ❍ To cancel the “Color Balance” function, touch [Cancel] in the Color Balance screen.
-
Page 212: To Adjust The "Portrait" Parameter
7.10 Improving Color Copy Quality (Color Image Adjustment Parameters) To adjust the “Portrait” parameter This parameter can be used to adjust the tint of flesh tones. Touch [Application], and then touch [Color Image Adjustment]. In the Color Image Adjustment screen, touch [Portrait]. -
Page 213: To Adjust The "Hue" Parameter
7.10 Improving Color Copy Quality (Color Image Adjustment Parameters) To adjust the “Hue” parameter The hue is divided into magenta, yellow and cyan. By adjusting the hue, the image can be made either more reddish or more bluish. Touch [Application], and then touch [Color Image Adjustment]. -
Page 214: To Adjust The "Copy Density" Parameter
7.10 Improving Color Copy Quality (Color Image Adjustment Parameters) To adjust the “Copy Density” parameter This parameter can be used to finely adjust the copy density to any of 19 levels between -3 and +3. Touch [Application], and then touch [Color Image Adjustment]. -
Page 215: To Make Sample Copies
7.10 Improving Color Copy Quality (Color Image Adjustment Parameters) To make sample copies From each screen for the Color Image Adjust parameters, you can make Sample Copies of your document to see how it will appear with the currently specified color adjustment settings. -
Page 216: Editing Images (Creation Functions)
7.11 Editing Images (Creation Functions) 7.11 Editing Images (Creation Functions) The Creation functions can be used to easily apply special effects to the copies. Reference Samples for the Creation functions can be seen in the Creative Image Book. The following Creation functions are available. To make settings for the “Background Color”... - Page 217 7.11 Editing Images (Creation Functions) Select the desired color, and then touch [Enter]. ❍ The colors are listed on two screens. Touch [Background Color 2] in the lower-right corner to display the next screen. Touch [Background Color 1] to return to the previous screen.
-
Page 218: To Make Settings For The "Color Separation" Function
7.11 Editing Images (Creation Functions) To make settings for the “Color Separation” function This function allows you to make copies of a document with its colors separated into cyan (C), magenta (M), yellow (Y) and black (Bk). In addition, copies of the separated colors can be printed in just black. - Page 219 7.11 Editing Images (Creation Functions) Select either [Each] or [Black] , and then touch [Enter]. ❍ To cancel the “Color Separation” function, touch [Cancel] in the Color Separation screen. If necessary, specify any other copy settings. Press the [Start] key. 7-44 C350...
-
Page 220: To Set The "Neg. Pos. Reverse" Function
7.11 Editing Images (Creation Functions) To set the “Neg. Pos. Reverse” function This function allows you to copy a document with the light- and dark-colored areas or the colors of the image inversed. Position the document(s) to be copied. Reference For details, refer to “Feeding the Document”... -
Page 221: To Make Settings For The "Multi-Page Enlargement" Function
7.11 Editing Images (Creation Functions) To make settings for the “Multi-Page Enlargement” function This function allows you to copy a document automatically split into parts with each part printed enlarged. These copies can then be put together to make a large poster. - Page 222 7.11 Editing Images (Creation Functions) Normally, the document size is automatically detected. However, if you wish to specify the document size, touch [Original Size Input]. ❍ Select the document size, and then touch [Enter]. If the desired document size is not listed, touch [Other Sizes] to display a screen containing additional document sizes.
- Page 223 7.11 Editing Images (Creation Functions) Specify how the original image will be enlarged, according to the following methods. ❍ To specify the final image size, continue with step 8. ❍ To specify an enlargement ratio, skip to step 14. ❍ To specify the paper size for each part of the enlarged image, skip to step ❍...
- Page 224 7.11 Editing Images (Creation Functions) ❍ Select the desired image size, and then touch [Enter]. For a non-standard image size, touch [Custom Size]. ❍ Touch [X] and [Y], and use the keypad to specify the size of the final image, and then touch [Enter].
- Page 225 7.11 Editing Images (Creation Functions) Using the keypad, type in the desired zoom ratio, and then touch [Enter]. If necessary, specify any other copy settings. Press the [Start] key. This concludes the setting of the copy enlargement ratio for the “Multi-Page Enlargement”...
- Page 226 7.11 Editing Images (Creation Functions) For paper sizes in inch measurements, touch [Inch]. ❍ Select the desired paper size, and then touch [Enter]. If necessary, specify any other copy settings. Press the [Start] key. This concludes the setting of the paper size for the “Multi-Page Enlargement” function.
-
Page 227: To Make Settings For The "Mirror Image" Function
7.11 Editing Images (Creation Functions) To make settings for the “Mirror Image” function This function allows you to produce a copy in the mirror image of the original document. Position the document(s) to be copied. Reference For details, refer to “Feeding the Document” on page 2-41. Touch [Application], and then touch [Creation]. - Page 228 7.11 Editing Images (Creation Functions) Normally, the document size is automatically detected. However, if you wish to specify the document size, touch [Original Size Input]. Select the document size, and then touch [Enter]. If the desired document size is not listed, touch [Other Sizes] to display a screen containing additional document sizes.
- Page 229 7.11 Editing Images (Creation Functions) ❍ Select a photo size, or touch [X] and [Y], and use the keypad to specify the size of the original, and then touch [Enter]. In the Mirror Image screen, touch [Enter]. ❍ To cancel the “Mirror Image” function, touch [Cancel] in the Mirror Image screen.
-
Page 230: Reducing The Document To Postcard Size And Printing Multiple Copies On One Page ("Postcard" Function)
7.11 Editing Images (Creation Functions) Reducing the Document to Postcard Size and Printing Multiple Copies on One Page (“Postcard” Function) The document can be reduced to the size of a postcard, and up to four copies can be printed on one sheet of A4-size postcard paper. To make settings for the “Postcard”... - Page 231 7.11 Editing Images (Creation Functions) Select either [With Margin] or [Without Margin]. Additional Information There are two ways of arranging the print image with the “Postcard” function. With Margin: Select this setting to reduce the image so that it fits within the allowable print area for the paper (inside the area that excludes the margins).
- Page 232 7.11 Editing Images (Creation Functions) If the desired document size is not listed, touch [Other Sizes] to display a screen containing additional document sizes. ❍ Select the appropriate document size, and then touch [Enter]. To specify a photo size or a non-standard size, touch [Photo Size or Custom Size].
- Page 233 7.11 Editing Images (Creation Functions) 7-58 C350...
-
Page 234: Managing Jobs
Managing Jobs... -
Page 235: Overview Of Jobs
8.1 Overview of Jobs Overview of Jobs Jobs Specifying the desired copy settings, then pressing the [Start] key queues the copy operation in this machine. This queued operation is called a job. Scan and computer print operations are also listed as jobs. The queued jobs are listed in the job display. -
Page 236: Changing The Copy Settings For A Queued Job
8.1 Overview of Jobs Changing the Copy Settings for a Queued Job The copy settings for jobs listed as “Waiting Print” can be changed. Change the copy settings according to the procedure described below. Touch [Job Log]. The list of queued jobs is displayed. Select the job whose copy settings you wish to change, and then touch [Change Mode]. -
Page 237: Job Log Screens
8.2 Job Log Screens Job Log Screens The list and details of queued jobs can be viewed. The following Job Log screens provide a variety of functions. Active Jobs Screen To view a list of queued print jobs, touch [Job Log]. To return to the Basic screen, touch [Basic]. - Page 238 8.2 Job Log Screens Item Name Description Copy Displays the specified number of pages to be printed With jobs listed as “Printing”, the number of pages remaining to be printed is counted down. Job start Displays the time that the job was queued Job end Displays the time when printing of the job is expected to be finished...
-
Page 239: Send List Screen
8.2 Job Log Screens Send List Screen Touch [Send List]. The Send List screen (containing the list of queued jobs) appears. To return to the Basic screen, touch [Basic]. To delete a job, select the job, and then touch [Delete]. The following details of the jobs are displayed. -
Page 240: Mode Check Screen
8.2 Job Log Screens Mode Check Screen Touch [Mode Check]. The Mode Check screen (containing the list of queued jobs) appears. To return to the Basic screen, touch [Basic]. To delete a job, select the job, and then touch [Delete]. Select a listed job to view its setting details. -
Page 241: Print Log Screen
8.2 Job Log Screens Print Log Screen Touch [Print Log]. The Print Log screen (containing the list of printed jobs) appears. In addition, the jobs can be divided into separate lists of those that have finished being printed and those that have been deleted. To view a list of completed print jobs, touch [Finished Jobs]. - Page 242 8.2 Job Log Screens Item Name Description Job end Displays the time when printing of the job is expected to be finished Result Displays the job process details Job status Displays details of any errors that may have occurred while the job was being performed C350...
-
Page 243: Send Log Screen
8.2 Job Log Screens Send Log Screen Touch [Send Log]. The Send Log screen (containing the list of transmitted jobs) appears. A log of all jobs scanned in Scan mode can be viewed from the Send Log screen. In addition, the jobs can be divided into separate lists of those that have finished being transmitted and those that have been deleted. -
Page 244: Job Control Screens
8.3 Job Control Screens Job Control Screens Jobs stored in the memory can be printed and jobs can be prioritized for output. The following Job Control screens provide a variety of functions. Hold Job Screen Touch [Job Control]. The Hold Job screen (containing the list of jobs scanned and stored in the memory) appears. -
Page 245: To Print Stored Data
8.3 Job Control Screens The following details of the jobs are displayed. Item Name Description Job number Job identification number assigned when the job is queued Up/down arrows When there are more than five jobs, press these arrows to display jobs higher or lower in the list (higher or lower in the printing order). -
Page 246: Locked Jobs Screen
8.3 Job Control Screens Locked Jobs Screen Reference For details on setting the “Locked Jobs” function, refer to the C350 Printer Controller User’s Guide. Touch [Locked Jobs]. The locked Jobs screen (containing the list of locked jobs) appears. Locked jobs (box print jobs) can be unlocked and printed. To return to the Basic screen, touch [Basic]. - Page 247 8.3 Job Control Screens Item Name Description Copy Displays the specified number of pages to be printed With jobs listed as “Printing”, the number of pages remaining to be printed is counted down. Job start Displays the time that the job was queued 8-14 C350...
-
Page 248: To Print A Locked Job
8.3 Job Control Screens To print a locked job Select the locked job that you wish to print. To print multiple jobs together, continue selecting all desired jobs. Using the keypad, type in the 4-digit code for printing a locked job ❍... -
Page 249: Increase Priority Screen
8.3 Job Control Screens Increase Priority Screen Touch [Increase Priority]. The Increase Priority screen (containing the list of jobs waiting to be printed or stored in the memory) appears. Queued jobs can be prioritized so that they will be printed before other jobs. To return to the Basic screen, touch [Basic]. -
Page 250: To Increase The (Print) Priority Of A Job
8.3 Job Control Screens To increase the (print) priority of a job Select the job that you wish to prioritize. Touch [OK]. If the job currently being printed can be interrupted, printing is interrupted and the job given priority is printed. Printing of the interrupted job is automatically restarted once printing for the job that printing was interrupted for is finished. -
Page 251: Combine Jobs Screen
8.3 Job Control Screens Combine Jobs Screen To view a list of jobs stored in the memory, touch [Combine Jobs]. Two to five stored jobs can be selected and combined into one job. Additional Information If jobs are combined while any of the following settings are selected, the setting changes to the default. - Page 252 8.3 Job Control Screens The following details of the jobs are displayed. Item Name Description Job number Job identification number assigned when the job is queued Up/down arrows When there are more than five jobs, press these arrows to display jobs higher or lower in the list (higher or lower in the printing order).
-
Page 253: To Combine Jobs
8.3 Job Control Screens To combine jobs Select the first job that you wish to combine with other jobs. Select another job that you wish to combine with the first job selected. ❍ To combine more than two jobs, continue selecting all desired jobs. ❍... - Page 254 8.3 Job Control Screens The following details of the jobs are displayed. Item Name Description Job number Job identification number assigned when the job is queued Up/down arrows When there are more than five jobs, press these arrows to display jobs higher or lower in the list (higher or lower in the printing order).
-
Page 255: To Print A Job From The Hard Disk
8.3 Job Control Screens To print a job from the hard disk From the HDD screen, touch the job to be printed. Touch [Open Job]. Touch [Hold Job]. Check that the selected job is listed in the Hold Job screen. Additional Information Jobs retrieved as stored jobs can be prioritized or combined before being printed. -
Page 256: Reprint Screen
8.3 Job Control Screens Reprint Screen Condition If the “Reprint” function in Administrator mode has been set to “Yes”, the Reprint screen is available (jobs can be recalled from the memory). However, if the “Reprint” function has been set to “No”, all jobs are erased after they are finished being printed. -
Page 257: To Reprint A Job Saved In The Memory
8.3 Job Control Screens The following details of the jobs are displayed. Item Name Description Job number Job identification number assigned when the job is queued Up/down arrows When there are more than five jobs, press these arrows to display jobs higher or lower in the list (higher or lower in the printing order). -
Page 258: Care Of The Machine
Care of the Machine... -
Page 259: Cleaning
9.1 Cleaning Cleaning Reminder! Turn off the machine (set the power switch to [O]) before cleaning it. Housing ➜ Clean the surface of the housing by wiping it with a soft cloth dampened with a mild household detergent. Original Glass ➜... -
Page 260: Control Panel
9.1 Cleaning Control Panel ➜ Clean the control panel by wiping it with a soft, dry cloth. Reminder! Pressing too hard on the control panel or the touch panel may damage them. Never use a mild household detergent or glass cleaner to clean the control panel or touch panel. -
Page 261: Paper Take-Up Roller
9.1 Cleaning Carefully slide the belt to the left to expose a hidden area of the belt. Clean the newly exposed surface of the belt by wiping it with a soft cloth dampened with a mild household detergent (as in step 1). Repeat the above step until the entire surface of the document transfer belt has been wiped clean. -
Page 262: Electrostatic Charger
9.1 Cleaning Electrostatic Charger If the electrostatic charger is dirty, streaks will appear though the copies. If this occurs, clean the charger according to the following procedure. Open the machine’s front door. Slowly pull out the charger- cleaning tool as far as possible. Next, slowly push in the charger- cleaning tool as much as possible. - Page 263 9.1 Cleaning C350...
-
Page 264: Utility Mode Operations
Utility Mode Operations... -
Page 265: Utility Screen
10.1 Utility Screen 10.1 Utility Screen The various functions available in Utility mode are described below. When the [Utility] key is pressed, the following screen appears. (Refer to page 10-4.) “Reset Mode” function: The default settings, selected after this machine is reset, can be changed. - Page 266 10.1 Utility Screen (Refer to page 10-30.) The usage level for the various supplies and parts can be checked. (Refer to page 10-31.) The Administrator mode allows the use of this machine to be controlled, by allowing various functions to be set according to need. The administrator access number (8-digit password) must be entered in order to set the Administrator mode functions.
-
Page 267: Programming/Recalling Copy Programs
10.2 Programming/Recalling Copy Programs 10.2 Programming/Recalling Copy Programs Setting the “Reset Mode” Function The settings selected when this machine is turned on (the power switch is set to “I”) are called the default settings. By specifying the default settings, the desired copy settings are selected when the machine is turned on (the power switch is set to “I”). -
Page 268: Storing Copy Programs
10.2 Programming/Recalling Copy Programs Storing Copy Programs User-specified copy settings can be stored as copy programs. Each of the 10 copy programs that are stored can be given a name. Recall the copy programs by touching [Copy Program Recall] on the Utility screen. Select the desired copy settings. - Page 269 10.2 Programming/Recalling Copy Programs Using the character keys, type in the program name, and then touch [Enter]. ❍ The program name can contain a maximum of 9 characters. ❍ To enter uppercase letters, touch [CAPS]. ❍ To delete characters that have been entered, touch [Del.]. Touch [Enter], and then touch [Enter] in the Store screen.
-
Page 270: Recalling A Copy Program
10.2 Programming/Recalling Copy Programs Recalling a Copy Program The stored copy programs can be recalled to be used again, as necessary. Load the document into the reverse automatic document feeder or position it on the original glass. Press the [Utility] key. Touch [Copy Program Recall]. -
Page 271: Viewing Counters ("Counter List" Function)
10.3 Viewing Counters (“Counter List” Function) 10.3 Viewing Counters (“Counter List” Function) The number of the various types of prints can be viewed. The following counters can be viewed. Total counters Total: Total number of copies and printouts Size: Total number of copies and printouts on paper specified as large-sized paper Duplex Copy: Total number of double-sided copies Duplex Print: Total number of double-sided printouts... - Page 272 10.3 Viewing Counters (“Counter List” Function) Printer Size: Total number of 2-color printouts on paper specified as large-sized paper 2 Color Copy + 2 Color Printer: Total number of 2-color copies and printouts Press the [Utility] key. Touch [Counter List]. Touch the key for the desired color type.
-
Page 273: Specifying Default Settings (User's Choice: 1 Functions)
10.4 Specifying Default Settings (User’s Choice: 1 Functions) 10.4 Specifying Default Settings (User’s Choice: 1 Functions) Setting the “Key Click Sound” Function This function is used to specify whether or not a confirmation beep is sounded each time a key on the touch panel or a key in the control panel is pressed. (The default setting is “ON”.) Press the [Utility] key. -
Page 274: Setting The "Power Save" Function
10.4 Specifying Default Settings (User’s Choice: 1 Functions) Setting the “Power Save” Function This function is used to specify the length of time after the last operation until this machine automatically enters Power Save mode, and whether or not the machine enters Power Save mode when a job is stored in the memory or a locked job is programmed. - Page 275 10.4 Specifying Default Settings (User’s Choice: 1 Functions) Using the keypad, type in the desired length of time (between 10 and 240 minutes). Touch the appropriate key to specify whether or not the machine enters Power Save mode when a job is stored in the memory or a locked job is programmed.
-
Page 276: Setting The "Sleep" Function
10.4 Specifying Default Settings (User’s Choice: 1 Functions) Setting the “Sleep” Function This function is used to specify the length of time after the last operation until this machine automatically enters Sleep mode, and whether or not the machine enters Sleep mode when a job is stored in the memory or a locked job is programmed. - Page 277 10.4 Specifying Default Settings (User’s Choice: 1 Functions) Using the keypad, type in the desired length of time (between 15 and 240 minutes). Touch the appropriate key to specify whether or not the machine enters Sleep mode when a job is stored in the memory or a locked job is programmed.
-
Page 278: Setting The "Account Change Auto Reset" Function
10.4 Specifying Default Settings (User’s Choice: 1 Functions) Setting the “Account Change Auto Reset” Function This function is used to specify whether or not this machine clears all settings when it detects that the user has changed, for example, when the optional key counter has been removed, or when the screen for entering the account number and administrator code appears. -
Page 279: Specifying Default Settings (User's Choice: 2 Functions)
10.5 Specifying Default Settings (User’s Choice: 2 Functions) 10.5 Specifying Default Settings (User’s Choice: 2 Functions) Setting the “Language Select” Function This function is used to change the display language for the screens in the touch panel. (The default setting is “English”.) Press the [Utility] key. -
Page 280: Setting The "2In1, 4In1, Booklet Copy Zoom" Function
10.5 Specifying Default Settings (User’s Choice: 2 Functions) Setting the “2in1, 4in1, Booklet Copy Zoom” Function This function is used to specify the zoom ratios for 2in1 and 4in1 copying, and booklet binding. If this function is set to “Preset”, the recommended zoom ratio is automatically recalled when a 2in1, 4in1 or Booklet setting is selected. -
Page 281: Setting The "Acs Judgement Level Adjustment" Function
10.5 Specifying Default Settings (User’s Choice: 2 Functions) Setting the “ACS Judgement Level Adjustment” Function This function is used to adjust the level for detecting a color or black-and-white document with the “Auto Color” setting. The detection level can be adjusted to one of 5 settings. -
Page 282: Setting The "Intelligent Sorting" Function
10.5 Specifying Default Settings (User’s Choice: 2 Functions) Setting the “Intelligent Sorting” Function This function is used to specify if the “Sort” setting or the “NonSort” setting is selected automatically for documents loaded into the reverse automatic document feeder. (The default setting is “Yes”.) If this function is set to “Yes”, loading a document into the reverse automatic document feeder and pressing the [Start] key automatically selects the “NonSort”... -
Page 283: Setting The "Criss Cross" Function
10.5 Specifying Default Settings (User’s Choice: 2 Functions) Setting the “Criss Cross” Function This function is used to set whether or not copies will be sorted in a crisscross pattern if the necessary conditions are met while using the “Sort” setting. (The default setting is “Yes”.) Reference For details on crisscross sorting, refer to “Crisscross Sorting (Crisscross... -
Page 284: Setting The "Paper Type Select" Function
10.5 Specifying Default Settings (User’s Choice: 2 Functions) Setting the “Paper Type Select” Function This function is used to specify that special paper is loaded into any paper drawer, other than the 1st drawer and the bypass tray. (The default setting is “Normal”.) If a drawer is set to any setting other than “Normal”, the paper in that drawer is not automatically selected with the “Auto Paper Select”... - Page 285 10.5 Specifying Default Settings (User’s Choice: 2 Functions) Additional Information Normal Select this setting if plain paper is loaded. This is the default setting. Paper with this setting can be automatically selected with the “Auto Paper Select” setting and “Auto Zoom” setting. Fine Select this setting when using high-quality paper.
-
Page 286: Setting The "Auto-Select Paper For Small Originals" Function
10.5 Specifying Default Settings (User’s Choice: 2 Functions) Setting the “Auto-select paper for small originals” Function This function is used to specify whether or not small-sized documents are printed if the paper size is too small and cannot be automatically detected. (The default settings are “OFF”... - Page 287 10.5 Specifying Default Settings (User’s Choice: 2 Functions) Touch the key for the desired setting. ❍ If “ON” was selected, touch the key for the paper drawer loaded with the paper to be used. Touch [Enter]. Touch [Exit], and then touch [Exit] in the Utility screen.
-
Page 288: Setting The "4In1 Copy Order" Function
10.5 Specifying Default Settings (User’s Choice: 2 Functions) Setting the “4in1 Copy Order” Function This function is used to specify the copy order during 4in1 copying. (The default setting is “ ”.) Press the [Utility] key. Touch [User’s Choice: 2]. Touch [2/3]. -
Page 289: Setting The "Centering" Function
10.5 Specifying Default Settings (User’s Choice: 2 Functions) Setting the “Centering” Function This function is used to specify where the image is positioned when the document is smaller than the paper. (The default setting is “Yes”.) Press the [Utility] key. Touch [User’s Choice: 2]. -
Page 290: Setting The "Priority Output Tray" Function
10.5 Specifying Default Settings (User’s Choice: 2 Functions) Setting the “Priority Output Tray” Function This function is used to specify the output tray that is given priority for each application. (The default settings are tray “2” for copying and printing and faxing.) Condition This function can be set only if the finisher FS-501 is installed. - Page 291 10.5 Specifying Default Settings (User’s Choice: 2 Functions) Touch the key for the output tray that you wish to assign to each application. Touch [Enter]. Touch [Exit], and then touch [Exit] in the Utility screen. The Basic screen appears again. 10-28 C350...
-
Page 292: Setting The "Priority Device" Function
10.5 Specifying Default Settings (User’s Choice: 2 Functions) Setting the “Priority Device” Function This function is used to specify the print timing for print jobs that are received. (The default setting is “Printer”.) Additional Information If “Copier” is selected, the print jobs are queued as a job after the data for all pages are received, then printing begins. -
Page 293: Viewing Part Maintenance Levels ("Unit Life Indicator" Function)
10.6 Viewing Part Maintenance Levels (“Unit Life Indicator” Function) 10.6 Viewing Part Maintenance Levels (“Unit Life Indicator” Function) The usage level for the various supplies and parts can be checked. Press the [Utility] key. Touch [Unit Life Indicator]. Graphs showing the maintenance levels for the various parts and supplies are displayed. -
Page 294: Administrator Mode Operations
10.7 Administrator Mode Operations 10.7 Administrator Mode Operations The Administrator mode allows the use of this machine to be controlled. When this mode is selected, a screen appears, indicating that the administrator code must be entered. After typing in the 8-digit administrator code and touching [Enter], the following screen appears. - Page 295 10.7 Administrator Mode Operations These functions are used to specify the device name for this machine and the compression priority methods for PDF and TIFF files. For details, refer to the C350 Printer Controller User’s Guide. These functions are used for specifying network settings, such as the IP address of the FTP server and the login name.
-
Page 296: Administrator Settings
10.8 Administrator Settings 10.8 Administrator Settings Setting the “Top Erase” Function This function is used to set the amount of loss at the edge of the original. The specified amount is erased during printing. (The default setting is “5 mm”.) Press the [Utility] key. -
Page 297: Setting The "Disable Sleep Mode" Function
10.8 Administrator Settings Setting the “Disable Sleep Mode” Function This function is used to disable the Sleep mode. (The default setting is “No”.) Setting this function to “Yes” allows you to disable the Sleep mode completely using the “No” function available through the User’s Choice: 1 screen. Reference For details on the Sleep mode, refer to “Turning the Machine On and Off”... -
Page 298: Setting The "A3 Wide Paper Size" Function
10.8 Administrator Settings Touch the key for the desired setting. Touch [Enter]. Touch [Exit] in the next three screens that appear. The Basic screen appears again. Setting the “A3 Wide Paper Size” Function This function is used to set the paper size for A3 Wide-sized paper. (The default setting is “305 ×... - Page 299 10.8 Administrator Settings Touch the key for the desired setting. Touch [Enter]. Touch [Exit] in the next three screens that appear. The Basic screen appears again. 10-36 C350...
-
Page 300: Setting The "Locked Jobs Auto Delete Time" Function
10.8 Administrator Settings Setting the “Locked Jobs Auto Delete Time” Function This function is used to specify the length of time until locked jobs are automatically deleted. (The default setting is “No”.) Press the [Utility] key. Touch [Admin. Mode]. Using the keypad, type in the administrator code. ❍... - Page 301 10.8 Administrator Settings Touch [Enter]. Touch [Exit] in the next three screens that appear. The Basic screen appears again. 10-38 C350...
-
Page 302: Setting The "Skip Volume Track (E.k.c.) Error" Function
10.8 Administrator Settings Setting the “Skip Volume Track (E.K.C.) Error” Function This function is used to specify whether or not other jobs can skip a job that was stopped because the maximum number of copies has been reached for the account. -
Page 303: Setting The "Access Lock" Function
10.8 Administrator Settings Setting the “Access Lock” Function This function is used to specify penalties for incorrect access attempts (when the administrator code, account access number or unlocking code for locked jobs are incorrectly entered). (The default setting is “Disable”.) Condition If this function is set to “Enable”, entering an incorrect access number (administrator code, account access number or unlocking code for locked jobs) - Page 304 10.8 Administrator Settings Press the [Utility] key. Touch [Admin. Mode]. Using the keypad, type in the administrator code. ❍ Touch [Enter]. Touch [Admin. Set.]. Touch [2/4]. Touch [Unauthorized Access Lock]. Touch the key for the desired setting. Touch [Enter]. Touch [Exit] in the next three screens that appear.
-
Page 305: Setting The "Access Lock Release" Function
10.8 Administrator Settings Setting the “Access Lock Release” Function This function is used to allow access codes to be entered again after access has been denied. Additional Information If input of the administrator code is denied, turn this machine off, then on again. Press the [Utility] key. -
Page 306: Setting The "User Authentication" Function
10.8 Administrator Settings Setting the “User Authentication” Function This function is used to select whether user authentication is required in order to enter Scan mode or Box mode after the [Scan] key or the [Box] key is pressed. In addition, user authentication can be performed with Active Directory or NTLM. (The default setting is “No”.) Reference For details on the Scan mode and Box mode, refer to the C350 Printer... - Page 307 10.8 Administrator Settings Touch the key for the desired setting. If authentication was set to be performed with Active Directory, touch [Active Directory] below “Domain Name”. Type in the domain name for Active Directory, and then touch [Enter]. ❍ The domain name can contain a maximum of 64 characters.
- Page 308 10.8 Administrator Settings ❍ To enter uppercase letters, touch [CAPS]. ❍ To delete characters that have been entered, touch [Del.]. Touch [Enter]. Touch [Exit] in the next three screens that appear. The Basic screen appears again. C350 10-45...
-
Page 309: Setting The "Ldap Search" Function
10.8 Administrator Settings Setting the “LDAP Search” Function This function is used to select whether or not an LDAP search is allowed in Scan mode and Box mode. (The default setting is “Prohibit”.) Reference For details on the Scan mode and Box mode, refer to the C350 Printer Controller User’s Guide. -
Page 310: Setting The "Box Function" Function
10.8 Administrator Settings Setting the “Box Function” Function This function is used to select whether or not box functions are expanded. (The default setting is “Prohibit”.) Reference For details on box function, refer to the C350 Printer Controller User’s Guide. Press the [Utility] key. -
Page 311: Setting The "Date & Time Setting" Function
10.8 Administrator Settings Setting the “Date & Time Setting” Function This function is used to specify the current date and time. In addition, the time zone can be set between -1200 and +1200 (in 30 minute intervals). (The default setting is “+0000”.) Press the [Utility] key. - Page 312 10.8 Administrator Settings Using the keypad, enter the current year. Repeat the above steps to specify the “Month”, “Day”, “Hour”, “min.” and “Time Zone” settings. ❍ Touch [Time Zone] before touching [+/-]. Additional Information The time zone appears as a time difference from Greenwich Mean Time. Touch [Enter].
-
Page 313: Setting The "Reprint" Function
10.8 Administrator Settings Setting the “Reprint” Function This function is used to specify whether or not the last job printed can be recalled and printed again. (The default setting is “Yes”.) Reference For details on the memory recall feature, refer to “Reprint Screen” on page 8-23. Press the [Utility] key. - Page 314 10.8 Administrator Settings Additional Information If the “Reprint” function is set to “Yes”, [Reprint OFF] appears in the Basic screen. For details on the “Reprint OFF” function, refer to “Blocking Document Scan Storage (“Reprint OFF” Function)” on page 6-2. C350 10-51...
-
Page 315: Setting The "Hdd Lock" Function
10.8 Administrator Settings Setting the “HDD Lock” Function This function is used to select whether or not the hard disk is locked. If the hard disk is locked, the password must also be specified in order to unlock it. (The default setting is “No”.) Condition [HDD Lock] appears only if the optional hard disk is installed. - Page 316 10.8 Administrator Settings Touch the key for the desired setting. Touch [Enter]. ❍ If “No” was selected, the screen shown in step 6 appears. ❍ If “Yes” was selected, continue with step 9. Using the keyboard that appears on the screen, type in the 8-character password, and then touch [Enter].
- Page 317 10.8 Administrator Settings Type in the password again, and then touch [Enter]. The message “Note: Please turn the main switch of the copier OFF/ON to activate HDD Lock.” appears. As instructed, turn the machine off, then on again.The hard disk is locked. Reminder! Be sure to keep the specified password in a safe place so that it will not be lost.
-
Page 318: Changing The Password For The Hard Disk
10.8 Administrator Settings Changing the Password for the Hard Disk By selecting the “HDD Lock” function when the hard disk is already locked, the password can be changed or the lock setting for the hard disk can be removed. Follow the procedure described below to change the password. Press the [Utility] key. - Page 319 10.8 Administrator Settings Type in the new password, and then touch [Enter]. ❍ The keypad can also be used to type in the password. ❍ If [Cancel] is touched, the password is not changed. The screen shown in step 6 appears again. ❍...
-
Page 320: Removing The Lock Setting For The Hard Disk
10.8 Administrator Settings Removing the Lock Setting for the Hard Disk By selecting the “HDD Lock” function when the hard disk is already locked, the password can be changed or the lock setting for the hard disk can be removed. Follow the procedure described below to remove the lock setting for the hard disk. - Page 321 10.8 Administrator Settings The message “Note: Please turn the main switch of the copier OFF/ON to release HDD Lock.” appears. As instructed, turn the machine off, then on again. The lock setting for the hard disk is removed. 10-58 C350...
-
Page 322: Setting The "Administrator Code Change" Function
10.8 Administrator Settings Setting the “Administrator Code Change” Function This function is used to change the administrator code. Press the [Utility] key. Touch [Admin. Mode]. Using the keypad, type in the administrator code. ❍ Touch [Enter]. Touch [Admin. Set.]. Touch [3/4]. Touch [Administrator Code Change]. - Page 323 10.8 Administrator Settings Type in the new administrator code, and then touch [Enter]. The “Retype New Code” box appears. Type in the new administrator code again, and then touch [Enter]. The new administrator code is registered. Touch [Exit] in the next three screens that appear. The Basic screen appears again.
-
Page 324: Setting The "Panel Reset Timer" Function
10.8 Administrator Settings Setting the “Panel Reset Timer” Function This function is used to specify the length of time after the last operation until all functions automatically return to their default settings. (The default setting is 1 min.) Reference For details, refer to “Turning the Machine On and Off” on page 2-17. Press the [Utility] key. - Page 325 10.8 Administrator Settings Using the keypad, type in the desired length of time (between 1 and 9 minutes). ❍ If [No] is touched, the machine will not automatically reset its modes and functions. Touch [Enter]. Touch [Exit] in the next three screens that appear. The Basic screen appears again.
-
Page 326: Setting The "Add Prefix/Suffix" Function
10.8 Administrator Settings Setting the “Add Prefix/Suffix” Function This function is used to specify whether or not a prefix/suffix is added when recalling or entering an address in Scan mode or Box mode. (The default setting is “No”.) Reference For details on box function, refer to the C350 Printer Controller User’s Guide. Press the [Utility] key. - Page 327 10.8 Administrator Settings Touch the key for the desired setting. Additional Information If “Yes” is selected, register the prefix/suffix that will be added. For details on registering prefixes/suffixes, refer to “Setting the “Prefix/Suffix Registration” Function” on page 10-65. Touch [Enter]. Touch [Exit] in the next three screens that appear.
-
Page 328: Setting The "Prefix/Suffix Registration" Function
10.8 Administrator Settings Setting the “Prefix/Suffix Registration” Function This function is used to register prefixes/suffixes that can be added when the “Add Prefix/Suffix” function is set to “Yes”. Up to 8 prefixes/suffixes can be registered. Press the [Utility] key. Touch [Admin. Mode]. Using the keypad, type in the administrator code. - Page 329 10.8 Administrator Settings Type in the prefix, and then touch [Enter]. ❍ The prefix can contain a maximum of 20 characters. ❍ The keypad can also be used to type in the number. ❍ If [Cancel] is touched, the setting is not registered.
-
Page 330: Setting The "Gradation Adjustment" Function
10.9 Setting the “Gradation Adjustment” Function 10.9 Setting the “Gradation Adjustment” Function The color gradation levels can be adjusted if they are incorrect. In addition, perform the “Gradation Adjustment” function after replacing the imaging unit. Load A3 L-size paper into the 1st drawer. A4 C, 11 ×... - Page 331 10.9 Setting the “Gradation Adjustment” Function After the test pattern is printed, a screen appears, indicating how the test pattern must be loaded. Place the printed test pattern on the original glass. ❍ Align the edges of the printed test pattern with the document scales.
-
Page 332: 10.10 Specifying Expert User Mode Functions
10.10 Specifying Expert User Mode Functions 10.10 Specifying Expert User Mode Functions Setting the “Thick Paper and OHP Film Image Density” Function This function is used to adjust the density of the image printed on thick paper and overhead projector transparencies. (The default settings are the standard settings (middle settings).) Press the [Utility] key. -
Page 333: Setting The "Color Shift Correction (Bk)" Function
10.10 Specifying Expert User Mode Functions Setting the “Color Shift Correction (Bk)” Function If a difference can be seen between the original document and the copy, fine adjustments in the color shift can be made. The procedure with A3-size paper loaded into the 1st drawer is described below. Condition Perform color shift corrections starting with black. - Page 334 10.10 Specifying Expert User Mode Functions Fold the paper in half while aligning the corners of the printed test pattern. If horizontal lines A and B are angled as shown at the right, touch to specify the desired negative adjustment for θ (between -1 dot and -10 dots).
- Page 335 10.10 Specifying Expert User Mode Functions If horizontal lines A and B are angled as shown at the right, touch to specify the desired positive adjustment for θ (between +1 dot and +10 dots). Press the [Start] key. The adjusted test pattern is printed on A3-size paper. Check the print result.
-
Page 336: Setting The "Color Shift Correction (C,M,Y)" Functions
10.10 Specifying Expert User Mode Functions Setting the “Color Shift Correction (C,M,Y)” Functions If a difference can be seen between the original document and the copy, fine adjustments in the color shift can be made. The procedure with A3-size paper loaded into the 1st drawer is described below. Condition Before performing color shift corrections for the other colors (cyan, magenta and yellow), perform the color shift correction for black. - Page 337 10.10 Specifying Expert User Mode Functions Press the [Start] key. The automatic color shift adjustment procedure begins, and the test pattern is printed on A3-size paper. Check the distance from the reference line of the black lines to the cyan lines in the test pattern along the X and Y directions.
- Page 338 10.10 Specifying Expert User Mode Functions If the lines are shifted as shown at the right, touch specify the desired positive adjustment for “X” (between +1 dot and +6 dots). If the lines are shifted as shown at the right, touch [Y], and then touch to specify the desired negative adjustment for...
- Page 339 10.10 Specifying Expert User Mode Functions Check the print result. ❍ If the distance between the black reference line and the cyan lines is adjusted to 0, continue with step 14. ❍ If more adjustment is necessary, return to step 8 and repeat the adjustment procedure.
-
Page 340: Setting The "Black Image Density Correction" Function
10.10 Specifying Expert User Mode Functions Setting the “Black Image Density Correction” Function This function is used to adjust the density of the printed image in black-and-white copies. (The default setting is the standard setting (middle setting).) Press the [Utility] key. Touch [Admin. -
Page 341: Setting The "Stabilizer" Function
10.10 Specifying Expert User Mode Functions Setting the “Stabilizer” Function If the image is incorrect, even after the gradation levels have been adjusted, set the “Stabilizer” function. Reference For details on adjusting the gradation levels, refer to “Setting the “Gradation Adjustment”... - Page 342 10.10 Specifying Expert User Mode Functions Check that “Stabilize” is selected, and then press the [Start] key. The indicator on the [Start] key lights up in orange, and the image stabilization operation is performed. When the image stabilization operation is finished, the indicator on the [Start] key lights up in green.
-
Page 343: Setting The "Prt Area (Top Margin)" Function
10.10 Specifying Expert User Mode Functions Setting the “PRT Area (Top Margin)” Function This function is used to adjust the printing position at the left edge of the paper (in comparison to the paper feed direction). The top margin of the print area can be adjusted for each paper type. The procedure described below is for A3-size paper. - Page 344 10.10 Specifying Expert User Mode Functions Press the [Start] key. The test pattern is printed on A3-size paper. Check that the top margin of the test pattern is between 4.5 mm and 5.5 mm. If the top margin is within the specified range, skip to step 14.
-
Page 345: Setting The "Prt Area (Left Margin)" Function
10.10 Specifying Expert User Mode Functions Setting the “PRT Area (Left Margin)” Function This function is used to adjust the printing position at the left edge of the paper (in comparison to the paper feed direction). The left margin of the print area can be adjusted for each paper drawer. Condition The left margin of the print area is adjusted during manufacturing of the machine. - Page 346 10.10 Specifying Expert User Mode Functions Touch [1st Tray]. Press the [Start] key. The test pattern is printed on A3-size paper. Check that the left margin of the test pattern is between 2.5 mm and 3.5 mm. If the left margin is within the specified range, skip to step 14.
-
Page 347: Setting The "Prt Area (Dup. Left Margin)" Function
10.10 Specifying Expert User Mode Functions Setting the “PRT Area (Dup. Left Margin)” Function This function is used to adjust the printing position at the left edge of the paper (in comparison to the paper feed direction) for the second side during automatic double-sided copying. - Page 348 10.10 Specifying Expert User Mode Functions Touch [1st Tray]. Press the [Start] key. The test pattern is printed on A3-size paper. Check that the left margin of the test pattern for the second side is between 2.5 mm and 3.5 mm. If the left margin is within the specified range, skip to step 14.
-
Page 349: Setting The "Center Staple Position" Function
10.10 Specifying Expert User Mode Functions Setting the “Center Staple Position” Function This function is used to make fine adjustments to the center stapling position and the folding position when binding. (The default setting is 0 mm.) Before making the adjustment, use the “Booklet” and “Bind” settings to make a copy sample. - Page 350 10.10 Specifying Expert User Mode Functions Compare the width of the left pages of the copy sample with the width of the right pages to check for the center of the paper. If the staple position is too far to the left of the center of the paper, touch to specify the...
- Page 351 10.10 Specifying Expert User Mode Functions If the fold position is shifted to the left, touch to specify the desired positive adjustment (between +1 mm and +7 mm). If the fold position is shifted to the right, touch to specify the desired negative adjustment (between -1 mm and -7 mm).
-
Page 352: Supervising Machine Use (Volume Track (E.k.c.) Functions)
10.11 Supervising Machine Use (Volume Track (E.K.C.) Functions) 10.11 Supervising Machine Use (Volume Track (E.K.C.) Functions) These functions are used to control the permissions and the number of copies that can be printed for each user account. In addition, permissions can be set separately for the various printing operations. - Page 353 10.11 Supervising Machine Use (Volume Track (E.K.C.) Functions) Touch the key for the desired setting. ❍ When “Yes” is selected, the keys below “Scanning from PC” become available. Touch the key for the desired setting. Reference For details on remote scanning, refer to the C350 Printer Controller User’s Guide.
-
Page 354: Canceling Volume Track Mode (E.k.c.)
10.11 Supervising Machine Use (Volume Track (E.K.C.) Functions) Canceling Volume Track Mode (E.K.C.) The procedure for canceling Volume Track mode (E.K.C.) is described below. Reminder! In order to cancel the Volume Track mode (E.K.C.), all Volume Track Data (E.K.C.) counters must be initialized. If “No”... - Page 355 10.11 Supervising Machine Use (Volume Track (E.K.C.) Functions) Touch [No], and then touch [Enter]. The Initialize screen appears. Touch [Yes], and then touch [Enter]. The Volume Track Data (E.K.C.) counters are initialized, and then the Volume Track mode (E.K.C.) is canceled. 10-92 C350...
-
Page 356: Setting Up Volume Track (E.k.c.) Accounts ("Volume Track Setting (E.k.c.)" Function)
10.11 Supervising Machine Use (Volume Track (E.K.C.) Functions) Setting Up Volume Track (E.K.C.) Accounts (“Volume Track Setting (E.K.C.)” Function) This function is used to specify the access number for each account, printing permissions, and the maximum number of copies allowed. Condition The “Volume Track Setting (E.K.C.)”... - Page 357 10.11 Supervising Machine Use (Volume Track (E.K.C.) Functions) Touch to specify the desired volume number. ❍ Touch [-10] and [+10] to increase or decrease by 10 the volume number that is selected. Specify the 8-digit access number for the desired account. ❍...
- Page 358 10.11 Supervising Machine Use (Volume Track (E.K.C.) Functions) Additional Information If the “Color” parameter is set to “Prohibit”, full-color, 2-color and monocolor printing are not possible. In addition, the “Auto Color”, “Full Color”, “2 Color” and “Single Color” Color settings from the Basic screen are also not available.
- Page 359 10.11 Supervising Machine Use (Volume Track (E.K.C.) Functions) Touch [Enter]. The access code, permissions and printing limits are applied for the selected account. Touch [Enter]. The Volume Track Setting screen appears again. Additional Information To apply the selected settings for the selected account to all accounts, touch [Same for All Volumes] in the Allowance screen or Upper Limit Copy + Print screen.
-
Page 360: Viewing Volume Track Data (E.k.c.) Counters ("Volume Track Data (E.k.c.)" Function)
10.11 Supervising Machine Use (Volume Track (E.K.C.) Functions) Viewing Volume Track Data (E.K.C.) Counters (“Volume Track Data (E.K.C.)” Function) This function is used to check the following data for each account. All Counters Total: Counts the total number of copies and printouts made using all Color settings, the “Full Color”... - Page 361 10.11 Supervising Machine Use (Volume Track (E.K.C.) Functions) Touch [Volume Track Data (E.K.C.)]. The Volume Track Data (E.K.C.) screen appears. Touch the key for the block containing the desired account. ❍ The 998 accounts are divided into 20 blocks with each range indicated on the keys.
- Page 362 10.11 Supervising Machine Use (Volume Track (E.K.C.) Functions) Additional Information To initialize the counters displayed in the current counter screen for the selected account, touch [Counter Clear]. After touching [Counter Clear], requesting confirmation to clear the counters screen appears. Touch [Yes], and then touch [Enter] to initialize the displayed counters for the selected account.
-
Page 363: Printing Volume Track Data (E.k.c.) Counters
10.11 Supervising Machine Use (Volume Track (E.K.C.) Functions) Printing Volume Track Data (E.K.C.) Counters The counters for each account can be printed. Condition The “Volume Track Data (E.K.C.)” function is available only if the “Volume Track Mode (E.K.C.)” function is set to “Yes”. Press the [Utility] key. - Page 364 10.11 Supervising Machine Use (Volume Track (E.K.C.) Functions) Load A3-size paper into one of the drawers, and then press the [Start] key. The icon ( showing that data is being transmitted appears in the job display. The job is queued for printing. The Volume Track Data (E.K.C.) is printed.
-
Page 365: Clearing Volume Track Data (E.k.c.) Counters
10.11 Supervising Machine Use (Volume Track (E.K.C.) Functions) Clearing Volume Track Data (E.K.C.) Counters The counters for the accounts can be cleared. Condition The “Volume Track Data (E.K.C.)” function is available only if the “Volume Track Mode (E.K.C.)” function is set to “Yes”. Press the [Utility] key. - Page 366 10.11 Supervising Machine Use (Volume Track (E.K.C.) Functions) Touch the key for the account that you wish to initialize. To initialize the Volume Track Data (E.K.C.) counters for other accounts, continue selecting Volume numbers. Touch [Clear]. The Individual Counter Clear screen appears. Touch [Yes].
- Page 367 10.11 Supervising Machine Use (Volume Track (E.K.C.) Functions) Touch [Yes]. Touch [Enter]. ❍ The Total, Large Size, Duplex Copy and Scan counters for all accounts are initialized. ❍ The Upper Limit value is not initialized. Touch [Enter]. The Volume Track (E.K.C.) screen appears again. 10-104 C350...
-
Page 368: Viewing Toner Usage ("Toner Coverage" Function)
10.12 Viewing Toner Usage (“Toner Coverage” Function) 10.12 Viewing Toner Usage (“Toner Coverage” Function) The total average usage ratio for each color of toner (cyan, magenta, yellow and black) can be checked. The total average value is indicated in units of 0.001%. Press the [Utility] key. - Page 369 10.12 Viewing Toner Usage (“Toner Coverage” Function) 10-106 C350...
-
Page 370: Touch Panel Messages
Touch Panel Messages... -
Page 371: When The Message "Toner Cartridge (X) Needs To Be Replaced Soon." Appears
11.1 When the Message “Toner Cartridge (X) needs to be replaced soon.” Appears 11.1 When the Message “Toner Cartridge (X) needs to be replaced soon.” Appears When toner is about to run out, the advance warning message shown below appears. (As an example, the message for the yellow toner is shown below.) Display in Enlarge Display Mode If the toner is about to run out,... - Page 372 11.1 When the Message “Toner Cartridge (X) needs to be replaced soon.” Appears Additional Information About 1000 (A4) pages can be printed after the message “Toner Cartridge (X) needs to be replaced soon.” appears. When the message appears, prepare to replace the toner cartridge according to your maintenance agreement.
-
Page 373: When The Message "Replace The Toner Cartridge" Appears
11.2 When the Message “Replace the Toner cartridge” Appears 11.2 When the Message “Replace the Toner cartridge” Appears When the toner is empty, a warning message appears and copies can no longer be made. (As an example, the message indicating that the yellow toner is empty (when replaceable by the user) is shown below.) Display in Enlarge Display Mode When the toner is empty, the screen shown below appears. -
Page 374: Replacing The Toner Cartridge
11.2 When the Message “Replace the Toner cartridge” Appears Touch to display the message shown in the following illustration. Hint When the message appears, replace the toner cartridge according to your maintenance agreement. Additional Information For details on replacing the toner cartridges, refer to “Replacing the Toner Cartridge”... - Page 375 11.2 When the Message “Replace the Toner cartridge” Appears CAUTION Be careful not to spill toner inside the machine or get toner on your clothes or hands. ➜ If your hands become soiled with toner, immediately wash them with soap and water.
- Page 376 11.2 When the Message “Replace the Toner cartridge” Appears Replacing the Toner Cartridge The procedure for replacing any of the toner cartridges (yellow (Y), magenta (M), cyan (C) or black (Bk)) is the same. The following procedure describes the replacement of the yellow toner cartridge as an example.
- Page 377 11.2 When the Message “Replace the Toner cartridge” Appears Prepare the new toner cartridge. ❍ Check that the color of the toner in the cartridge is the same color as the toner- cartridge-securing lever. Reminder! Do not install the toner cartridge of a color different than the one that was removed, otherwise the...
- Page 378 11.2 When the Message “Replace the Toner cartridge” Appears Peel off the tape, and then remove the protective cap. Reminder! Slowly remove the tape attached to the toner cartridge. If the tape is removed with too much force, toner may spurt out. Position the toner cartridge as shown, and then insert it into its compartment.
- Page 379 11.2 When the Message “Replace the Toner cartridge” Appears Slowly pull out the charger- cleaning tool as far as possible. Next, slowly push in the charger- cleaning tool as much as possible. Repeat the above operations three times. Securely insert the charger- cleaning tool, and then close the front door.
-
Page 380: When The Message "Replace Staple Cartridge." Appears
11.3 When the Message “Replace Staple Cartridge.” Appears 11.3 When the Message “Replace Staple Cartridge.” Appears When finisher FS-501 or FS-601 is installed and is about to run out of staples, the message shown below appears. Follow the procedure described below to replace the staple cartridge. Display in Enlarge Display Mode If the staples are empty, appears in the screen on the touch panel. -
Page 381: Replacing The Staple Cartridge For Fs-501
11.3 When the Message “Replace Staple Cartridge.” Appears Touch to display the message shown in the following illustration. Reminder! Be sure to replace the staple cartridge only after the message appears, otherwise the machine may be damaged. Replacing the Staple Cartridge for FS-501 Reminder! Be sure to replace the staple cartridge only after the message appears, otherwise the machine may be damaged. - Page 382 11.3 When the Message “Replace Staple Cartridge.” Appears Pull the staple cartridge holder out toward you. Staple cartridge holder Stapler Remove the empty staple Staple cartridge holder cartridge from the staple cartridge holder. Staple cartridge Insert the new staple cartridge into the staple cartridge holder.
- Page 383 11.3 When the Message “Replace Staple Cartridge.” Appears Carefully pull off the seal. Insert the refilled staple cartridge holder until it locks into place. Slide the finisher back against the machine. 11-14 C350...
-
Page 384: Replacing The Staple Cartridge For Fs-601
11.3 When the Message “Replace Staple Cartridge.” Appears Replacing the Staple Cartridge for FS-601 Reminder! Be sure to replace the staple cartridge only after the message appears, otherwise the machine may be damaged. Open the front door of the finisher. Turn misfeed-clearing dial ➀... - Page 385 11.3 When the Message “Replace Staple Cartridge.” Appears Slowly pull out the stapler unit as far as possible. Stapler unit Grasp both sides of the staple Staple cartridge holder cartridge holder, lift it up, and then pull it out. Press the button marked “PUSH” Staple case on the side of the staple cartridge Staple cartridge...
- Page 386 11.3 When the Message “Replace Staple Cartridge.” Appears Pull up the staple case. Remove the staple cartridge from the staple case. Staple cartridge Load the staple cartridge holder with a new staple cartridge. ❍ Fully insert the staple cartridge as far as possible. C350 11-17...
- Page 387 11.3 When the Message “Replace Staple Cartridge.” Appears Press the staple case down. Peel the tape off of the staple cartridge. Insert the staple cartridge holder, making sure the tabs on the holder slide along the rails in the compartment. 11-18 C350...
- Page 388 11.3 When the Message “Replace Staple Cartridge.” Appears Insert the refilled staple cartridge holder until it locks into place. ❍ Check that the staple cartridge holder is securely installed. Carefully move the stapler unit back into its original position. Close the front door. C350 11-19...
-
Page 389: When The Message "Misfeed Detected." Appears
11.4 When the Message “Misfeed detected.” Appears 11.4 When the Message “Misfeed detected.” Appears Locations of Paper Misfeeds A flashing “O” indicates the location of the paper misfeed. In addition, a lit “O” indicates areas where paper may have been misfed and that should be checked. (As an example, the following illustration shows a paper jam that occurred in a paper drawer.) Hint... -
Page 390: Locations Of Paper Misfeeds In The Enlarge Display Mode
11.4 When the Message “Misfeed detected.” Appears Locations of Paper Misfeeds in the Enlarge Display Mode If a paper misfeed occurs, the screen shown below appears. Touch to display the message shown in the following illustration. C350 11-21... -
Page 391: Paper Misfeed/Staple Jam Indications
11.4 When the Message “Misfeed detected.” Appears Paper Misfeed/Staple Jam Indications Message Description Message Description A paper misfeed in the reverse A staple jam in the finisher FS-501 automatic document feeder (p. 11-50) (p. 11-37) A paper misfeed in the fusing area A paper misfeed in the automatic (p. -
Page 392: Clearing A Paper Misfeed In The Bypass Tray
11.4 When the Message “Misfeed detected.” Appears Clearing a Paper Misfeed in the Bypass Tray Reference For details on the positions of paper misfeeds, refer to “Paper Misfeed/Staple Jam Indications” on page 11-22. Remove all paper from the bypass tray. If misfed paper cannot be pulled out, pull the lever for the sliding plate of the bypass tray, and then... - Page 393 11.4 When the Message “Misfeed detected.” Appears Pull the sliding plate toward you, and then carefully pull out any misfed paper. Pull the lever, and then open the right-side door of the 1st drawer. Carefully pull out any misfed paper. Close the right-side door.
-
Page 394: Clearing A Paper Misfeed In The Automatic Duplex Unit
11.4 When the Message “Misfeed detected.” Appears Clearing a Paper Misfeed in the Automatic Duplex Unit Reference For details on the positions of paper misfeeds, refer to “Paper Misfeed/Staple Jam Indications” on page 11-22. Open the automatic duplex unit door. Carefully pull out any misfed paper. -
Page 395: Clearing A Paper Misfeed In The 1St Or 2Nd Drawer
11.4 When the Message “Misfeed detected.” Appears Clearing a Paper Misfeed in the 1st or 2nd Drawer Reference For details on the positions of paper misfeeds, refer to “Paper Misfeed/Staple Jam Indications” on page 11-22. Pull the lever, and then open the right-side door of the 1st drawer. -
Page 396: Clearing A Paper Misfeed In A Paper Drawer (3Rd Or 4Th Drawer)
11.4 When the Message “Misfeed detected.” Appears Clearing a Paper Misfeed in a Paper Drawer (3rd or 4th Drawer) Reference For details on the positions of paper misfeeds, refer to “Paper Misfeed/Staple Jam Indications” on page 11-22. Pull the lever, and then open the right-side door of the paper drawer (3rd or 4th drawer). -
Page 397: Clearing A Paper Misfeed In The Large-Capacity Paper Feed Cabinet
11.4 When the Message “Misfeed detected.” Appears Clearing a Paper Misfeed in the Large-Capacity Paper Feed Cabinet Reference For details on the positions of paper misfeeds, refer to “Paper Misfeed/Staple Jam Indications” on page 11-22. Pull the lever, and then open the right-side door of the large- capacity paper feed cabinet. -
Page 398: Clearing A Paper Misfeed In The Right-Side Door
11.4 When the Message “Misfeed detected.” Appears Clearing a Paper Misfeed in the Right-Side Door Reference For details on the positions of paper misfeeds, refer to “Paper Misfeed/Staple Jam Indications” on page 11-22. Pull out the paper drawer being used, and then remove any paper remaining in the drawer. - Page 399 11.4 When the Message “Misfeed detected.” Appears Turn the knob M1 on the inside of the right-side door clockwise to feed out the paper. Fusing unit Pull out any paper caught in the timing roller section. Timing roller 11-30 C350...
- Page 400 11.4 When the Message “Misfeed detected.” Appears CAUTION The area around the fusing unit is extremely hot. ➜ Touching anything other than the indicated levers and dials may result in burns. If you get burnt, immediately cool the skin under cold water, and then seek professional medical attention.
- Page 401 11.4 When the Message “Misfeed detected.” Appears Reminder! If the paper is misfed as described below, contact your service representative. The paper is wrapped around the timing roller. The paper is folded or shredded by the timing roller. 11-32 C350...
-
Page 402: Clearing A Paper Misfeed In The Fusing Unit
11.4 When the Message “Misfeed detected.” Appears Clearing a Paper Misfeed in the Fusing Unit Reference For details on the positions of paper misfeeds, refer to “Paper Misfeed/Staple Jam Indications” on page 11-22. Pull up the right-side door release lever, and then open the right-side door. - Page 403 11.4 When the Message “Misfeed detected.” Appears Pull tab M2 down toward you. Turn dial M3 to feed out the paper. Pull out any paper caught in the fusing unit. 11-34 C350...
- Page 404 11.4 When the Message “Misfeed detected.” Appears CAUTION The area around the fusing unit is extremely hot. ➜ Touching any part other than those indicated may result in burns. If you get burnt, immediately cool the skin under cold water, and then seek professional medical attention.
- Page 405 11.4 When the Message “Misfeed detected.” Appears Close the right-side door. Reminder! If the paper is misfed as described below, contact your service representative. The paper is wrapped around the roller in the fusing unit. The paper is folded or shredded by the roller in the fusing unit. The paper that was removed tore and remains in the fusing unit.
-
Page 406: Clearing A Paper Misfeed In The Reverse Automatic Document Feeder
11.4 When the Message “Misfeed detected.” Appears Clearing a Paper Misfeed in the Reverse Automatic Document Feeder Reference For details on the positions of paper misfeeds, refer to “Paper Misfeed/Staple Jam Indications” on page 11-22. Open the misfeed-clearing cover on the left side of the reverse automatic document feeder. - Page 407 11.4 When the Message “Misfeed detected.” Appears Open the guide. Turn the dial to feed out any Guide misfed documents. Carefully pull out any misfed documents. Carefully open the document output tray as far as possible. ❍ Check that the tray remains secured with the guide open.
- Page 408 11.4 When the Message “Misfeed detected.” Appears Lower the document output tray. Open the reverse automatic document feeder, and then carefully pull out any misfed documents. Remove any documents on the original glass, and then close the reverse automatic document feeder.
- Page 409 11.4 When the Message “Misfeed detected.” Appears Close the left-side and right-side misfeed-clearing covers. Reload the documents according to the instructions that appear on the touch panel. 11-40 C350...
-
Page 410: Clearing A Paper Misfeed In Finisher Fs-501
11.4 When the Message “Misfeed detected.” Appears Clearing a Paper Misfeed in Finisher FS-501 Reference For details on the positions of paper misfeeds, refer to “Paper Misfeed/Staple Jam Indications” on page 11-22. Slide the finisher away from the machine. Open the horizontal transport unit cover, and then remove any misfed paper. - Page 411 11.4 When the Message “Misfeed detected.” Appears Close the horizontal transport unit cover. Open front door FN4. Turn knobs FN5 clockwise at the same time. Hint If the paper can be seen from the paper output tray, turn knobs FN5 counterclockwise at the same time to feed out any misfed paper.
- Page 412 11.4 When the Message “Misfeed detected.” Appears While holding misfeed-clearing guide FN7 open, pull out any misfed paper. Open upper cover FN1. CAUTION Metallic parts on the inside of the upper cover are very hot. ➜ Touching any part other than the paper may result in burns. C350 11-43...
- Page 413 11.4 When the Message “Misfeed detected.” Appears While holding misfeed-clearing guide FN2 open, pull out any misfed paper. While holding misfeed-clearing guide FN3 open, pull out any misfed paper. Close upper cover FN1. ❍ If the job separator is not installed, skip to step 15. 11-44 C350...
- Page 414 11.4 When the Message “Misfeed detected.” Appears If the job separator is installed: Open the job separator. Remove any misfed paper. Close the job separator. While holding misfeed-clearing guide FN6 open, pull out any misfed paper. Slide the finisher back against the machine. C350 11-45...
-
Page 415: Clearing A Paper Misfeed In Finisher Fs-601
11.4 When the Message “Misfeed detected.” Appears Clearing a Paper Misfeed in Finisher FS-601 Reference For details on the positions of paper misfeeds, refer to “Paper Misfeed/Staple Jam Indications” on page 11-22. Slide the finisher away from the machine. Open the horizontal transport unit cover. - Page 416 11.4 When the Message “Misfeed detected.” Appears Open the front door of the finisher. Turn misfeed-clearing dial ➀ clockwise until the removal Removal indicator indicator is completely blue. Hint If the dial is turned too far, turn it counterclockwise to adjust it.
- Page 417 11.4 When the Message “Misfeed detected.” Appears Open the upper door of the finisher, and then pull out any paper in the feed section. Close the upper door. Remove all paper fed into the paper output tray. Open the feed guide for the finisher, and then remove any misfed paper.
- Page 418 11.4 When the Message “Misfeed detected.” Appears Open the transport guide, and then pull out any misfed paper in the transport section. Reminder! If the paper cannot easily be pulled out, stop trying to pull it out, and continue with to step Pulling out the paper with too much force may damage the folding unit.
-
Page 419: When The Message "Staple Mode Cannot Be Used." Appears
11.5 When the Message “Staple mode cannot be used.” Appears 11.5 When the Message “Staple mode cannot be used.” Appears Clearing Jammed Staples in Finisher FS-501 Reference For details on the positions of paper misfeeds, refer to “Paper Misfeed/Staple Jam Indications” on page 11-22. Slide the finisher away from the machine. - Page 420 11.5 When the Message “Staple mode cannot be used.” Appears Pull the staple cartridge holder out toward you. Staple cartridge holder Stapler Push the staple holder guide up, and then pull out one sheet of staples. Return the guide to its original position.
- Page 421 11.5 When the Message “Staple mode cannot be used.” Appears Reminder! If stapling still cannot be performed, even after performing the above procedure, contact your service representative. 11-52 C350...
-
Page 422: Clearing Jammed Staples In Finisher Fs-601
11.5 When the Message “Staple mode cannot be used.” Appears Clearing Jammed Staples in Finisher FS-601 Reference For details on the positions of paper misfeeds, refer to “Paper Misfeed/Staple Jam Indications” on page 11-22. Reminder! If the message “Staple mode cannot be used.” appears, be sure to perform the following procedure. - Page 423 11.5 When the Message “Staple mode cannot be used.” Appears Open the feed guide for the finisher, and then remove any misfed paper. Open the front door of the finisher. Turn misfeed-clearing dial ➀ clockwise until the removal Removal indicator indicator is completely blue.
- Page 424 11.5 When the Message “Staple mode cannot be used.” Appears Reminder! If the message “Staple mode cannot be used.” appears, be sure to perform these steps. If the paper is pulled out with too much force without performing these steps, the finisher may be damaged.
- Page 425 11.5 When the Message “Staple mode cannot be used.” Appears Clockwise turn the misfeed- clearing dial in the folding section. Feed out into the lower output tray the paper that could not be fed out in step 8, and then pull out the paper.
- Page 426 11.5 When the Message “Staple mode cannot be used.” Appears Grasp both sides of the staple Staple cartridge cartridge holder, lift it up, and holder then pull it out. Swing open the shutter of the staple cartridge. Pull out toward you the two staples jammed at the end of the staple cartridge.
- Page 427 11.5 When the Message “Staple mode cannot be used.” Appears Insert the staple cartridge holder, making sure the tabs on the holder slide along the rails in the compartment. Insert the staple cartridge holder until it locks into place. ❍ Check that the staple cartridge holder is securely installed.
-
Page 428: When The Message "Remove Punch Scraps." Appears
11.6 When the Message “Remove Punch Scraps.” Appears 11.6 When the Message “Remove Punch Scraps.” Appears If the punch kit PK-501 is attached to finisher FS-601, the following message will appear when the hole-punch waste container is full (If it can be emptied by the user). -
Page 429: Emptying The Hole-Punch Waste Container
11.6 When the Message “Remove Punch Scraps.” Appears Touch to display the message shown in the following illustration (if it can be emptied by the user). Emptying the Hole-Punch Waste Container Empty the hole-punch waste container as described below. Slide the finisher away from the machine. - Page 430 11.6 When the Message “Remove Punch Scraps.” Appears Empty the hole-punch waste container. Insert the hole-punch waste container into its original position. Slide the finisher back against the machine. C350 11-61...
- Page 431 11.7 When the Inspection Mark “ ” Appears 11.7 When the Inspection Mark “ ” Appears When the inspection mark ( ) appears in the lower-left corner of the Basic screen, the image stabilization or printing or scanning functions have become unstable.
-
Page 432: When The Inspection Mark " " Appears
11.7 When the Inspection Mark “ ” Appears Display in Enlarge Display Mode If an error occurs during image stabilizing, printing or scanning, appears in the screen on the touch panel. Touch . The mark ( ) appears in the lower-left corner of the screen. Touching the inspection mark ( ) that appears in the Basic screen displays a screen like that shown below. -
Page 433: When The Message "Malfunction Detected." Appears
11.8 When the Message “Malfunction detected.” Appears 11.8 When the Message “Malfunction detected.” Appears When the message shown below appears in the touch panel, a malfunction has occurred within this machine. Display in Enlarge Display Mode If a malfunction occurs, the screen shown below appears. 11-64 C350... - Page 434 11.8 When the Message “Malfunction detected.” Appears Touch to display the message shown in the following illustration. Reminder! If this message appears, contact your service representative. When contacting the service representative, be sure to inform them of the malfunction code (“C-0200” for the example shown above) that was indicated. C350 11-65...
-
Page 435: When "The Following Units Need To Be Replaced Soon." Appears
11.9 When “The following units need to be replaced soon.” Appears 11.9 When “The following units need to be replaced soon.” Appears When it is almost time to replace supplies or a part within this machine, the message shown in the following illustration appears, warning about the replacement period. - Page 436 11.9 When “The following units need to be replaced soon.” Appears Touch to display the message shown in the following illustration. Hint When the message appears, replace the specified supplies or part according to your maintenance agreement. Additional Information After the message “The following units need to be replaced soon.”, the message “Please replace XXXX.”...
-
Page 437: When The Message "Please Replace Xxxx." Appears
11.10 When the Message “Please replace XXXX.” Appears 11.10 When the Message “Please replace XXXX.” Appears When it is time to replace supplies or a part within this machine, a message appears, indicating that the part or supplies should be replaced, and the machine stops operating. - Page 438 11.10 When the Message “Please replace XXXX.” Appears Touch to display the message shown in the following illustration. Hint When the message appears, replace the specified supplies or part according to your maintenance agreement. CAUTION Used supplies or part ➜ Do not throw away used supplies or parts.
-
Page 439: 11.11 Main Messages And Their Remedies
11.11 Main Messages and Their Remedies 11.11 Main Messages and Their Remedies Message Cause Remedy Original left on Glass. The document was left on the Remove the document from the original glass. original glass. Matching paper size is not Paper of a suitable size is not Either select a different copy available. - Page 440 11.11 Main Messages and Their Remedies Message Cause Remedy Replace the Toner Cartridge. Since the toner for the indicated Replace the toner cartridge color has run out, the machine is according to your maintenance unable to make copies. agreement. Replace Staple Cartridge. The staples have run out.
- Page 441 11.11 Main Messages and Their Remedies 11-72 C350...
-
Page 442: Troubleshooting
Troubleshooting... -
Page 443: When The Print Quality Is Low
12.1 When the Print Quality Is Low 12.1 When the Print Quality Is Low Symptom Possible Cause Remedy The printed output is too light. The copy density is set too Select a darker Density light. setting. (See page 3-45.) The paper is damp. Replace the paper. - Page 444 12.1 When the Print Quality Is Low Symptom Possible Cause Remedy There are dark specks or spots The original glass is dirty. Wipe the glass with a soft, dry throughout the printed output. cloth. (See page 9-2.) Either the document pad or the Clean the document pad or the document transfer belt is dirty.
- Page 445 12.1 When the Print Quality Is Low Symptom Possible Cause Remedy The edge of the printed output is Either the document pad or the Clean the document pad or the dirty. document transfer belt is dirty. document transfer belt with a soft cloth dampened with a mild detergent.
-
Page 446: When The Machine Is Not Operating Correctly
12.2 When the Machine Is Not Operating Correctly 12.2 When the Machine Is Not Operating Correctly Symptom Possible Cause Remedy Nothing appears in the touch The indicators on the [Start] key The machine is in Power Save panel. and [Power Save] key light up in mode. - Page 447 12.2 When the Machine Is Not Operating Correctly 12-6 C350...
-
Page 448: Specifications
Specifications... -
Page 449: Specifications
13.1 Specifications 13.1 Specifications Copier C350 Specifications Type Desktop scanner/printer Platen Stationary Photoconductor Copying system Dry-type electrophotographic method Developing system HMT developing method Fusing system Belt-fixing × Resolution Scanning: 600 dpi; Printing: 600 dpi 1800 dpi equivalent Document Types: Sheets, books, and other three-dimensional objects Size: Maximum A3;... -
Page 450: Automatic Duplex Unit Ad
13.1 Specifications Specifications Multiple copies 1 to 999 sheets Density control Copy density: Manual Background density: Automatic and manual Power requirements 220-240 V, 240 V: 6.7 A or less, 50 Hz Power consumption Less than 1,550 W × × Dimensions 903 mm (width) 730 mm (depth) 770 mm (height) -
Page 451: Reverse Automatic Document Feeder Df-601
13.1 Specifications Reverse Automatic Document Feeder DF-601 Specifications Document feed methods Plain paper: Single-sided and double-sided documents Thick paper: Single-sided documents (129 to 210 g/m “Mixed Original” function: Single-sided and double-sided documents Document paper type Single-sided: Plain paper (35 to 128 g/m Double-sided or mixed: Plain paper (50 to 110 g/m ×... -
Page 452: Paper Feed Cabinet Pc-101
13.1 Specifications Paper Feed Cabinet PC-101 Specifications Paper types Plain paper (60 to 90 g/m Paper sizes A3 L to A5 L Paper capacity 500 sheets (80 g/m Power requirements Supplied from main unit Power consumption Less than 15 W ×... -
Page 453: Finisher Fs-601
13.1 Specifications Finisher FS-601 Specifications Output trays Paper output tray and lower paper output tray Settings Normal functions: “Non sort”, “Sort”, “Sort/Staple” and “Saddle Staple” settings Hole-punch functions: “Non sort/Punch”, “Sort/Punch” and “Sort/ Staple/Punch” settings Paper types Paper output tray: “Non sort”... -
Page 454: Job Separator Js
13.1 Specifications Finisher FS-501 Specifications Output trays Primary paper output tray (non sorted copies), Secondary paper output tray (sorted copies) Settings “Non sort”, “Sort”, “Group” and “Staple” settings Paper types Primary paper output tray: “Non sort” setting: Plain paper (60 to 90 g/m thick paper 1 (91 to 150 g/m ), thick paper 2 (151 to 209 g/m thick paper 3 (210 to 256 g/m... -
Page 455: Punch Kit Pk-501
13.1 Specifications Punch Kit PK-501 Specifications Number of punched holes Punch hole diameter 6.5 mm Paper type Plain paper (60 to 90 g/m ), thick paper 1 (91 to 150 g/m thick paper 2 (151 to 209 g/m Paper size A4 C, A3 L Power requirements Supplied by finisher... - Page 456 Appendix...
-
Page 457: Paper Size And Zoom Ratio Tables
14.1 Paper Size and Zoom Ratio Tables 14.1 Paper Size and Zoom Ratio Tables Copy Paper Sizes Paper Format Metric Size English Size × × A3 Wide 305 mm 457 mm × × 297 mm 420 mm 11-3/4 16-1/2 × ×... -
Page 458: Zoom Ratios
14.1 Paper Size and Zoom Ratio Tables Zoom Ratios Metric Sizes Document Paper Size Desired Paper Size Zoom Ratio × 0.707 × 297 mm 420 mm × × 0.500 11-3/4 16-1/2 × 0.866 × 0.610 × 0.707 × 210 mm 297 mm ×... - Page 459 14.1 Paper Size and Zoom Ratio Tables × 0.816 × 128 mm 182 mm × × 1.640 7-1/4 × 1.154 × 2.000 × 1.414 English Sizes Document Paper Size Desired Paper Size Zoom Ratio × × Ledger 0.823 × × ×...
- Page 460 14.1 Paper Size and Zoom Ratio Tables × × Invoice 2.000 × 5-1/2 8-1/2 × × × 1.647 139.7 mm 215.9 mm × Legal 1.545 × Foolscap 1.529 × Letter 1.294 Zoom ratio = Paper size/Document size 1 inch = 25.4 mm 1 mm = 0.0394 inch C350 14-5...
-
Page 461: Loading Documents For Specific Applications
14.2 Loading Documents for Specific Applications 14.2 Loading Documents for Specific Applications The most appropriate document feed method and copy settings for specific applications are described below. For details on specifying the various copy settings, refer to “Basic Copy Operations” on page 3-1. -
Page 462: Single-Sided Documents
14.2 Loading Documents for Specific Applications Single-Sided Documents Single-Sided Document Ö Single-Sided Copy Original Direction Finished Copy Output Margin File Output Setting Setting Margin Position (Orig Ö Setting Copy (Applica- Screen) tion Screen) 1 Staple — — — Turn page Turn page Hole... - Page 463 14.2 Loading Documents for Specific Applications Single-Sided Document Ö Single-2in1 Copy Original Direction Finished Copy Output Margin File Output Setting Setting Margin Position (Orig Ö Setting Copy (Applica- Screen) tion Screen) 1 Staple — — — Turn page Turn page Hole —...
- Page 464 14.2 Loading Documents for Specific Applications Single-Sided Document Ö Single-4in1 Copy Original Direction Finished Copy Output Margin File Output Setting Setting Margin Position (Orig Ö Setting Copy (Applica- Screen) tion Screen) 1 Staple — — — Turn page Turn page Hole —...
- Page 465 14.2 Loading Documents for Specific Applications Single-Sided Document Ö Double-Sided Copy Original Direction Finished Copy Output Margin File Output Setting Setting Margin Position (Orig Ö Setting Copy (Applica- Screen) tion Screen) 1 Staple — — — Turn page 1 Staple —...
- Page 466 14.2 Loading Documents for Specific Applications Single-Sided Document Ö Double-2in1 Copy Original Direction Finished Copy Output Margin File Output Setting Setting Margin Position (Orig Ö Setting Copy (Applica- Screen) tion Screen) 1 Staple — — 3 4 5 6 Turn page 1 Staple —...
- Page 467 14.2 Loading Documents for Specific Applications Single-Sided Document Ö Double-4in1 Copy Original Direction Finished Copy Output Margin File Output Setting Setting Margin Position (Orig Ö Setting Copy (Applica- Screen) tion Screen) 1 Staple — — — Turn page 1 Staple —...
-
Page 468: Left-Bound Double-Sided Documents
14.2 Loading Documents for Specific Applications Left-Bound Double-Sided Documents Left-Bound Double-Sided Document Ö Single-Sided Copy Original Direction Finished Copy Output Margin File Output Setting Setting Margin Position (Orig Ö Setting Copy (Applica- Screen) tion Screen) 1 Staple — — — Turn page Turn... - Page 469 14.2 Loading Documents for Specific Applications Left-Bound Double-Sided Document Ö Single-2in1 Copy Original Direction Finished Copy Output Margin File Output Setting Setting Margin Position (Orig Ö Setting Copy (Applica- Screen) tion Screen) 1 Staple — — — Turn page Turn page Hole —...
- Page 470 14.2 Loading Documents for Specific Applications Left-Bound Double-Sided Document Ö Single-4in1 Copy Original Direction Finished Copy Output Margin File Output Setting Setting Margin Position (Orig Ö Setting Copy (Applica- Screen) tion Screen) 1 Staple — — — Turn page Turn page Hole —...
- Page 471 14.2 Loading Documents for Specific Applications Left-Bound Double-Sided Document Ö Double-Sided Copy Original Direction Finished Copy Output Margin File Output Setting Setting Margin Position (Orig Ö Setting Copy (Applica- Screen) tion Screen) 1 Staple — — — Turn page 1 Staple —...
- Page 472 14.2 Loading Documents for Specific Applications Left-Bound Double-Sided Document Ö Double-2in1 Copy Original Direction Finished Copy Output Margin File Output Setting Setting Margin Position (Orig Ö Setting Copy (Applica- Screen) tion Screen) 1 Staple — — 3 4 5 6 Turn page 1 Staple...
- Page 473 14.2 Loading Documents for Specific Applications Left-Bound Double-Sided Document Ö Double-4in1 Copy Original Direction Finished Copy Output Margin File Output Setting Setting Margin Position (Orig Ö Setting Copy (Applica- Screen) tion Screen) 1 Staple — — — Turn page 1 Staple —...
-
Page 474: Top-Bound Double-Sided Documents
14.2 Loading Documents for Specific Applications Top-Bound Double-Sided Documents Top-Bound Double-Sided Document Ö Single-Sided Copy Original Direction Finished Copy Output Margin File Output Setting Setting Margin Position (Orig Ö Setting Copy (Applica- Screen) tion Screen) 1 Staple — — Turn page Turn page... - Page 475 14.2 Loading Documents for Specific Applications Top-Bound Double-Sided Document Ö Single-2in1 Copy Original Direction Finished Copy Output Margin File Output Setting Setting Margin Position (Orig Ö Setting Copy (Applica- Screen) tion Screen) 1 Staple — — Turn page Turn page Hole —...
- Page 476 14.2 Loading Documents for Specific Applications Top-Bound Double-Sided Document Ö Single-4in1 Copy Original Direction Finished Copy Output Margin File Output Setting Setting Margin Position (Orig Ö Setting Copy (Applica- Screen) tion Screen) 1 Staple — — Turn page Turn page Hole —...
- Page 477 14.2 Loading Documents for Specific Applications Top-Bound Double-Sided Document Ö Double-Sided Copy Original Direction Finished Copy Output Margin File Output Setting Setting Margin Position (Orig Ö Setting Copy (Applica- Screen) tion Screen) 1 Staple — Turn page 1 Staple — —...
- Page 478 14.2 Loading Documents for Specific Applications Top-Bound Double-Sided Document Ö Double-2in1 Copy Original Direction Finished Copy Output Margin File Output Setting Setting Margin Position (Orig Ö Setting Copy (Applica- Screen) tion Screen) 1 Staple — 3 4 5 6 Turn page 1 Staple —...
- Page 479 14.2 Loading Documents for Specific Applications Top-Bound Double-Sided Document Ö Double-4in1 Copy Original Direction Finished Copy Output Margin File Output Setting Setting Margin Position (Orig Ö Setting Copy (Applica- Screen) tion Screen) 1 Staple — Turn page 1 Staple — —...
-
Page 480: Function Combination Table
14.3 Function Combination Table 14.3 Function Combination Table Function Combination Table C350 14-25... - Page 481 14.3 Function Combination Table 14-26 C350...
- Page 482 14.3 Function Combination Table C350 14-27...
- Page 483 14.3 Function Combination Table 14-28 C350...
- Page 484 14.3 Function Combination Table C350 14-29...
- Page 485 14.3 Function Combination Table 14-30 C350...
- Page 486 14.3 Function Combination Table Function combination code keys :The functions can be combined. :The functions cannot be combined. The function set last has priority. :The functions cannot be combined. The function set first has priority. A warning message will appear. :The functions cannot be combined.
- Page 487 14.3 Function Combination Table no effect on, such as with the “Photo Paper” setting. Next, select a Photo/Density setting where the “Text Enhancement” setting can be specified, such as with the “Text” setting (34) or the “Map” setting (36). The previously specified “Text Enhancement”...
- Page 488 14.3 Function Combination Table Sample copies: Another function cannot be selected while a sample copy is being printed. When a sample copy is printed, the mode returns to the one before the sample copy was printed. The paper drawer is selected according to the priority order.
- Page 489 14.3 Function Combination Table 14-34 C350...
-
Page 490: Index
Index... - Page 491 15.1 Index 15.1 Index Numerics 1 (Copy) .................... 3-38 1 (Original) ..................3-27 1 staple ..................... 3-10 1-2in1 (Copy) ..................3-38 1-4in1 (Copy) ..................3-39 1st drawer ................2-26 3-22 2 (Copy) .................... 3-38 2 (Original) ..................3-27 2 color ....................3-5 2-2in1 (Copy) ..................
- Page 492 15.1 Index Automatic paper source selection ............4-8 Automatic scaling ................3-13 Auto-select paper for small originals ..........10-23 Average brightness ................3-6 Background color ................7-41 Basic screen ..................2-21 Bind ....................3-41 Binding margin ...................3-31 Black ....................3-5 Black image density correction ............10-77 Blue ....................7-34 Book ..................2-44 3-27 Booklet ....................3-40 Booklet copy zoom ................10-17...
- Page 493 15.1 Index Clearing a paper misfeed in the reverse automatic document feeder ....................11-37 Clearing a paper misfeed in the right-side door ......11-29 Clearing access lock ............... 10-42 Clearing jammed staples in finisher FS-501 ........11-50 Clearing jammed staples in finisher FS-601 ........11-53 Color adjustment samples ..............
- Page 494 15.1 Index Density settings ............... 3-45 3-47 Disable sleep mode .................10-34 Document orientation ................3-29 Document transfer belt ................9-3 Document types ...................5-2 Double-sided 2in1 copy ..............3-38 Double-sided 4in1 copy ..............3-39 Double-sided copy ................3-38 Double-sided original .................3-27 Edge/Frame erase ................7-10 Electrostatic charger ................9-5 Enlarge ....................3-13 Enlarged display clear check .............6-14 Envelopes ..................2-26...
- Page 495 15.1 Index Hard disk ................10-55 10-57 Hard disk password ................ 10-55 HDD lock setting ................10-52 HDD screen ..................8-20 Hold job screen ................. 8-11 Hole-Punching .................. 3-11 Housing ....................9-2 Hue ....................7-38 Image adjustment ................7-15 Image density .................. 10-69 Image repeat ..................
- Page 496 15.1 Index Language select ................10-16 LDAP search ...................10-46 Left margin ................10-82 10-84 Left-Bound double-sided documents ..........14-13 Loading ..............2-26 2-31 2-33 2-35 Loading documents for specific applications ........14-6 Locked job delete ................10-37 Locked jobs screen ................8-13 Main unit ....................13-2 Malfunction ................
- Page 497 15.1 Index Neg. Pos. reverse ................7-45 Non-standard paper size ............3-22 3-23 Number of copies ................3-2 Numbering ..................7-5 OHP interleave .................. 7-22 Original direction ............2-41 2-44 3-29 Original glass ..................9-2 Original settings ...............3-27 3-35 Original settings specifying ............... 3-32 Output settings ..................
- Page 498 15.1 Index Password ..................10-55 Photo/Density settings ............. 3-45 3-47 Portrait ....................7-37 Postcard ....................7-55 Power save ..................10-11 Power save mode ................2-18 Power source ..................1-7 Prefix/Suffix registration ..............10-65 Print area ............4-6 10-80 10-82 10-84 Print log screen ..................8-8 Print quality ..................12-2 Priority device ..................10-29 Priority output tray ................10-27 PRT area (DUP.
- Page 499 15.1 Index Sample copies ................6-6 7-40 Saturation ..................7-30 Scan to memory .................. 7-2 Scanning ..................... 7-3 Screen pattern .................. 3-49 Send list screen .................. 8-6 Send log screen ................8-10 Separate scan ..................7-3 Sharpness ..................7-31 Single Color ..................3-5 Single-sided 2in1 copy ..............
- Page 500 15.1 Index Take-up roller ..................9-4 Thick original ..................3-31 Thick paper and OHP film image density ........10-69 Toner cartridge ...............11-2 11-4 11-7 Toner coverage ................10-105 Top erase ..................10-33 Top margin ..................10-80 Top-Bound double-sided documents ..........14-19 Touch panel ..................2-21 Troubleshooting .................12-1 Turning off ..................2-20 Turning on ..................2-17 Unit life indicator ................10-30 Units ....................11-66...
- Page 501 15.1 Index X/Y zoom ..................3-17 Zoom ratios ................10-17 14-3 Zoom settings ..............3-13 3-14 3-15 Zooming .................... 3-14 15-12 C350...
- Page 502 www.konicaminolta.net Copyright 4036-7708-02A 2004. 4 2004...