Table of Contents
Advertisement
Quick Links
Advertisement
Table of Contents

Related Manuals for Multitech CommPlete RAS96


Summary of Contents for Multitech CommPlete RAS96
- Page 1 RAS96 RASCard - E1 User Guide...
- Page 2 Multi-Tech, CommPlete, RASExpress, MultiExpress, MultiExpress Fax MultiModem, MultiModemZDX, MultiCommManager, and the Multi-Tech logo are trademarks of Multi-Tech Systems, Inc. AMD is a trademark of Advanced Micro Devices, Inc. Award is a trademark of Award Software International, Inc. Cyrix is a trademark of Cyrix Corp.
-
Page 3: Important Safety Instructions
Dispose of used batteries according to the manufacturer’s instructions. The RAS96 RASCard circuit board includes a battery that maintains the RASCard’s setup information when it is turned off or disconnected from power. The battery can maintain the setup information for approximately 10 years with no external power, and longer when the RASCard is turned on and operating normally. -
Page 4: Table Of Contents
Table of Contents 1 Introduction Introduction ... 2 Manual Organization ... 2 Technical Specifications... 3 2 RASCard Description Introduction ... 6 Memory Banks... 6 Jumpers... 7 Internal Connectors ... 8 External Connectors ... 9 Front Panel ...10 LED Indicators ...10 Switches ...11 3 Installation Introduction ...14... - Page 5 Country Selection ...44 E1 Facility Termination ...45 PCB Description...46 RJ-11 Alarm Jack...46 E1 Line Monitoring Jack...46 Test Modes...46 47Configuration of the E1 Daughter Card...47 Ordering an E1 Line...47 To Configure the E1 Daughter Card ...48 E1 Comands...49 E1 Command Messages...53 E1 Status LEDs ...53 Functional Description ...54 6 Solving Problems...
-
Page 7: Introduction
1 Introduction CommPlete Communications Server... -
Page 8: Manual Organization
This chapter describes the options in the Award BIOS Setup utility. Chapter 5 This chapter describes the optional E1 daughter card that mounts on the RAS96. Chapter 6 This chapter describes how to solve typical problems that you might encounter when running the RASCard. -
Page 9: Technical Specifications
Appendix C This appendix describes codes generated by the BIOS during POST. Appendix D This appendix lists memory SIMMs that are known to work with the RAS96. Appendix E This appendix provides Regulatory Agency information pertaining to this E1device. Technical Specifications •... - Page 10 RAS96 RASCard User Guide • Humidity range: 20–90% (noncondensing). • Power consumption: 4.5 A @ +5 VDC. • Limited warranty: Two years. CommPlete Communications Server...
-
Page 11: Rascard Description
2 RASCard Description CommPlete Communications Server... -
Page 12: Introduction
RAS96 RASCard User Guide Introduction The RAS96 assembly consists of a Pentium computer card to which is mounted a 2.5- inch hard disk drive, up to two optional E1 cards, and a front panel. Figure 1 shows the layout of the RAS96 card. The RAS96 assembly plugs into bus connectors on the inside of the CC9600 chassis that supply power and support data communications among the various components of the CommPlete Communications Server. -
Page 13: Jumpers
Table 1. Memory Configurations. Bank 1 None 2 × 4 MB 2 × 4 MB 2 × 8 MB 2 × 8 MB 2 × 8 MB 2 × 16 MB 2 × 16 MB 2 × 16 MB 2 × 32 MB 2 ×... -
Page 14: Internal Connectors
RAS96 RASCard User Guide Internal Connectors The RASCard has several internal connectors, which are described from front to back. J20 CPU Fan This is the 5 VDC power connector for the CPU’s cooling fan. J12 Power Switch This is the connector for the power switch. -
Page 15: External Connectors
J2 Power Connector This connector supplies power and ground to the RASCard. External Connectors The RASCard has four connectors that are accessible from the rear of the CommPlete chassis. J22 E1 Alarm This RJ-11 jack can be used to connect an external alarm system (not supplied by Multi-Tech) to monitor the online or alarm condition of the E1 link. -
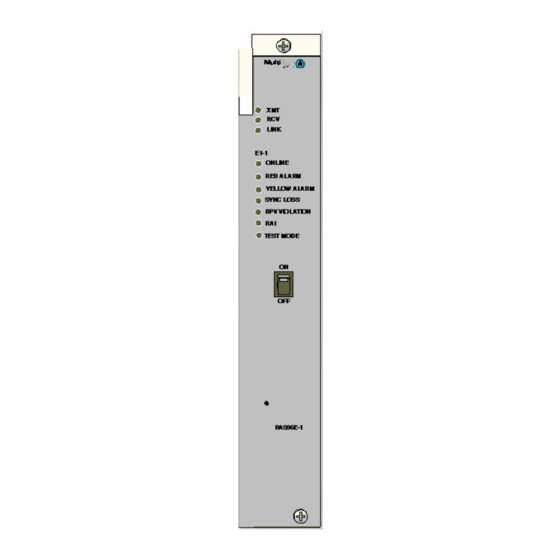
Page 16: Front Panel
RAS96 RASCard User Guide Front Panel LED Indicators Ethernet Status LEDs The RASCard front panel contains three indicators that show the status of the RASCard’s Ethernet port. LED Indicator XMT Transmit RCV Receive LINK Link Integrity Yellow E1 Status LEDs The RASCard front panel contains seven indicators that show the status of the RASCard’s optional E1... -
Page 17: Switches
LED Indicator RAI ALARM TEST MODE Switches Power Switch The power switch turns the RASCard on and off. An LED indicator in the switch lights when the RASCard is on. Reset Switch The reset switch is a momentary push-button that is recessed behind a small hole in the front panel. -
Page 19: Installation
Installation CommPlete Communications Server... -
Page 20: Introduction
RAS96 RASCard User Guide Introduction This chapter describes how to install the RAS96 RASCard into a CommPlete Communication Server chassis (either CC9600 or CC2400). This equipment should be installed only by a qualified service person. Safety Warnings • Never install telephone wiring during a lightning storm. - Page 21 Supporting the RASCard by the front panel and the bottom edge of the card, place it into the open slot. Make sure the edges of the RASCard card mate properly with the metal guides in the CommPlete chassis. Slide the RASCard into the CommPlete chassis until you feel the RASCard’s connectors mate with the chassis’s bus connectors.
-
Page 23: Bios Setup Utility
4 BIOS Setup Utility CommPlete Communications Server... -
Page 24: Introduction
RAS96 RASCard User Guide Introduction This chapter describes the Award Setup utility, which is built into the RASCard’s BIOS. The Setup utility allows users to modify the basic system configuration. This special information is then stored in battery-backed CMOS RAM that retains the setup information when the power is turned off. -
Page 25: Using Setup
Using Setup In general, use the arrow keys to highlight items, press E and P The following table lists the keys that can be used to navigate the Setup utility. Up arrow Down arrow Left arrow Right arrow Esc key Page Up key Page Down key + key... -
Page 26: Main Menu
RAS96 RASCard User Guide Main Menu When you run the Award BIOS CMOS Setup Utility, the main menu appears first on the screen. The main menu allows you to select from several setup pages and two exit choices. Use the arrow keys to select among the items, then press E selected page. - Page 27 4 BIOS Setup Utility PCI Configuration Setup This setup page allows you to set up your computer for efficient energy levels. See page Password Setting Change, set, or disable the password. The password allows you to limit access to the system and the Setup Utility, or just to the Setup Utility.
- Page 28 RAS96 RASCard User Guide Load Setup Defaults The chipset defaults are optimized settings for regular use. IDE HDD Auto Detection Automatically detects and configures hard disk parameters. The Award BIOS includes this ability in case you are uncertain of your hard disk’s parameters. See also “Standard CMOS Setup.”...
- Page 29 4 BIOS Setup Utility Save and Exit Setup Save changes to CMOS and exit Setup. Exit Without Saving Abandon all CMOS changes and exit Setup. CommPlete Communications Server...
-
Page 30: Standard Cmos Setup
RAS96 RASCard User Guide Standard CMOS Setup The items in the Standard CMOS Setup menu are divided into several categories. Use the arrow keys to highlight the item you want to change, then use the P key to select the value you want for the item. - Page 31 You can use the IDE HDD Auto Detection option in the main menu to automatically enter the specifications for your hard disk. If you wish to configure your drive manually, press P specifications in the drive table. The hard disk will not work properly if you enter improper information.
- Page 32 RAS96 RASCard User Guide Halt On The category determines whether the computer will stop if an error is detected during power up. All errors No errors All, But Keyboard All, But Diskette All, But Disk/Key Memory The category is display-only. Values are determined by the BIOS power-on self-test (POST).
-
Page 33: Bios Features Setup
BIOS Features Setup This menu allows you to configure your system for basic operation. You have the opportunity to select the system’s default speed, boot-up sequence, keyboard operation, shadowing and security. Virus Warning When this item is enabled, the Award BIOS will monitor the boot sector and partition table of the hard disk drive for any attempt at modification. -
Page 34: Quick Power On Self Test
RAS96 RASCard User Guide CPU Internal Cache/External Cache These two categories speed up memory access when enabled. Enabled Disabled Quick Power On Self Test This category speeds up the power-on self-test (POST) after you power up the computer. If it is set to Enable, BIOS will shorten or skip some check items during POST. -
Page 35: Gate A20 Option
Gate A20 Option This entry allows you to select how the gate A20 is handled. The gate A20 is a device used to address memory above 1 MB. Initially, the gate A20 was handled via a pin on the keyboard. Today, though keyboards still provide this support, it is more common, and much faster, for the system chipset to provide support for gate A20. -
Page 36: Security Option
RAS96 RASCard User Guide Typematic Delay (Msec) When the typematic rate is enabled, this selection allows you to select the delay between the first and second characters. 1000 Security Option This category allows you to limit access to the system and to Setup, or just to Setup. -
Page 37: Chipset Features Setup
Chipset Features Setup This section allows you to configure the system based on the specific features of the installed chipset. The chipset manages bus speeds and access to system memory resources, such as DRAM and the L2 external cache. It also coordinates communications between the conventional ISA bus and the PCI bus. -
Page 38: Video Bios Cacheable
RAS96 RASCard User Guide Video BIOS Cacheable As with caching the System BIOS above, enabling the Video BIOS cache will cause access to video BIOS addressed at C0000H to C7FFFH to be cached, if the cache controller is also enabled. - Page 39 On-Chip Primary PCI IDE As stated above, your system includes a built-in primary IDE controller, which operates on the PCI bus. This setup item allows you to either enable or disable the primary controller. Enabled Disabled PCI Concurrancy PCI concurrency means that more than one PCI device can be active at a time. Enabled Disabled PCI Streaming...
-
Page 40: Power Management Setup
RAS96 RASCard User Guide Power Management Setup The Power Management Setup allows you to configure your system to most effectively save energy while operating in a manner consistent with your own style of computer use. Power Management This option allows you to select the type (or degree) of power saving and is directly related to the following modes: •... -
Page 41: Video Off Method
PM Control by APM When this item is enabled, Advanced Power Management device will keep the system time updated when the computer enters suspend mode activated by the BIOS power management. If Max Power Saving is not enabled, this will be preset to No. Video Off Method This determines the manner in which the monitor is blanked. - Page 42 RAS96 RASCard User Guide Power Down Activities Power Down Activities events are I/O events whose occurrence can prevent the system from entering a power saving mode or can awaken the system from such a mode. In effect, the system remains alert for anything that occurs to a device that is configured as ON, even when the system is in a power down mode.
-
Page 43: Pci Configuration Setup
PCI Configuration Setup This section describes how to configure the PCI bus system. The PCI bus allows I/O devices to operate at speeds near the speed the CPU itself uses to communicate with its own special components. It is strongly recommended that only experienced users should make any changes to the default settings. - Page 44 RAS96 RASCard User Guide You can select which INT# is associated with each PCI slot and which conventional IRQ is associated with one of the two available INT#s. A setting of NA means the IRQ has been assigned to the ISA bus and is not available to any PCI slot.
-
Page 45: Password Setting
Password Setting When you select this item, the following message will appear at the center of the screen to assist you in creating a password. ENTER PASSWORD: Type the password, up to eight characters in length, and press E that you type now will clear any previously entered password from CMOS memory. You will be asked to confirm the password. -
Page 47: E1 Daughter Cards
5 E1 Daughter Cards CommPlete Communications Server... -
Page 48: Introduction
RAS96 RASCard User Guide Introduction The E1 Daughter Card mounts on the RAS96 RASCard to provide an E1 interface for up to two MT5634HD16 sixteen-modem cards. This chapter documents the operating characteristics of the E1 card. 32-Pin Header (J3) 32-Pin Header (J4) Figure 4. -
Page 49: E1 Glossary
E1 Glossary RAI: Remote Alarm Indication; a field of all ones (1) used as a “keep-alive” signal. AMI: Alternate Mark Inversion; a type of line coding for E1 spans. HDB3: High Density Bipolar Order 3 Encoding. CAS: Channel Associated Signaling. A form of circuit state signaling in which the circuit state is indicated by one or more bits of signaling status sent repetitively and associated with that specific circuit. -
Page 50: E1 Basics
RAS96 RASCard User Guide FXS: Foreign Exchange, Subscriber; the customer premises interface that, along with FXO, allows the phones to act as if connected locally to the main PBX, but without the cost. G.704: A series of ITU standards for E1 frame formatting. (e.g., section 2.1.3.1). -
Page 51: E1 Frame Formats
E1 Frame Formats Framing is the way E1 equipment formats bits on the E1 line for encoding digital voice. Selecting the method of framing is a major E1 network design issue. There are two options for E1 frame formatting: • CRC4 (16 Frame) •... -
Page 52: Country Selection
RAS96 RASCard User Guide Country Selection Country Selection identifies your country. You may select China, Hungary, India or Mexico. Select ITU for all other locations. CommPlete Communications Server... -
Page 53: E1 Facility Termination
E1 Facility Termination The E1 facility termination typically enters the customer’s premises as two wire pairs for data. Figure 5 shows the RJ-48C connector, and Table 2 shows its pin configuration. Figure 5. RJ-48C connector. Table 2. RJ-48C Pin Configuration Signal Tip 1 (Receive from network) Ring 1 (Receive from network) -
Page 54: Pcb Description
PCB Description The E1 Daughter Card has two external jacks: an RJ-48 E1 line jack, and an E1 line monitoring Bantam jack. Connection to the RAS96 RASCard is via two 32-pin headers (J3 and J4 in Figure 4). RJ-11 Alarm Jack The RJ-11 Alarm jack, located on the RASCard, is for connection to an external alarm system, such as a relay, warning light or bell. -
Page 55: 47Configuration Of The E1 Daughter Card
Configuration of the E1 Daughter Card The E1 Daughter Card is configured through the MR9600 Controller. Before you configure it, you should know how your E1 line was set up by the telephone company when you ordered it. Ordering an E1 Line There are many choices to make when ordering an E1 line. -
Page 56: To Configure The E1 Daughter Card
RAS96 RASCard User Guide To Configure the E1 Daughter Card Turn on power to the segment containing the E1 Card to be configured. Log in to the controller as supervisor, supervisor and type the command E1status 1b (5b, 9b, or 13b) for E1-1 at the A:# prompt. The E1 Card Status screen is displayed. - Page 57 E1 Commands Three E1 commands are available (some that result in a displayed menu) for displaying and changing E1 provisioning parameters. The screen below displays the MultiComm Manager software interface: Command Example Examples of using the E1STATUS, E1SETUP, E1CFG commands with the MR96000 Controller are provided below.
- Page 58 RAS96 RASCard User Guide Enter the E1SETUP command to change the configuration information. At the A:# prompt type E1setup xy and hit Enter (xy is the CC9600 slot number. For example, type E1setup 9b to re-provision the E1-1 card. A:\#e1setup 9b Use Settings from: 1.
- Page 59 A:\# e1setup 9b Use settings from: 1. Use Active Settings (pre-configured card) 2. User System Defaults (new card) 3. User Stored Settings (swapping cards) Enter Selection (q(uit), <1>): 3 1. Channel Polling Interval (Sec) : 20 2. Error Threshold : 10 3.
- Page 60 RAS96 RASCard User Guide Country Selection 1. ITU 2. India 3. Mexico 4. Hungary 5. China Enter Selection (-(previous), q(uit), d(one), <1>): - 1. Channel Polling Interval (Sec) : 20 2. Error Threshold : 10 3. Disconnect timeout (sec) : 11 4.
-
Page 61: E1 Command Messages
E1 Command Messages The system can display the following E1 command messages: Message: E1 Settings have not been changed Meaning: Either the E1SETUP command parameters were not changed, or the E1CFG command was not entered. Recovery: Start over at step 1 of the command example, re-provision the appropriate menu(s), and enter the E1CFG command to implement the changes to the E1 Daughter Card configuration. -
Page 62: Functional Description
RAS96 RASCard User Guide Functional Description The on-board Single–Chip Transceiver (SCT) provides the connection to E1 lines (DS–1 long haul or DSX–1 short haul). The clock recovery circuitry automatically adjusts to E1 lines from 0 feet to over 6000 feet in length. The framer locates the frame and multiframe boundaries and monitors the data stream for alarms. -
Page 63: Solving Problems
6 Solving Problems CommPlete Communications Server... -
Page 64: Introduction
RAS96 RASCard User Guide Introduction This chapter describes steps you can take in the event of a RASCard failure. As with any microcomputer product, start with simple hardware and software tests, and work toward more complex tests or operating system/application software tests. -
Page 65: The Com1 Port Does Not Respond Correctly
• The hard disk or floppy drive cables are not connected properly, or their parameters are not set properly in Setup. • Verify that enough memory is installed to load the intended applications. • Verify that the memory SIMMs are seated properly on the RASCard. If two or four SIMMs are installed, they must be the same brand, size and speed. -
Page 66: Memory Upgrade
RAS96 RASCard User Guide Memory Upgrade Two memory banks (Bank 1 and Bank 2) with two SIMM sockets per bank (M1 through M4) are provided on the RASCard. The standard configuration has 16 MB of EDO DRAM in Bank 1. The RASCard supports four 72-pin SIMMs of 4 MB, 8 MB, 16 MB, or 32 MB DRAM to form a memory size from 8 MB to 128 MB. -
Page 67: Diagnostic Tests
contacts of the sockets, use your fingers to bend the SIMM upright until it is held in place by the metal tabs. Follow the same process for the second SIMM in Bank 1. Select the memory SIMMs for Bank 2 and follow the same procedure as in Step 6. Note: The front bracket of the RASCard may have to be removed to install SIMM 2 of Bank 2. - Page 68 RAS96 RASCard User Guide CommPlete Communications Server...
- Page 69 Appendixes CommPlete Communications Server...
-
Page 70: Appendix A Connector Pinouts
RAS96 RASCard User Guide Appendix A Keyboard Connector (J11) Figure A-1. 6-pin mini-DIN keyboard connector. Description +Keyboard Data Video Connector (J35) This connector provides video analog data and horizontal and vertical synchronization signals for IBM PS/2 and VGA monitors. Figure A-2. DB-15 video connector. - Page 71 COM1 Connector (J3) This serial port connector can be used to configure the RASCard or to connect a mouse to the RASCard. Figure A-3. DB-9 COM1 connector. Description RX Data TX Data Ground E1 Alarm Connector (J22) Figure A-5. E1 alarm connector. Description Close 2 Open 2...
- Page 72 RAS96 RASCard User Guide 34-Pin Floppy Disk Drive Connector (J27) This connector provides signal and data connection between the floppy drive and the RASCard. Figure A-4. Floppy disk connector. Description Ground RPM/RWC Ground Not Used Ground Not Used Ground Index...
- Page 73 Hard Disk Connector (J6) This connector supplies IDE data and signals and power and ground for the RASCard’s on-board hard disk drive. Figure A-6. IDE connector. Description /Reset Ground (GND) Data Bit 7 (SD7) Data Bit 8 (SD8) Data Bit 6 (SD6) Data Bit 9 (SD9) Data Bit 5 (SD5) Data Bit 10 (SD10)
- Page 74 RAS96 RASCard User Guide IDE Connector (J21) This connector supplies IDE data and signals for an IDE CD-ROM drive or a second hard disk. Figure A-7. IDE connector. Description /Reset Ground (GND) Data Bit 7 (SD7) Data Bit 8 (SD8)
-
Page 75: Appendix B Post Messages
Appendix B POST Messages Introduction During the power-on self-test (POST), if the BIOS detects an error, it will sound a beep code or display a message. If a message is displayed, it will be accompanied by the following instruction: PRESS F1 TO CONTINUE OR DEL TO ENTER SETUP POST Beep There is currently only one beep code in BIOS. - Page 76 RAS96 RASCard User Guide ERROR ENCOUNTERED INITIALIZING HARD DRIVE The hard disk cannot be initialized. Make sure the adapter is installed correctly and all cables are correctly and firmly attached. Also, make sure the correct hard disk type is selected in Setup.
-
Page 77: Offending Segment
B POST Messages OFFENDING SEGMENT: This message is used in conjunction with the I/O CHANNEL CHECK and RAM PARITY ERROR messages when the segment that has caused the problem has been isolated. PRESS A KEY TO REBOOT This will be displayed at the bottom screen when an error occurs that requires you to reboot. -
Page 78: Appendix C Post Codes
RAS96 RASCard User Guide Appendix C POST Codes EISA power-on self-test (POST) codes are typically output to port address 300h. ISA POST codes are output to port address 80h. Code Name Turn Off Processor Test 1 Processor Test 2 Initialize Chips... - Page 79 Code Name Test DMA Controller 0 Test DMA Controller 1 Test DMA Page Registers 12–13 Reserved Test Timer Counter 2 Test 8259-1 Mask Bits Test 8259-2 Mask Bits Test Stuck 8259’s Interrupt Bits Test 8259 Interrupt Functionality Test Stuck NMI Bits (Parity/IO Check) Display CPU clock 1B–1E Reserved...
- Page 80 RAS96 RASCard User Guide Code Name Detect and Initialize Serial and Parallel Ports Reserved Detect and Initialize Math Coprocessor 46–4D Reserved Manufacturing POST Loop or Display Messages Security Check Write CMOS Pre-Boot Enable Initialize Option ROMs Initialize Time Value Setup Virus Protect...
-
Page 81: Appendix D Approved Memory
Appendix D Approved Memory The following memory SIMMs have been tested with the RAS96 and are known to work with it. This is not to imply that other SIMMs may not work as well with the RAS96, only that they have not been tested with it. -
Page 82: Appendix E Regulatory Information
RAS96 RASCard User Guide Appendix E Regulatory Information EMC, Safety and Terminal Directive Compliance The CE mark is affixed to this product to confirm compliance with the following European Community Directives: Council Directive 89/336/EEC of 3 May 1989 on the approximation of the laws of Member States relating to electromagnetic compatibility.