VeriFone VX520 User Manual
Hide thumbs
Also See for VX520:
- Reference manual (190 pages) ,
- Installation manual (64 pages) ,
- Implementation manual (34 pages)

Related Manuals for VeriFone VX520


Summary of Contents for VeriFone VX520
- Page 1 MANUAL VERIFONE VX520 POINT TRANSACTION SYSTEMS OY Vanha Nurmijärventie 62 FI-01670 VANTAA | tel: +358 (0)9 477 4330 | fax: +358 (0)9 436 2490 www.point.fi...
-
Page 2: Table Of Contents
Page 2 (37) INDEX: 1. BEFORE USE ........................4 1.1 Important ..........................4 1.2 PA-DSS –Standard ......................5 1.3 Terminal structure ......................6 1.4 Technical data ........................7 1.5 Connecting the cables ..................... 8 1.5.1 Connecting the power cord..................8 1.5.2 Connecting the Ethernet cable.................. - Page 3 Page 3 (37) 4.1.5 External Void ........................19 4.1.6 Manual entry ........................19 4.1.7 Receipt copy ........................20 4.1.8 Refund ..........................20 4.2 ONLINE TRANSACTIONS ....................20 4.2.1 General information on online transactions ............20 4.2.2 Online batch ........................21 4.2.3 Point reporting .......................21 4.3 Reports and bank connection ..................22 4.3.1 Print batch ........................22 4.3.2 Monthly report .......................22 4.3.3 Send Batch ........................22...
-
Page 4: Before Use
Page 4 (37) 1. BEFORE USE 1.1 Important NOTE! If these instructions are not followed and the terminal is damaged it will void the warranty! • Protect the power cord and modem. If they are damaged they are not to be used anymore. •... -
Page 5: Pa-Dss -Standard
Page 5 (37) 1.2 PA-DSS –Standard The purpose of the PA-DSS –standard is to help software suppliers develop, according to the PCI- DSS requirements, payment solutions which do not save forbidden card information such as the CVV2 or the PIN-code. Companies must use solutions for card payment processing that are approved according to the PCI-DSS –standard. -
Page 6: Terminal Structure
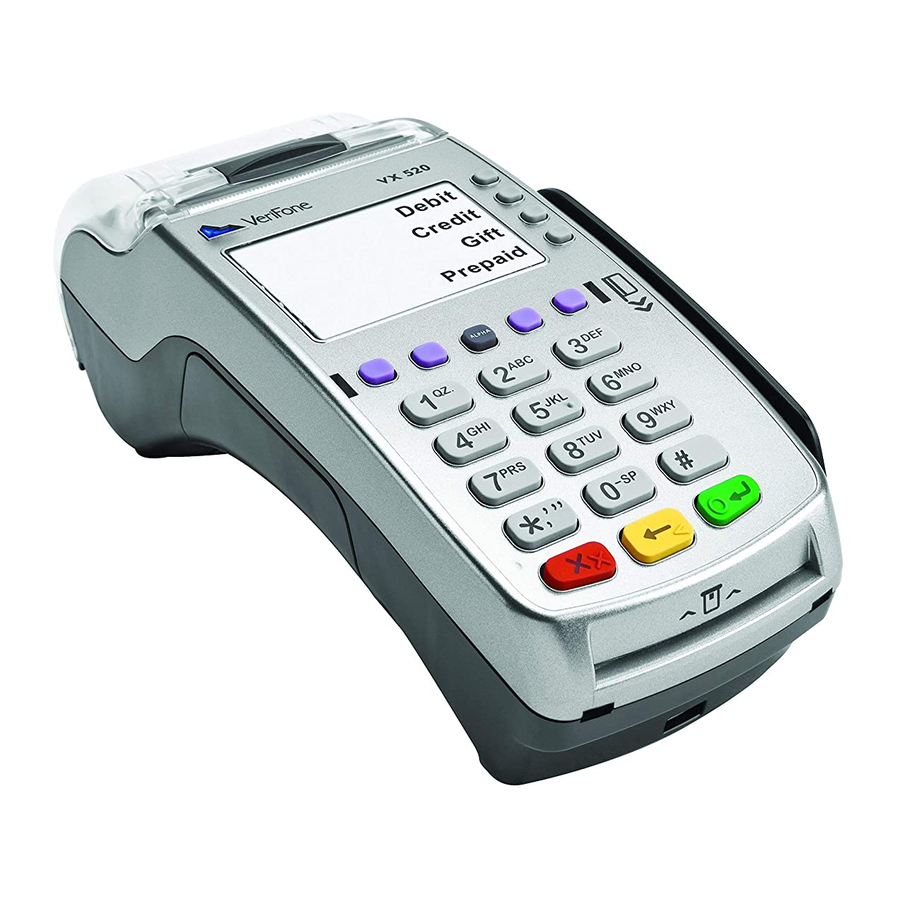
Page 6 (37) 1.3 Terminal structure INTERNAL THERMAL PRINTER PRINTER DOOR LATCH SERRATED METAL SWIPE READER STRIP TERMINAL DISPLAY F1-F4-KEYS ALPHA-KEY LILA1-4-KEYS KEYPAD ENTER KEY CANCEL KEY CLEAR KEY CHIP CARD READER POINT TRANSACTION SYSTEMS OY Vanha Nurmijärventie 62 FI-01670 VANTAA | tel: +358 (0)9 477 4330 | fax: +358 (0)9 436 2490 www.point.fi... -
Page 7: Technical Data
Page 7 (37) 1.4 Technical data Processor: 400 MHz ARM11, 32-bit RISC processor Memory: 160 MB (128 MB Flash, 32 MB SDRAM) standard, can exceed up to 500 MB. Display: 128 x 64 pixel graphical (white backlit) LCD with backlighting; supports up to 8 lines x 21 characters Swipe card reader: Triple track (tracks 1, 2, 3), high coercivity, bi-directional... -
Page 8: Connecting The Cables
Page 8 (37) 1.5 Connecting the cables In order to access the connection ports, remove the cover. 1.5.1 Connecting the power cord. Connect the adapter to the main power cord, the power cord to the power supply and the plug to the electrical outlet. -
Page 9: Connecting The Ethernet Cable
Page 9 (37) 1.5.2 Connecting the Ethernet cable Connect the ethernet cable to the ETH-port at the bottom of the terminal. The other end of the cable is connected either to a broadband modem or plug. POINT TRANSACTION SYSTEMS OY Vanha Nurmijärventie 62 FI-01670 VANTAA | tel: +358 (0)9 477 4330 | fax: +358 (0)9 436 2490 www.point.fi... -
Page 10: Battery
Page 10 (37) 1.6 Battery The battery is attached by placing it on its slot and pressing it downwards. To remove the battery, press the locking tab and pull the battery from its slot. During normal use, the battery should be loaded when its indicator shows 1 bar or less. The terminal starts charging the battery when it is connected to the power cord. -
Page 11: Sim-Card
Page 11 (37) 1.7 SIM-card Terminals which use GPRS-connection have a SIM-card. Before inserting the SIM-card inside the terminal, disable the PIN-code query. The SIM-card operator’s APN information is inserted to the GPRS APN menu in the terminal. The APN information is set to INTERNET by default, change this if needed. The SIM-card is placed beneath the battery so that the chip is facing down and the folded corner points downwards. -
Page 12: Switching The Paper
Page 12 (37) 1.8 Switching the paper • Pull the printer covers eject button upwards, so that it opens. • Remove the previous paper roll from the printer tray. • Place the new paper roll so that the paper moves from the bottom of the roll towards the front edge. -
Page 13: Letters And Special Characters
Page 13 (37) 1.10 Letters and special characters To insert letters and special characters, press the number with the desired character once, and after that press the ALPHA-button until the appropriate character appears. To switch capital letters into lower case letters, press LILA3. 1= Q Z . -
Page 14: Settings
Page 14 (37) 2. SETTINGS 2.1 Terminal settings To get to the terminals setting menu, press LILA4 and Enter. Select EDIT F4. Some of the listed settings are explained in later sections. The sections are marked in brackets. BATCH TIME (2.3) Batch sending time CASHIER NUMBER (2.4) Terminal’s cashier number... -
Page 15: Cashier Number
Page 15 (37) 2.4 Cashier number If you have in use more than one terminal, it is important to specify each terminal by their cashier number. The cashier number is printed on every receipt so that it is easy to discover which transaction has been done with which terminal in any problem cases. -
Page 16: Audit Log Ip
Page 16 (37) 2.9 Audit log IP With the audit log IP-function, your payment terminal sends log information to a desired IP- address. The terminal logs include error and update information etc. from the payment terminal. To input your desired IP-address, select the Settings icon from the screen and press enter. Choose Edit, and navigate down with the arrow icon and select Audit log IP. -
Page 17: Daily Use
Page 17 (37) 4. DAILY USE 4.1 Transactions 4.1.1 Chip card transactions ENTER AMOUNT: Type the precise amount, including the cents, and press Enter. INSERT/SWIPE OR PRESENT CARD: Insert the card into the chip reader, located at the front of the terminal, with the chip side facing up. -
Page 18: Swipe Card Transactions
Page 18 (37) 4.1.2 Swipe card transactions ENTER AMOUNT: Type the precise amount, and press Enter. INSERT/SWIPE OR PRESENT CARD: Swipe the card from the magnetic reader. CREDIT / DEBIT: Choose the payment method The terminal prints out the merchant’s receipt and asks to print the customer’s receipt. Press Enter if you wish to print out the customer’s receipt. -
Page 19: External Void
Page 19 (37) TRANSACTION DOESN’T EXIST: The receipt number is incorrectly typed or the transaction has been sent forward from the terminal. 4.1.5 External Void With the external void you can void a transaction that has been made with another terminal. This requires that the terminals are linked to the Point reporting service. -
Page 20: Receipt Copy
Page 20 (37) NOT ALLOWED: The transaction is not allowed with the card type 4.1.7 Receipt copy Press MENU F1, scroll down with LILA2 and choose PRINT COPY F4. RECEIPT NUMBER: The terminal suggests the number of the last transaction. Accept by pressing Enter. -
Page 21: Online Batch
Page 21 (37) memory until the next batch sending. In these cases the responsibility is always the merchant’s! It is recommended to use the online batch-function. If you wish to deactivate this setting, please contact Point’s customer service. 4.2.2 Online batch Online batch settings enable you to choose the maximum sum and number of transactions in the terminal memory. -
Page 22: Reports And Bank Connection
Page 22 (37) 4.3 Reports and bank connection 4.3.1 Print batch Press LILA1 and Enter. Choose PRINT BATCH F3. The terminal prints out a report of the current days transactions. Different card types are grouped separately on the receipt. The terminal resets the report after sending the batch from the terminal. 4.3.2 Monthly report The monthly report can also be used as a shift report. -
Page 23: Blacklist
Page 23 (37) 4.3.4 Blacklist The terminal updates the blacklist automatically during the batch sending. You can also download the blacklist manually if it is missing from the terminal. Press LILA4 and Enter. Choose DOWNLOAD F3. Choose BLACKLIST F3 and select FULL F2 or UPDATE F3. FULL = Terminal downloads the full blacklist UPDATE = Terminal updates the blacklist The terminal connects to Point reporting and downloads the blacklist from the bank. -
Page 24: Issue Acknowledgment
Page 24 (37) SENT TO BANK, REPORT OVERDUE = The batch has been forwarded to the receiver, but the report has been delayed. Actions = Contact the batch receiver and confirm that the batch has been successfully received. Acknowledge the issues from Point reporting or from the terminal. ALL REJECTED = The batch has been rejected by the receiver Actions = Contact the batch receiver and check why the batch has been rejected. -
Page 25: Report Explanations
Page 25 (37) 4.3.7 Report explanations This is an example of the report and the information in it. SENT TO TCS: The total sum and amount of transactions that are sent to Point reporting as online transactions NOT SENT TO TCS: The total sum and amount of transactions that have not been sent to Point reporting... - Page 26 Page 26 (37) When a transaction is declined at the authorization centre a declining code is printed on the receipt. This code tells you the reason why it has been declined. The transaction is declined by a notification given by the bank or the credit card company. 000-099 Accepted Accepted...
- Page 27 Page 27 (37) Cashier, contact recipients’ security department Exceeds PIN-code attempts Special situation Extinct card Stolen card Suspected abuse Successful Unsuccessful unsuccessful, form fault Declined. Accepted revocation of authorization, try again 900-999 System error, authorization not successful False transaction Do the transaction again Form fault, try again Unable to route the transaction to recipient Temporary usage brake in the card donors system...
-
Page 28: Special Functions
Page 28 (37) 5. SPECIAL FUNCTIONS 5.1 Cash receipt Cash receipt is used when a customer pays with cash and a receipt is wanted from the terminal. Cash receipts are also seen on batch reports. Cash receipt is activated from the EDIT menu (2.1). Making a cash receipt sale: Press MENU F1 Scroll down with LILA2 and choose CASH RECEIPT F3... -
Page 29: Cash Withdraw
Page 29 (37) 5.3 Cash withdraw Cash withdraw is used when a customer wants to withdraw cash from the cash register. A transaction is made, and the customer receives cash from the register. The merchant receives 0,50 € from every cash withdraw transaction. For example, if a customer wants to withdraw 10,00€ the merchant makes a transaction of 10,50€. -
Page 30: Vat
Page 30 (37) The terminal prints out the merchant’s receipt and asks to print the customer’s receipt. Press Enter if you wish to print out the customer’s receipt. Otherwise, press Cancel. 5.5 VAT VAT is activated from the EDIT menu (2.1). When making a transaction, the terminal asks to choose a VAT-rate for the transaction. -
Page 31: Multiuser Version
Page 31 (37) The terminal prints out the merchant’s receipt and asks to print the customer’s receipt. Press Enter if you wish to print out the customer’s receipt. Otherwise, press Cancel. Voiding an invoice: Press F1 and LILA2 twice. Choose INVOICE F2. Choose VOID INVOICE F3 ENTER AMOUNT: Enter the complete amount and press Enter. -
Page 32: Product Version
Page 32 (37) 5.10 Product version Product version allows you to define products for your terminal. In this version receipts print out details of the sold products. This version can replace receipts from cash registers. In order to update your terminal to this version, please contact Point. Forming VAT-groups Select LILA4, press enter and choose Edit. - Page 33 Page 33 (37) a) Add product Product id: type the products number (0-99) and press Enter. Product name: Type the product name and press enter. To get letters, first press the number keys, after which press the alpha-button (middle of the lila-buttons) repeatedly until the correct character is on the screen.
-
Page 34: Trouble Shooting
Page 34 (37) The terminal prints out the receipts. Reversal of a product transaction Press MENU F1 and select cash receipt. Choose cash receipt void Add products: press enter and type the product number. Units: Type the unit amount for this product and press enter. Price per unit: Type the price for the product and press enter. -
Page 35: Notifications On The Receipt
Page 35 (37) BLACKLIST MISSING = The blacklist is missing from the terminal. See instructions for downloading the blacklist (4.4.4). USE MAG CARD = The terminal cannot read the card’s chip. Use the magnetic strip reader. USE CHIP = The card has an EMV-chip. Use the chip reader. PIN LOCKED = The pin code of the card in use has been locked. -
Page 36: Other Exceptions
Page 36 (37) ERROR FILE NOT EXISTENT = The bank does not have information ready of the previous batch sending. OTA YHTEYS NEUVONTAAN = Contact the bank. 6.3 Other exceptions CONNECTION PROBLEM = Switch the terminal off and on and try to connect again. Check that the SIM-card is properly placed in its slot. -
Page 37: Service
Page 37 (37) 6.4 Service NOTE! Do not, under any circumstances, try to fix the terminal by yourself. The terminal should be always delivered to the maintenance service. If you suspect that the terminal is damaged or broken, do the following: •...