D-Link DNS-1560-04 User Manual
1u 4-bay rackmount unified storage
Hide thumbs
Also See for DNS-1560-04:
- Quick installation manual (10 pages) ,
- Quick installation manual (49 pages)

Related Manuals for D-Link DNS-1560-04


Summary of Contents for D-Link DNS-1560-04
-
Page 1: User Manual
D-Link 1U 4-bay rackmount unified storage User Manual DNS-1560-04 Version 1.00 May 2014... - Page 2 Copyright Copyright@2014, D-Link Corporation, Inc. All rights reserved. Trademarks All products and trade names used in this manual are trademarks or registered trademarks of their respective companies. Login information User name: admin Password: 1234 Copyright@2014 D-Link System, Inc. All Rights Reserved.
-
Page 3: Preface
Preface About this manual This manual is the introduction of a D-Link unified storage system and it aims to help users know the operations of the disk array system easily. Information contained in this manual has been reviewed for accuracy, but not for product warranty because of the various environments / OS / settings. -
Page 4: Conventions
Technical Standard: EMC DIRECTIVE 2004/108/EC (EN55022 / EN55024) UL statement Rack Mount Instructions - The following or similar rack-mount instructions are included with the installation instructions: Copyright@2014 D-Link System, Inc. All Rights Reserved. - Page 5 CAUTION: (English) Risk of explosion if battery is replaced by incorrect type. Please replace the same or equivalent type battery use and dispose of used batteries according to the instructions. Copyright@2014 D-Link System, Inc. All Rights Reserved.
- Page 6 Las baterías pueden explotar si no se manipulan de forma apropiada. No desmonte ni tire las baterías al fuego. Siga las normativas locales al desechar las baterías agotadas. 警告: (Simplified Chinese) 本电池如果更换不正确会有爆炸的危险,请依制造商说明处理用过之电 池。 Copyright@2014 D-Link System, Inc. All Rights Reserved.
-
Page 7: Table Of Contents
Web UI .............................. 18 ...................... 21 OW TO SE THE UIDED ONFIGURATIONS Setup Wizard Tool ..........................21 Chapter 4 BASIC CONFIGURATION ........................23 ............................ 23 NTERFACE IERARCHY ..............................23 ASHBOARD ..............................24 ONITOR Copyright@2014 D-Link System, Inc. All Rights Reserved. - Page 8 Snapshot Schedule ..........................57 ......................... 57 PPLICATION ONFIGURATION Directory Services ..........................58 CIFS Service ............................60 NFS Service ............................60 AFP Service ............................61 FTP Service ............................61 WebDAV Service ..........................62 iSCSI ..............................62 Copyright@2014 D-Link System, Inc. All Rights Reserved.
- Page 9 HPERE OS X ............................77 Apple Time Machine Support ......................78 FTP ................................79 Method 1: Using Command Line Shell ....................79 Method 2: Using FTP Client Application ................... 80 DAV ..............................81 Copyright@2014 D-Link System, Inc. All Rights Reserved.
- Page 10 ADVANCED OPERATIONS ........................88 ..........................88 ERMINAL PERATIONS Serial Console ............................ 88 Secure Shell Remote Access......................88 Console UI ............................89 Chapter 8 GLOSSARY AND ACRONYM LIST ......................91 Chapter 9 INDEX ..............................93 Copyright@2014 D-Link System, Inc. All Rights Reserved.
-
Page 11: Chapter 1 Overview
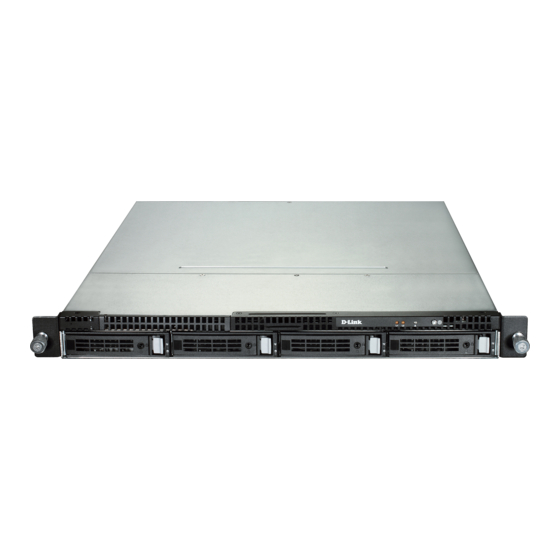
Keys, screws for drives and rail kit (x1 packet) CD-ROM with Manual and Software Quick Installation Guide Hardware This section provides basic information about the hardware components. DNS-1560-04: (1U4bays) Copyright@2014 D-Link System, Inc. All Rights Reserved. -
Page 12: Front View
D-Link Document – User Manual Front View There are three LEDs and one button on DNS-1560-04 This table provides details about the button and LEDs. Number Description LAN1(Management port) LED: Blinking amber: Accessing data. LAN2 LED: Blinking amber: Accessing data. -
Page 13: Rear View
The operating system detects the RAID drive as a single storage device. RAID Levels There are various RAID levels with different degrees of data protection, data availability, and performance. A description of supported RAID levels follow: Copyright@2014 D-Link System, Inc. All Rights Reserved. -
Page 14: Nas Concepts
SAN still appears to the client OS as a disk, visible in disk and volume management utilities (along with client's local disks), and available to be formatted with a file system and mounted. Copyright@2014 D-Link System, Inc. All Rights Reserved. -
Page 15: Iscsi Concepts
The target is the storage device itself or an appliance which controls and serves volumes or virtual volumes. The target is the device which performs SCSI command or bridge to an attached storage device. Copyright@2014 D-Link System, Inc. All Rights Reserved. -
Page 16: Chapter 2 Installation
Use care when inserting or removing a system into or out of a rack to prevent the accidental tipping or the rack causing damage or personal injury. Install the disk drives. Copyright@2014 D-Link System, Inc. All Rights Reserved. -
Page 17: Power On / Off
It can shutdown via Web UI or management software. Shutdown using Web UI Using the Web UI: Select Maintenance -> Shutdown. Click the Shutdown button. The power LED will display blue blinking, and then power off. Copyright@2014 D-Link System, Inc. All Rights Reserved. -
Page 18: Chapter 3 Quick Setup
(LAN 1) of the system. The web UI can be accessed via every network interface, but D-Link still defines a management port, the default IP setting is a static IP address (unless changed by the user to another IP or DHCP setting). - Page 19 To access the Web UI, you have to enter a user name and password. The initial defaults for administrator login are: User name: admin Password: 1234 When the password has been verified, the home page is displayed. Copyright@2014 D-Link System, Inc. All Rights Reserved.
- Page 20 D-Link Document – User Manual Logout Button Menu Bar Options Display and Operation Area Choose the functions from the Menu Bar on the top side of the window to make any configuration changes. Copyright@2014 D-Link System, Inc. All Rights Reserved.
-
Page 21: How To Use The Guided Configurations
Click Configuration / Setup wizard. Enter a System name and set up the Time and date if necessary. Choose the Time zone and RAID level of pool, then click the Apply button to proceed. Copyright@2014 D-Link System, Inc. All Rights Reserved. - Page 22 D-Link Document – User Manual The file systems and volumes are created and named by the system automatically. The system is also created for sharing usage. It is now available to use. Copyright@2014 D-Link System, Inc. All Rights Reserved.
-
Page 23: Chapter 4 Basic Configuration
The Dashboard menu option displays a whole picture of the system. The tables include Disk throughput, Network flow, Device information, System status, Temperature, Power supply, Cooling, Service status, Event log, and Pool status. Copyright@2014 D-Link System, Inc. All Rights Reserved. -
Page 24: Monitor
S.M.A.R.T. (Self-Monitoring Analysis and Reporting Technology) is a diagnostic tool for hard drives to deliver warning of drive failures in advance. The S.M.A.R.T. option provides users a chance to take actions before a possible drive failure. Copyright@2014 D-Link System, Inc. All Rights Reserved. -
Page 25: Physical Disk
Importing: the system is loading data from the disks, which means the pool is not ready for use yet. Health The health of the hard drive: Good: the hard drive is good. Copyright@2014 D-Link System, Inc. All Rights Reserved. -
Page 26: Snapshot
The refer capacity of the file system or volume. Created time The time that the snapshot is created. The function is available in this tab: Filter: Drop down menu to select the file system or volume. Copyright@2014 D-Link System, Inc. All Rights Reserved. -
Page 27: Hardware Monitor
The event log is displayed in reverse order which means the latest event log is on the first / top page. When the UserHome directory exists, the system will store event log content in the storage pool where the UserHome directory belongs. Deleting the UserHome pool will result in deleting Copyright@2014 D-Link System, Inc. All Rights Reserved. -
Page 28: Ups
The system will shutdown if either Shutdown battery level (%) or Shutdown delay (s) reaches the condition. User should set these values carefully. Connection The Connection option displays all the connection information for the system. Copyright@2014 D-Link System, Inc. All Rights Reserved. -
Page 29: System Configuration
Auto shutdown: Enable this to let the system shutdown automatically when the voltage or temperature is out of the normal range. For better data protection, it is recommended to check Auto Shutdown. When it is done, click the Apply button. Copyright@2014 D-Link System, Inc. All Rights Reserved. -
Page 30: Time
Local user accounts and domain user accounts are displayed separately by selecting the drop down list. Domain user accounts are only for display purpose. You cannot edit domain account or change the password of domain account. Copyright@2014 D-Link System, Inc. All Rights Reserved. - Page 31 The user can access his/her home directory right away. Take an example of creating an account. Click the Add User button. Copyright@2014 D-Link System, Inc. All Rights Reserved.
- Page 32 The menu Group account tab provides the function to manage local groups such as add, delete, edit, or view the status of the groups. Local groups and domain groups are displayed separately by selecting the drop down list. Copyright@2014 D-Link System, Inc. All Rights Reserved.
- Page 33 Functions in the right click menu: Add Group: Create a group. Edit: Edit the group. Delete: Delete the group. Take an example of creating a group. Click Add Group button. Copyright@2014 D-Link System, Inc. All Rights Reserved.
- Page 34 Please be aware that the actual password will not be exported. In an exported file, the password will be replaced with a dummy password 1234. When the same account name (case sensitive) exists during importing, it will not overwrite the existing account information unless “overwrite Copyright@2014 D-Link System, Inc. All Rights Reserved.
-
Page 35: Mail Setting
You can also select which levels of event logs you would like to receive. The default setting only includes WARNING and ERROR event logs. When it is done, click Apply button. Messenger The Messenger option is used to setup pop-up messages via Windows messenger (not MSN). Copyright@2014 D-Link System, Inc. All Rights Reserved. -
Page 36: Snmp
There are many SNMP tools available on the internet. SNMPc: http://www.snmpc.com/ 。 Net-SNMP: http://net-snmp.sourceforge.net/ 。 When it is done, click Apply button. System Log Server The System log server option is used to setup alerts via the syslog protocol. Copyright@2014 D-Link System, Inc. All Rights Reserved. -
Page 37: Network Configuration
1 x GbE Management port + 1 x GbE port. Each port must be assigned its own IP address. The following table describes the relationship with the service and the network ports. This table shows the column descriptions. Copyright@2014 D-Link System, Inc. All Rights Reserved. - Page 38 DHCP. If the network environment does not have DHCP server, the IP address will fallback to zero config. IPv6: There are three options: Automatic, DHCP, or Static for specifying IPv6 address. The default is Automatic. Copyright@2014 D-Link System, Inc. All Rights Reserved.
-
Page 39: Dns Setting
Jumbo frame: Enable or disable jumbo frame on the port. DNS Setting The DNS setting option is for accessing the DNS (Domain Name Service) setting. It is used to change DNS IP addresses. Copyright@2014 D-Link System, Inc. All Rights Reserved. -
Page 40: Storage Configuration
This table shows the column descriptions. Column Name Description Slot No. The position of a hard drive. Size (GB) Capacity of hard drive. Pool Name Pool name. Status The status of the hard drive: Copyright@2014 D-Link System, Inc. All Rights Reserved. - Page 41 Download SMARTCTL log: Download SMART self-test log. Set free disk: Make the hard drive free for use. Disk replace: Replace the hard drive of the pool to another free hard drive. Copyright@2014 D-Link System, Inc. All Rights Reserved.
-
Page 42: Pool
Export encrypt key: Export the encrypt key file. (This icon is shown when the pool is enabled the pool encrypt function.) Delete: Delete the pool. The pool can be deleted when there is no file system or volume in it. Copyright@2014 D-Link System, Inc. All Rights Reserved. - Page 43 6. Check Enable for Pool encrypt and enter the encrypt key if necessary. Check Auto unlock will unlock the pool upon the next reboot. Otherwise, it cannot be used except entering the encrypt key on every reboot. 7. Select disks from below, and then click Next button. Copyright@2014 D-Link System, Inc. All Rights Reserved.
- Page 44 2. Enable or disable the properties of write cache, standby, readahead, command queuing. 3. Select the free disk you want to use as dedicated spare disk for this pool. 4. Click Apply button. Copyright@2014 D-Link System, Inc. All Rights Reserved.
-
Page 45: Zfs
The ZFS option provides functions to manage ZFS datasets such as create, edit, delete, take snapshot, auto snapshot or view the status of the ZFS. This table shows the column descriptions. Column Name Description Copyright@2014 D-Link System, Inc. All Rights Reserved. - Page 46 File system: File level access and folder sharing. To use with data services such as CIFS, NFS, AFP, FTP, and WebDAV. Volume: Block level access. To use with iSCSI target function. Copyright@2014 D-Link System, Inc. All Rights Reserved.
-
Page 47: Thin Provisioning
Thin provisioning The following are the thin provision features: Dynamic allocating space to store user data. Applied to both file system and volume. Remove stranded or reserved-but-unused capacity. Improve storage efficiency. Copyright@2014 D-Link System, Inc. All Rights Reserved. -
Page 48: Compression
1. For example, create a file system of 20MB with compression turned ON. 2. Map the share in Windows as a network drive. And check the drive property. 3. Copy several bitmap files that are over the size of 20MB. Copyright@2014 D-Link System, Inc. All Rights Reserved. -
Page 49: Share
4. Check the network drive property again. The actual space taken is less than 20MB, which means Compression is functioning. Share The Share option is provided to manage the permission of the file system and view the status of each file system. There are Explorer and Shares tabs. Copyright@2014 D-Link System, Inc. All Rights Reserved. -
Page 50: Explorer
Click the check box to share the folder by CIFS, NFS, AFP, FTP protocols. If select NFS protocol, it has to set the NFS access control rules. Use Add button to add the rules and Delete button to delete them. Copyright@2014 D-Link System, Inc. All Rights Reserved. - Page 51 NFS protocol. This is to avoid users using a matching UID to access someone else’s home directory. Select the permission of the Users and groups. And check the radio box for Denied, Read- only or Read/Write. Click Apply button. Copyright@2014 D-Link System, Inc. All Rights Reserved.
- Page 52 NFS exports parameters. The system will not do validation check for you. It’s up to user’s discretion to provide the correct rules. Take an example of editing the folder for WebDAV. Click the Edit icon of the folder. Click WebDAV tab. Copyright@2014 D-Link System, Inc. All Rights Reserved.
- Page 53 Click the Create folder icon of the folder. Enter a folder name. Click the check box to share the folder by CIFS, NFS, AFP, FTP or WebDAV protocols. Click Apply button. Take an example of searching the files. Copyright@2014 D-Link System, Inc. All Rights Reserved.
-
Page 54: Shares
Share name for NFS. AFP name Share name for AFP. FTP name Share name for FTP. WebDAV name Share name for WebDAV. The function is available on the share: Delete: Delete the share. Copyright@2014 D-Link System, Inc. All Rights Reserved. -
Page 55: Lun
Click the LUN Attach icon. Select the volume from the drop-down list. Select the Target number from the drop-down list. Select the LUN number from the drop-down list. Choose the Permission level. Click Apply button. Copyright@2014 D-Link System, Inc. All Rights Reserved. -
Page 56: Snapshot
Delete: Delete the snapshot file system or volume. Take an example of taking a snapshot. Click the Take snapshot icon. Use the drop-down list to select a ZFS name. Enter a Snapshot name for the snapshot. Click Apply button. Copyright@2014 D-Link System, Inc. All Rights Reserved. -
Page 57: Snapshot Schedule
Select the radio box for Hourly, Daily or Weekly. According to the different schedule type, input the proper parameters. Application Configuration The Application configuration menu option is for accessing the Directory service, CIFS, NFS, AFP, FTP, WebDAV, iSCSI, Backup and AntiVirus options. Copyright@2014 D-Link System, Inc. All Rights Reserved. -
Page 58: Directory Services
Primary DNS (Domain Name Server) setting is identical to that of the Active Directory server. The system time is synchronous with that of the Active Directory server with less than 1 minute tolerance. Copyright@2014 D-Link System, Inc. All Rights Reserved. - Page 59 Admin DN: By default, the administrator DN is in the form cn=Administrator,dc=<your domain>. Using previous example, Admin should cn=Administrator,dc=aaa, dc=bbb,dc=com. TIP: Please contact your LDAP server administrator for the correct login parameters for Base DN, Admin DN, User base DN, and Group base DN. Copyright@2014 D-Link System, Inc. All Rights Reserved.
-
Page 60: Cifs Service
Starting this service will open the following ports on the unified storage system: TCP 111 (rpcbind) TCP 2049 (nfsd) UDP 111 (rpcbind) Additionally, mountd and rpcbind will each bind to a randomly available UDP port. Copyright@2014 D-Link System, Inc. All Rights Reserved. -
Page 61: Afp Service
FTP server so that users can browse and download data using their web browser or FTP client software. FTP is easy to use and it is cross-platform. All major operating systems have FTP client function. Copyright@2014 D-Link System, Inc. All Rights Reserved. -
Page 62: Webdav Service
(SAN) over an existing Ethernet network. Specifically, it exports disk devices over an Ethernet network that iSCSI clients (called initiators) can attach to and mount. Copyright@2014 D-Link System, Inc. All Rights Reserved. -
Page 63: Iscsi Entity
CHAP enables the username and password to transmit in an encrypted form for protection. If you want to use CHAP authentication, select CHAP from the drop-down list, and then click Apply button. Copyright@2014 D-Link System, Inc. All Rights Reserved. -
Page 64: Backup
If you experience slow system performance, please reduce the replication tasks. It supports one-to-one replication tasks but not one-to-many. The same replication source cannot coexist in different tasks. The max task number is limited as 16 tasks. Copyright@2014 D-Link System, Inc. All Rights Reserved. -
Page 65: Amazon S3
Amazon S3 account first at http://aws.amazon.com/s3/. There is no limit to the number of how many Amazon S3 tasks can be created. If you experience slow system performance, please reduce the Amazon S3 tasks. Copyright@2014 D-Link System, Inc. All Rights Reserved. -
Page 66: Antivirus
The AntiVirus option is for accessing the AntiVirus service, AntiVirus scan filter, AntiVirus task, AntiVirus update and AntiVirus report option tabs. It uses McAfee antivirus engine which is an American global computer security software company. Copyright@2014 D-Link System, Inc. All Rights Reserved. -
Page 67: Antivirus Service
This tab manages the antivirus tasks. This table shows the column descriptions. Column Name Description Task name The task name. Pool The pool name. File system The file system name. Path The path of the file system. Copyright@2014 D-Link System, Inc. All Rights Reserved. -
Page 68: Antivirus Update
Click Apply button to take effect. Or click Update Now button to update immediately. If you have the update file, it also can be updated manually. AntiVirus Report This tab displays the report of the infected files. Copyright@2014 D-Link System, Inc. All Rights Reserved. -
Page 69: Maintenance Configuration
Please send this compressed file to us when you need technical assistance. Reset to Factory Default The Reset to factory default option allows users to reset the system configurations back to the factory default settings. Copyright@2014 D-Link System, Inc. All Rights Reserved. -
Page 70: Firmware Upgrade
Browse to select the file. Click Upgrade button to start upgrading the firmware. When upgrading, there is a percentage displayed. After upgrading is finished, the system must reboot manually so the new firmware can take effect. Copyright@2014 D-Link System, Inc. All Rights Reserved. -
Page 71: Reboot
The Shutdown option is used to shutdown the system. Before powering off the system, it is highly recommended to execute Shutdown function to flush the data from cache onto the physical disks. The step is important for data protection. Copyright@2014 D-Link System, Inc. All Rights Reserved. -
Page 72: Access Shares From Your Operating System
Method 1: The Address Input in Explorer Open a Windows Explorer from Start button or by pressing Start key + E. In the address input, put in the share path and press Enter. Please refer to the screenshot below. Copyright@2014 D-Link System, Inc. All Rights Reserved. -
Page 73: Method 2: The Command Line Input From Start Button
Method 2: The Command Line Input from Start Button Click Start button to bring up the start menu. In the command line input, put in the share path and press Enter. The rest is the same as described in Option 1. Copyright@2014 D-Link System, Inc. All Rights Reserved. -
Page 74: Method 3: Map A Network Drive In Explorer
Open a Windows Explorer from Start button or by pressing Start key + E. Go to Tools and select Map network drive. Select the drive letter you like. Put the share path in Folder. Make sure you check Reconnect at logon. Click Finish. Copyright@2014 D-Link System, Inc. All Rights Reserved. -
Page 75: Nfs And Linux
NFS share. Please make sure you add the keyword – nfs-share before the share name. It represents the absolute path that the end user doesn’t need to know. Copyright@2014 D-Link System, Inc. All Rights Reserved. -
Page 76: Redhat Linux 6
Open Solaris 10/11 will use NFS version 4 as a default. Use the following syntax to mount an NFS share. mount -F nfs -o rw <IP address of NAS>:/<share name> <mount point> For example: mount -F nfs -o rw 192.168.8.180:/SQL_DB2 /mnt/nas NFS and vShpere5 /nfs-share/<share name> Copyright@2014 D-Link System, Inc. All Rights Reserved. -
Page 77: Afp And Ac Os X
In Finder, go to Go and select Connect to Server. Put in the network port IP address that you want to access. Click Connect. It will bring up a window requesting account and password. Please put in your account and password. Click Connect. Copyright@2014 D-Link System, Inc. All Rights Reserved. -
Page 78: Apple Time Machine Support
AFP shares on the Mac machine and do the steps below. 1. Go to Time Machine function. 2. Turn on Time Machine. Click Select Disk. 3. Select the share and put in account and password again. 4. Start Time Machine operation. Copyright@2014 D-Link System, Inc. All Rights Reserved. -
Page 79: Ftp
In Windows XP or Windows 7, open a command line window and use FTP command – “ftp”. Enter your account and password. The share is available for you to access. In Red Hat Linux, it looks like the screenshot below. Copyright@2014 D-Link System, Inc. All Rights Reserved. -
Page 80: Method 2: Using Ftp Client Application
There are a lot of FTP client tools in Windows platform such as WSFTP, FileZilla. In Linux X-Window environment, there are gFTP, WXftp, and LLNL XFTP. For example, using FileZilla in Windows looks like the screenshot below. Copyright@2014 D-Link System, Inc. All Rights Reserved. -
Page 81: Webdav
Method 1: Windows 7 Using Map Network Drive Wizard From Windows Explorer, go to Tools and select Map Network Drive. From Network and Sharing Center in the Control Panel, go to Tools and select Map Network Drive. Copyright@2014 D-Link System, Inc. All Rights Reserved. - Page 82 From the Computer icon on Desktop, right click on Computer icon and select Map Network Drive. When the wizard appears, click Connect to a Web site that you can use to store your documents and pictures. Copyright@2014 D-Link System, Inc. All Rights Reserved.
- Page 83 D-Link Document – User Manual Follow the instructions and click Next. Select Choose a custom network location and click Next. Copyright@2014 D-Link System, Inc. All Rights Reserved.
- Page 84 Please make sure you put in the port number 50000. Put in the required account and password information. You may name the network location. Here we simply use the default as 192.168.122.112. You may access the web folder now. Copyright@2014 D-Link System, Inc. All Rights Reserved.
-
Page 85: Method 2: Using 3 Rd Party Webdav Client Appplication
D-Link Document – User Manual Method 2: Using 3 Party WebDAV Client Appplication Recommended tools include WebDrive, NetDrive, or Bitkinex. Copyright@2014 D-Link System, Inc. All Rights Reserved. -
Page 86: Software Application
2008 R2. Connect to iSCSI Target Run Microsoft iSCSI Initiator. Input IP address or DNS name of the target. And then click Quick Connect button. Select the target name, and then click Done button. Copyright@2014 D-Link System, Inc. All Rights Reserved. -
Page 87: Disconnect
D-Link Document – User Manual It can connect to an iSCSI disk now. Disconnect Select the target name, click Disconnect button, and then click Yes button. Done, the iSCSI device disconnected successfully. Copyright@2014 D-Link System, Inc. All Rights Reserved. -
Page 88: Advanced Operations
Host IP: <IP Address> (e.g.: 198.168.0.32) Port: 2222 User name: admin Password: 1234 TIP: The system supports SSH for remote access only. When using SSH, the IP address and password are required for login. Copyright@2014 D-Link System, Inc. All Rights Reserved. -
Page 89: Console Ui
restart_http: If the web UI is abnormal, restart HTTP service for management. list_port: List the port number of the services. console> list_port [Service] [Port] http => 80 https => 443 Copyright@2014 D-Link System, Inc. All Rights Reserved. - Page 90 Connect a USB flash via USB port at the rear of the system, use this command to dump the system information on the USB device. reboot: Reboot the system. shutdown: Shutdown the system. exit: Exit the console UI. help: Display the help description. Copyright@2014 D-Link System, Inc. All Rights Reserved.
-
Page 91: Glossary And Acronym List
Apple Filing Protocol, formerly AppleTalk Filing Protocol. AFP is a proprietary network protocol that offers file services for Mac OS X and original Mac OS. In Mac OS X, AFP is one of several file services supported Copyright@2014 D-Link System, Inc. All Rights Reserved. - Page 92 Multiple Connections per Session Maximum Transmission Unit. CHAP Challenge Handshake Authentication Protocol. An optional security mechanism to control access to an iSCSI storage system over the iSCSI data ports. iSNS Internet Storage Name Service. Copyright@2014 D-Link System, Inc. All Rights Reserved.
-
Page 93: Index
Replication ................64 Event log ................27 S.M.A.R.T................24 Secure Shell Remote Access ..........88 Serial Console ..............88 FCC Statement ..............4 Setup Wizard................ 21 Firmware Upgrade via USB ..........70 Copyright@2014 D-Link System, Inc. All Rights Reserved. - Page 94 System Configuration ............29 Account ................30 Mail Setting ..............35 Web UI (Web User Interface) ..........18 Messenger ............... 35 WebDAV (Web Distributed Authoring and Versioning) ..62 SNMP ................36 System ................29 Copyright@2014 D-Link System, Inc. All Rights Reserved.
Need help?
Do you have a question about the DNS-1560-04 and is the answer not in the manual?
Questions and answers