Bowflex Max Trainer M3i Assembly And Owner's Manual
Hide thumbs
Also See for Max Trainer M3i:
- Troubleshooting manual (5 pages) ,
- Troubleshooting manual (3 pages) ,
- Troubleshooting manual (3 pages)

Related Manuals for Bowflex Max Trainer M3i


Summary of Contents for Bowflex Max Trainer M3i
- Page 1 A SSE MB LY / OW NE R’ S M AN UAL This product is compliant with the applicable CE requirements.
-
Page 2: Table Of Contents
USA | Printed in China | © 2014 Nautilus, Inc. | ® indicates trademarks registered in the United States. These marks may be registered in other nations or otherwise protected by common law. Bowflex, the B logo, Bowflex Max Trainer, Bowflex Connect, Nautilus, Schwinn, and Universal are trademarks owned by or licensed to Nautilus, Inc. -
Page 3: Important Safety Instructions - Assembly
Important Safety Instructions This icon means a potentially hazardous situation which, if not avoided, could result in death or serious injury. Obey the following warnings: Read and understand all warnings on this machine. Carefully read and understand the Assembly instructions. •... -
Page 4: Safety Warning Labels / Serial Number
Safety Warning Labels and Serial Number Product Specification Label Serial Number Label Assembly / Owner’s Manual... -
Page 5: Specifications
• When attaching 2 pieces, lightly lift and look through the bolt holes to help insert the bolt through the holes. 0.6m • The assembly requires 2 people. ( 24” ) Machine Mat The Bowflex Max Trainer™ Machine Mat is an optional accessory that helps keep your workout area clear and adds a layer of protection to your floor. The rubber machine mat provides a non-slip, rubber surface which limits static discharge and reduces the possibility of display or running er- rors. If possible, put your Bowflex Max Trainer™ Machine Mat in your selected workout area before you begin assembly. To order the optional machine mat, contact your local distributor. Assembly / Owner’s Manual... -
Page 6: Parts
Parts ( 2 Boxes ) Box 1 Item Description Frame Shroud, Rear AC Adapter Hardware Card Box 2 A decal has been applied to all right (“ R ”) and left (“ L ”) parts to assist with assembly. Item Description Item Description... -
Page 7: Hardware
Hardware / Tools Item Description Item Description Socket Head Hex Screw, M6x1.0x8 Socket Head Hex Screw, M6x1.0x20 Socket Head Hex Screw, M8x1.25x55 Socket Head Hex Screw, M10x1.5x25 Washer, Flat M8x18 Washer, Flat M10x23 Socket Head Hex Screw, M8x1.25x20 Washer, Flat M8x24 Pan Phillips Screw, M5x0.8x20 Washer, Flat M6x13 Lock Washer, M6 Lock Nut, M8 Lock Washer, M8 Tools Included 5 mm 6 mm 8 mm 13 mm Assembly / Owner’s Manual... -
Page 8: Assembly
Assembly 1. Attach Rail Assembly to Frame and then Release the Frame from the Shipping Plate Some components of the machine can be heavy or awkward. Use a second person when doing the assembly steps involving these parts. Do not do steps that involve heavy lifting or awkward movements on your own. NOTICE: Hand tighten hardware. - Page 9 2. Carefully Lift the Frame Assembly from the Shipping Plate and Attach to the Stabilizer Assembly Some components of the machine can be heavy or awkward. Use a second person when doing the assembly steps involving these parts. Do not do steps that involve heavy lifting or awkward movements on your own. Lift the Frame Assembly from the exterior of the pivot assembly as indicated below.
- Page 10 3. Cut the Shipping Zip-Ties and Attach the Rear Shroud and Caps to the Frame Assembly NOTICE: Place the inside hook of the Rear Shroud on the Frame Assembly and then pivot it up into place. Assembly / Owner’s Manual...
- Page 11 4. Attach Legs to Frame Assembly Be aware that the Legs are connected and when either of these parts move the other does as well. Assembly / Owner’s Manual...
- Page 12 5. Attach Pedals to Frame Assembly In order to avoid possible serious injury, when inserting the tube ends into the Leg Assemblies be careful to avoid fingers or hands being caught or pinched. 13mm Assembly / Owner’s Manual...
- Page 13 6. Connect the Foot Pads and then the Foot Pad Inserts Assembly / Owner’s Manual...
- Page 14 7. Attach the Upper Handlebars to Frame Assembly Be aware that the Pedals and the Upper Handlebars are connected and when either of these parts move the other does as well. Some components of the machine can be heavy or awkward. Use a second person when doing the assembly steps involving these parts. Do not do steps that involve heavy lifting or awkward movements on your own.
- Page 15 8. Connect the Static Handlebar Assembly to the Frame Assembly NOTICE: Do not crimp the Console Cable. Assembly / Owner’s Manual...
- Page 16 9. Attach the Shifter Assembly to the Static Handlebar and Attach the Grip NOTICE: Do not crimp the Cable. Hardware is pre-installed and not on Hardware Card (*). Be sure the settings on the Shifter Assembly are visible to a User before fully tightening the hardware. Note: A small application of soapy water can be used to ease the Static Handleber Grip onto the Handelbar.
-
Page 17: Final Inspection
10. Connect the AC Adapter to the Frame Assembly NOTICE: Be sure to use the appropriate AC Adapter plug for your region. 11. Final Inspection Inspect your machine to ensure that all hardware is tight and components are properly assembled. Be sure to record the serial number in the field provided at the front of this manual. -
Page 18: Moving The Machine
Adjustments Moving the Machine The machine may be moved by one or more persons depending on their physical abilities and capacities. Make sure that you and others are all physically fit and able to move the machine safely. Grasp the inner, unmoving part of the Pivot Assembly to carefully tilt the machine toward you onto the transport rollers. Be aware of the Handlebars and the weight of the machine before tilting the machine. -
Page 19: Important Safety Instructions
Important Safety Instructions This icon means a potentially hazardous situation which, if not avoided, could result in death or serious injury. Before using this equipment, obey the following warnings: Read and understand the complete Manual. Keep the Manual for future reference. Read and understand all warnings on this machine. -
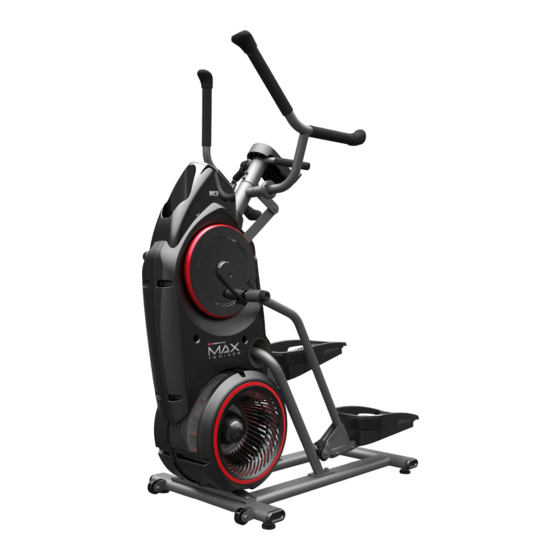
Page 20: Features
Features Console Buttons Leveler Resistance Level Shifter Rail Assembly Console Display Roller Water Bottle Holder Pedal Resistance Fan Media Tray Power Connector Static Handlebar Transport Roller Upper Handlebar Heart rate monitoring systems may be inaccurate. Over exercising may result in serious injury or death. If you feel faint stop exercising immediately. Assembly / Owner’s Manual... -
Page 21: Console Features
Console Features The Console provides information about your workout on the display Burn Rate screen. Display Target Burn Rate Display Burn The Burn Rate Display shows the level of calories being burned per Rate LED minute. This rate is a function of the current level of RPM (pedal speed) Range and resistance level (1-8). -
Page 22: Resistance Level Shifter
PAUSE/END button- Pauses an active workout, ends a paused workout, or goes back to the previous screen. Resistance Level Shifter Your Bowflex Max Trainer machine uses Resistance to change the intensity of your workout or to adjust the pace of the Pedals. The level of Resis- ®... - Page 23 To get yourself oriented with the process, begin with the Shifter set to 4. If this setting does not allow enough Pedal travel at a casual stepping pace, adjust the Shifter toward the 1 setting until you are comfortable with the amount of travel. If you find that the Pedals move too much and you are not able to increase the stepping pace, adjust the Shifter setting toward the 8 setting, allowing less Pedal movement.
- Page 24 Heart Rate Calculations Your maximum heart rate usually decreases from 220 Beats Per Minute (BPM) in childhood to approximately 160 BPM by age 60. This fall in heart rate is usually linear, decreasing by approximately one BPM for each year. There is no indication that training influences the decrease in maximum heart rate. Individuals of the same age could have different maximum heart rates. It is more accurate to find this value by completing a stress test than by using an age related formula. Your at-rest heart rate is influenced by endurance training. The typical adult has an at-rest heart rate of approximately 72 BPM, whereas highly trained runners may have readings of 40 BPM or lower. The Heart Rate table is an estimate of what Heart Rate Zone (HRZ) is effective to burn fat and improve your cardiovascular system. Physical condi- tions vary, therefore your individual HRZ could be several beats higher or lower than what is shown.
-
Page 25: Fitness Basics
Fitness Basics Frequency To maintain good health, lose weight and improve your cardiovascular endurance, use the Bowflex Max Trainer cardio machine a minimum of 3 ® times per week, around 14 minutes each day. If you are new to exercise (or returning to a regular exercise program), and you are unable to comfortably complete 14 minutes of continuous exer- cise at one time, just do 5 – 10 minutes, and gradually increase your workout time until you can reach a 14 minute total. If your schedule is busy, and you are unable to fit 14 minutes of continuous exercise into your day, try accumulating 14 minutes by doing multiple shorter workouts on the same day. For example, 7 minutes in the morning and 7 minutes in the evening. This may be a great way to start your cardio training if you are new to vigorous activity. For best results, combine your Bowflex Max Trainer cardio machine workouts with a strength training program using a Bowflex home gym or Bow- ® ® flex SelectTech dumbbells, and follow the Bowflex™ Body Weight Loss Guide included in this manual. - Page 26 Warm-Up * Before you use your Bowflex Max Trainer cardio machine, consider doing these dynamic warm-up stretches, which will help prepare your body for ® the workout: Dynamic Knee Hug Stand with the feet together. Bring one knee forward and up toward the chest. Place the hands around the shin and pull the knee into the chest.
- Page 27 Dynamic Bent Knee Heel Press Stand with one foot forward and one foot back, hip-width apart and feet facing forward. Hold onto a wall for balance with one hand, if necessary. Bend both knees putting weight on the back heel. Release the stretch by returning to the start position.
- Page 28 Consult a physician before you start an exercise program. Stop exercising if you feel pain or tightness in your chest, become short of breath, or feel faint. Contact your doctor before you use the machine again. Use the values calculated or measured by the machine’s computer for reference purposes only. The heart rate displayed on the console is an approximation and should be used for reference only. Steady State and Interval Training are 2 types of workouts you can do on your Bowflex Max Trainer cardio machine: ® Steady State workouts A Steady State workout involves slowly increasing your workout speed to a challenging, but comfortable, speed you can hold for most of your work- out. Getting your Heart Rate up into the Fat-Burning, Heart Zone zone for an entire workout would be a great Steady State workout. For example,...
-
Page 29: Workout Log
Workout Log Use this log to track your workouts and progress. Tracking your workouts helps you stay motivated and achieve your goals. Date Calories Burn Rate (aver- Time RPM (average) Heart Rate (aver- Level (average) age) age) Cool-Down * When you are done using your cardio machine, consider doing these relaxing stretches, which will help your body recover from the workout and make you more flexible: Lying Leg Raise Lie on the floor face up with the legs slightly bent. Lift one leg... - Page 30 Side Lying Knee Bend Lie on the floor on one side of the body and rest the head on the lower arm. Bend the top knee and hold the ankle with the same-side hand, then pull the heel toward the gluteals. Hold the stretch for 10 to 30 seconds. Lie on the other side and repeat the stretch with the other leg.
-
Page 31: Operations
Operations How Often Should You Exercise Consult a physician before you start an exercise program. Stop exercising if you feel pain or tightness in your chest, become short of breath, or feel faint. Contact your doctor before you use the machine again. Use the values calculated or measured by the machine’s computer for reference purposes only. The heart rate displayed on the console is an approximation and should be used for reference only. • 3 times a week for about 15 minutes each day. • Schedule workouts in advance and try to follow the schedule. Note: If you are new to exercise (or returning to a regular exercise program), and you are unable to comfortably complete 15 minutes of continuous exercise at one time, just do 5 – 10 minutes, and gradually increase your workout time until you can reach a 15 minute total. -
Page 32: Power Up / Idle Mode
Push the START button to begin a Quick Start workout. Starting with a Quick Start workout will get you familiar with how your Bowflex Max Trainer machine operates and responds to adjustments of ® Resistance Level and Burn Rate. Note: When operating the Bowflex Max Trainer machine, be sure the Legs are moving in the direc- ® tion as shown on the Crank Cover. When ready for a Bowflex Max Trainer workout, be sure to program your User Profile (see the Edit a ®... -
Page 33: Manual (Quick Start) Program
Manual ( Quick Start ) Program The Manual workout program is an open-ended workout that tracks your total time, allowing you total control. The Workout Profile Display shows the Target Burn Rate for the Manual program. Calorie Burn Manual * Stand on the machine. 2. Push the USER button to select your User Profile. Push the START button to begin the Manual workout program. When done with your workout, stop pedaling and push PAUSE/STOP to pause the workout. -
Page 34: Paused / Results Mode
Paused / Results Mode To Pause a workout: 1. Stop pedaling and push the PAUSE/STOP button to pause your workout. Interval ENTER USER Note: T he Console will automatically pause if there is no RPM signal for 5 seconds. START 2. To continue your workout, push START or start pedaling. BURN RATE PAUSE/END When paused, the Console display will show “WORKOUT PAUSED”, and then flash the workout values. -
Page 35: Edit A User Profile
Customize the MAX Interval Program The interval times and burn rate levels can be adjusted on the MAX Interval Program. The adjusted values will be set as the default settings for future workouts. Step up to the machine. Push and hold down the MAX Interval button for 3 seconds. 3. T he Console will display the “ACTIVE” interval time, flashing. The ACTIVE segments in the Profile display will also be flashing. Push the Burn Rate/Increase or Burn Rate/Decrease buttons to adjust the “ACTIVE”... -
Page 36: Console Setup Mode
Console Setup Mode The Console Setup Mode lets you control the sound settings, or see maintenance statistics (Total Run Hours and Software Version). Push and hold down the Burn Rate/Increase and PAUSE/END buttons for 3 seconds while in the Power-Up Mode to go into the Console Setup Mode. -
Page 37: Maintenance
Maintenance Read all maintenance instructions fully before you start any repair work. In some conditions, an assistant is required to do the necessary tasks. Equipment must be regularly examined for damage and repairs. The owner is responsible to make sure that regular maintenance is done. Worn or damaged components must be repaired or replaced immediately. Only manufacturer supplied components can be used to maintain and repair the equipment. -
Page 38: Maintenance Parts
Maintenance Parts Assembly / Owner’s Manual... - Page 39 Upper Handle Grip Shroud, Right Fan Drive Pulley, Upper Handlebar, Left Fan Assembly Inserts Arm Drive Assembly Lower Handle Grip Shroud, Rear Crank Arm Console Shroud / Water Bottle Holder Rail Assembly Tensioner Console Assembly Transport Wheel Drive Pulley, Lower Speaker Stabilizer Fan Back Plate...
-
Page 40: Troubleshooting
Troubleshooting Condition/Problem Things to Check Solution No display/partial display/unit Check electrical (wall) outlet Make sure unit is plugged into a functioning wall outlet. will not turn on Pedal movement Safely pedal the machine for a few seconds. The Console should sense the signal from the Speed Sensor and fully activate. - Page 41 Condition/Problem Things to Check Solution Console shuts off (enters sleep Check electrical (wall) outlet Make sure unit is plugged into a functioning wall outlet. mode) while in use Check connection at front of unit Connection should be secure and undamaged. Replace adapter or connec- tion at unit if either are damaged.
-
Page 42: Body Weight Loss Guide
™ Bowflex Body Weight Loss Guide Introduction and Overview Welcome to the Bowflex™ Body Weight Loss Guide. This guide is designed to be used with your Bowflex equipment and will help you: ® • Lose weight and get lean • Improve your health and wellness • Increase your energy and vitality Consult a physician before you start an exercise program or a new health and diet plan. Stop exercising if you feel pain or tightness in your chest, become short of breath, or feel faint. Contact your doctor before you use the machine again. Use the values calculated or measured by the machine’s computer for reference purposes only. The heart rate displayed on the console is an approximation and should be used for... - Page 43 – You can swap out any type of protein, vegetables or smart carbs for the suggested meal options. For example: • Turkey for tuna • Any fish or seafood for chicken • Cooked vegetables instead of salad • Eat your calories – Cut out high calorie beverages like soda, juices, coffee drinks, and alcohol – Stick with water, unsweetened tea, and coffee. Aim for a minimum of 64oz (1.9 liters) of water per day to stay well hydrated •...
- Page 44 Here’s an overview of what an ideal day looks like: (See Portion Size Guide for proper serving sizes) Breakfast Snack #1 smart rich fruit protein carb carbs smart protein carb veggies protein/fat Lunch Snack #2 healthy smart protein carb smart protein carb veggies...
- Page 45 Breakfast Options Fruit Smart Carb Protein/Fat Fruit and Nut Oatmeal Cook Berries or banana Plain oats Nuts and milk plain oats in water. Top with fruit, (Regular or quick-cook) nuts, milk, cinnamon, and honey. Egg Muffin Cook egg/s. Toast Tomato English muffin or sandwich thin Egg, ham, and cheese bread and top with 1 slice of...
- Page 46 Baby carrots 30ml (2 tbsp) hummus 1 serving of crackers* 1 string cheese Energy or protein bar with <200 calories* *See www.Bowflex.com/Resources for brand recommendations Optional Treats You have the choice of replacing Snack #2 with a 100-150 calorie treat. You can have an optional treat every day but for optimal health it is recom- mended to limit small splurges to 3-4 times per week. Use the approach that works best for you. Here are a few examples: • 118ml (½ cup) lowfat ice cream • 1 small bag of baked potato chips •...
- Page 47 Portion Size Guide Each of the items listed are for one serving MALE FEMALE PROTEIN 237ml (1 cup) = baseball 2 eggs 1 egg 142g (5oz) chicken, fish, lean meat, or tofu 85g (3oz) chicken, fish, or lean meat 158ml (2/3 cup) beans or lentils* 118ml (1/2 cup) beans or lentils* 237ml (1 cup) greek yogurt* 118ml (1/2 cup) greek yogurt* 42.5g (1.5oz) cheese* 42.5g (1.5oz) cheese* HEALTHY FAT...
- Page 48 Grocery List BREAD & GRAINS 100% whole wheat bread Tips: Look for 100% whole wheat as the first ingredient. Look for 4g of Sprouted grain breads fiber per slice or 5g per 2 slices of light or diet bread. Aim for bread with Light or whole wheat english muffins less than 100 calories per slice. Sandwich or bagel thins Corn or low-carb whole wheat tortillas High-fiber wraps Plain oats: 1 minute or old fashioned Whole grains: brown rice, bulgar, barley, quinoa, couscous DAIRY &...
- Page 49 • Treat yourself. Have a non-food reward for each goal you hit such as a massage, a new outfit, or an outing with friends and family • Use the resources below to find new recipes, get expert advice, and support to stay motivated Resources Downloadable Resources from Bowflex™ Website (www.Bowflex.com/Resources) • Grocery Shopping List for Fridge (Blank Form) • 7 Day Meal Planning Form • Additional Dinner Options •...
- Page 50 Assembly / Owner’s Manual...
- Page 51 Assembly / Owner’s Manual...
- Page 52 8006425.090115.C...
Need help?
Do you have a question about the Max Trainer M3i and is the answer not in the manual?
Questions and answers