
Related Manuals for Uniclass RD1041 Series


Summary of Contents for Uniclass RD1041 Series
- Page 1 User's Manual RD1041 Series 4-Port Quad View DVI USB KVM Switch Rev.1.1 Copyright© All rights reserved.
-
Page 2: Table Of Contents
RD1041K/RD1041Q/RD1041QD Introduction ....................... 3 Overiew ........................3 Features ........................3 Package contents ..................... 3 Specifications ......................4 Product overview ..................... 5 Front view ....................... 5 Rear view ........................ 6 KVM connection ....................... 7 Connect to console ....................7 Connect to computers ..................8 Daisy chain ...................... -
Page 3: Introduction
RD1041K/RD1041Q/RD1041QD Introduction Thank you for purchasing our RD1041 series KVM switch. We recommend that you read this manual thoroughly and retain it for future reference. Overiew RD1041 (series) is a product of 4-port DVI USB KVM switch. User can easy access and control up to 4 computers with one keyboard and mouse. -
Page 4: Specifications
RD1041K/RD1041Q/RD1041QD Specifications Model RD1041Q RD1041K RD1041QD DVI output Local: 1+1 Local: 1+1 Extend: 1 Local: 1+1 Console keyboard and 2 x USB Type A female connector mouse connector USB 2.0 hub 2 x USB Type A female connector Console video connector 2 x DVI-I female connector Console audio connector 1 x 3.5mm audio jack... -
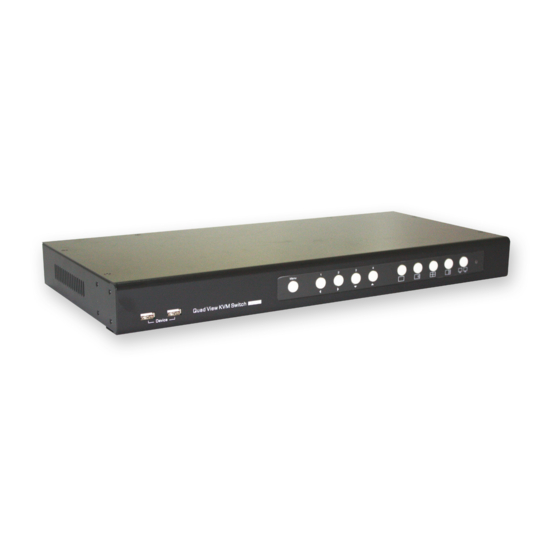
Page 5: Product Overview
RD1041K/RD1041Q/RD1041QD Product overview Front view Item Description USB2.0 port Connect to USB peripherals. ■ Press to enable the OSD menu. OSD menu button ■ Same function as key under OSD menu. Enter ■ To close the OSD menu, press button. ■... -
Page 6: Rear View
RD1041K/RD1041Q/RD1041QD Rear view RD1041K RD1041QD RD1041Q No. Item Description Power switch Press to turn on or off the unit. Power socket Plug power cable into this socket。 Daisy Chain Connect to other RD1041 up to 8 units. (Input /Output) RS-232 control Connect to a computer with RJ45 to RS232 cable for command (Input port) sending using HyperTerminal. -
Page 7: Kvm Connection
RD1041K/RD1041Q/RD1041QD KVM connection * The diagrams illustrated in the chapter are emaples, the actual application may vary. All illustrated accessories and monitors are not included in the package, it is for reference only. Connect to console ■ Plug the power cord to a power socket (the power cord/adapter may vary, it is depending on the models). -
Page 8: Connect To Computers
RD1041K/RD1041Q/RD1041QD Connect to computers ■ Connect to a DVI monitor. Connect to a computer's USB type A connector. Connect to a computer's audio out jack。 Daisy chain ■ Connect to the RJ45 in connector of the first unit to the RJ45 out of second unit. First unit's out to second unit's in, and so on. -
Page 9: Connect To Usb Devices
RD1041K/RD1041Q/RD1041QD Connect to USB devices * Make sure the driver of USB peripheral has been installed if necessary before plugging into RD1041. To install the driver, please remove the USB peripheral first. ■ Plug USB peripherals into the USB ports of front panel. Note that the USB ports of rear panel are not available for USB hub function. -
Page 10: Extension (Rd1041K Only)
RD1041K/RD1041Q/RD1041QD Extension (RD1041K only) To extend the function of KVM, connect to an extender and ethernet hub (both are not included) are required. Typically, the extender is usually comprised of two units, transmitter and receiver respectively. For more details of extension, please contact your local distributor. -
Page 11: Operation
RD1041K/RD1041Q/RD1041QD Operation 1. Please follow the previous chapter to connect power, PC, monitors and peripherals . Press the power button to turn on this unit. 2. Turn on the connected computers, the image will be outputted to both DVI monitors. Connector A (primary monitor) is the primary monitor and connector B (auxiliary... -
Page 12: Pc Selection
RD1041K/RD1041Q/RD1041QD PC selection ■ If binding is enabled between USB hub, audio and auxiliary switching, they will be jointly switched at the same time . By default, these bindings are enabled. ■ USB hub, audio and auxiliary can be switched separately. To setup the binding or unbinding, please refer to page 14. -
Page 13: Display Mode Menu
RD1041K/RD1041Q/RD1041QD Display mode menu ■ Press button or hotkey+hotkey+ (by default, the hotkey is to enable the ScrLk display mode menu on the screen of connect A (primary monitor). To switch between different computers or display modes, please use your mouse or keyboard directly. Full view PIP view Quad view... -
Page 14: Daisy Chain Operation
RD1041K/RD1041Q/RD1041QD Quad view ■ To select the active port, press number button 1-4 or click on screen using mouse cursor directly, and then the selected screen will be highlighted by red color. ■ Double click left button of mouse to switch between quad and full view. -
Page 15: Keyboard Hotkeys
RD1041K/RD1041Q/RD1041QD Keyboard hotkeys 1. RD1041 provides a way of fast switching by pressing hotkey sequence. The keyboard sequence consists of at least three specific keyboards. By default, the hotkey sequence is +command key(s). ScrLk ScrLk 2. Each keystroke within a hotkey sequence should be pressed within 2 seconds. Otherwise, the hotkey sequence will not be validated. - Page 16 RD1041K/RD1041Q/RD1041QD Command Hotkeys Bind A (primary monitor) and B (auxiliary ScrLk + ScrLk + Insert monitor) switching Unbind A (primary monitor) and B (auxiliary ScrLk + ScrLk + Delete monitor) switching ScrLk + ScrLk + F9 Switch the B (auxiliary monitor) to port1 (Press ScrLk + ScrLk + Delete to disable the binding) Switch the B (auxiliary monitor) to port2...
-
Page 17: Osd Menu
RD1041K/RD1041Q/RD1041QD OSD menu 1 2 3 Operation Please follow the stpes below to operate OSD menu. Enable OSD: (Space button) ScrLk ScrLk Exit OSD: (Escape button) Move cursor: Press on keyboard or on front panel Edit the name of PC: To edit the name of PC, press , press or OSD menu button to... -
Page 18: Information
RD1041K/RD1041Q/RD1041QD Press on keyboard or on the front panel of unit to move cursor, press to select the desired option, and then press or OSD menu button to confirm. Enter Item Options Description Hotkey Select the hotkey preceding sequence among 5 ScrLk , alternative keys. -
Page 19: Rs232 Control
RD1041K/RD1041Q/RD1041QD RS232 Control 1. Connect the RD1041 to a PC refer to page 9. 2. Device Manager > Ports > Communication Port, right click of mouse to open the pop-up windows, and then select Properties. (The COM port is the port which RD1041K connected) 5. -
Page 20: Technical Support
CE Statement : This is a Class B product in a domestic environment, this product may cause radio interference, in which case the user may be required to take adequate measures. RoHS Compliant http://www.uniclass.com.tw/...
Need help?
Do you have a question about the RD1041 Series and is the answer not in the manual?
Questions and answers