
Subscribe to Our Youtube Channel
Related Manuals for Uniclass KLE Series


Summary of Contents for Uniclass KLE Series
- Page 1 User Manual KLE Series KLE-Z DVI/VGA/USB IP-based KVM Switch Console EN Version : 1.1 Oct, 2021...
- Page 2 Index I. Introduction ...................4 II. Features ....................4 III. Specifications ..................5 IV. Package Contents ................5 V. Product Overview ................6 5.1 Front Panel ...................6 5.2 Rear Panel ....................6 VI. Configuration Diagram ..............7 6.1 Console Connection (Front Panel) ............8 6.2 PC/Server Video Source Connection (Rear Panel) .......9 VII.
- Page 3 ..................19 8.4.1 KVM Server Log ................19 8.4.2 Video Capture Settings ..............20 8.4.3 Viewer Connection Settings ................20 8.4.4 Attached KVM Switch ................21 8.4.5 Computer Settings .................21 8.4.6 Power Controller 8.5 Users ....................22 ..............22 8.5.1 List of Viewer Connections ................22 8.5.2 User Local Database ..............22 8.5.3 User Remote Authentication ................23...
- Page 4 hank you for purchasing our KLE-Z IP-based KVM Switch Console. We recommend that you read this manual thoroughly and retain it for future reference. I. Introduction The KLE-Z is the latest generation of IP-based KVM Switch Console for remote Server/KVM switch management.
-
Page 5: Specifications
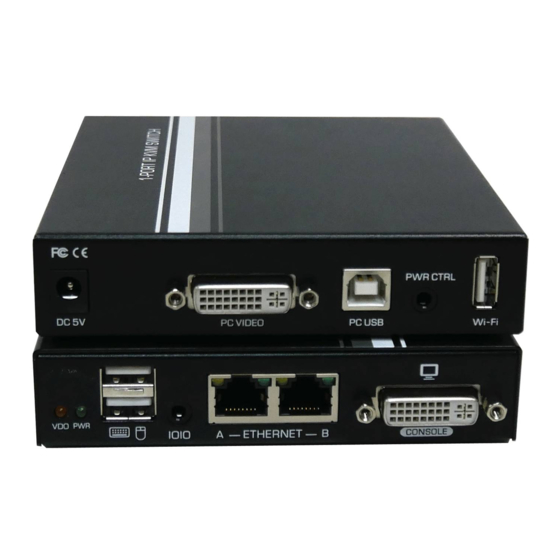
III. Specifications Model No. KLE-Z Server/KVM Video-in 1 x DVI-I Female Socket Connector Server/KVM USB Connector 1 x USB Type-B Female Socket (PC USB) Console Video-out Connector 1 x DVI-I Female Socket Console USB Connector 2 x USB 2.0 Type-A Female Sockets (Keyboard/Mouse) 2-port Ethernet Hub 2 x RJ45 Female Socket, 10/100/1000 Base-T (Auto-Sensing) LEDs... -
Page 6: Product Overview
V. Product Overview 5.1 Front Panel CONSOLE VDO PWR IOIO ETHERNET No. Item Description 1 Video LED Indicates the video source status (Flashing during video transmission.) 2 Power LED Indicates the power ON/OFF status. 3 Console USB Connector Connects to USB keyboard, mouse, or storage device. 4 IOIO Maintenance Port Reserved for system maintenance. -
Page 7: Configuration Diagram
VI. Configuration Diagram The configuration diagrams illustrated below are for exemplary purpose only and may vary in different applications. All the illustrated computers, accessories and monitors are not included in the sales package. Make sure all the devices and peripherals are connected appropriately before using the KLE-Z unit. - Page 8 6.1 Console Connection (Front Panel) VDO PWR CONSOLE IOIO ETHERNET ■ Connect a keyboard and a mouse to the USB Type-A sockets marked with keyboard/mouse icons at the unit front panel. ■ Connect the DVI-I socket at the unit front panel to a DVI monitor. * When connecting the KLE-Z unit to a VGA monitor, please make sure the PC/Server outputs a VGA signal source as well.
- Page 9 6.2 PC/Server Video Source Connection (Rear Panel) PC/Server WiFi Adaptor (optional) AC IN AC Power RS232 Power Distribution Unit (optional) ■ Connect the USB Type-B socket on the KLE-Z unit to an USB port on the PC/Server. ■ Connect the DVI-I socket at the unit rear panel to the DVI video output of the PC/Server. * When connecting the KLE-Z unit to a VGA PC/Server, please make sure the KLE-Z unit connects to a VGA monitor as well.
-
Page 10: Quick Start
VII. Quick Start 1. Due to the topological data flow requirement, please follow the previous chapter to connect power adaptor, PC/Server, monitor and peripherals in advance. Then plug the power adaptor to the AC outlet to turn on the KLE-Z unit. 2. - Page 11 7.2 First Access to KLE-Z Web Management The factory default network settings for the KLE-Z are as follows: ■ IPv4 Address: 192.168.1.200 ■ Subnet Mask: 255.255.255.0 ■ Default Gateway: 192.168.1.254 ■ DNS Servers: 192.168.1.254 The default access IP address to enter the KLE-Z Web Management: ■...
- Page 12 7.3 Networks 7.3.1 Configuring the TCP Port Base (1) Log in the KLE-Z Web Management as instructed in the previous chapter. Expand Main on the left- side menu list and click Networks. (2) Specify a port base for IPViewer's connection in TCP Port Base option. You can choose any available port base, starting from 5900 with an increment of 10 right up to 6400.
- Page 13 7.3.3. Wireless IP Settings This subsection will be hidden if you do not have an 802.11 compatible USB Wifi Adapter plugged into the Wifi Extension Port on the KLE-Z unit. It's strongly recommended that you use a WPA/WPA2 wireless connection since older protocols ▲...
- Page 14 7.4 Log in to the IPViewer There are three available versions of the viewing application named IPviewer to access the KLE-Z on different platforms (Windows®, Java®, Android®.) The KLE-Z captures the video from its attached computer and transmits it to the IPViewer application. It also receives the signals from the keyboard and mouse attached to the KLE-Z and emulates an USB keyboard and a mouse on the attached computer.
- Page 15 3. In the Connection Dialog window, key in the access address for the IPViewer <IP_address>:<TCP Port Base> then click Connect. After the KLE-Z is identified, the IPViewer will pop up an User Authentication window. Key in the User ID (i.e. superuser) and Password (superu) respectively and click OK to proceed.
- Page 16 VIII. KLE-Z Web Management Instructions The KLE-Z Web Management is the main administrative interface for the KLE-Z unit. This chapter will go into details to introduce more useful instructions in each sections. You could also get more instructive information by clicking the Help hyperlink on each page. 8.1 Download Refer to the subsection 7.4.1 Downloading the IPViewers.
-
Page 17: Virtual Media
8.3 Virtual Media 8.3.1 Remote Virtual Media When running the IPViewer, the user could share a DVD/CDROM, an USB drive, or even an ISO file at a remote location with the computers attached to the KLE-Z at a local location. For example, as the computer at the remote location running the IPViewer application shares its CDROM drive, the computer attached to the KLE-Z will see a removable mass storage device appeared for its access. - Page 18 8.3.2 Local Virtual Media KLE-Z can access over the LAN to an ISO file shared at the local location by a Windows® computer using SMB Share protocol, or by a Linux® computer with Samba Server functioning the same. Similar to the Remote Virtual Media feature as aforementioned, the KLE-Z emulates an ISO file at the local location as a removable mass storage for the KLE-Z's local attached computers.
- Page 19 8.4 KVM Server 8.4.1 KVM Server Log The Server Log keeps detailed records of events, errors, user logins and logouts, video modes, etc. It also records each login attempt, even for an unsuccessful one. It provides various technical details such as compression ratio, encoding scheme, and bytes transmitted.
- Page 20 8.4.3 Viewer Connection Settings This page correlates to IPViewer's connection settings: ■ Assign a Server Name for the IPViewer, i.e. KLE-Z, as displayed on the title bar of the IPViewer window. ■ Select a Keyboard layout you are using which is consistent with the KLE-Z's attached computers. ■...
-
Page 21: Computer Settings
8.4.5 Computer Settings In this page you must provide every required information for each of the attached computers: ■ Computer Name: Assign a name to an attached computer. ■ Computer Type: Standard (Non-Mac OS X platforms) or Mac OS X. ■... - Page 22 8.5 Users 8.5.1 List of Viewer Connections This page shows a list of connected users that are using IPViewer to connect with the KLE-Z. Note: This list of connected users will not be generated when the password policy option (Refer to subsection 8.2.2 Security Settings) is set as No Password or Global Password since the distinction of user identities is unnecessary when these policies are adpoted.
-
Page 23: Radius Accounting
8.5.4 Radius Accounting The Radius Accounting allows you to record user connection and disconnection events on a remote Radius Accounting server. The Radius Accounting is not correlated to RADIUS server or LDAP server features that can be used to authenticate users from a centralized server. The Enable Radius Accounting option is disabled by default. - Page 24 IX. IPViewer Instructions This chapter mainly provides some information, tricks and tips about the IPViewer for Windows® and the IPViewer for Java®. The operation of IPViewer for Android® is similar and will be omitted here. To log in the IPViewer for Windows® and the IPViewer for Java®, refer to section 7.4 IPViewer applications. 9.1 Title Bar and Menu Bar ■...
- Page 25 ■ Send Ctrl-Alt-Del: This option requests the KLE-Z to send out a system shortcut Ctrl-Alt-Del to restart the computer attached to it. This option is specially offered for the Windows® computer runing the IPViewer because when the user directly keys in this system shortcut at his Windows®...
- Page 26 (IPViewer for Java®) ■ Connection Information: Display information concerning the KLE-Z, such as the video type, the frame capturing and transmitting times, the networking status, etc. ■ About: Copyright and version information of the IPViewer for Java®. 9.6 Virtual Medium ■...
- Page 27 X. Connection Options Window 10.1 Compression Specify an appropriate video compression type that the KLE-Z applies to trasmit the compressed video to the IPViewer application. The compression types are listed from lowest to highest in data volume. Note that a low video compression type (higher data volume) requires more processing time for the KLE-Z thus it takes longer to be displayed on the IPViewer application.
-
Page 28: Troubleshooting
Normal: This is the default setting. We highly recommend apply this option since you can click on an ● element on the screen using the remote cursor intuitively without worrying whether the local cursor has already reached the element or not. 10.3 Session A session can be set as public or private. - Page 29 (1) Key in https://192.168.1.200:5908 in your browser to access KLE-Z Web Management. (2) Press the Advanced button to proceed. (3) Click the "Proceed to 192.168.1.200 (unsafe)" hyperlink to enter the KLE-Z Web Management.
-
Page 30: Technical Support
XII. Technical Support Please contact your local distributor for more information or technical support. XIII. FCC/ CE Statements 13.1 FCC Statement: This equipment has been tested and found to comply with the regulations for a Class B digital device, pursuant to Part 15 of the FCC Rules. These limits are designed to provide reasonable protection against harmful interference when the equipment is operated in a commercial environment. - Page 31 P/N: 30-191-KLEZXXXX-01-GN-11 *This content and specification are subject to possible change without prior notice. EN Version 1.1 Copyright © 2021 All Rights Reserved...
Need help?
Do you have a question about the KLE Series and is the answer not in the manual?
Questions and answers