
Related Manuals for Uniclass Prima IP 8


Summary of Contents for Uniclass Prima IP 8
-
Page 1: User Guide
8/16-PORT IP KVM SWITCH CASCADABLE RACKMOUNT USB AND PS/2 TYPE OSD, FRONT-PANEL BUTTONS, KEYBOARD HOTEKYS User Guide Revision 1.4 Copyright © 2007... - Page 2 About this manual This User Guide is the complete reference to the Prima IP KVM Switch, its functional features and usage. The Complete User Guide can be found only on the Prima IP Support CD-ROM disc. Prima IP documentation List Installation Guide Printout / Prima IP support CD-ROM disc User Guide...
-
Page 3: Table Of Contents
Prima IP User Guide R1.4 TABLE OF CONTENTS INTRODUCTION ..........................1 RIMARY FEATURES ........................4 YSTEM RCHITECTURE ......................... 6 IP E XTERNAL IEWS RIMA ......................8 PRIMA IP INTALLATION ......................11 HECKLIST BEFORE NSTALLATION ....................11 ET UP THE HYSICAL ONNECTIONS ................... - Page 4 Prima IP User Guide R1.4 4.16 – F AINTENANCE IRMWARE OFTWARE ERSION NFORMATION PGRADE ONFIGURATION ACKUP AND PLOAD ..........................84 4.17 – L OGOUT OG OUT THE ANAGEMENT ................87 4.18 – V PPLY ETTINGS ALIDATE ETTINGS ................88 LOCAL CONSOLE OPERATION....................90 ONTROL NTERFACES .........................
-
Page 5: Introduction
Total server control from BIOS level up anytime anywhere The Prima IP 8 / Prima IP 16 gives users total control over its total 16 server ports, from preboot stage such as the BIOS-level CMOS setting up to the GUI applications and daily maintenance routines such as power cycling (power control unit required). -
Page 6: Management
KVM Switch Management Prima IP 8 / Prima IP 16 not only provides remote user access, but also plays the role of KVM management. It manages the software version of all KVM switches connected in the daisy-chain, and upgrades automatically any KVM switches whose software is not the latest. - Page 7 Prima IP KVM Switch User Guide R1.4 Prima IP is fully Web-enabled to allow software upgrade and configuration upload/backup over the Web Management Interface. All you need to do is to upload the files to Prima IP over Web interface and it is freshly restarted and begins working with those latest update functionalities and features.
-
Page 8: Primary Features
Prima IP KVM Switch User Guide R1.4 1.1 Primary features General features ▪ 8/16-port IP-based Cascadable 19” Rackmount USB PS/2 KVM Switch w/ OSD ▪ Provides 1 digital port for remote control over IP ▪ Port capacity scalable up to a maximum of 128 computers with cascaded configuration of other Prima KVM Switches (Prima 4/Prima 8/Prima 16) ▪... - Page 9 Prima IP KVM Switch User Guide R1.4 Security ▪ 1024-bit Public key Authentication using certificates generated by an external CA ▪ 256-bit SSL Encryption for keyboard, mouse and video signal transmissions ▪ Remote authentication support for LDAP or RADIUS servers ▪...
-
Page 10: System Architecture
Prima IP KVM Switch User Guide R1.4 1.2 System Architecture The Prima IP is based on an embedded Linux platform for computing power and rugged stability. The Prima IP employs a High speed Processor to ensure excellent video quality and fast keyboard / mouse response across the Internet, even when bandwidth availability is limited. - Page 11 Prima IP KVM Switch User Guide R1.4 Power Control Configuration The Prima IP KVM switch supports Serial Power Control device to facilitate the remote Power ON/OFF and power cycling of the connected computers/servers. Prima IP connected to a Remote Power Control Device PPP connections The Prima IP KVM switch can serve either as a PPP client or a PPP server to support PPP connection.
-
Page 12: Prima Ip External Views
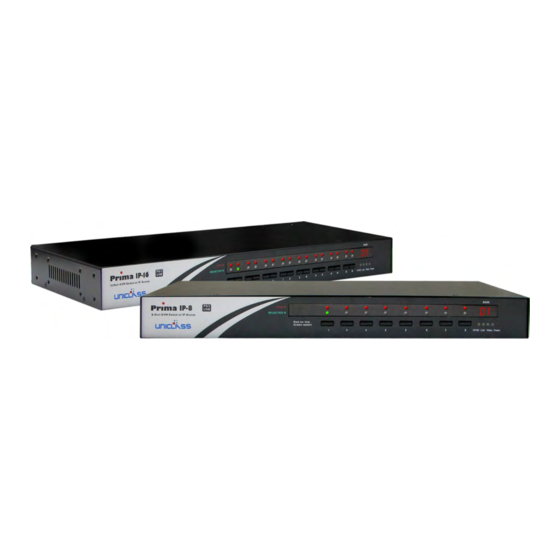
User Guide R1.4 1.3 Prima IP External Views Prima IP Front View Prima IP 8 - Front-panel Prima IP 16 - Front-panel Status LEDs The Dual Numerical LED shows bank number of the Prima IP KVM Switch within a Daisy-chain... - Page 13 Prima IP KVM Switch User Guide R1.4 Prima IP 16 - Rear-panel 8 x 16 PC ports The PC port is where you connect to your computer. The PC port is a HDB 15 connector integrated with USB and PS/2 keyboard, mouse and video. To connect PC port to one of your computer, you may either use USB KVM Combo Cable, or PS/2 KVM Combo Cable, or Combo-free USB PS/2 KVM Cable, depending on your package option.
- Page 14 Prima IP KVM Switch User Guide R1.4 Restore-to-Default Button Res ore o-Default but on is a tiny recessed button located to the left of the Power Receptacle, and can only be accessed by prying down with a pointed needle tip. To depress the recessed button for over 5 seconds, and upon release, it will restore Prima IP to factory default –...
-
Page 15: Prima Ip Intallation
Prima IP KVM Switch User Guide R1.4 2 PRIMA IP INTALLATION Before installing the KVM switch, you should run through the following peripheral checklist to ensure a proper setup of your KVM Switch…. 2.1 Checklist before Installation Suitable KVM cables to connect the Prima IP KVM Switch to the keyboard, video and mouse ports of each of your PC. -
Page 16: Set Up The Physical Connections
Prima IP KVM Switch User Guide R1.4 Figure 2-3 The Combo-free USB PS/2 KVM cable Figure 2-4 The Daisy-chain Cable [M-HDB15-to-HDB15-F] Figure 2-5 The [Daisy-chain] Terminator 2.2 Set up the Physical Connections Step 1. Power on the Prima IP: Connect the Prima IP Power adapter to power on the Prima IP KVM Switch. - Page 17 Prima IP KVM Switch User Guide R1.4 Prima IP configuration – Single server mode 3.1 Make sure (at least the PS/2) computers that are to be connected to the KVM switch are powered off. If not, power them off before you proceed with the following steps. If you use only one single Prima IP KVM switch in non-cascaded application, you should ignore step 3.2, 3.3, and 3.4 and jump directly to step 4.
-
Page 18: Configure Your Servers For Connections To Prima Ip
Prima IP KVM Switch User Guide R1.4 The special Combo-free KVM cable provides a PS/2 keyboard connector, a USB connector and a HDB video connector for the computer connection. When connecting with a USB computer, just plug the USB connector to it and leave the PS/2 connector free. When connecting with a PS/2 computer, just add one USB-to-PS/2 adapter to the USB connector and you’ll have a PS/2 connector for mouse. - Page 19 Prima IP KVM Switch User Guide R1.4 Click OK. Windows 2000 Platform Control Panel Mouse Mouse Properties Pointer Options Access . On the tab, select the page : 1. Adjust the pointer speed slide bar to the exact middle None 2.
-
Page 20: More Tips For Server Desktop Configuration
Prima IP KVM Switch User Guide R1.4 Click OK. The mouse setting page on different Windows platforms might be quite different, some gives mouse acceleration option and some don’t. If you see any mouse acceleration option, please uncheck it. If there is no mouse acceleration available on the setting page, you can adjust the mouse speed slide bar to either x1 or the slowest position (such as on Linux platforms). - Page 21 Prima IP KVM Switch User Guide R1.4 1024 x 1152 x 1280 x 1600 x 640 x 400 640 x 480 800 x 600 1024 1200 56Hz 60Hz 61Hz 64Hz 70Hz 72Hz 74Hz 75Hz 76Hz 78Hz 84Hz 85Hz 100Hz Note: These are suggested display modes for server desktop-connected Prima IP. However, the actual display modes for as specific server desktop will be dependent on its display card.
-
Page 22: Configure Ip Address And Port Base
Prima IP KVM Switch User Guide R1.4 Choose plain and solid server desktop backgrounds for your connected servers. To optimize the bandwidth efficiency and speed up video performance across bandwidth-limited environment, one should preferably adopt a server desktop which should be as plain as a color background with a solid and light-colored graphics. - Page 23 Prima IP KVM Switch User Guide R1.4 Step 4. Go to the LAN TCP/IP page on the Prima IP Browser Management Interface and modify the IP address and port base for your Prima IP KVM switch. For example, if you choose Section your IP seeting for the Prima to be 192.168.1.210 with a port base of 5900.
- Page 24 Prima IP KVM Switch User Guide R1.4 If you are satisfied with the default port base setting as 5900, you can leave the port base unmodified. The default port base for Prima IP connection is set at 5900. This means it will use port 5900 (port base) for viewer connection and port 5908 (port base + 8) for https web browser connection.
-
Page 25: Configure Your Firewall/Router For Accessing Prima Ip Across Internet
Prima IP KVM Switch User Guide R1.4 2.6 Configure your firewall/router for accessing Prima IP across internet To allow access to the Prima IP behind corporate firewall/router, please configure the following settings on your firewall/router (not on your Prima IP): Step 1. -
Page 26: Nstall Ertificates On Rima Ip
Prima IP KVM Switch User Guide R1.4 2.7 Install Certificates on Prima IP You could use the default set of certificates (could be found on CD-ROM) to practice making some PKI-authenticated connections as long as your network safety is not jeopardized. We advise that it is better to do the practices within your Local Area Network, which is supposed to be well secured with adequate firewall and other due precautions against network intrusions. - Page 27 Prima IP KVM Switch User Guide R1.4 Step 3. Click UPLOAD button to upload the root certificate to Prima IP. After the uploading is completed, you can then see the prompt page for reboot. Reboot server.crt Click and wait till Prima IP is booted up, then likewise try to import the and the serverkey pem The certificate and key for LDAP authentication could be uploaded likewise.
-
Page 28: Select A Security Level For Viewer Connection
Prima IP KVM Switch User Guide R1.4 2.8 Select a Security Level for Viewer Connection Step 1. Go to the Security page on the Prima IP Web management interface and select a viewer connection security level. There are three security levels for choice: •... -
Page 29: Select A User Password Policy
Prima IP KVM Switch User Guide R1.4 However, if you use your own set of certificates, you should get the correct server password from the Certificate Authority that issues those certificates. Apply Setting Apply Setting Step 2. Go to the page and hit the button to validate your selection. - Page 30 Prima IP KVM Switch User Guide R1.4 1. Certifidcates: (as you have obtained from your CA (Certification Authority). They are required only if you select level 3 viewer security) root.crt client_name.p12. (client_name is freely chosen) 2. Certificate password: (as you have obtained from your CA. It is required only if you select level 3 viewer security) clientpwd (if you use the default set of certificate provided on Prima IP CD-ROM)
-
Page 31: Making A Viewer Connection
Prima IP KVM Switch User Guide R1.4 3 MAKING A VIEWER CONNECTION The Prima IP provides a win32 viewer for Windows clients and a Java viewer for cross-platform on any major operating systems. 3.1 Install Win32 Viewer on the Client Computer Download Kripview_install exe. -
Page 32: Import Certificates To Prima Ip Viewer On The Client Computer
Prima IP KVM Switch User Guide R1.4 After all, to run the small java program, you don’t have to actually save the Kviewer.jar to your local hard disk, since it is small (only 70 KB), you can choose to open it directly while download is completed. On some client platforms such as Linux, after you have installed the JRE on your client platform, you have to set the path information in order for the client system to know where the Java compiler program is. -
Page 33: Specify The Viewer Connection Option Before Making A Connection
Prima IP KVM Switch User Guide R1.4 ......Specifically, we should import client certificate(s) in . format, to the win32 viewer and Java Viewer on your client computer, using each of their own certificate import utilities. -
Page 34: Establish The Viewer Connection
Prima IP KVM Switch User Guide R1.4 The viewer connection option interface provides you with several alternative options to use in combination for optimization of your viewer connection. Connection details box Options Connec ion Details Click the button on the dialog box. - Page 35 Prima IP KVM Switch User Guide R1.4 First, run the viewer program, enter the access IP and port number for Prima IP. Default IP address: 192.168.1.200 Login dialog box (Win32 Viewer) At the password or private path phrase prompt, just enter the user name and password as required: Default user &...
-
Page 36: Mouse Cursors Synchronization
Prima IP KVM Switch User Guide R1.4 Note that you can simply type in the access IP of Prima IP server without specifying its port number only when the port number is default to 5900 IP_address [only if port number is default to 5900] 192.168.1.200 Of course, you can always type IP_address:port_number... -
Page 37: Save The Connection Options
Prima IP KVM Switch User Guide R1.4 Mouse cursors out of sync Mouse cursors in Sync Local/remote cursor resynchronization hotkey- RCtrl-RCtrl-Home Note that, while operating your mouse, it is not necessary to wait till the remote cursor has actually caught up with the local one before you can click on the target in the view area. - Page 38 Prima IP KVM Switch User Guide R1.4 Viewer Window with scroll bars (Win32 viewer) The size of the Prima IP viewer window can be adjusted by dragging the border of the viewer windows. Change the Viewer size to full screen mode Note that only the win32 viewer supports full screen mode.
- Page 39 Prima IP KVM Switch User Guide R1.4 To exit the full-screen mode, just hit Ctrl-Esc to bring up the local task bar. Right-click the viewer taskbar icon to bring up Quick Menu, then click to deselect the full screen mode to restore it to window mode.
- Page 40 Prima IP KVM Switch User Guide R1.4 Centralize your remote servers control If you have multiple Prima IP units installed in a distributed manner among your global branch offices, you can then simultaneously monitor different remote servers distributed over this IP KVM Link Extender infrastructure on a single client desktop.
-
Page 41: Title Bar Information
Prima IP KVM Switch User Guide R1.4 3.9 Title Bar Information ServerRoom_TPE : This is the name you specified for your Video Server. Window XP P o essional : This is the name you specified for this connected computer 53 ms : This is the capture time that is used for capturing the video image Shared : This is a shared session that allows other authorized user logins... - Page 42 Prima IP KVM Switch User Guide R1.4 Java viewer Select Computer Box Quick Menu To bring up the , click the Viewer Computer List option on the For the java viewer, the Select Computer Box will not appear by default. Quick Menu (Java Viewer) To switch to specific computer, just click any item on the listing …...
-
Page 43: Viewer Quick Menu
Prima IP KVM Switch User Guide R1.4 3.11 Viewer Quick Menu Quick Menu of Prima IP’s Win32 Viewer can be evoked by clicking the program icon on the leftmost of the title bar, or right-clicking anywhere on the title bar. For the Java Viewer, Just click the Menu options under the Title Bar to evoke the Quick Menu. - Page 44 Prima IP KVM Switch User Guide R1.4 Select computer Select the remote computer by a drop-down combo box View Computer ICONs Select Computer Open the box for computer selection by clicking icons...
- Page 45 Prima IP KVM Switch User Guide R1.4 Select Computer Box (Win32 viewer) Adjust Screen Fine-tune the screen area by pixel shifts. Adjust Screen Box (Win32 viewer) Connection options Connection Options Open the dialog box Connection Options dialog Box (Win32 viewer) Connection info Show the Connection information of the viewer session.
- Page 46 Prima IP KVM Switch User Guide R1.4 Connection Info (Win32 viewer) New connection Make another new connection by the viewer. Save connection options Save the connection options settings such as those connection parameters specified within the Connection Options Box and also the password within the registry of the client computer. By selecting this option, you can save your session password as well as other connection parameters in the registry of your client computer, so that next time when you log in the viewer for a new session, you will not be prompted for session password again.
-
Page 47: Java Viewer Characteristics
Prima IP KVM Switch User Guide R1.4 Power-on/off options grayed-out (unavailable for User privilege) Now you have got yourself well familiar with Prima IP viewer interface, so go ahead to use and enjoy the remote viewer connection! 3.12 Java Viewer Characteristics You can perform likewise operations (except full screen) on java viewer. - Page 48 Prima IP KVM Switch User Guide R1.4 Video Server Video Filter Level, please go to the Page in Prima IP Web Management Interface, and select the filter as either Medium or High Quality according to your requirements. Note that High Quality video filter gives high quality always on the expense of video response speed on the viewer screen.
- Page 49 Prima IP KVM Switch User Guide R1.4 Q: I can log in and make successful browser connection with Prima IP. However, I cannot make a valid viewer connection or the Prima IP does not respond to my viewer connection request. What can I do about it? A: The Prima IP video server might not function properly.
-
Page 50: Prima Ip Unit Management Over A Secure Https Browser Connection46
Prima IP KVM Switch User Guide R1.4 4 PRIMA IP UNIT MANAGEMENT OVER A SECURE HTTPS BROWSER CONNECTION Prima IP’s Web Management interface uses only password authentication to authenticate login user’s identity. After user identity is authenticated (that is, if you have typed in the right user name with a right password in the login prompt…), an SSL-secured browser connection using 256-bit cipher strength is established. - Page 51 Prima IP KVM Switch User Guide R1.4 Full access - SUPERADMIN Partial access - ADMIN Minimal Access (User privilege) Prima IP Browser Management Access Privilege Feature Page SUPERADMIN ADMIN USER √ √ √ Download √ √ × Date & Time √...
-
Page 52: Download - Download Programs For Viewers
Prima IP KVM Switch User Guide R1.4 4.2 Download – Download Programs for Viewers Prima IP Viewer Download Page The win32 viewer program supports all the current Windows platforms such as Windows 98/Me/NT/2000/XP/2003 Server, and the java viewer is truly cross-platform for all major Operating Systems including Windows, Linux, MacOS, etc. -
Page 53: Date & Time - Date, Time, Global Time Zone Support And Ntp Server Synchronization
Prima IP KVM Switch User Guide R1.4 4.3 Date & Time – Date, Time, Global Time Zone Support and NTP server synchronization Submit After any setting change, click the button to save new setting to the Prima IP database, and then Apply Setting click to apply new settings to Prima IP immediately. - Page 54 Prima IP KVM Switch User Guide R1.4 The option here is for the automatic synchronization of Prima IP time with a Time Server on the Internet. You can check the option and then specify the time servers you prefer. Prima IP will try to synchronize with the timer servers every time it starts or restarts and will continue to synchronize every hour thereafter.
-
Page 55: Video Server - Miscellaneous Settings For Video Servers
Prima IP KVM Switch User Guide R1.4 4.4 Video Server – Miscellaneous Settings for Video Servers Submit After any setting change, click the button to save new setting to the Prima IP database, and then Apply Setting click to apply new settings to Prima IP immediately. Default Settings Filter Specify the Video Filter Level for the Prima IP video server. - Page 56 Prima IP KVM Switch User Guide R1.4 and video refresh speed will be slower (however, only noticeable when bandwidth is very limited). This filter provides the best image quality. Medium Quality, Medium Speed (Medium Filter): This level is recommended for internet connection to connect to Prima IP half a world away across internet with not so ample bandwidth like in LAN for a smooth video performance.
- Page 57 Prima IP KVM Switch User Guide R1.4 since some keycodes are represented by different key locations in different keyboard layout. And keyboard layout setting ensure you will have a matching keycode output as you have on the physical keyboard on client computer. The default keyboard layout is the keyboard ( Largest Possible Screen Select the largest workable resolution for your display device.
- Page 58 Prima IP KVM Switch User Guide R1.4 (Alt-Shift/Ctrl-Shift, pressed together) operate more smoothly and interference-free with both client computer and remote server. Once this option is enabled, you can use separate key strokes (Alt Shift/ Ctrl Shift) to do the language/input method switching trick only on the remote server desktop without acting on the client computer system.
-
Page 59: Power Control - Settings For Serial Power Control Unit
Prima IP KVM Switch User Guide R1.4 4.5 Power Control – Settings for Serial Power Control Unit Submit After any setting change, click the button to save new setting to the Prima IP database, and then Apply Setting click to apply new settings to Prima IP immediately. Power Control Enable the power control via the serial port : Check this option if you want to enable the remote power control over Prima IP viewer interface. -
Page 60: Computers - Settings For Specific Computers
Prima IP KVM Switch User Guide R1.4 4.6 Computers – Settings for Specific Computers Submit After any setting change, click the button to save new setting to the Prima IP database, and then Apply Setting click to apply new settings to Prima IP immediately. Select the KVM into the Daisy-Chain (PRIMA IP is #1) : Select the target KVM switch within a daisy-chained configuration. -
Page 61: Power Management
Prima IP KVM Switch User Guide R1.4 Computer Scanning and Alarms Do not include in scanning process : If you do not want any KVM port (in this case, it is port 6) to be included in Prima IP auto-scanning, you should check this option to exclude it. Do not generate alarm : If you do not want the scanning process to generate alarm or SNMP messages for this computer then you should check this option to exclude it. -
Page 62: Server Log - Logging Server Events
Prima IP KVM Switch User Guide R1.4 4.7 Server Log – Logging Server Events Submit After any setting change, click the button to save new setting to the Prima IP database, and then Apply Setting click to apply new settings to Prima IP immediately. Each log item in the server log file records a specific server event and is preceded by the date and time it is written and then followed by the description for that specific log event. -
Page 63: Video Modes - Keeping, Modifying And Augmenting Your Video Mode Data Base
Prima IP KVM Switch User Guide R1.4 4.8 Video Modes – Keeping, Modifying and Augmenting your Video Mode Data Base Submit After any setting change, click the button to save new setting to the Prima IP database, and then Apply Setting click to apply new settings to Prima IP immediately. - Page 64 Prima IP KVM Switch User Guide R1.4 Screen Height: specifies the screen height of the target video mode. Total Height: specifies the total screen height of the target video mode. Vsync start: specifies where the vertical synchronization should start. To change these parameters, you should follow VESA standard specifications in order for the video capture function of Prima IP to work properly.
-
Page 65: Alarms - E-Mail Notifications And Snmp Logging Support
Prima IP KVM Switch User Guide R1.4 4.9 Alarms – e-mail Notifications and SNMP Logging Support Submit After any setting change, click the button to save new setting to the Prima IP database, and then Apply Setting click to apply new settings to Prima IP immediately. This Alarms feature should be used in conjunction with Prima IP’s auto-scanning function, thus Prima IP can serve as a non-stop server health-monitoring agent. - Page 66 Prima IP KVM Switch User Guide R1.4 Email to: support@Prima IP.net, emma@international.com, joe@netview.co.jp Copy to: charles@unisum.com.tw, daniel@runfast.com, coco@Prima IPpro.com.au Log SNMP Prima IP supports SNMP traps so that it can provides the alarms information to the SNMP manager devices on the network. Primary Manager: Specify the IP address of the Primary SNMP manager device on your network.
- Page 67 Prima IP KVM Switch User Guide R1.4 Enable Alarm: Check this option to enable Prima IP to respond to specific alarm triggering events. Restart Computer: Check this option to restart computer upon specific alarm triggering events. Send an e-mail: Check this option to send an alert e-mail upon specific alarm triggering events. Send an SNMP Trap: Check this option to send an SNMP trap message upon specific alarm triggering events.
- Page 68 Prima IP KVM Switch User Guide R1.4 SYNTAX DisplayString (SIZE (0..256)) ACCESS read-only STATUS deprecated DESCRIPTION "The Name of the computer that originated the trap." ::= { trapInfo 4 } videoMode OBJECT-TYPE SYNTAX DisplayString (SIZE (0..256)) ACCESS read-only STATUS deprecated DESCRIPTION "The blue screen video resolution."...
-
Page 69: Lan Tcp/Ip - Port And Ip Settings
Prima IP KVM Switch User Guide R1.4 4.10 LAN TCP/IP – Port and IP settings Submit After any setting change, click the button to save new setting to the Prima IP database, and then Apply Setting click to apply new settings to Prima IP immediately. TCP/IP Settings TCP Port base : Specify the port base for viewer connection with the Prima IP server. - Page 70 Prima IP KVM Switch User Guide R1.4 that is assigned to a specific Prima IP unit. Thus, you need only one external IP address to port number allow remote clients to login multiple Prima IP units only by using different port number mappings. Use DHCP : Normally, it is NOT recommended to use the DHCP setting for Prima IP.
-
Page 71: Wan Ppp - Ppp Server And Client
Prima IP KVM Switch User Guide R1.4 4.11 WAN PPP – PPP Server and Client Submit After any setting change, click the button to save new setting to the Prima IP database, and then Apply Setting click to apply new settings to Prima IP immediately. Prima IP can either serves as a PPP server for the peer computer to dial-in for connection, or as a PPP client to dial in a PPP server to connect to a network or the Internet. - Page 72 Prima IP KVM Switch User Guide R1.4 PPP Connection over direct serial cable with Prima IP as PPP Server To enable as the PPP server , you should still specify the following settings …. Prima IP Prima IP address : Enter an IP address here (default = 192.168.2.200) to be used by the Prima IP in the PPP connection.
- Page 73 Prima IP KVM Switch User Guide R1.4 Note that this IP address is used for Prima IP PPP server, and is distinct from the one (default = 192.168.1.200) that is used by Prima IP on local area network. Enable Prima IP PPP Client for Dial-in connection to a PPP server in your ISP or to an Enterprise PPP Server You could enable the PPP Client feature, if the only way to get your Prima IP on network is through Prima IP’s dial-in request to your ISP or enterprise PPP server.
- Page 74 Prima IP KVM Switch User Guide R1.4 Modem Initialization (Chat Script Style) : the modem initialization script is a chat script that will initialize modem to be ready for connection. The standard script provided here by default should be able to work on most of the modem: 'ABORT' 'BUSY' 'ABORT' 'ERROR' 'ABORT' 'NO CARRIER'...
-
Page 75: User Status - Show The Currently Connected Users
Prima IP KVM Switch User Guide R1.4 4.12 User Status – Show the Currently Connected Users Connected Users : Refresh In this field, one can click the button below and see the currently connected users who are now having viewer connections with Prima IP. Note that: Only when you have selected your password policy to be User Password policy, will the currently connected users be registered and shown on this page. -
Page 76: User Management - Manage User Accounts, Radius Accounting And Remote Authentications
Prima IP KVM Switch User Guide R1.4 4.13 User Management – Manage User Accounts, Radius Accounting and Remote Authentications Submit After any setting change, click the button to save new setting to the Prima IP database, and then Apply Setting click to apply new settings to Prima IP immediately. - Page 77 Prima IP KVM Switch User Guide R1.4 Cancel If you decide to abandon editing an existing user account, you can always click to abort User Management and return to the page. User New : To add a new user account, just press the button.
-
Page 78: Remote Authentication
Prima IP KVM Switch User Guide R1.4 Enable RADIUS Accounting : Check this option, if you want to enable RADIUS accounting support on Prima IP. Accounting Server : Here you should enter the IP address of the server that offers RADIUS accounting service. - Page 79 Prima IP KVM Switch User Guide R1.4 To enable the LDAP Authentication ……. LDAP Enable Remote Authentication : Just select as the Remote Authentication method, and then configure subsequent settings: SSL Access : Check this option if you want to enable SSL access of the LDAP authentication. However, to use this option, you should make sure your LDAP server support SSL and also you have to install a distinct set of certificates –...
- Page 80 Prima IP KVM Switch User Guide R1.4 RADIUS Enable Remote Authentication : Just select as the Remote Authentication method, and then configure subsequent settings: Server : Enter here the IP address of the RADIUS server. Port : Enter here the port number used in RADIUS authentication. By default, it is set to port 1812.
-
Page 81: User Group - Manage User Group, And Access Right To Each Computer Within That Group
Prima IP KVM Switch User Guide R1.4 4.14 User Group – Manage User Group, and Access Right to each Computer within that Group Submit After any setting change, click the button to save new setting to the Prima IP database, and then Apply Setting click to apply new settings to Prima IP immediately. -
Page 82: Mouse Acceleration
Prima IP KVM Switch User Guide R1.4 Local Console – Configure Local Console Authentication and mouse acceleration Submit After any setting change, click the button to save new setting to the Prima IP database, and then click Apply Setting to apply new settings to Prima IP immediately. On this page, you can enable/disable the local console authentication by password, and also specify the mouse acceleration parameters. - Page 83 Prima IP KVM Switch User Guide R1.4 your mouse. Thus, you can try to enable the mouse acceleration on the local console, for more efficient mouse maneuvering. To enable local console mouse acceleration will not affect the mouse acceleration on the connected server since it is only imposed atop its original zero acceleration on the local console.
-
Page 84: Security - Certificates Installation , V Iewer Encryption And Password Policies
Prima IP KVM Switch User Guide R1.4 4.15 Security – Certificates Installation, Viewer Encryption and Password Policies Submit After any setting change, click the button to save new setting to the Prima IP database, and then Apply Setting click to apply new settings to Prima IP immediately. root.crt server.crt serverkey.pem, ldapcert.crt, ldapkey.pem... - Page 85 Prima IP KVM Switch User Guide R1.4 Then click UPLOAD button to upload your certificates, one at a time, to Prima IP, and the certificate will begin uploading to Prima IP. After the uploading is completed, you can then see the prompt page for reboot.
- Page 86 Prima IP KVM Switch User Guide R1.4 ldapkey.pem Sec ion 4.13, User Management – Mange User Accounts, Radius Accounting For details, refer to and Remote Authentications You don’t have to reboot each time when you finish uploading one certificates. You could do one complete reboot at the end when you finish uploading all of them.
- Page 87 Prima IP KVM Switch User Guide R1.4 No Password – the viewer will prompt you for no password. Anyone who is with the viewer and passes the security level check of the viewer, could well establish the connection. Global Password – the viewer will prompt you for a global password, which is used by all who want to make viewer connections to Prima IP.
-
Page 88: Backup And Upload
Prima IP KVM Switch User Guide R1.4 4.16 Maintenance – Firmware/Software Version Information, Upgrade, Configuration Backup and Upload Software version Applications for the IP module Information about the versioning of the linux kernel and as well as the KVM firmware are provided here: Linux Kernel: Built on 07/15/06-19:06:53 Applications: Built on 07/29/06-11:35:48 KVM Firmware: 02-11-06... - Page 89 Prima IP KVM Switch User Guide R1.4 KVM Firmware Upgrade (kvmfirm-xx-xx-xx) -xx-xx-xx Generally, the Prima IP upgrade file comes with a file name such as kvmfirm , for -06-07-29 example, kvmfirm . It is also of an accumulative nature. You can upgrade the KVM part of the Prima IP just like you upgrade the firmware of the its IP module.
-
Page 90: Apply Settings
Prima IP KVM Switch User Guide R1.4 Configuration Files (*.tgz) It is wise to backup your configuration files periodically so that you will aCClways be free from risk of being required to configure Prima IP anew when you have lost your configuration or when you have to configure another unit of Prima IP with the same configuration like one that you have used. - Page 91 Prima IP KVM Switch User Guide R1.4 4.17 Logout – Log out the Web Management Logout To log out Prima IP Web Management Interface, just hit the link on the left frame of the Prima IP Web Management Interface… and a prompt box will ask you whether you want to close the browser window.
- Page 92 Prima IP KVM Switch User Guide R1.4 4.18 Apply Settings – Validate New Settings All the new settings you have made could only be committed to ’s database by clicking Prima IP the Submit button on each setting page. However, just clicking the Submit button won’t have these new settings immediately activated.
- Page 93 Prima IP KVM Switch User Guide R1.4 button no longer works to bring Prima IP to an effective restart, you can click the Emergency Reboot Maintenance button on the Page. Only bear in mind that The Emergency Reboot is a total reboot and takes longer time to boot up completely.
-
Page 94: Local Console Operation
5.1 Control Interfaces There are three ways to operate your Prima IP 4/Prima IP 8/Prima IP 16 KVM Switch—either by Front-panel buttons, keyboard hotkeys and OSD Menu options. The operation details of these three control methods are detailed as... -
Page 95: On Screen Display
Prima IP KVM Switch User Guide R1.4 Command Hotkeys / OSD Menu option ScrLk + ScrLk + (a) + (b) + (y) + (z) Select PC ab = 2-digit bank number yz= 2-digit channel number ScrLk + ScrLk + ↑ (arrow up) Next lower channel ScrLk + ScrLk + ↓... -
Page 96: Osd Main Menu
Prima IP KVM Switch User Guide R1.4 OSD Main Menu Figure 3-1 OSD Main Menu The computer name that is followed by a human symbol, means that computer is currently the active channel you can monitor on your local console now. -
Page 97: Osd Setup Menu
Prima IP KVM Switch User Guide R1.4 OSD Setup Menu Figure 3-2 OSD Main Menu Autologout : Specify time for autologout (00~99 min) Title Bar : Specify the position of the OSD title bar. Hotkey: Specify the hotkey preceding sequence IP : specify the local IP address for the Prima IP KVM Switch Submask : Specify the submask for the Prima IP KVM Switch Firmware version : show forth the firmware version of the KVM switch... -
Page 98: Hotkey Operations
Prima IP KVM Switch User Guide R1.4 5.2 Local Console Hotkey Operations The followings describe each local console hotkey command operation of the Prima IP KVM Switch and available ways to execute the command, either by a front-panel button, a keyboard hotkey sequence or an OSD Menu option. <Select PC>... -
Page 99: Next Lower Channel
Prima IP KVM Switch User Guide R1.4 However, when using single KVM Switch configuration, if you want to select port 7, you should first press its default bank number 01 and then the port number 07: Select PC = bank port number number... -
Page 100: Next Higher Channel
Prima IP KVM Switch User Guide R1.4 <Next Higher Channel> Hotkeys ↓ Next higher channel = Select the corresponding OSD Menu option. <Next Lower Bank> (when daisy-chained) Front Panel Button Press the corresponding button. Hotkeys Previous bank = While the OSD is activated on the console screen, press the Page Up key to rotate through the bank selections upwards. -
Page 101: Show Osd Menu
Prima IP KVM Switch User Guide R1.4 <Beep Sound On/Off> While autoscanning, port-switching or issuing a hotkey command, a beep sound will be heard. If you want to turn on/off this beeping, try the following hotkey sequence. Hotkey Beep sound on/off = <Show OSD Menu>... -
Page 102: Auto Logout
Prima IP KVM Switch User Guide R1.4 <Auto Logout> Use cursor keys to navigate to the Auto Logout option on the OSD Setup Menu, and then hit Enter to select and edit the Autologout timeout value. The OSD Menu Timeout is disabled by default. You can specify a timeout value between 0 and 99 min.
Need help?
Do you have a question about the Prima IP 8 and is the answer not in the manual?
Questions and answers