Table of Contents
Advertisement
Available languages
Available languages
Quick Links
© 2012 Sunbeam Products, Inc. doing business as Jarden Consumer
Solutions. All rights reserved. Distributed by Sunbeam Products, Inc.
doing business as Jarden Consumer Solutions, Boca Raton, Florida 33431.
Sunbeam Products, Inc.is a subsidiary of Jarden Corporation (NYSE:JAH).
© 2012 Sunbeam Products, Inc. operando bajo el nombre de Jarden
Consumer Solutions. Todos los derechos reservados. Distribuido por
Sunbeam Products, Inc. operando bajo el nombre de Jarden Consumer
Solutions, Boca Raton, Florida 33431. Sunbeam Products, Inc. es una
subsidiaria de Jarden Corporation (NYSE:JAH).
U.S. 1-800-MR COFFEE (1-800-672-6333) Canada 1-800-667-8623 Visit us
at www.mrcoffee.com / Visítenos en www.mrcoffee.com
Printed in China/Impreso en China
GCDS-MRC23174-VW
BVMC-KG2_11ESM1.indd 1-2
User Manual /
Manual del Usuario
P.N. 144294 Rev A
www.mrcoffee.com
BVMC-KG2_12ESM1
Single Serve Brewer / Cafetera individual
BVMC-KG2
2/1/12 2:50 PM
Advertisement
Chapters
Table of Contents

Related Manuals for Mr. Coffee BVMC-KG2


Summary of Contents for Mr. Coffee BVMC-KG2
-
Page 1: User Manual
User Manual / Manual del Usuario Single Serve Brewer / Cafetera individual BVMC-KG2 © 2012 Sunbeam Products, Inc. doing business as Jarden Consumer Solutions. All rights reserved. Distributed by Sunbeam Products, Inc. doing business as Jarden Consumer Solutions, Boca Raton, Florida 33431. -
Page 2: Important Safeguards
10. Do not operate any appliance with a damaged cord or plug or after the appliance malfunctions or is damaged in any manner. Contact your Mr. Coffee Customer Service to arrange for replacement or repair. -
Page 3: Table Of Contents
Single Serve Brewer. Your new brewer will wake ® hOUSEhOLD USE ONLy up with you in the morning and provide you breaks and treats during your hectic daily activities. How you enjoy your Mr. Coffee Single Serve Brewer is ® up to you! BVMC-KG2_11ESM1.indd 5-6... -
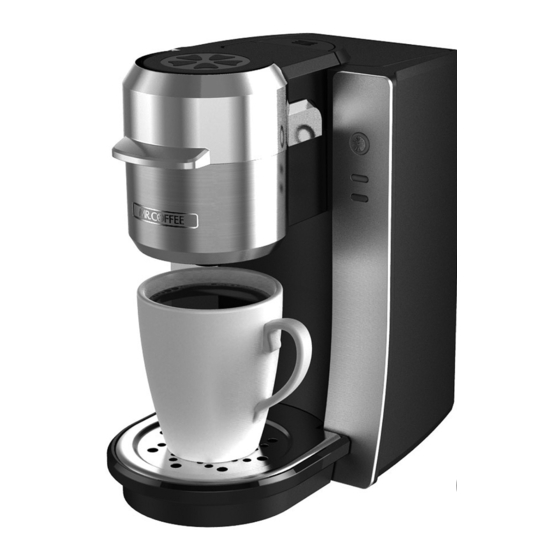
Page 4: Parts Diagram
PARTS DIAGRAM SET-UP & hOW TO bREW 1. Place Brewer upright on a flat surface, remove protective sheet and plug into outlet. 2. DO NOT remove or puncture the foil lid of the K-Cup Pack. ® 3. Lift front handle of the brewer to insert a K-Cup Pack. - Page 5 5. Lower the handle completely and 9. Place a coffee cup in the firmly to close the Lid and puncture dispense area on the drip tray. Press the BREW NOW button. the K-Cup Pack. ® NOTE: Drip Tray can be removed to accommodate larger mugs.
-
Page 6: Helpful Hints
hELPFUL hINTS to place. Depending on the mineral content of the water in your area, calcium deposits or scale may build up in • Initial Cleansing brew – Before you use your Brewer for the your Brewer. Scale is non-toxic, but left unattended, it can first time, perform an initial cleansing brew by running clean hinder Brewer performance. - Page 7 Emptying the hot Water Tank align the K-Cup ® Pack Holder with the opening using the two front ribs as a guide, and snap into place from the top. 1. Ensure that the Water Fill Lid is closed. 2. Cleaning the Funnel – The Funnel 2.
-
Page 8: Troubleshooting
Step 3: Close the lid, and perform a brew into the ceramic TROUbLEShOOTING yOUR SINGLE SERvE bREWER mug without adding a K-Cup Pack. ® Beyond these recommended cleaning and maintenance Step 4: Pour the contents of the ceramic mug into the Hot procedures this Brewer is not user serviceable, for service Water Tank, careful the liquid will be hot, close the please refer to the Warranty section in this guide. -
Page 9: Warranty Information
JCS products do not have the right to a rich blend of gourmet recipes, entertaining tips and the alter, modify or any way change the terms and conditions of latest information on MR. COFFEE ® products. - Page 10 NOTES warranty or condition of merchantability or fitness for a particular purpose is limited in duration to the duration of the above warranty. JCS disclaims all other warranties, conditions or representations, express, implied, statutory or otherwise. JCS shall not be liable for any damages of any kind resulting from the purchase, use or misuse of, or inability to use the product including incidental, special, consequential or similar damages or loss of profits, or for any breach of contract,...
-
Page 11: Precauciones Importantes
10. No opere ningún electrodoméstico con un cable o enchufe dañados o después de un mal funcionamiento o cualquier daño del electrodoméstico. Llame a Servicio al cliente de Mr. Coffee para el reemplazo o la reparación. 11. No deje que el cable quede colgando del borde de la mesa o mostrador o que toque superficies calientes. -
Page 12: Instrucciones Especiales Para El Cable
ES TE PRODUCTO ES PARA USO ® despertará con usted en la mañana y le ofrecerá descansos y deliciosas infusiones durante sus agotadoras DOMÉSTICO ÚNICAMENTE actividades diarias. ¡Disfrutar de su cafetera individual MR. COFFEE depende de ® usted! ADVERTENCIA ADVERTENCIA: PARA REDUCIR EL RIESGO DE INCENDIO O DE DESCARGA ELÉCTRICA. -
Page 13: Diagrama De Las Partes
DIAGRAMA DE LAS PARTES INSTALACIÓN DE LA CAFETERA y PREPARACIÓN DEL CAFÉ 1. Coloque la cafetera en posición vertical sobre una superficie plana, retire la lámina protectora y conecte en un tomacorriente. 2. NO retire ni perfore la tapa de aluminio del paquete K-Cup Pack. - Page 14 5. Baje la manija completa y 9. Coloque una taza en el área firmemente para cerrar la tapa y dispensadora sobre la bandeja perforar el K-Cup Pack. ® de goteo. Oprima el botón de preparación. NOTA: La bandeja de goteo se puede retirar para acomodar tazas más grandes.
-
Page 15: Sugerencias
SUGERENCIAS de limpiar los componentes externos e internos con frecuencia. Para mayor información, consulte la página 29. • Operación para limpieza inicial – Antes de usar su cafetera • Remoción del sarro – El contenido mineral en el agua varía por primera vez, opere la cafetera para una limpieza inicial de un lugar a otro. - Page 16 Limpieza del ensamble de receptáculo del K-Cup Pack NOTA: Con el tiempo, pueden aparecer ® descoloraciones o manchas en el tanque de agua 1. Limpieza de las partes – El ensamble del receptáculo del caliente. Esto es normal y variará dependiendo del K-Cup Pack se puede colocar en la sección superior del ®...
- Page 17 es tóxico pero si se ignora puede obstruir el desempeño de SOLUCIÓN DE PRObLEMAS PARA la cafetera. Quitar el sarro de su cafetera ayuda a mantener el elemento calefactor y otras partes internas de la cafetera que SU CAFETERA INDIvIDUAL entran en contacto con el agua.
- Page 18 Los agentes y centros de servicio de JCS o las sugerencias para invitados y la información más reciente tiendas minoristas que venden productos de JCS no tienen acerca de los productos MR. COFFEE ® derecho a alterar, modificar ni cambiar de ningún otro modo los términos y las condiciones de esta garantía.
- Page 19 causados por el incumplimiento de alguna garantía o En los Estados Unidos, esta garantía es ofrecida por Sunbeam condición expresa, implícita o legal. Products, Inc. operando bajo el nombre de Jarden Consumer Solutions, Boca Ratón, Florida 33431. En Canadá, esta Excepto en la medida en que lo prohíba la ley aplicable, garantía es ofrecida por Sunbeam Corporation (Canada) cualquier garantía o condición implícita de comerciabilidad...
Need help?
Do you have a question about the BVMC-KG2 and is the answer not in the manual?
Questions and answers