Table of Contents
Advertisement
I.Warning
To avoid fire or electrical shock, do not expose this product to rain or moisture.
To avoid short circuit, please sure the batteries contacts are securely packed and in accordance with local
provisions when handling the battery.
Please place the batteries and the parts which can be swallowed mistakenly away from children. Contact a doctor
immediatelywhen it occurs.
To avoid possible injury to eyes, do not use the flash light in a short distance from the eyes.
To avoid possible safety accident, do not use the flash light on the people who need a high degree of attention.
Please take out the batteries and stop using immediately in case of below.
This product is dropped or shocked seriously and the inner part of the product is bared.
If the battery leaks corrosive liquids, please take out the battery with gloves.
The product gives off strange smell, heats or smokes.
Do not disassemble or maintain this product. Touching the internal high voltage circuit will cause electric shock.
Please take out all the batteries if not use this product for a long time.
-33-
Advertisement
Table of Contents

Related Manuals for Yongnuo YN565EXII


Summary of Contents for Yongnuo YN565EXII
- Page 1 I.Warning To avoid fire or electrical shock, do not expose this product to rain or moisture. To avoid short circuit, please sure the batteries contacts are securely packed and in accordance with local provisions when handling the battery. Please place the batteries and the parts which can be swallowed mistakenly away from children. Contact a doctor immediatelywhen it occurs.
- Page 2 II.Features COMPATIBLE WITH N’s and C’s WIRELESS FLASHING SYSTEM One YN565EX II is able to accept the internal flashing of YN568EX II, 580EX II, SB-900/800/700,7D/60D/600D, C order of N’s internal flashing and wireless signal of ST-E2,supports 4 channels,achieves external TTL and manual flashing.
- Page 3 PC PORT PROVIDED Allow you more easy to make the flash synchronously by using the PC sync line. SOUND PROMPT SYSTEM When the sound prompt system is enabled, different sound modes will prompt different working conditions of the speedlite so as to allow you to focus on shooting process. APERTURE PREVIEW MODELING LIGHT FUNCTION Press the aperture preview button, the YN565EX II will send out continuous flash which lasting one second for modeling light.
-
Page 4: Quick Start
III. Quick Start If you don’t have much time to read the whole user manual, we advise you to read this section. 1. Please avoid the excessive use of the output with maximum power. It can effectively extend the service life of this product. - Page 5 IV.COMPONENTS DISCRIPTION 1. Reflection board 2. Wide-angle diffuser 3. Flash head 4. External power socket (It can be connected to the SF-18C or SF-17C external Battery Pack) 5. PC port (for input) 6. Port cover 7. Wireless trigger sensor 8. Battery door 9.
- Page 6 -38-...
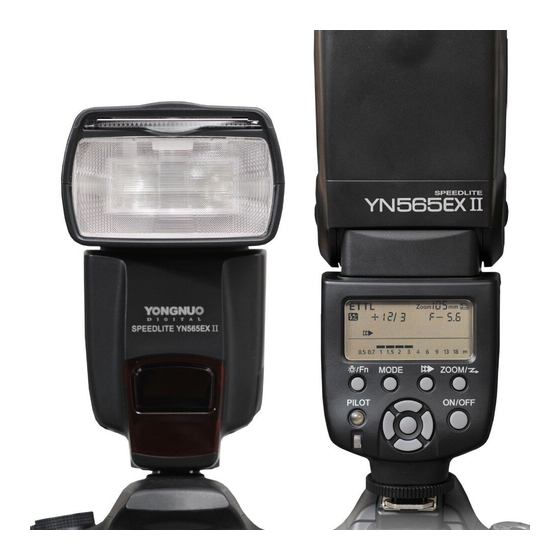
- Page 7 14. LCD screen: Displays all functions and application setting of the speedlite, convenient for users’ examination and quick setting. 15. Rear curtain sync shortcut button: The flash will be switched between rear/front curtain sync by each pressing. 16. ZOOM button: Set the flash focal length and the relevant parameters of the slave unit. 17.
- Page 8 Manual flash output level FEB compensation amount M/Multi Manual flash/Multi flash Manual zoom Zoom focal length Advanved options number ETTL/i-TTL C’s/N’s wireless TTLsystem Power low indication Flash exposure compensation Sound prompt Rear-curtain sync Slave Slave flash Overheating indication Channel Stroboscopic flash count,frequency FEB status Slave group Manual flash fine-turning increment indicator...
-
Page 9: Installation Instruction
V.Installation Instruction 1. Install Batteries Slide the Batteries door in the direction of the arrow. Insert the batteries according to the label inside battery door and make sure the direction of the batteries’ polarity is correct. Close the battery door in the direction of the arrow. Note:Please use four standard specification AA batteries. -
Page 10: Basic Functions
VI. Basic Functions 1.Basic operations Button Operation: Operation Parts Press this button for about 2 seconds to turn on or off the power of speedlite. [Power Switch] When in the normal set-top mode and off-camera S1/S2 mode, the zoom range (auto, 24, 28, 35, 50,70, 80, 105mm)can be adjusted by short pressing the [ZOOM] button;... - Page 11 Meaning of [Charging indicator] Method Statues of [Charging Meaning Indicator] The red light is lit The speedlite is fully charged and can be used Normal The green light is lit The speedlite has not been fully charged. Please wait for completion of charging. The internal temperature of the flash has risen Please properly reduce the flash The red light blinking...
- Page 12 2. Power-on and Power-offz The power of the speedlite can be turned on or turned off by long pressing the [ON/OFF] button. It is recommend that the batteries should be taken out after turned off the speedlite through this button. After turning on the power of the speedlite, the [PILOT] indicator light is red, which indicates the speedlite is available.
-
Page 13: Multi Mode
mixing grade 0.3EV, 0.5EV or 0.3/0.5EV mixed as adjustment increment, totally 29-grade fine adjustment at most; adjust whole grade brightness with the [Left] and [Right] button, and make fine adjustment with the [Up] and [Down] button, and the adjustment result will be shown on the LED screen. When shooting, you only need to set flash brightness, adjust the camera and press the shutter;... - Page 14 [OK] button to confirm and save the setting. (four off-camera modes Sc/Sn /S1/S2 for option ) The four off-camera modes Sc/Sn/S1/S2 can be used as off-camera slave unit in order to create multiple lighting effects. Sc/Sn mode can separately accept YN568EX II、580EX II、SB-910/900/ 800/700、7D/60D/600D built-in flash, Nikon camera C-command, SU-800 and ST-E2 wireless signal, supporting 4 channels and realizing TTL and manual wireless flash.
-
Page 15: Test Flash
S2 mode: It is also called “pre-flash cancel mode”. This mode is similar with S1 mode, but it can neglect the pre-flash given by TTL flash. Therefore, it can support the master flash working in TTL mode. In particular, if S1 mode cannot flash properly and synchronically with your internal flash, you can try to use S2 mode. -
Page 16: Overheating Protection
state,and then select the option numbered 01 with the [Up] and [Down] buttons,set the state to be “SL EP - -” with the [Left] and [Right] buttons, means the“Automatic power off” function is closed, and when the state is “SL EP on”, means the “Automatic power off”... -
Page 17: Sound Prompt
to 5 minutes before continuing use. Please try to use 1/4 output or lower when rapidly shooting is needed to prevent the effect on the shooting. Note: when continuous shooting, the charge indicator will be warn by a red light flashing as the flash internal temperature rises to a certain value;At this time, the flash recycling time will be extended, and it is recommended to appropriately reduce the use intensity of the flash. -
Page 18: Master Unit Setting
Note:Please try to control the continuous modeling lights under 10 times;After the operation of consecutive imaging flash,the flash need to idle for 10 to 15 minutes to avoid overheating or damage of the flash lamp holder. 14. PC Sync port (for input) By connecting to the PC sync port, you can make the flash synchronously. - Page 19 into wireless slave unit state. Through the [LEFT] and [RIGHT] buttons to set the slave unit SLAVE (four off-camera modes Sc/Sn/S1/S2 for choose),choose a trigger mode,then press [OK] button to save the setting. For the four off-camera modes of YN565EX II, Sc / Sn is equipped with 3 groups (A, B, and C) respectively and four communication channels (1,2, 3,4).When the YN565EX II as the slave unit, in Sc/Sn mode, through short press the [ZOOM] button to choose the focal length,channel,grouping...
- Page 20 Master unit: YN568EX II, 600EX-RT,580-II, SB-900/800/700, 7D/60D/600D with built-in flash, C-commander of Nikon’s, SU-800 and ST-E2. Slave unit: YONGNUO EX series flash with slave unit flash function,which can be created three slave groups at most. Use the mini flash stand (tripod socket provided) to prop up the salve unit YN565EX II.
-
Page 21: Advanced Applications
VIII. Advanced Applications 1. Remote Wireless Flashing Shooting YN565EX II can receive remote wireless signal. The longest distance used indoors is up to 25 meters and up to 15 meters used outdoors. Please note that the wireless sensor of the YN565EX II should be face to master unit, and make sure that the YN565EX II located within the effective range of transmission of the master unit. -
Page 22: Rear- Curtain Sync
4. Rear- curtain Sync You can use slow-speed shutter to produce trailing smear for the object and the flash light will flash at the moment when the shutter is going to be shut, which means the rear-curtain sync function .(For the rear-curtain sync setting, refer to your camera manual for setting). - Page 23 Long press the [Backlight/Fn] button to enter into the advanced options function setting state,the screen will displays the setting items. The advanced options items can be changed through short pressing the [UP] and [DOWN] buttons, and the parameters can be changed through the [LEFT] and [RIGHT] buttons. For example: <SE oF 3>...
- Page 24 Fn NO.: 08 AF on:AF-assist light is enabled AF﹣﹣:AF-assist light is disabled Fn NO.: 09 AP S A1:Automatic identification enabled AP S﹣﹣:Disabled Fn NO.: 10 SL Sd 10:Power automatic off of the slave unit is 10 minutes SL Sd 60:Power automatic off of the slave unit is 60 minutes Fn NO.: 11 SL oF 1H:Slave auto power off cancel within 1 hours SL oF 8H:Slave auto power off cancel within 8 hours...
- Page 25 Fn NO.: 20 So nd on:Sound prompt function is enabled So nd﹣﹣:Sound prompt function is disabled Fn NO.: E1 SE oF 3/5/10/30/1H/2H/3H/4H/5H:Keeping idle for 3/5/10/30 minutes or 1/2/3/4/5 hours will enter the dormancy mode, after it enters the sleep state, it powers off automatically after keeps the same idle time. SE oF﹣﹣:NO dormancy, NO automatically turn off.
-
Page 26: High-Speed Continuous Shooting
Settings 8. Use the External Charging Pack You can purchase the Yongnuo external charging pack SF-18C or SF-17C, connect it to the charging port of the YN565EX II. After the flicker shown, the charging pack will charge the flash. - Page 27 10. Reflection Flash Bounce flash means to take photos by making flash light head aimed at wall or ceiling and using the light reflected back from the ceiling or wall to light the desired object, so that the shade behind the object can be decreased to get more natural shooting effect.
-
Page 28: Specifications
IX. Specifications Circuit design Insulated Gate Bipolar Transistor (IGBT) Guide No. 58 (ISO 100, 105mm) Flash mode TTL,M, Multi Trigger mode Set-top,Sc, Sn S1, S2 Wireless triggering distance 20~25m indoor, 10~15m outdoor Flash coverage auto、24、28、35、50、70、80、105mm Vertical rotation angle -7~90 degrees Horizontal rotation angle 0~270 degrees Power supply... - Page 29 Guide Number of different focal length range (at ISO 100, in meters / feet) Flash Flash Coverage (mm) Output 28/91.9 30/98.4 39/127.9 42/137.8 50/164 53/173.9 58/190.3 19.8/65 21.2/69.6 27.6/90.7 29.7/97.4 35.4/116.1 37.5/123 41/134.5 14/45.9 15/49.2 19.5/64 21/68.9 25/82 26.5/86.9 29/95.1 9.9/32.5 10.6/34.8 13.7/45.2...
- Page 30 X. Possible problems during use and solutions 1. The YN565EX II can’t flash Check whether the batteries is installed in the correct orientation: Please install the batteries in the correct orientation. Check whether the speedlite is attached to the camera: Slip the speedlite hot shoe stand into the camera hot shoe stand hard.
- Page 31 4. You must set the FEB every time? You can access FEB setting through camera menu or lock FEB setting through Fn advanced option setting to avoid that FEB will cancel automatically when completing three shooting tasks. The number of setting option is 03.
- Page 32 The functions of this manual are based on test conditions of our company. Further notice will not be given if the design and specifications change. The YONGNUO logo in this manual includes the registered trademark or trademark of SHENZHEN YONGNUO PHOTOGRAPHY EQUIPMENT Co., Ltd in China or/and other countries (regions). All other trademarks are the property of their respective owners.
Need help?
Do you have a question about the YN565EXII and is the answer not in the manual?
Questions and answers
En el flash aparece la figura de un termometro y no enciende
The Yongnuo YN565EXII flash shows a thermometer icon and does not turn on because the internal temperature has risen too high. This activates the overheating protection, and the flash must idle for 3–5 minutes to cool down before it can be used again.
This answer is automatically generated