
Related Manuals for Slendertone Bottom S7


Summary of Contents for Slendertone Bottom S7
- Page 1 Instruction Manual Mode D’emploi Bedienungsanleitung Instrucciones de Uso Gebruiksaanwijzingen Istruzioni per l'Uso Instruções Para a Utilização www.slendertone.com...
- Page 2 An improvement in your shape in 4 weeks • Look better in your jeans For the best results we recommend that you use your slendertone bottom in conjunction with a normal, healthy diet and exercise. is an electronic muscle stimulator intended for the enhancement of SLENDERTONE BOTTOM S7 the performance of the gluteal muscles of the body.
-
Page 3: Product Warranty
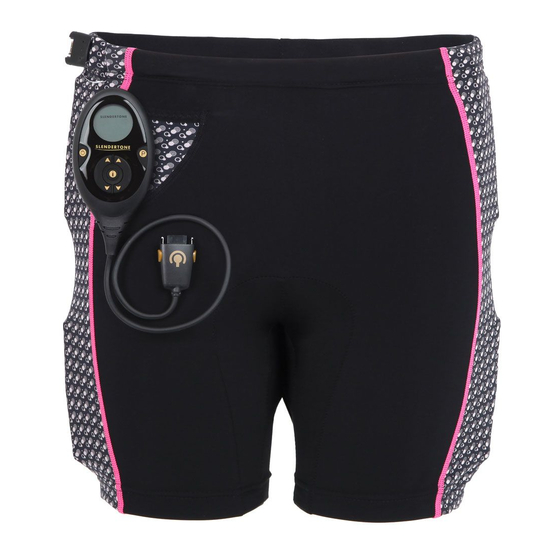
INTRODUCING YOUR SLENDERTONE BOTTOM S7 THESE ARE THE CONTENTS FOR THE FULL SLENDERTONE BOTTOM S7 PACK. THE BOTTOM S+7 PACK DOES NOT CONTAIN A CONTROLLER OR CHARGER. Garment: SLENDERTONE BOTTOM S7 Your garment has been ergonomically designed and incorporates SLENDERTONE BOTTOM S7 the stimulation area into a comfortable shorts garment. -
Page 4: Controller Display
HOW DOES THE CONTROLLER WORK? DISPLAY 1. On/Off Button ( Press and hold this button for 2 seconds to turn your controller on or off. You may also pause the exercise by briefly pressing this button. 2. Increase Toning Intensity ( ) Press and hold these buttons to increase the intensity of the exercise. - Page 5 SETTING UP YOUR SLENDERTONE BOTTOM S7 1. Insert your charger into a socket and then connect it to your Fig. a controller (Fig. a). It’ll take approximately 3 hours to fully charge the battery. Your controller is fully charged when all three sections of the battery icon are full.
- Page 6 6. To remove the garment, first open the flaps and replace the gel pads covers. The gel pads should remain on the flaps. Store your BOTTOM S7 TONER, ensuring that the pads are kept flat, until your next session. Do not disconnect the controller from the garment...
- Page 7 GETTING RESULTS WITH YOUR BOTTOM S7 • Use the strongest training intensity you can - the harder you work your muscles, the better the results you will see, but remember, the stimulation should never be uncomfortable. • Try to increase your toning intensity regularly. But do not over-exert yourself.
-
Page 8: Additional Controller Functions
(Fig. e), unscrew the back cover and remove it. Replace the existing battery Fig. f pack with a new battery pack (Fig. f) and replace the battery cover. You can purchase a new battery pack by contacting the Careline. SLENDERTONE... - Page 9 QUICK GUIDE TO SOLVING PROBLEMS Problem Possible Cause Solution The display doesn’t The battery is low Recharge the battery come on and there is no signal from the controller The battery is low Recharge the battery The display is on but there is no signal The battery is low Recharge the battery...
-
Page 10: Frequently Asked Questions
If the signal is still weak or uncomfortable, you should order a new battery pack. • New gel pads can be purchased online at www.slendertone.com or from the Careline. SLENDERTONE Will the product cause muscle soreness? As with all exercise some muscle soreness can occur after using the garment. - Page 11 • the battery in your controller. At this point you should purchase a new rechargeable battery pack. New rechargeable battery packs can be purchased through the Careline, or by visiting www.slendertone.com. SLENDERTONE CARING FOR YOUR GARMENT Your garment can be washed, but you must first remove the controller and gel pads.
-
Page 12: Do's And Don'ts
(i.e. one gel pad on the front of the chest and one on the back), on the genitals or on the head. (Other toning units are available for other areas of the body - details are available at www.slendertone.com or from your local retailer). •... - Page 13 Do not over exert yourself when using muscle stimulation. Any workout should be at a level comfortable for you. • will not accept responsibility if the guidelines and instructions supplied with SLENDERTONE this product are not followed. • Although compliant with applicable EMC requirements, this device may still interfere with more sensitive equipment, please move away or switch off.
-
Page 14: Technical Specifications
: In compliance with German law, product safety testing must be conducted every two NOTE years by an authorised test service. Accessories: You can purchase all accessories at www.slendertone.com. Under no circumstances should anything other than accessories be used with your charger... - Page 15 Description of your controller’s symbols: There are a number of technical markings on your controller. These can be explained as follows: The controller and garment are manufactured for Bio-Medical Research Ltd, Parkmore Business Park West, Galway, Ireland. The controller requires 1 x 3.6 volt (NiMH) DC battery pack. DC is indicated by the symbol: The Output Frequency indicates the number of pulses per second transmitted by the controller.
- Page 16 30-DAY PLANS Week Day 1 Day 2 Day 3 Day 4 Day 5 Day 6 Day 7 PROGRAMME SUR 30 JOURS Semaine Jour 1 Jour 2 Jour 3 Jour 4 Jour 5 Jour 6 Jour 7 30 TAGE PLAN Woche Tag 1 Tag 2 Tag 3...
- Page 20 Designed by & Manufactured for: Bio-Medical Research Ltd., Parkmore Business Park West, Galway, Ireland. Copyright © 2015 Bio-Medical Research Ltd. All rights reserved. slendertone is a registered trade mark of BMR Ltd. Part No.: 2400-0343 Rev.: 1 Issue Date: 3/15...
Need help?
Do you have a question about the Bottom S7 and is the answer not in the manual?
Questions and answers