Table of Contents
Advertisement
Quick Links
DUAL MAGNETRON COMMERCIAL
Please read these instructions carefully before installing and operating the oven.
In the space below, record the SERIAL NO.
found on the nameplate of your oven and
retain this information for future reference.
SERIAL NO. ________________________
Please save sales receipt for warranty.
MICROWAVE OVEN
Model: SCM1800M2
User's manual
FELIX STORCH, INC.
Summit Appliance Division
770 Garrison Avenue
Bronx, New York 10474
www.summitappliance.com
Advertisement
Table of Contents

Related Manuals for Summit SCM1800M2


Summary of Contents for Summit SCM1800M2
-
Page 1: Microwave Oven
DUAL MAGNETRON COMMERCIAL MICROWAVE OVEN Model: SCM1800M2 User's manual Please read these instructions carefully before installing and operating the oven. In the space below, record the SERIAL NO. FELIX STORCH, INC. found on the nameplate of your oven and Summit Appliance Division retain this information for future reference. -
Page 2: Table Of Contents
Do not attempt to operate this oven with the door open since open-door operation can result in harmful exposure to microwave energy. It is important not to defeat or tamper with the safety interlocks. Do not place any object between the oven front face and the door or allow soil or cleaner residue to accumulate on sealing surfaces. -
Page 3: Important Safety Instructions
When using electrical appliances, basic safety precautions should be followed. WARNING - To reduce the risk of burns, electric shock, fire, and injury to persons or exposure to excessive microwave energy: 1. Read all instructions before using the appliance. 2. Read and follow the specific "PRECAUTIONS TO AVOID POSSIBLE EXPOSURE TO EXCESSIVE MICROWAVE ENERGY"... -
Page 4: Save These Instructions
may be needed to handle the utensil. 14. Do not cover or block any openings on the appliance. 15. Do not store or use this appliance outdoors. Do not use this product near water, for example, near a kitchen sink, in a wet basement, near a swimming pool, or similar locations. 16. -
Page 5: Installation Guide
1. Make sure that all packing materials are removed, both inside and out of the oven. 2. Check the oven for any damage, such as misaligned or bent door, damaged door seals and sealing surface, broken or loose door hinges and latches, and dents inside the cavity or on the door. - Page 6 Follow these steps to replace the oven lamp: E14A/T170 (lamp type: Power Supply: 230v~ 240v / 25w) 1. Unplug the oven and carefully loosen the screw of the lamp cover with a Phillips-head screwdriver. 2. Remove the lamp cover. 3. Gently turn the bulb in a counter-clockwise direction to take it out. 4.
-
Page 7: Grounding Instructions
This appliance must be grounded. In the event entangled in or tripping over a longer cord. of an electrical short circuit, grounding reduces Longer cord sets or extension cords are the risk of electric shock by providing an available and may be used if care is escape wire for the electric current. -
Page 8: Utensils Guide
Λ LIMITED USE This section lists which utensils can be used in the microwave, which ones have limited use for Aluminum foil — Use narrow strips of foil to short periods, and which ones should not be prevent overcooking of exposed areas. Using used in the microwave. -
Page 9: Cooking Techniques
Your microwave makes cooking easier than stirred when cooking is complete. Let liquids conventional cooking, provided you keep these stand a moment before serving. When heating considerations in mind: baby food, stir well at removal and test the temperature before serving. TIRRING Stir foods such as casseroles and vegetables DDING MOISTURE... -
Page 10: Specifications
Power Supply 240V~60Hz Power Consumption (Microwave) 2800W (2 MAGNETRONS) 1400W (1 MAGNETRON) Rated Microwave Power Output 1800W (2 MAGNETRONS) 900W (1 MAGNETRON) Operation Frequency 2450MHz 15 15/16 ×19 5/16 × 25 1/8 Outside Dimensions: (H)×(W)×(D) Oven Cavity Dimensions: 8 13/16 × 14 3/4 × 14 7/8 (H)×(W)×(D) Oven Capacity 1.1 cu.ft. -
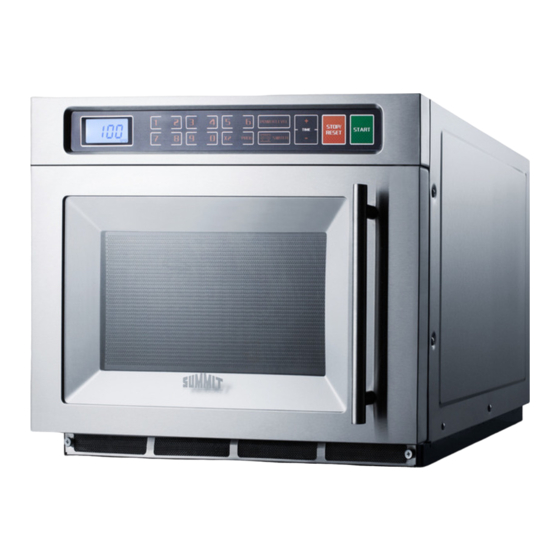
Page 11: Location Of Parts
1. Door Safety Lock System 2. Oven Window 3. Cavity Floor 4. Control Panel 5. Ceramic Board 6. Lamp cover... - Page 12 Installing and removing the ceramic board: The ceramic board is removable. You can install or remove it following the steps below : To install the ceramic board 1. Turn off the power. Install the ceramic board when the cavity has cooled. 2.
- Page 13 Never install the board above the groove. Never place the board with WARNING at the back. To remove the ceramic board from the cavity 1. Unplug the unit. Remove the ceramic board when the cavity and board have cooled down. 2.
-
Page 14: Control Panel
Display Screen Cooking time, power, indicators and present time are displayed. Number Pad Press these button to set the cooking time, to set a cooking program, etc. Press to store a cooking program. PROG Press to store a multi-stage cooking program. It is also used to set child lock. POWER LEVEL Press to select a microwave cooking power. -
Page 15: Operation Instructions
MICROWAVE COOKING Microwave cooking allows you to customize cooking power and time. First, select a power level by pressing the POWER LEVEL button a number of times (see the table below). Maximum cooking time is 99 minutes and 99 seconds. Suppose you want to cook for 5 minute at 80% power level. -
Page 16: How To Use The X2 Pad
Note : When the program has been saved, you can press START to start cooking or you can also press STOP/RESET to cancel. You can set a two or three stage cooking program by repeating steps 4 and 5 once or twice. Suppose you want to set a multi-stage cooking program to number pad 3. -
Page 17: Multi-Stage Cooking
5. Press Power Level once. 6. Touch number pads 3, 0, 0. 7. Press PROG to save. NOTE : When the program has been saved, you can press START to start cooking or you can also press the STOP/RESET key to cancel. If you want the oven to start immediately after you touch any of the number keys instead of after you touch the START key, press and hold down STOP/RESET for 5 sec until “P L”... -
Page 18: Switch
oven has been used. This function is for the user to analyze the usage of the oven and the traffic flow at a particular location where the oven is being used commercially. SWITCH The oven can use a single magnetron or double magnetrons to cook. In single magnetron mode, you can save power, while with double magnetrons, you can use less time to cook. -
Page 19: Care And Cleaning
Turn off the oven and remove the power plug from the wall socket before cleaning. Keep the inside of the oven clean. When food splatters or spilled liquids adhere to oven walls, wipe with a damp cloth. Mild detergent may be used if the oven gets very dirty. -
Page 20: Limited Warranty
ONE-YEAR LIMITED WARRANTY Within the 48 contiguous United States, for one year from the date of purchase, when this appliance is operated and maintained according to instructions attached to or furnished with the product, warrantor will pay for factory-specified parts and repair labor to correct defects in materials or workmanship. Service must be provided by a designated service company.
Need help?
Do you have a question about the SCM1800M2 and is the answer not in the manual?
Questions and answers