Table of Contents
Advertisement
Available languages
Available languages
Advertisement
Chapters
Table of Contents

Related Manuals for Yamaha A-S1100


Summary of Contents for Yamaha A-S1100
- Page 1 Integrated Amplifier Amplificateur Intégré OWNER’S MANUAL MODE D’EMPLOI...
- Page 2 The technician performs exhaustive listening tests and every component is considered, in order to finally achieve the ideal sound. Yamaha’s tradition of audio quality stretches back over 125 years, and continues to live on in all Yamaha products today.
- Page 3 NS-10M Studio Monitor Speaker Became of the most popular studio monitors in the world. A-1 Integrated Amplifier PX-2 Turntable Yamaha’s first straight arm turntable. B-6 Power Amplifier B-2x Pyramid-shaped power amplifier. GT-2000/L Turntable First CD Player (CD-1) introduced in 1983...
- Page 4 ◆ Floating & Balance power amplifier circuit ◆ Parallel volume and tone control ◆ Large power supply with four separate circuits ◆ Left-right symmetrical design with rigid, stable construction ◆ Discrete phono amplifier ■ Supplied accessories Please check that you have received all of the following parts. •...
-
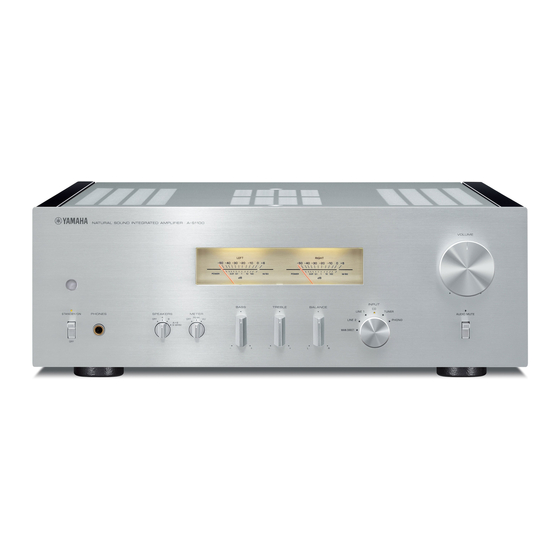
Page 5: Controls And Functions
Controls and functions In this chapter, you will learn the controls and functions of A-S1100. - Page 6 CONTROLS AND FUNCTIONS Controls and functions ■ Front panel (pages 6 to 9) 1 STANDBY/ON, OFF switch 3 PHONES jack Turns on or off this unit. Connects your headphones. STANDBY/ON (upper position): With this switch Notes position, pressing the p AMP key on the remote control toggles the power between STANDBY and •...
- Page 7 5 METER selector Switches the meter function as follows: OFF: Turns off the meter and the illumination. PEAK: The meter functions as a peak level meter. The peak level meter shows a momentarily highest audio output level. VU: The meter functions as a VU (Volume Unit) level meter.
- Page 8 Controls and functions ■ Front panel (pages 6 to 9) TUNER: Selects the tuner connected to the TUNER 0 Remote control sensor jacks. Receives signals from the remote control. PHONO: Selects the turntable connected to the A INPUT selector/indicator PHONO jacks. Selects the input source.
- Page 9 B AUDIO MUTE switch D VOLUME control Press downward to reduce the current volume level by Controls the volume level. This does not affect the approximately 20 dB. Press again to restore the audio output level at the LINE 2 REC jacks. output to the previous volume level.
-
Page 10: Rear Panel
Controls and functions ■ Rear panel 6 MM/MC switch See page 16 for connection information. Selects the type of cartridge of the turntable connected to the PHONO jacks. 1 PRE OUT jacks MM: Choose this setting if the connected turntable uses an moving magnet (MM) cartridge. - Page 11 0 MAIN IN jacks C REMOTE IN/OUT jacks Use these jacks to connect an external component Use these jacks to connect an external component for equipped with a volume control. remote control. For details on the connection, see page 20. D SYSTEM CONNECTOR When you select MAIN DIRECT as the input source, the volume level is fixed.
-
Page 12: Remote Control
4 Tuner control buttons Control functions of Yamaha tuner. Refer to the owner’s manual of your tuner for details. SOURCE LAYER Note Certain Yamaha tuners may not respond to some of these control keys on the remote control. VOLUME MUTE... - Page 13 The playback source changes each time this key is pressed. LAYER: Switches the playback layer of a hybrid SA- CD between SA-CD and CD. Note Certain Yamaha CD players may not respond to some of these control keys on the remote control.
-
Page 14: Installing Batteries In The Remote Control
Controls and functions ■ Installing batteries in the remote control ■ Operating range of the remote control Remove the battery compartment cover. Insert the two batteries (AAA, R03, UM-4) according to the polarity markings (+ and –) on the inside of the battery compartment. Approximately 6 m (20 ft) The remote control transmits a directional infrared beam. -
Page 15: Connections
Connections In this section, you will make connections between A-S1100, speakers, and source components. - Page 16 Connections CD player with Speakers A RCA jacks (R channel) Tuner Ground Speakers B (R channel) BD player, etc. Turntable Notes • Do not let the bare speaker wires touch each other or do not let • Use RCA unbalanced cables to connect other components them touch any metal part of this unit.
- Page 17 AV receiver, etc. (L channel) Notes • Because the power amplifier of A-S1100 is of the floating balanced type, the Fig. 1 Fig. 2 following types of connections are not possible. – Connecting with the left channel “–” terminal and the right channel “–” terminal as well as “+”...
-
Page 18: Connecting The Speakers
Connections ■ Connecting the speakers ■ Connecting the banana plug (Except for Europe models) Remove approximately 10 mm of insulation from the end of each speaker cable and twist First, tighten the knob and then insert the banana the exposed wires of the cable together to plug into the end of the corresponding terminal. -
Page 19: Connecting The Power Cable
This split connects the mid and high Rear panel of A-S1100 frequency drivers to one set of terminals and the low frequency driver to the other pair. - Page 20 REMOTE IN jack of the other component to the REMOTE IN/OUT jacks of this unit, using cables with monaural miniplugs. Up to three Yamaha components (including this unit) can be connected. Rear panel of A-S1100 Rear panel of A-S1100...
- Page 21 Yamaha AV receiver (power ON/ STANDBY or MAIN DIRECT input selection). Connect the PRE OUT jacks and the TRIGGER OUT jack of the Yamaha AV receiver to this unit as illustrated below: Rear panel of A-S1100...
-
Page 23: Appendix
Appendix In this section, you will find technical specifications for A-S1100. 20kHz 20Hz 1kHz 20Hz 1kHz 20kHz... -
Page 24: Specifications
Appendix Specifications CONTROL SECTION • Input Sensitivity/Input Impedance CD, etc............. 200 mVrms/47 k POWER SECTION PHONO MM ............ 2.5 mVrms/47 k • Rated Output Power PHONO MC ............100 µVrms/50 [U.S.A, Canada, Taiwan, China, Korea, Australia, U.K. and MAIN IN .............. -
Page 25: Block Diagram
■ Block diagram CPU/LOGIC, etc. Standby power MC AMP MM EQ AMP After Vol Amp INPUT AMP METOR MOTOR VOL VOLUME RELAY HP AMP FLOATING & BALANCE FLOATING & BALANCE SPEAKER DRIVER SPEAKER DRIVER MOS FET MOS FET... - Page 26 Appendix ■ Tone control characteristics –2 –4 –6 –8 –10 –12 –14 20k 30k 100k Frequency (Hz) ■ Total harmonic distortion 0.05 20kHz 0.03 0.02 20Hz 0.01 1kHz 0.005 0.003 0.002 0.001 50 60 Measured Level (W)
- Page 27 ■ Total harmonic distortion (PHONO) 0.05 20Hz 1kHz 20kHz 0.03 0.02 0.01 0.005 0.003 0.002 0.001 0.0005 0.0003 0.0002 0.0001 100µ 200µ 500µ 100m 200m 500m Generator Level (Vrms)
-
Page 28: Troubleshooting
There is a problem with the internal Disconnect the power cable and contact the nearest — circuitries of this unit. authorized Yamaha dealer or service center. The protection circuitry has been activated Check that the speaker wires are not touching each The INPUT indicator because of a short circuit, etc. - Page 29 Problem Cause Remedy page Incorrect cable connections. Connect the audio cable plugs firmly. If the problem A “humming” sound persists, the cables may be defective. is heard. No connection from the turntable to the Connect the turntable to the GND terminal of this GND terminal.
- Page 30 à la fabrication de nos produits audio. Le technicien effectue des tests d’écoute approfondis et chaque composant est étudié avant d’obtenir finalement le son idéal. La tradition de la qualité audio de Yamaha remonte à plus de 125 ans et est toujours présente dans l’ensemble des produits Yamaha actuels.
- Page 31 Enceinte de contrôle pour studio NS-10M Devenue l’une des enceintes de studio les plus populaires au monde. Amplificateur intégré A-1 Tourne-disque PX-2 Le premier tourne-disque à bras droit de Yamaha. Amplificateur de puissance B-6 B-2x Amplificateur de puissance pyramidal. Tourne-disque GT-2000/L Premier lecteur de CD (CD-1) commercialisé...
-
Page 32: Accessoires Fournis
◆ Circuit d’amplification de puissance à symétrie flottante ◆ Commandes de volume et de tonalité parallèles ◆ Sources d’alimentation de grande capacité avec quatre circuits séparés ◆ Conception symétrique gauche-droite avec construction rigide et stable ◆ Amplificateur phono discret ■ Accessoires fournis Veuillez vous assurer que tous les articles suivants vous ont bien été... -
Page 33: Commandes Et Fonctions
Commandes et fonctions Ce chapitre décrit les commandes et fonctions de l’A-S1100. - Page 34 Commandes et fonctions ■ Panneau avant (pages 6 à 9) 1 Commutateur STANDBY/ON, OFF 3 Prise PHONES Met l’appareil sous tension ou hors tension. Pour brancher votre casque. STANDBY/ON (position supérieure) : Quand le commutateur est dans cette position, chaque Remarques pression sur la touche p AMP du boîtier de •...
- Page 35 5 Sélecteur METER Change la fonction des mètres de niveau comme suit: OFF: Éteint les mètres de niveau et l’éclairage. PEAK : Les mètres de niveau font office de PEAK- mètres. Les PEAK-mètres indiquent le niveau de sortie audio momentané le plus élevé. VU : Les mètres de niveau font office de VU-mètres (volume sonore).
- Page 36 Commandes et fonctions ■ Panneau avant (pages 6 à 9) TUNER : Sélectionne le syntoniseur branché aux 0 Capteur de télécommande prises TUNER. Il reçoit les signaux émis par le boîtier de PHONO : Sélectionne le tourne-disque branché aux télécommande. prises PHONO.
- Page 37 B Commutateur AUDIO MUTE D Commande VOLUME Appuyez vers le bas pour réduire le niveau sonore Contrôle le niveau sonore. Elle est sans effet vis-à-vis d’environ 20 dB. Appuyez une nouvelle fois sur cette du niveau de sortie des prises LINE 2 REC. touche pour rétablir le niveau sonore initial.
- Page 38 Commandes et fonctions ■ Panneau arrière 6 Commutateur MM/MC Voir page 16 en ce qui concerne les raccordements. Sélectionne le type de cartouche magnétique du tourne-disque raccordé aux prises PHONO. 1 Prises PRE OUT MM : Choisissez ce réglage si le tourne-disque raccordé...
- Page 39 0 Prises MAIN IN C Prises REMOTE IN/OUT Utilisez ces prises pour raccorder un composant Utilisez ces prises afin de raccorder un composant externe équipé d’une commande de volume. externe pour le boîtier de télécommande. Pour plus de détails sur le raccordement, voir page 20. Lorsque vous sélectionnez MAIN DIRECT comme source D SYSTEM CONNECTOR d’entrée, le niveau sonore est fixe.
- Page 40 Commandent des fonctions du syntoniseur Yamaha. SOURCE LAYER Reportez-vous au mode d’emploi du syntoniseur pour le détail. Remarque Il se peut que certains syntoniseurs Yamaha ne répondent pas VOLUME à certaines touches de commande du syntoniseur du boîtier de télécommande. MUTE...
- Page 41 LAYER : Sélectionne la couche de lecture SA-CD ou CD d’un SA-CD hybride. Remarque Il se peut que certains lecteurs de CD Yamaha ne répondent pas à certaines touches de commande du lecteur de CD du boîtier de télécommande.
- Page 42 Commandes et fonctions ■ Mise en place des piles dans le boîtier ■ Portée du boîtier de télécommande de télécommande Retirez le couvercle du logement des piles. Insérez les deux piles (AAA, R03, UM-4) en suivant les repères de polarité (+ et –) à Environ 6 m l’intérieur du logement des piles.
-
Page 43: Raccordements
Raccordements Dans cette section, vous allez raccorder l’A-S1100, les enceintes et les composants source. - Page 44 Raccordements Enceintes A Lecteur de CD (voie R) avec prises RCA Syntoniseur Masse Enceintes B (voie R) Tourne-disque Lecteur de BD, etc. Remarques • Faites en sorte que la partie dénudée d’un conducteur du câble • Utilisez des câbles RCA asymétriques pour relier d’autres d’enceinte ne puisse pas venir en contact avec la partie dénudée appareils à...
- Page 45 à cassette, etc. récepteur AV, etc. (voie L) Remarques • L’amplificateur de puissance de l’A-S1100 étant à symétrie flottante, il n’est pas possible d’effectuer les types de raccordements suivants. Fig. 1 Fig. 2 – Raccordement à la borne « – » de la voie gauche et à la borne « – » de la voie droite de même qu’aux bornes «...
-
Page 46: Raccordement Des Enceintes
Raccordements ■ Raccordement des enceintes ■ Raccordement d’une fiche banane (Sauf modèle pour l’Europe) Enlevez environ 10 mm de la gaine isolante à l’extrémité de chaque câble d’enceinte et Serrez d’abord le bouton et insérez la fiche torsadez les fils exposés du câble pour éviter banane dans la prise correspondante. - Page 47 Ces deux jeux de bornes permettent de diviser Panneau arrière de l’A-S1100 l’enceinte en deux sections indépendantes. Les circuits d’attaque du médium et de l’aigu sont reliés à un jeu de bornes et le circuit d’attaque du grave est relié...
- Page 48 Yamaha Si vous branchez un récepteur et un émetteur infrarouge Lorsque vous avez un autre composant Yamaha prenant en aux prises REMOTE IN/OUT de cet appareil, vous charge la connexion à distance, comme c’est le cas pour pouvez utiliser l’appareil et/ou le composant externe à...
- Page 49 AV Yamaha (alimentation sur ON/STANDBY ou sélection de l’entrée MAIN DIRECT). Branchez les prises PRE OUT et la prise TRIGGER OUT du récepteur AV Yamaha à cet appareil comme illustré ci- dessous : Panneau arrière de l’A-S1100 TRIGGER MAIN IN Câble stéréo...
-
Page 51: Annexe
Annexe Dans cette section, vous trouverez les caractéristiques techniques de l’A-S1100. 20kHz 20Hz 1kHz 20Hz 1kHz 20kHz... - Page 52 Annexe Caractéristiques techniques SECTION DE COMMANDE • Sensibilité et impédance d’entrée CD, etc............. 200 mVrms/47 k SECTION D’ALIMENTATION PHONO MM ........... 2,5 mVrms/47 kW • Puissance de sortie nominale PHONO MC ............100 µVrms/50 [Modèles pour les États-Unis, le Canada, Taïwan, la Chine, MAIN IN ..............
- Page 53 ■ Schéma fonctionnel CPU/LOGIC, etc. Standby power MC AMP MM EQ AMP After Vol Amp INPUT AMP METOR MOTOR VOL VOLUME RELAY HP AMP FLOATING & BALANCE FLOATING & BALANCE SPEAKER DRIVER SPEAKER DRIVER MOS FET MOS FET...
- Page 54 Annexe ■ Caractéristiques du contrôle du son –2 –4 –6 –8 –10 –12 –14 20k 30k 100k Frequency (Hz) ■ Distorsion harmonique totale 0.05 20kHz 0.03 0.02 20Hz 0.01 1kHz 0.005 0.003 0.002 0.001 50 60 Measured Level (W)
- Page 55 ■ Distorsion harmonique totale (PHONO) 0.05 20Hz 1kHz 20kHz 0.03 0.02 0.01 0.005 0.003 0.002 0.001 0.0005 0.0003 0.0002 0.0001 100µ 200µ 500µ 100m 200m 500m Generator Level (Vrms)
-
Page 56: Guide De Dépannage
Reportez-vous au tableau suivant si l’appareil ne fonctionne pas comme il devrait. Si l’anomalie constatée n’est pas mentionnée, ou encore si les actions correctives suggérées sont sans effet, mettez l’appareil hors tension, débranchez le câble d’alimentation et prenez contact avec le revendeur ou le service après-vente agréé Yamaha le plus proche. Voir... - Page 57 Voir Anomalies Causes possibles Actions correctives page Les raccordements des câbles sont Branchez à fond les fiches du câble audio. Si le Un « ronflement » est incorrects. problème persiste, les câbles sont sans doute audible. défectueux. Pas de raccordement du tourne-disque à la Branchez le tourne-disque à...
- Page 60 © 2015 Yamaha Corporation Printed in Malaysia ZQ25540...
Need help?
Do you have a question about the A-S1100 and is the answer not in the manual?
Questions and answers