Table of Contents
Advertisement
Available languages
Available languages
Quick Links
Advertisement
Chapters
Table of Contents

Related Manuals for SCHOLTES MIN 32


Summary of Contents for SCHOLTES MIN 32
-
Page 3: Table Of Contents
Uso, 4 Manutenzione, 6 Istruzioni per l’installatore Installazione, 8 Posizionamento, 8 Collegamento elettrico, 8 Assistenza, 10 MIN 32 (L) QUESTO PRODOTTO È STATO CONCEPITO PER UN IMPIEGO DI TIPO DOMESTICO. COSTRUTTORE DECLINA OGNI RESPONSABILITÀ NEL CASO DI EVENTUALI DANNI A COSE O PERSONE DERIVANTI DA UNA NON CORRETTA INSTALLAZIONE O DA USO IMPROPRIO, ERRONEO OD ASSURDO. -
Page 4: Principio Di Funzionamento
Istruzioni per l’utente Principio di funzionamento (Fig. 1) vale a dire che il controllo si spegne, anche attivando più tasti contemporaneamente. E’ basato sulle proprietà elettromagnetiche della maggior parte dei recipienti per la cottura. Il circuito elettronico governa Accensione di una zona di cottura il funzionamento della bobina (induttore) creante un campo Nella modalità... - Page 5 mediante i tasti Più/Meno avviene attraverso il led 8. programmato con dei valori non uguali a 0. Esempio: il timer parte Ol led del timer lampeggiante segnala che il valore dei con il rilascio del tasto Più dopo aver impostato il valore timer “01”. display a 7 segmenti si riferisce al timer e può...
-
Page 6: Manutenzione
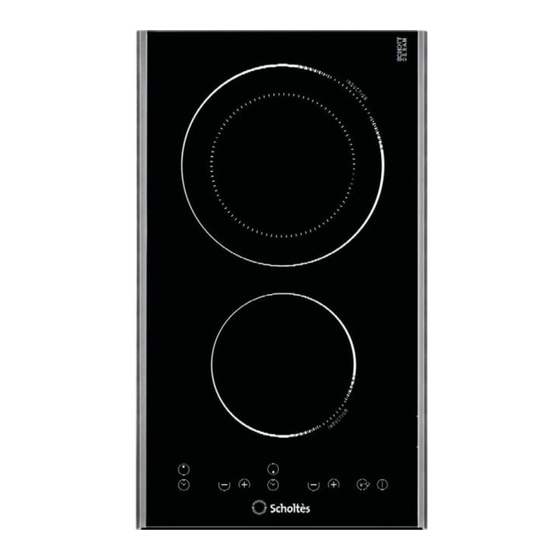
Funzione mantenimento della temperatura (Lo Temp) Pentolame (Fig. 3) La funzione mantenimento della temperatura - se una calamita avvicinata al fondo di un recipiente serve per mantenere riscaldati i cibi pronti su rimane attratta questa può già essere una pentola una zona di cottura. - Page 7 Fig.4 1. zona cottura Ø 160/1400W 2. zona cottura Ø 200/2300W 1. accensione/spegnimento 2. sicurezza bambini (key lock) 3. indicazione zona cottura 4. incremento potenza 5. decremento potenza 6. Timer/a 7. Timer/b 8. Led timer 9. Led key lock...
-
Page 8: Istruzioni Per L'installatore
Istruzioni per l’installatore Installazione Fig.6 Le presenti istruzioni sono rivolte all’installatore qualificato quale guida all’installazione, regolazione 230V e manutenzione secondo le leggi e le normative in vigore. Gli interventi devono sempre essere effettuati ad apparecchiatura disinserita elettricamente. Posizionamento (Fig. 5) L’apparecchio è... - Page 9 Fronte Induzione 50 MIN. Aria aria - air - air - Luft - aire - lucht - ar induzione - induction - induction - Induktion 100 cm MIN. Induzione - inducción - inductie - indução (2 x 500) ZONA FORNO O ARMADIETTO ZONA FORNO O OVEN ZONE OR CUPBOARD ARMADIETTO...
-
Page 10: Assistenza
Assistenza Prima di contattare il Servizio di Assistenza Tecnica: In caso di necessità d’intervento chiamate il Numero Unico Nazionale 199.199.199*. Un operatore sarà a 1. Verificare se non è possibile eliminare da soli i guasti. completa disposizione per fissare un appuntamento 2. - Page 11 Installater’s instructions Installation, 16 Positioning, 16 Electrical connection, 16 Assistance, 18 MIN 32 (L) THIS APPLIANCE IS CONCEIVED FOR DOMESTIC USE ONLY. THE MANUFACTURER SHALL NOT IN ANY WAY BE HELD RESPONSIBLE FOR WHATEVER INJURIES OR DAMAGES ARE CAUSED BY INCORRECT INSTALLATION OR BY UNSUITABLE, WRONG OR ABSURD USE.
- Page 12 User’s Instructions Operating Principle (Fig. 1) If starting with the “+” button, the cooking level changes from “0” to “4”. If starting with the “-“ button, the cooking It expIoits the eIectromagnetic properties of most cooking vessels. level changes from “0” to “9”. The coil (inductor) which produces the eIectromagnetic fieId is operated and controlled by the eIectronic circuit.
- Page 13 conditions of the previously set function: switched off. a) The cooking zone corresponding to the timer is - The display and the selected timer LED flash on (cooking level > 0): The timer is programmed alternating the cooking level from “00” to “H”, if there in reference to the cooking zone;...
- Page 14 Maintenace (Fig. 4) - when the hob is in use keep all magnetizable objects away (credit cards, floppy disks, calculators and so on) By means of a scraper immediately remove any - do not use any alluminium foil or place any foodstuffs alluminium foil bits, food spills, grease splashes, sugar wrapped in alluminium foil directly on the hob marks and other high sugarcontent food from the...
- Page 15 Fig.4 1. cooking zone Ø 160/1400W 2. cooking zone Ø 200/2300W 1. On/Off 2. Child safety (key lock) 3. Cooking zone indication 4. Power increase 5. Power Decrease 6. Timer/a 7. Timer/b 8. Timer Led 9. Key lock Led...
- Page 16 Installer’s Instructions Installation Fig.6 These Instructions are for the qualified technician, as a guide to installation, adjustment and maintenance, 230V according to the Iaws and standards in force. These operations must aIways be carried out when the appliance has been disconnected from the eIectric system.
- Page 17 Front Induction 50 MIN. aria - air - air - Luft - aire - lucht - ar induzione - induction - induction - Induktion 100 cm MIN. Induction - inducción - inductie - indução (2 x 500) ZONA FORNO O ARMADIETTO OVEN ZONE OR OVEN ZONE OR CUPBOARD CUPBOARD...
- Page 18 Assistance Before contacting After-Sales Service: 1. See if you can solve the problem yourself. 2. Switch the appliance on again to see if the problem has been solved. if it has not, disconnect the appliance from the power supply and wait for about an hour before switching on again.
- Page 19 Principe de fonctionnement, 20 Notice d’emploi Installation, 20 Deutsch Nederlands Emploi, 20 Entretien, 22 Modalités d’installation Installation, 24 Positionnement, 24 Branchement électrique, 24 Assistance, 26 MIN 32 (L) CE PRODUIT EST CONÇU EXCLUSIVEMENT POUR USAGE DOMESTIQUE. CONSTRUCTEUR DÉCLINE TOUTE RESPONSABILITÉ POUR DOMMAGES BLESSURES CAUSÉES...
- Page 20 Instructions pour l’usager Principe de fonctionnement (Fig. 1) Mise en marche d’un foyer En mode d’attente ou en mode actif, un foyer peut être enclenché à Il se base sur les propriétés électromagnétiques de la plupart l’aide des touches Plus/Moins, à moins que la zone de cuisson ne des récipients de cuisson.
- Page 21 fonctionner en mode OFF, le voyant de la minuterie - On programme uniquement un réveil, le contrôle reste s’éclaire statiquement. Ceci indique que la valeur sur de prime abord en mode d’attente (aucun autre foyer les afficheurs se réfère à la minuterie, mais ne peut n’est enclenché).
- Page 22 Fonction de maintien de la température (Lo Temp) Casseroles (Fig. 3) La fonction de maintien de la température - une casserole dont le fond attire l’ aimant serait déjà sert à garder au chaud les aliments prêts una casserole adaptée à la cuisson à induction sur un foyer.
- Page 23 Fig.4 1. zone de cuisson Ø 160/1400W 2. zone de cuisson Ø 200/2300W 1. mise en marche/arrêt 2. sécurité enfants (key-lock) 3. indication du foyer 4. augmentation de la puissance 5. diminution de la puissance 6. Minuterie/a 7. Minuterie/b 8. voyant de minuterie 9.
- Page 24 Instructions pour l’installateur Installation Fig.6 Ces instructions sont faites pour le technicien spécialisé comme guideà l’installation, au réglage e à l’entretien 230V suivantles lois et les normes en vigueur. Les interventions doivent toujours ètre effectuées quandl’appareil est débranché. Positionnement (Fig. 5) L’appareil estprévupour ètre encanstré...
- Page 25 Parte frontal Induction 50 MIN. aria - air - air - Luft - aire - lucht - ar induzione - induction - induction - Induktion 100 cm MIN. Induction - inducción - inductie - indução (2 x 500) ZONA FORNO O ARMADIETTO ZONE FOUR OU OVEN ZONE OR CUPBOARD PLACARD...
- Page 26 Assistance Avant de contacter le Service Après-vente: 1. Vérifiez s’il n’est pas possible d’éliminer les pannes sans aide. 2. Remettez l’appareil en marche pour vous assures que l’inconvénient a été éliminé. Si tel n’est pas le cas, débranchez à nouveau l’appareil et réessayezune heure après.
- Page 27 Installation 28 Deutsch Nederlands Anwendung 28 Instandhaltung 30 Anweisungen für den Installateur Installation 32 Aufstellung 32 Elektroanschluß 32 Kundendienst, 34 MIN 32 (L) DIESES PRODUKT HAUSHALTSGERÄT GEDACHT. FÜR SCHADEN AN SACHEN ODER PERSONEN, DIE AUF FALSCHE INSTALLATION BZW. UNGEEIGNETEN GEBRAUCH ODER MISSBRAUCH ZURÜCKZUFÜHREN SIND,...
-
Page 28: Arbeitsweise
Anweisungen für den Benutzer Arbeitsweise (Abb. 1) die Bedienung sich ausschaltet, auch wenn mehrere Tasten gleichzeitig gedrückt werden. Es beruht auf den elektromagnetischen Eigenschaften des Großteils der Kochgefässe. Der Stromkreis steuert den Betrieb der Einschalten eines Kochfeldes Drosselspule (Induktor), die ein Magnetfeld aufbaut. Die Warme Im Wartemodus oder in der aktiven Betriebsart kann ein wirdvom Topf selbst an die Speise übertragen. - Page 29 Tasten Plus/Minus erfolgt mit der LED 8. Die blinkende LED nachdem ein Timer-Wert von “01” eingestellt wurde. des Timers weist darauf hin, dass sich der Wert des 7-stellign - Die Timereinstellungen sind vorrangig bezogen auf Display auf den Timer bezieht und bearbeitet werden kann. die Begrenzung der Betriebszeit in Anwesenheit von Wenn ein Zähler in der Betriebsart OFF weiter funktioniert, Einstellungen hoher Kochstufen.
-
Page 30: Instandhaltung
Warmhaltefunktion (Lo Temp) Kochgefäße (Abb. 3) Die Warmhaltefunktion dient dazu, fertige - Wir dein Magnet, der an den Boden eines Gefäßes Gerichte auf einem Kochfeld warm zu halten. angenähert wird, von diesem angezogen, so ist dies Zu diesem Zweck wird das gewählte Kochfeld ein zum Induktionskochen geeigneter Topf. - Page 31 Abb.4 1. Kochzone Ø 160/1400W 2. Kochzone Ø 200/2300W 1. Ein/Ausschalten 2. Kindersicherung (Key Lock) 3. Kochfeldanzeige 4. Leistung steigern 5. Leistung mindern 6. Timer/a 7. Timer/b 8. LED Timer 9. LED Key Lock...
-
Page 32: Anweisungen Für Den Installateur
Anweisungen für den Installateur Installation Abb.6 angegebenen Anweisungen sind zugelassenen Installateur Richtlinie für 230V Installation, Regelung und Instandhaltung, gemäß den geltenden Gesetzen und Normen, gerichtet. Die Eingriffe dürfen nurbei ausgeschaltetem Apparat vorgenommen werden. Aufstellung (Abb. 5) Das Gerät istdafür vorgesehen, in eine Arbeitsfläche, H05 V2V2–F 3x2.5 wie in der Abbildung dargestellt, eingefügt zuwerden. - Page 33 Frontseite Induktion 50 MIN. Luft aria - air - air - Luft - aire - lucht - ar induzione - induction - induction - Induktion 100 cm MIN. Induktion - inducción - inductie - indução (2 x 500) ZONA FORNO O ARMADIETTO OFENBEREICH OVEN ZONE OR CUPBOARD ODER SCHRANK...
-
Page 34: Kundendienst
Kundendienst Bevor Sie den Kundendienst rufen: 1. Prüfen Sie erst, ob Sie die Störung selbst beheben können. 2. Schalten Sie das Gerät nochmals ein, um zu prüfen, ob die Störung immer noch vorliegt. Haben Sie keinen Erflog, schalten Sie den Versuch nach einer Stunde. - Page 35 Installatie, 36 Deutsch Nederlands Gebruik, 36 Onderhoud, 38 Instructies voor de installateur Installatie, 40 Plaatsing, 40 Elektrische aansluiting, 40 Service, 42 MIN 32 (L) DIT PRODUKT IS ALS HUISHOUDELIJK APPARAAT GEDACHT. VOOR BESCHADIGINGEN SPULLEN OF PERSONEN DIE AAN VERKEERDE INSTALLATIE, MISBRUIK...
-
Page 36: Werking
Instructies voor de gebruiker Werking (Afb. 1) Inschakeling van een kookzone In de wachtmodus of in de actieve modus kan een kookzone Het berust op de elektromagnetische eigenschappen van een worden geactiveerd door middel van de toetsen Plus/Min, groot deel van de pannen. Het stroomcircuit regelt de werking van mits de kookzone zich op dat moment niet in de timer- de smoorspoel (inductor) die een magnetisch veld opbouwt. - Page 37 waarde op de displays tot de timer behoort, maar tijdelijk - Als er slechts één wekker wordt geprogrammeerd, blijft niet rechtstreeks kan worden gewijzigd; daarvoor zou de de besturing eerst in de wachtmodus (er is geen andere besturing opnieuw geactiveerd moeten worden. kookzone geactiveerd).
-
Page 38: Onderhoud
Functie temperatuurbehoud (Lo Temp) Kookpannen (Afb. 3) De functie temperatuurbehoud dient voor het - Als er een magneet tot de bodem van een pan naderbij warm houden van gereed voedsel op een gebracht wordt, en hij door deze aangetrokken blijft, zo is deze kookzone. - Page 39 Afb.4 1. kookplaat Ø 160/1400W 2. kookplaat Ø 200/2300W 1. inschakeling/uitschakeling 2. kinderveilig (key lock) 3. aanduiding kookzone 4. verhoging vermogen 5. afname vermogen 6. Timer/a 7. Timer/b 8. Led timer 9. Led key lock...
-
Page 40: Instructies Voor De Installateur
Instructies voor de installateur Installatie Afb.6 De onderstaande instructies zijn bedoeld voor de gekwalificeerde installateur, die de installatie, regeling en 230V het onderhoud uitvoert volgens de geldende wetten en normen. Reparaties moeten altijd worden uitgevoerd terwijjl de stroomvoorziening van het apparaat is onderbroken. Plaatsing (Afb. - Page 41 Voorkant Inductie 50 MIN. Lucht aria - air - air - Luft - aire - lucht - ar induzione - induction - induction - Induktion 100 cm MIN. Inductie - inducción - inductie - indução (2 x 500) ZONA FORNO O ARMADIETTO OVENRUIMTE OF OVEN ZONE OR CUPBOARD KASTJE...
-
Page 42: Service
Service Voordat u er de installateur bijhaalt: • Kijk eerst even of u het probleem zelf kunt oplossen (zie blz. 11); • Start het programma om te controleren of de storing is verholpen; • Is dit niet het geval dan meemt u contact op met de bevoegde dichtsbijzijnde Technische Dienst via het telefoonnummer dat op het garantiebewijs/ gebruiksaanwijzing staat. - Page 43 Notes...
- Page 44 Notes...
- Page 45 Notes...
- Page 46 Notes...
- Page 48 Viale Aristide Merloni 47 60044 Fabriano (AN) Italy Tel. +39 0732 6611 Cod. 1.005.97.0 www.scholtes.com...
Need help?
Do you have a question about the MIN 32 and is the answer not in the manual?
Questions and answers