
Subscribe to Our Youtube Channel
Related Manuals for Hyundai H-CMD4002


Summary of Contents for Hyundai H-CMD4002
- Page 1 H-CMD4002 MULTIMEDIA DVD/CD/MP3 RECEIVER WITH BUILT-IN 3.6” TFT DISPLAY AND TV TUNER Instruction manual DVD/CD/MP3- 3.6” TFT-...
-
Page 2: Table Of Contents
Dear customer! Thank you for purchasing our product. For safety, it is strongly recommended to read this manual carefully before connecting, operating and/or adjusting the product and keep the manual for reference in the future. Table of contents Table of contents ...............................2 Important safeguards ............................3 Accessories................................4 Installation/Connection............................5... -
Page 3: Important Safeguards
Important safeguards Using the device at temperature below -10º may cause the breakage of the device. Before using please heat up the passenger compartment to the recommended temperature! Disconnect the vehicle's negative battery terminal while mounting and connecting the unit. When replacing the fuse, be sure to use one with an identical amperage rating. -
Page 4: Accessories
Accessories Receiver 1 pc Remote controller 1 pc USB cable 1 pc Front panel protective case 1 pc ISO connector 1 pc iPod cable (option) 1 pc Mounting parts: Screw 5X5 4 pcs 2 pcs Mounting sleeve 1 pc Back strap 1 pc Rear mounting bolt 1 pc... -
Page 5: Installation/Connection
Installation/Connection Installation method 1: DIN front mounting Install the mounting sleeve into the dashboard. Bend as many claws outward for tight fit, to lock the sleeve into the place. Install the trim frame to the unit. Use the rear mounting bolt to support the unit. - Page 6 Installation method 2: Using the screw holes at the sides of the unit. Select a position where the screw holes of the mounting bracket supplied with the car and the screw holes of the main unit become aligned, tighten the screws on each side, and remount the brackets with the factory hardware in the original location.
- Page 7 Electrical connection...
- Page 8 Brake wire Note: The brake wire is connected with brake signal; for safety, the programs can be seen on the monitor after braking the car. Connecting the reversing line to taillight on the car After connecting, when you start up the reverse gear, the unit will receive the picture from car rear view camera.
- Page 9 Telephone Mute Control Connect the telephone mute control wire TEL_MUTE (see Wiring Diagram). If there is a vehicle call comes in, the sound volume will mute off automatically, and TFT monitor shows: PHONE…; when call finished, the sound volume will recover to former volume, and the words PHONE… disappear. Using the ISO Connector 1.
-
Page 10: Panel Controls
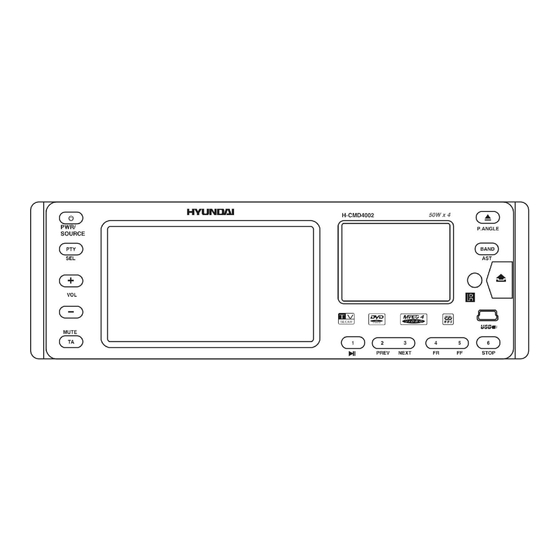
Panel controls Front panel 1. POWER/SOURCE button 2. PTY/SEL button 3. VOL+ button 4. VOL- button 5. MUTE/TA button 6. LCD display 7. 1/PLAY/PAUSE button 8. 2/3/PREV/NEXT buttons 9. 4/5/FR/FF buttons BAND/AST button 10. 6/STOP button EJECT/P.ANGLE button 11. USB port IR sensor 12. - Page 11 Remote control 1. MUTE button 2. POWER/SOURCE button 3. Number buttons 4. MENU button 5. AUDIO button 6. DISPLAY button 7. Cursor buttons/BAND/ENTER/AF/PTY buttons 8. PROGRAM button 9. F.REV/F.FWD buttons 10. SLOW button 11. RANDOM button 12. ZOOM button 13. SEL button 14.
- Page 12 Changing the battery 1. Remove the battery cover. Follow the arrow (1) slide the tab to the right while pulling the cover away at the same time. 2. Place the new battery in the tray and slide the cover back into place. 3.
-
Page 13: General Operation
General operation Reset the unit Operating the unit for the first time or after replacing the car battery, you must press OPEN button to remove the front panel. Press and hold RESET button with a pointed object to restore the unit to the original factory settings. - Page 14 Clock setting 1. Press any button except PWR/SRC, EJECT/P.ANGLE and OPEN buttons only under in power off mode, the current time will be displayed and disappear automatically 5 seconds later if no operation is done. 2. Adjust time only in power off mode. Press PTY/SEL button to select items as following: PM/AM – HOUR –...
- Page 15 TREBLE: -07 – 00 – +07 LOUDNESS: ON/OFF USER – POP – CLASSIC – ROCK – USER Picture Parameter Setup: NTSC/PAL: AUTO – PAL – NTSC – ATUO COLOR: 00 – 30 BRIGHT: 00 – 30 CONTRAST: 00 – 30 TINT: 00 –...
-
Page 16: Radio Operation
Radio operation Band selection Press BAND/ENTER button on the RC or BAND/AST button on the panel repeatedly to select FM1, FM2, FM3, MW1 (AM1), MW2 (AM2). Display will show the wave band, frequency and preset station number if already stored. Manual/Automatic tuning Manual tuning: Press cursor LEFT/RIGHT buttons to adjust a frequency upward or downward step-by- step. - Page 17 Mono/Stereo selection Press ST button to select the channel mode: MONO or STEREO. When Stereo reception is activated, “STEREO ON” appears on the display. RDS function RDS (Radio Data System) service availability varies with areas. Please understand if RDS service is not available in you area, the following service is not available, either.
- Page 18 When the signal of the Traffic-Program identification (TP) is bad, there will be a beep sound. The volume setup of the beep sound is the same as the TA initialization volume. PTY (Program Type) function Press PTY/SEL button on the panel or PTY button on the RC to activate the PTY mode. During the station search the letters “PTY”...
-
Page 19: Disc Operations
Disc operations Disc glossary PBC (Play Back Control) PBC is a menu recorded on the disc with SVCD or VCD2.0 format. For the discs contained PBC, it can playback interactive software with the menu displayed on TV. And if the disc contains still images, it can playback high definition of still image. - Page 20 Ejecting Disc Press EJECT button, the front panel will slide down to position 1; then eject the disc; the panel will slide back automatically after 30 seconds if no action is taken. Play/Pause Press PLAY/PAUSE button to play or pause the disc. Stop During disc playback, press STOP button once;...
- Page 21 zoom levels. Repeat Press REPEAT button to repeat the same track; press it twice to repeat all tracks. When playing a DVD disc, pressing once will repeat the same chapter but pressing twice will repeat the entire title. Angle Press D.ANGLE button during playback to select different viewing angles with interactive DVD media. PBC is available in VCD mode as playback control switch.
- Page 22 Slow Press SLOW button to activate the slow playback (DVD discs only). Press P/N button to select the video output format (PAL/NTSC). Random Press RANDOM button to shuffle all tracks. Press it again to return to the normal playback mode from the first track (CD mode only.) Note: This unit only supports ID3 tags in Latin letters.
-
Page 23: Sd/Usb Operations
SD/USB operations Press POWER/SOURCE button to switch to SD or USB mode if SD/MMC card or mini USB connected. The unit will switch to SD or USB mode automatically if SD/MMC card or mini USB connected. The unit will switch to RADIO mode automatically when SD/MMC card or mini USB disconnected if there is no disc in the unit;... -
Page 24: Mp3 Overview
MP3 overview Notes on MP3: MP3 is short for MPEG Audio Layer 3 and refers to an audio compression technology standard. This product allows playback of MP3 files on CD-ROM, CD-R or CD-RW discs. The unit can read MP3 files written in the format compliant with ISO 9660. However it does not support the MP3 data written by the method of packet write. - Page 25 Do not store more than 448 MP3 files per disc. For ISO 9660 - compliant format, the maximum allowable depth of nested folders is 8, including the root directory (folder). When CD-R disc is used, playback is possible only for discs, which have been finalized. Make sure that when MP3 CD-R or CD-RW is burned that it is formatted as a data disc and NOT as an audio disc.
-
Page 26: Ipod Operations
iPod operations Note: It is available for iPod operations with an additional iPod cable, which is an optional accessory. 1. The number of current track 4. The total time of current track 2. The total tracks in the list 5. Playback Time. 3. -
Page 27: Av In Operations
AV in operations Press POWER/SOURCE button to switch to AV IN mode. There are 2 RCA audio inputs and 1 RCA video input for unit. Rear view camera operations When you are backing the car, the unit will switch to Rear View mode automatically if a rear view camera is connected. -
Page 28: Tv Tuner Operations
TV tuner operations Press POWER/SOURCE button to switch to TV mode. Select the station directly Press number buttons on the RC to select the station directly. For example, press 2 to select station 2; press 1 and 2 to select station 12. Automatic tuning Press and hold PREV/NEXT buttons to seek the next available channel by increasing/decreasing the tuning frequency. -
Page 29: System Setup Menu
System setup menu 1. Press SETUP button on the RC to display the system setup menu. 2. Use LEFT/RIGHT cursor buttons on RC to select the desired menu: System setup, Language setup, Video setup, Speaker setup, Digital setup. 3. Press DOWN cursor button to enter it. 4. - Page 30 Password Here you can change the password. Insert your old password or 0000 (the general one). Insert the new password. Insert it again. Press OK to save the new password. Rating The rating level is for parents to control playing content and protect your children from violence and erotic. The disc, the level of which is higher than the setting level cannot be played.
- Page 31 Video setup Video Setup Brightness, Contrast, Hue, Saturation You can set the Brightness, Contrast, Hue, Saturation according to Brightness your preference. Contrast Saturation Exit setup Speaker setup DOWNMIX Speaker Setup LT/RT: The audio out is Left and Right channels format even if the Downmix original sound is 5.1CH format.
-
Page 32: Handling Discs
Handling discs Dirty, scratched or warped discs may cause skip ping or noise. Handle the disc only by the edges. To keep clean do not touch its surface. Discs should be stored in their cases after use to avoid scratches. Do not expose discs to direct sunlight, high humidity, high temperature or dust. -
Page 33: Troubleshooting Guide
Troubleshooting guide Symptom Cause Solution The car ignition is not on. If the power supply is properly No power connected to the car accessory switch the ignition key to “ACC”. The fuse is blown. Replace the fuse. Remove the disc in the player then put a Disc cannot be loaded. -
Page 34: Specification
Specification General Power supply: 14.4 V DC Maximum power output: 50 W x 4 channels Compatible formats: DVD/SVCD/DVCD/VCD/MPEG4 (DivX)/XviD/DVD audio/Super Audio CD/CDDA/MP3/WMA/HDCD/ Picture-CD/Photo-CD/JPEG Supported disc types: DVD/DVD±R/DVD±RW/CD/CD-R/CD-RW/USB/SD/MMC Dimensions (D x W x H) 187 x 188 x 60 mm ESP function: 40 sec. - Page 35 ..............................35 ..........................36 ............................37 ..........................38 ...........................43 ............................46 ............................50 ............................53 SD/USB ..................57 3 ..............................58 iPod.............................60 AV IN..........................61 ........................61 ..........................62 ............................63 ............................67 ..............................67 ....................68 ........................69...
- Page 36 -10º...
- Page 37 iPod...
- Page 42 TEL MUTE TEL MUTE “PHONE…”; “PHONE…” ISO,...
- Page 43 POWER/SOURCE PTY/SEL VOL+ VOL- MUTE/TA 1/PLAY/PAUSE 2/3/PREV/NEXT 4/5/FR/FF BAND/AST 6/STOP EJECT/P.ANGLE 11. USB OPEN RESET...
- Page 44 MUTE POWER/SOURCE MENU AUDIO DISPLAY BAND/ENTER/AF/PTY PROGRAM F.REV/F.FWD SLOW RANDOM ZOOM REPEAT STOP PLAY/PAUSE D.ANGLE NEXT/PREV SUBTITLE TITLE VOL+/- PBC/AST P.ANGLE/EJECT LOUD/EQ SETUP...
- Page 45 – 6...
- Page 46 OPEN, RESET POWER/SOURCE POWER/SOURCE. VOL+/- MUTE MUTE/TA VOL+/-, POWER/SOURCE, : RADIO ( ) => DVD ( ) => SD ( SD/MMC) =>...
- Page 47 USB ( ) => TV => IPOD ( iPod) => AV IN. PWR/SRC, EJECT/P.ANGLE OPEN PTY/SEL, : PM/AM – HOUR ( ) – MINUTE ( VOL+/-. ASIA MUTE MUTE/TA EUROPE LOUD LOUD/EQ LOUD LOUD/EQ...
- Page 48 FADER ( F07 – CENT – R07. BALANCE ( L07 – CENT – R07. BASS ( -07 – 00 – +07. TREBLE ( -07 – 00 – +07. LOUDNESS ( ON/OFF ( EQ ( USER – POP – CLASSIC – ROCK – USER. SUB VOL ( 00 –...
- Page 49 TA VOLUME ( TA): 12 – 42. EJECT/P.ANGLE, : Angle 1 => Angle 2 => Angle 3 => Angle 4 => Angle 1.
- Page 50 BAND/ENTER BAND/AST FM1, FM2, FM3, MW1 (AM1), MW2 (AM2). (18 FM, 12 AM). (1-6), BAND/AST PBC/AST...
- Page 51 “STEREO ON”. RDS ( AF ( “AF”; “AF” “PI SEARCH”. DISPLAY TA ( MUTE/ “TP”. “TA TP”. MENU, EQ/SEL TAVOL, VOL+/-...
- Page 52 PTY/SEL PTY. “PTY”; “PTY” BAND/AST MUTE/AST VOL+/- BAND/ENTER : NEWS, AFFAIRS, INFO, SPORT, EDUCATE, DRAMA, CULTURE, SCIENCE, VARIED, POP M, ROCK M, D.RMUSIC, LIGHT M, CLASSICS, OTHER M, WEATHER, FINANCE, CHILDREN, SOCIAL, RELIGION, PHONE IN, TRAVEL, LEISURE, JAZZ, COUNTRY, NATION M, OLDIES, FOLK M, DOCUMENT, TEST, ALARM. –...
- Page 53 PBC ( – PBC, – DVD- –...
- Page 54 EJECT/P.ANGLE EJECT, PLAY/PAUSE, STOP, PLAY/PAUSE STOP PLAY/PAUSE. F.FWD/F.REV PLAY/PAUSE. NEXT/PREV...
- Page 55 DISPLAY ZOOM REPEAT REPEAT D.ANGLE DVD) MENU, BAND/ENTER AUDIO SUBTITLE...
- Page 56 DVD/VCD PCB) PROGRAM, PROGRAM. SLOW P/N, (PAL/NTSC). RANDOM...
- Page 57 SD/USB POWER/SOURCE, SD/MMC SD/MMC SD/MMC DVD).
- Page 58 MPEG3 CD-ROM, CD-R CD-RW. ISO 9660. “.mp3”. “.mp3”, “ MP3” “ ”, PC “ ” “ ” 448. VBR, . VBR: WMA (Windows Media Audio) – Microsoft Corporation. , 64...
- Page 59 CD-R CD-RW, MP3: 44,1 ISO 9660, CD-R MP3 CD-R CD-RW CD-R CD-RW CD-R CD-RW 1. ID3TAG.
- Page 60 iPod iPod, iPod iPOD iPod. POWER/SOURCE, IPOD ( iPod iPod IPOD iPod DVD. STOP iPod. iPod. STOP.
- Page 61 AV IN POWER/SOURCE, AV IN.
- Page 62 POWER/SOURCE, PREV/NEXT BAND/AST PBC/AST...
- Page 63 SETUP BAND/ENTER, NTSC: PAL: PAL60: 4:3 PS: 4:3 LB: 16:9:...
- Page 64 – 0000. OSD, DivX DivX DivX DivX, DivX. DivX DivX.
- Page 65 LOGIC Dolby, VSS: 5.1,...
- Page 68 “ ”. RESET.
- Page 69 14.,4 : 50 DVD/SVCD/DVCD/VCD/MPEG4 (DivX)/XviD/DVD audio/Super Audio CD/CDDA/MP3/WMA/HDCD/ Picture-CD/Photo-CD/JPEG DVD/DVD±R/DVD±RW/CD/CD-R/CD-RW/USB/SD/MMC 187 188 60 : 40 CD, 120 3.6- TFT- 480x272 16:9 450:1 .: 120 .: 120 65.0 – 74.0/87.5 – 108.0 - 1620 0.5% RCA- (2 )
Need help?
Do you have a question about the H-CMD4002 and is the answer not in the manual?
Questions and answers