Table of Contents
Advertisement
Quick Links
INTRODUCTION
Welcome to the Alesis ProTrack iPod Recorder! We designed this device to be easy
to use, but you can refer to this manual when necessary if you have any questions
about how it works. Here are just a few features you'll come to love about your new
ProTrack iPod Recorder:
Compatible with iPod Classics, 5
iPod nanos, and iPod nano-chromatics *
44.1kHz, 16-bit Recording Capability
2 Built-In Condenser Microphones for Stereo Recording
2 Combo Mic / Line Inputs – Connect 1 stereo or 2 mono sound sources such as
XLR or 1/4" microphones and other line sources
Analog Input Limiter – Prevents hard digital "clipping" of the recorded signal in your iPod
Direct Monitoring – Monitor your recording with zero latency
Headphone output with dedicated volume control
Switchable 48V Phantom Power for Microphones
External Power Supply (AC Adapter) or Battery Power (4 AAA)
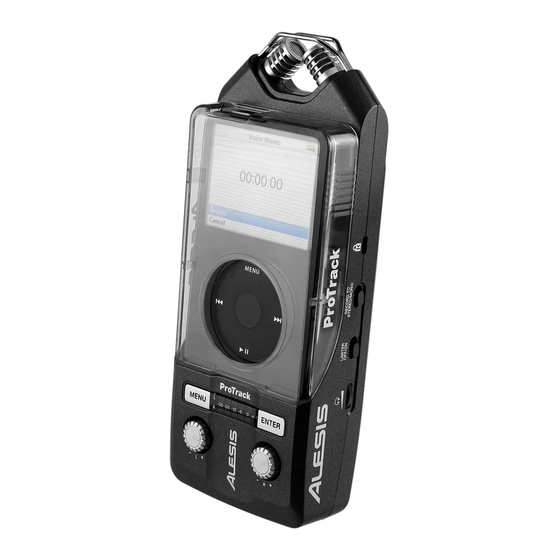
CONNECTION DIAGRAM
First, connect your
iPod to the ProTrack,
then
attach
the
plastic sled to the
ProTrack over the
iPod.
Power Supply
(or 4 AAA batteries
on back panel)
WARNING:
Turn
the
HEADPHONE VOLUME
all the way down before
turning on the unit to
prevent
the
power-on
"click"
noise
in
your
headphones.
** When using a high-impedance instrument like a guitar, use a direct box or a preamp to lower the signal's impedance for the recorder.
USING BATTERY POWER
Inserting Batteries:
1.
Remove the battery compartment cover on the back
panel.
2.
Insert 4 AAA batteries into the compartment. Make sure
they are inserted with the positive (+) and negative (-)
poles positioned correctly.
3.
Close the cover until it clicks into place.
Precautions:
Always be sure batteries are inserted with the positive (+)
and negative (-) poles positioned correctly.
Use batteries of the same type. Do not use different types
of batteries together at once.
Only use non-rechargeable batteries. Please refer to the
precautions on their labels before using them.
When not in use for long periods of time, remove the
batteries to prevent them from leaking. If they leak, wipe
away the liquid from inside the battery compartment.
Do not heat, disassemble, or dispose of batteries by
throwing them into a fire.
th
-Generation iPods, 2
* iPod is a trademark of Apple Inc., registered in the U.S.A. and other countries
iPod
Headphones
(1/8" stereo)
nd
rd
- and 3
-Generation
WARNING: Do not use rechargeable batteries as they may
damage the ProTrack.
Though you may use the recorder's phantom power
feature while using batteries, this will drain your battery
power more quickly, depending on the type of
microphones you are using.
Tip: You can extend battery life while recording by
disconnecting the headphones and/or keeping the
headphone volume turned down.
You may only charge your iPod with the recorder while
it is powered by the included AC adapter or an external
battery pack.
Note that the battery levels of your iPod and ProTrack
are unrelated. The amount of battery power of your
iPod (as seen on your iPod's screen) does not indicate
the amount of battery power of the ProTrack Recorder.
Also, using the iPOD CHARGE feature will charge only
the iPod, not the batteries of the ProTrack.
1
BOX CONTENTS
ProTrack iPod Recorder
AC Power Adapter
2 Clear Protective Covers
("sleds") for iPods
2 Foam Pads (for use with
sleds)
Mic (XLR)
or
Guitar **
(1/4" mono)
or
CD player,
sampler, drum
machine, etc.
(1/4" stereo)
Advertisement
Table of Contents

Related Manuals for Alesis ProTrack


Summary of Contents for Alesis ProTrack
-
Page 1: Box Contents
INTRODUCTION Welcome to the Alesis ProTrack iPod Recorder! We designed this device to be easy BOX CONTENTS to use, but you can refer to this manual when necessary if you have any questions about how it works. Here are just a few features you’ll come to love about your new... - Page 2 LIMITER has processed the signal.) During playback, these meters measure the iPod playback level. When the ProTrack’s batteries are getting low, the bottom two green LEDs will flash simultaneously. Note that this is not related to your iPod’s battery level.
- Page 3 (as seen on your iPod’s screen) does not indicate noise into your recordings. the amount of battery power of the ProTrack Recorder. POWER SWITCH – Turns the iPod Recorder on and off. Be sure to turn off your recorder when not in use to conserve battery power.
- Page 4 Place the SLED against the ProTrack as shown in the image above. Gently slide the SLED downwards until it snaps into place at the bottom. To remove the SLED, pull the OPEN switch on the left panel towards the bottom of the ProTrack, then slide the SLED off the ProTrack.
-
Page 5: Technical Specifications
TECHNICAL SPECIFICATIONS ANALOG INPUTS Gain: Internal Mic Inputs: +6dB to 49.3dB External Inputs (XLR): +6dB to 49.3dB External Inputs (1/4”): -11.3dB to +32dB THD+N & 3 Gen. iPod nano: 0.01% @ 92dB SNR A-weighted (charge off, min. gain) Gen. iPod / iPod Classic: 0.014% @ 88dB SNR A-weighted (charge off, min.
Need help?
Do you have a question about the ProTrack and is the answer not in the manual?
Questions and answers