Table of Contents
Advertisement
Quick Links
IMPORTANT SAFETY INFORMATION: Always read this manual
first before attempting to install or use the wall mount engine. For
your safety, always comply with all warnings and safety instructions
contained in this manual to prevent personal injury or property
damage.
To view the full line of Dimplex products, please visit
www.dimplex.com
Owner's Manual
Model
DWOP20R
DWOP20BR
6909030100
7212770100R04
Advertisement
Table of Contents

Related Manuals for Dimplex DWOP20R


Summary of Contents for Dimplex DWOP20R
- Page 1 For your safety, always comply with all warnings and safety instructions contained in this manual to prevent personal injury or property damage. To view the full line of Dimplex products, please visit www.dimplex.com 7212770100R04...
-
Page 2: Table Of Contents
CAUTION: Procedures and techniques which, if not carefully followed, will result in damage to the equipment. W ARNING: Procedures and techniques which, if not carefully followed, will expose the user to the risk of fire, serious injury, or death. www.dimplex.com... -
Page 3: Welcome & Congratulations
Welcome & Congratulations Thank you and congratulations for choosing to purchase an Optimyst ® wall mount engine from Dimplex, the world leader in electric fireplaces. Please carefully read and save these instructions. CAUTION: Read all instructions and warnings carefully before starting installation. -
Page 4: Important Instructions
Contact Do not use in areas where gasoline, Dimplex Technical Service at paint, or flammable liquids are used 1-888-346-7539. or stored or where the unit will be exposed to flammable vapors. -
Page 5: Save These Instructions
IMPORTANT INSTRUCTIONS this manual. Any other use vibration and store so as to avoid not recommended by the damage. manufacturer may cause fire, ⑳ The wall mount engine must electric shock or injury to persons. not be located directly below a ⑮... -
Page 6: Installation
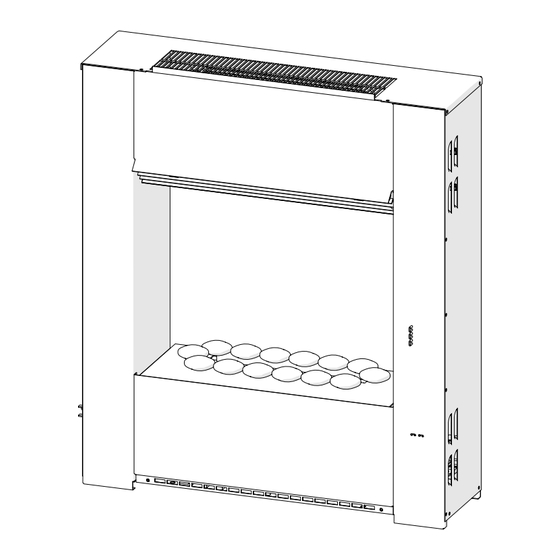
Ensure heater is operating. Additional ap- the installation meets the pliances on the same circuit may national and state/provincial exceed the current rating of the electrical codes. circuit breaker. www.dimplex.com... - Page 7 Installation Figure 2 Figure 1 24.6in. (625mm) Minimum CAUTION: A minimum of 24.6in. (625mm) from a corner, is recommended for optimum airflow and flame production. ! NOTE: It is recommended that the bottom of the unit not be mounted higher than 40 in. (1020mm) from the Fireplace Installation ground to maintain an optimized viewing angle of the...
- Page 8 (Figure 3) 12. Mount the unit on the wall, so that the tab on the engine bracket has been inserted into the hook on the wall bracket. (Figure 4) Figure 3 www.dimplex.com...
-
Page 9: Assembly
Assembly 1. Carefully unpack all of the Figure 6 components from the box. (Figure 5) 2. Remove top cover by turning the retaining tabs on both Cover ends of the water reservoir. (Figure 6) 3. Install the light bulbs by aligning the pins on the bulbs and the fixture and pressing down until they are fully... - Page 10 CAUTION: Do not arrange the rock media while the unit is run- ning, since the rocks may be hot. 9. Make sure the On/Off switch is switched to Off (refer to Operating Instruction section). www.dimplex.com...
-
Page 11: Operation
Operation Figure 9 desired temperature, turn the NOTE: When the engine is thermostat knob forward until you used in an environment where hear a click. Leave thermostat in background noise is very low, it this position to maintain the room may be possible to hear a sound temperature at this setting. -
Page 12: Remote Control
CAUTION: If you need to con- D. Flame Intensity Control tinuously reset the heater, unplug Adjusts the intensity of the flame the unit and call Dimplex North and smoke effect when the heater America Limited at 1-888-346- has been activated. - Page 13 Operation to be turned Off, using either the Figure 10 momentary button, on the unit, or the Off button on the remote control, then back on to return to Level 1 - Logs and Light only Flame operation. Button Standby Battery Replacement Button To replace the battery:...
-
Page 14: Maintenance
1/8 tsp of salt (0.5 lift out the top cover (Figure 6) mL) added to the water reservoir. 2. View the lamps from a dis- (The addition of additional salt tance in front of the fire and should only be when you notice www.dimplex.com... - Page 15 NOTE: Replacement light Filter Cleaning bulbs can be obtained by contact- The air filter can be removed ing Dimplex Customer Service at and gently rinsed with water to 1-888-346-7539. clean and dried on a towel before 7. Carefully insert the two pins reinstalling.
-
Page 16: Warranty
What Dimplex will do in the event of a with the purchaser, and in the event of a defect... - Page 17 Warranty practicable or cannot be timely made, IN CONNECTION WITH THE SALE, Dimplex may, in lieu of repair or MAINTENANCE, USE, OR INABILITY TO replacement, choose to refund the USE THE PRODUCT, EVEN IF DIMPLEX purchase price for such product or OR ITS DIRECTORS, OFFICERS, OR part.
-
Page 18: Replacement Parts
Light Bulbs..........RB400 Dimplex North America Limited 1367 Industrial Road Cambridge ON Canada N1R 7G8 © 2014 Dimplex North America Limited www.dimplex.com...
Need help?
Do you have a question about the DWOP20R and is the answer not in the manual?
Questions and answers