Table of Contents
Advertisement
Quick Links
K114
SPRINT PRO II
I
SPRINT MINI II Tripod
Operating Instructions
Thank you very much for choosing SLiK SPRINT PRO II Tripod.
The SLiK Corporation has designed your tripod to be a sturdy, rugged
and dependable product that will provide you with many years of
satisfactory use.
Please take a few moments to read these operating instructions
carefully before use so that you can take full advantage of your
Tripod's many fine features. Retain this operating instruction sheet in
case you might want to refer back to it.
LtCaution
This caution icon refers to information pertaining to important safety
procedures in preventing injuries, or damages which may occur as a
result of mishandling this product.
<S>
Prohibition
This prohibited icon refers to information pertaining to prohibited con-
tents. Please refer to instructions closely to avoid accidents.
Specification
SPRINT PRO II
Folded length
Max. operating height
Max. center column ext.
Weight
SPRINT MINI II
Folded length
Max. operating height
Max. center column ext.
Weight
470mm
1,615mm
300mm
940g
350mm
1,090mm
210mm
780g
LtCaution
Soft Grip is consumption and cannot be used permanently.
Please replace it whenever it is ragged.
Setting up
LtCaution
To prevent accidental equipment
fall or tripod tipping over making
sure all levers, knobs and handles
on
the
tripod
are
securely
tightened. And all three legs are
opened all the way.
This product has been designed
to handle equipment weighing
under 2 kgs (4 Ibs 6 oz). Do not
overload.
Some equipments weighing under
2 kgs (4 Ibs 6 oz), such as long
lenses, may not balance well due
to its weight distribution. In such
case use a larger tripod.
EqUipment that can be
loaded on this Tripod
SPRINT MINI II
Carrying a tripod with a camera
left on can result in unexpected
accidents.
We therefore, recommend you
to remove your camera while you
are carrying the tripod.
Carrying the Tripod
<S>
Prohibition
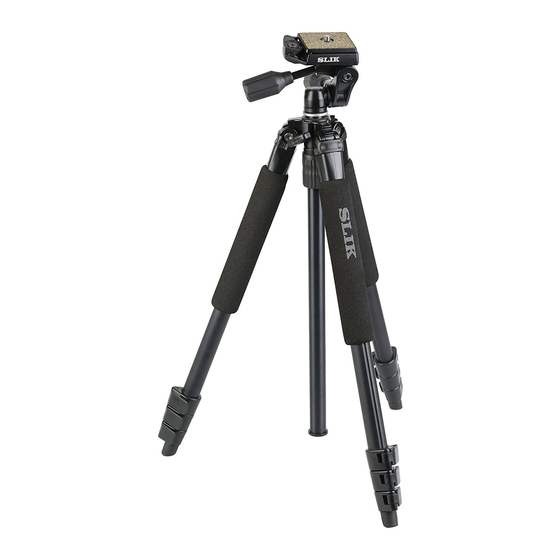
Soft grip
2-Way leg tip
Tilt lock knob
Quick release
lock lever
Leg lock lever
Upper part of
Center column
Quick release
plate
Camera platform
Center column stopper
3-Position leg angle
Adjustment lock
Lower part of
Center column
Center column
base stopper
Components
Center column
locking nut
SPRINT PRO II
(The example of
vertical position
photography)
Using the Pan Head
While
you
are
holding
the
camera, loosen the Tilt lock knob.
You can move Camera Platform
and Base Plate freely.
Note: For vertical photos the
Camera platform can be tilted 90
degrees in either direction.
To attach the plate, slide into
Quick release plate slantways.
It will be closed automatically after
attaching.
Fasten the plate Locking Lever
tightly. It must be certainly locked.
Insert the Camera mounting screw
on the Quick release plate in the
place of the tripod attachment
screw of your camera.
Turn the Camera mounting screw
knob and fix firmly.
Attaching
the
camera to the
Quick release platfonn
LtCaution
~
To remove the Quick release
plate, turn the Quick release plate
locking lever. In this case do not
put the lock lever back by force as
it has been stood by the stopper.
Advertisement
Table of Contents


Need help?
Do you have a question about the SPRINT PRO II and is the answer not in the manual?
Questions and answers