Advertisement
TYPICAL AERIAL MOUNTING APPLICATION EXAMPLES
WALL AND LOFT FIXING KITS ARE AVAILABLE FROM MAXVIEW (INCUDES 10M COAXIAL CABLE)
Wall mounted
Loft mounted
You should mount your aerial as high as possible on either a chimney, on an external wall,
or in the loft. Remember, that in general, TV pictures improve with height and the less
obstructions between the aerial and the transmitter the better.
Now point your aerial in the direction of the transmitter by looking at neighbours aerials and
copy the direction they are pointing. If you decide to fit the aerial in your loft, special care
should be taken when walking in the roof space.
POLARISATION
Horizontal mounting
recommended for
Main TV transmitters
Tip: Look at outdoor aerials in your
area to see which direction to
point your aerial for best reception.
ALIGNING YOUR AERIAL
Turn on your TV set. Refer to manufacturers instructions
to tune your TV into the available digital or analogue
channels. Select a tuned-in analogue channel.
Next, carry out the following procedures:
1. Turn your aerial to the LEFT until you lose the picture
(if alone turn the volume up and turn until you hear a
reduction in sound quality).
2. Remember this position and turn your aerial to the
RIGHT until you lose the picture/sound again.
3. Now point the aerial in the centre of these two points
and you will receive optimum reception.
To tune in Digital Terrestrial Television channels refer to
manufacturers instructions of your DTT equipment.
Chimney mounted
Vertical mounting
recommended for
Relay TV transmitters
I Helpline: +44 (0) 1553 811000
I Email: cust_serv@maxview.co.uk
I Visit: www.maxview.co.uk
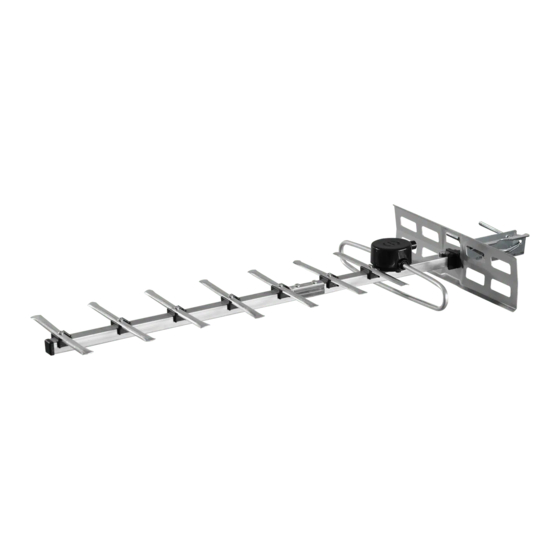
PLATINUM* QUALITY RANGE
10 ELEMENT
DIGITAL TV AERIAL
ASSEMBLY INSTRUCTIONS & USER GUIDE
KIT CONTENTS - CHECK LIST
A:
Reflector x 1
Reflector Bung x 1
H:
B:
Rear Boom x 1
I:
End Bung x 2
C:
Front Boom x 1
Joining Plate x 2
J:
D:
Mast Clamp x 1
K:
6 '' Element x 4
1 /
4
Dipole Cap x 1
E:
F:
Dipole x 1
Saddle Clip x 8
G:
C
D
B
A
SAFETY FIRST - PLEASE READ
I Ladder safety - always read and follow the manufacturer's instruction label affixed to the ladder.
I When working on installations outside, beware of overhead power lines.
I Observe safe working practices, tread carefully and ensure adequate lighting is available in loft
or roof space.
I To avoid injury always route cables or wiring carefully.
I Always follow manufacturer's operating and safety instructions before using tools and/or equipment.
I Before starting installation check structure is sound and check for hidden electrical wiring or plumbing.
If in doubt consult a qualified electrician or professional aerial installer
PLEASE NOTE - YOU WILL REQUIRE COAXIAL CABLE
TO COMPLETE THE ASSEMBLY OF THIS AERIAL.
L:
6" Element x 4
O:
M5 Screw x 2
M:
Washer x 2
P:
Screw x 10
N:
Nut x 2
E
J
I
K
H
F
G
O
N
M
L
P
9111303 Iss 1
Advertisement
Table of Contents

Subscribe to Our Youtube Channel
Related Manuals for Maxview MXR0010


Summary of Contents for Maxview MXR0010
- Page 1 TYPICAL AERIAL MOUNTING APPLICATION EXAMPLES PLATINUM* QUALITY RANGE WALL AND LOFT FIXING KITS ARE AVAILABLE FROM MAXVIEW (INCUDES 10M COAXIAL CABLE) Wall mounted Loft mounted Chimney mounted 10 ELEMENT DIGITAL TV AERIAL ASSEMBLY INSTRUCTIONS & USER GUIDE You should mount your aerial as high as possible on either a chimney, on an external wall, KIT CONTENTS - CHECK LIST or in the loft.
- Page 2 Gather outer braid strands of the terminals and the twisted braid and twist together. Remove 10mm of into the other. Tighten screws and close inner insulation around inner core. Dipole Cap. *Wall/Loft Fixing Kit and **Coaxial Cable Kit available from Maxview...
Need help?
Do you have a question about the MXR0010 and is the answer not in the manual?
Questions and answers