Dell MD1400 Owner's Manual
Storage enclosure
Hide thumbs
Also See for MD1400:
- Installation manual ,
- Deployment manual (12 pages) ,
- Getting started manual (8 pages)
Table of Contents
Advertisement
Advertisement
Table of Contents
Troubleshooting

Related Manuals for Dell MD1400


Summary of Contents for Dell MD1400
- Page 1 Dell Storage MD1400 Enclosures Hardware Owner's Manual...
- Page 2 WARNING: A WARNING indicates a potential for property damage, personal injury, or death. Copyright © 2014 Dell Inc. All rights reserved. This product is protected by U.S. and international copyright and intellectual property laws. Dell ™...
-
Page 3: Table Of Contents
Contents 1 About your enclosure................... 5 ..................... 5 Front-panel features and indicators ..................... 6 Front-bezel features and indicators ......................7 Hard disk drive indicator patterns ......................8 Back-panel features and indicators ......................8 Enclosure Management Module ................9 Enclosure failover when two EMMs are installed ........................ - Page 4 Troubleshooting enclosure cooling problems ................34 Troubleshooting Enclosure Management Modules ....................... 34 Troubleshooting hard disk drives ...................35 Troubleshooting enclosure connections ...................... 35 Troubleshooting a wet enclosure ..................... 35 Troubleshooting a damaged enclosure 4 Getting help......................37 ............................37 Contacting Dell ........................37 Documentation feedback...
-
Page 5: About Your Enclosure
About your enclosure Front-panel features and indicators Figure 1. Front-panel features and indicators Item Indicator, Icon Description Button, or Connector System The system identification button on the front control panel can identification be used to locate a particular enclosure within a rack. When button the button is pressed, the system status indicators on the control panel and the EMM blink blue until the button is... -
Page 6: Front-Bezel Features And Indicators
Front-bezel features and indicators Figure 2. Front-bezel features and indicators Item Indicator, Button, or Icon Description Connector Enclosure status LED The enclosure status LED lights when the enclosure power is on. Lights solid blue during normal operation. Blinks blue when a host server is identifying the enclosure or when the system identification button is pressed. -
Page 7: Hard Disk Drive Indicator Patterns
Hard disk drives are not ready for insertion or removal during this time. The Dell PowerEdge RAID controller PERC H830 and 12Gb SAS HBA may take up to a minute to discover and initialize all the hard disk drives. -
Page 8: Back-Panel Features And Indicators
Hard disk drive- status indicator pattern (RAID Condition Only) Blinks green for three seconds, amber for three Rebuild aborted seconds, and turns off in six seconds. Back-panel features and indicators Figure 4. Back-panel features and indicators Item Indicator, Button, or Connector Description Power supply unit or cooling fan 600 W power supply. -
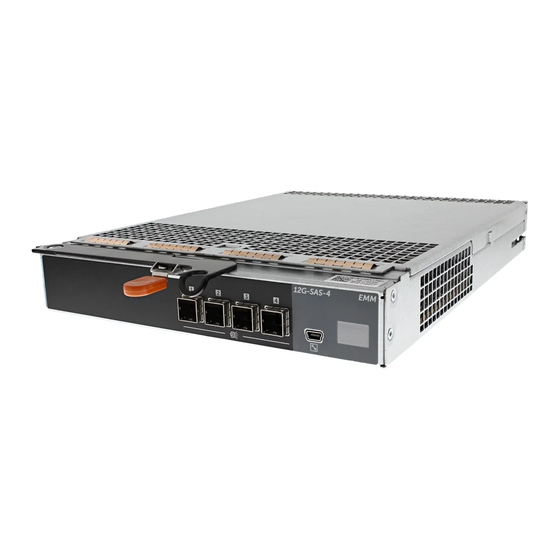
Page 9: Enclosure Failover When Two Emms Are Installed
LEDs, power supply units, and fans. EMM thermal shutdown If critical internal temperatures are reached, the enclosure turns off automatically through either a thermal shutdown command issued by the EMM firmware or through a command from Dell OpenManage Server Administrator. -
Page 10: Power Indicator Codes
Power indicator codes Figure 6. Power indicator codes Item Icon Color State • ON — Normal operation. Power supply is connected DC power Green to DC power and the power switch is on. The power supply module is supplying DC power to the array. •... - Page 11 The OpenManage Server Administrator documentation provides information about managing your storage solution using the storage management service within the server administrator. • The Dell PowerEdge RAID Controller (PERC) H830 and Dell 12Gb SAS HBA User’s Guide provides information about configuring RAID. •...
-
Page 12: Installing Enclosure Components
Installing enclosure components Recommended tools You may need the following items to perform the procedures in this section: • Key to the system keylock • #2 Phillips screwdriver • Wrist grounding strap Front bezel (optional) Removing the front bezel Using the system key, unlock the front bezel (if locked). Lift the release latch next to the keylock. -
Page 13: Installing The Front Bezel
Installing the front bezel Hook the right end of the bezel onto the chassis. Fit the free end of the bezel onto the system. Secure the bezel with the keylock. Hard disk drives Safety: Models AMT, E03J, and E04J Models AMT, E03J, and E04J are intended for installation only in restricted access locations as defined in cl 1.2.7.3 of IEC 60950-1:2005. -
Page 14: Installing A Hard Disk Drive Blank
Damage due to servicing that is not authorized by Dell is not covered by your warranty. Read and follow the safety instructions that came with the product. -
Page 15: Installing A Hard Disk Drive
Damage due to servicing that is not authorized by Dell is not covered by your warranty. Read and follow the safety instructions that came with the product. -
Page 16: Installing A Hard Disk Drive Into A Hard Disk Drive Carrier
Figure 10. Removing and installing a hard drive into a 3.5-inch hard disk drive carrier screws (4) hard disk drive hard disk drive carrier Installing a hard disk drive into a hard disk drive carrier Insert the hard disk drive into the hard disk drive carrier with the connector end of the hard disk drive at the back. -
Page 17: Removing An Emm Blank
Damage due to servicing that is not authorized by Dell is not covered by your warranty. Read and follow the safety instructions that came with the product. -
Page 18: Installing An Emm
Damage due to servicing that is not authorized by Dell is not covered by your warranty. Read and follow the safety instructions that came with the product. -
Page 19: Ac Power Supply Unit Or Cooling Fan Module
AC power supply unit or cooling fan module Your enclosure supports two hot-swappable power supply unit or cooling fan modules. While the enclosure can operate temporarily with one module, both the modules must be present for cooling the enclosure. CAUTION: A single power supply unit or cooling fan module can be removed from a turned on enclosure for a maximum period of five minutes. -
Page 20: Installing An Ac Power Supply Unit Or Cooling Fan Module
Installing an AC power supply unit or cooling fan module Slide the power supply unit or cooling fan module into the chassis until the release tab clicks into place. Connect the power cable to the power supply unit or cooling fan module and plug the cable into a power outlet. - Page 21 Figure 15. Power indicator codes Item Color State Green • ON — Normal operation. Power supply is connected to DC power and Power the power switch is on. The power supply module is supplying DC output power to the array. •...
-
Page 22: Dc Power Supply Module Back Panel Features
DC power supply module back panel features Figure 16. DC power supply module back panel features Item Feature Description Power supply release Unlocks the power supply module for removal from the storage array. lever Connector on the Connects the power supply module to the DC power supply module. power supply module Power supply On or Controls the power supply module power output to the storage array. - Page 23 All electrical wiring must comply with applicable local or national codes and practices. Damage due to servicing that is not authorized by Dell is not covered by your warranty. Read and follow all safety instructions that came with the product.
- Page 24 All electrical wiring must comply with applicable local or national codes and practices. Damage due to servicing that is not authorized by Dell is not covered by your warranty. Read and follow all safety instructions that came with the product.
- Page 25 .All electrical wiring must comply with applicable local or national codes and practices. Damage due to servicing that is not authorized by Dell is not covered by your warranty. Read and follow all safety instructions that came with the product.
- Page 26 All electrical wiring must comply with applicable local or national codes and practices. Damage due to servicing that is not authorized by Dell is not covered by your warranty. Read and follow all safety instructions that came with the product.
- Page 27 All electrical wiring must comply with applicable local or national codes and practices. Damage due to servicing that is not authorized by Dell is not covered by your warranty. Read and follow all safety instructions that came with the product.
-
Page 28: Control Panel
Technical specifications NOTE: The following specifications are only those required by law to ship with your system. For a complete and current listing of the specifications for your system, go to dell.com/support. Power AC Power Supply (per power supply) Watt... -
Page 29: Installing The Control Panel
Damage due to servicing that is not authorized by Dell is not covered by your warranty. Read and follow the safety instructions that came with the product. - Page 30 Remove the hard disk drives. See Removing a hard disk drive. Remove the EMMs. See Removing an EMM. Remove the power supply or cooling fan modules. See Removing an AC power supply unit or cooling fan module. Remove the control panel. See Removing the control panel.
-
Page 31: Installing The Backplane
Figure 23. Removing and installing the backplane screws (5) captive screws (2) backplane Installing the backplane Align the holes on the backplane with the holes on the enclosure. Tighten the captive screw to secure the backplane to the chassis. Replace the screws that secure the backplane to the chassis. Align the slots on the EMM or power supply cage with the tabs on the chassis. -
Page 32: Troubleshooting Your Enclosure
Damage due to servicing that is not authorized by Dell is not covered by your warranty. Read and follow the safety instructions that came with the product. -
Page 33: Troubleshooting Enclosure Cooling Problems
Damage due to servicing that is not authorized by Dell is not covered by your warranty. Read and follow the safety instructions that came with the product. -
Page 34: Troubleshooting Enclosure Management Modules
Damage due to servicing that is not authorized by Dell is not covered by your warranty. Read and follow the safety instructions that came with the product. -
Page 35: Troubleshooting Enclosure Connections
Damage due to servicing that is not authorized by Dell is not covered by your warranty. Read and follow the safety instructions that came with the product. - Page 36 • Hard disk drives • EMMs • Power supply unit or cooling fan modules • Control panel • Backplane Ensure that all the cables are properly connected and that there are no damaged pins in the connectors. Run diagnostics available in Server Administrator. If the test fails, see Getting Help.
-
Page 37: Getting Help
The support page that lists the various support categories is displayed. Documentation feedback If you have feedback for this document, write to documentation_feedback@dell.com. Alternatively, you can click on the Feedback link in any of the Dell documentation pages, fill out the form, and click Submit to send your feedback.
Need help?
Do you have a question about the MD1400 and is the answer not in the manual?
Questions and answers