
Related Manuals for Samsung TX-WN


Summary of Contents for Samsung TX-WN
-
Page 1: User Manual
User Manual TX-WN The color and the appearance may differ depending on the product, and the specifications are subject to change without prior notice to improve the performance. BN46-00302A-01... -
Page 2: Table Of Contents
Attaching the cradle Anti-theft Lock USING "WINDOWS What is "Windows Embedded Standard 7" Client? EMBEDDED STANDARD 7" Connection to Use "Windows Embedded (TX-WN) Standard 7" Before Connecting Connection Using the DVI Cable Connecting a Microphone Connecting to Headphones LAN Connection... - Page 3 Failed wireless LAN connection Failed to connect to a wireless LAN Internet connection is not available An AP is found but Internet access is not available TROUBLESHOOTING Requirements Before Contacting Samsung Customer Service Center GUIDE Check the following. SPECIFICATIONS General Power consumption APPENDIX...
- Page 4 Table Of Contents Responsibility for the Pay Service (Cost to Customers) Not a product defect A Product damage caused by customer's fault Others Correct Disposal Correct Disposal of This Product (Waste Electrical & Electronic Equipment) Correct disposal of batteries in this product INDEX Table Of Contents...
-
Page 5: Before Using The Product
© 2012 Samsung Electronics Samsung Electronics owns the copyright for this manual. Use or reproduction of this manual in parts or entirety without the authorization of Samsung Electronics is prohibited. The SAMSUNG logo is a registered trademark of Samsung Electronics. -
Page 6: Icons Used In This Manual
Before Using the Product Icons used in this manual The following images are for reference only. Real-life situations may differ from what is shown in the images. Symbols for safety precautions A serious or fatal injury may result if instructions are not followed. Warning Personal injury or damage to properties may result if instructions are Caution... -
Page 7: Securing The Installation Space
Before Using the Product Securing the Installation Space Ensure some space around the product for ventilation. An internal temperature rise may cause fire and damage the product. Be sure to allow the amount of space as shown below or greater when installing the product. -
Page 8: Safety Precautions
Before Using the Product Safety Precautions The following images are for reference only. Real-life situations may differ from what is shown in the images. Electricity and Safety Warning Do not use a damaged power cable or plug, or a loose power socket. An electric shock or fire may result. -
Page 9: Installation And Safety
The product may become damaged by an electric shock. Do not use the power cable for products other than authorized products supplied by Samsung. An electric shock or fire may result. Keep the power socket where the power cable is connected unobstructed. - Page 10 Before Using the Product Do not install the product on an unstable or vibrating surface (insecure shelf, sloped surface, etc.). The product may fall and break or cause a personal injury. Using the product in an area with excess vibration may damage the product or cause a fire.
-
Page 11: Operation And Safety
SAMSUNG time) may seriously affect its performance. Be sure to consult Samsung Customer Service Center (page 47) before installation if you want to install the product at such a place. Do not leave or install the product on the floor. - Page 12 If water or any foreign substance enters the product, be sure to power off the product, remove the power cable, and contact Samsung Customer Service Center (page 47). Product failure, an electric shock or fire may result.
- Page 13 Before Using the Product Caution Disconnect the power cable from the power socket if you do not plan on using the product for an extended period of time (vacation, etc.). Otherwise, a fire may result from accumulated dust, overheating, an electric shock, or electric leakage.
- Page 14 Before Using the Product Do not place heavy objects on the product. Product failure or personal injure may result. Do not increase the volume too high when using headphones (earphones). Sound particularly at a higher volume could potentially affect long-term hearing.
-
Page 15: Preparations
Preparations Checking the Contents 1.1.1 Removing the Packaging Open the packaging box. Be careful not to damage the product when you open the packaging with a sharp instrument. Remove the styrofoam from the product. Check the components and remove the styrofoam and plastic bag. The appearance of actual components may differ from the image shown. -
Page 16: Checking The Components
Preparations 1.1.2 Checking the Components Contact the dealer from whom you purchased the product if any item is missing. The appearance of the components and items sold separately may differ from the image shown. Components Quick setup guide Warranty card User Manual (Not available in some locations) - Page 17 Preparations Items sold separately The following items can be purchased at your nearest retailer. LAN cable USB cable HDMI-DVI cable DVI cable RS232C cable DVI-RGB cable Mouse (USB) Keyboard Headphone 1 Preparations...
-
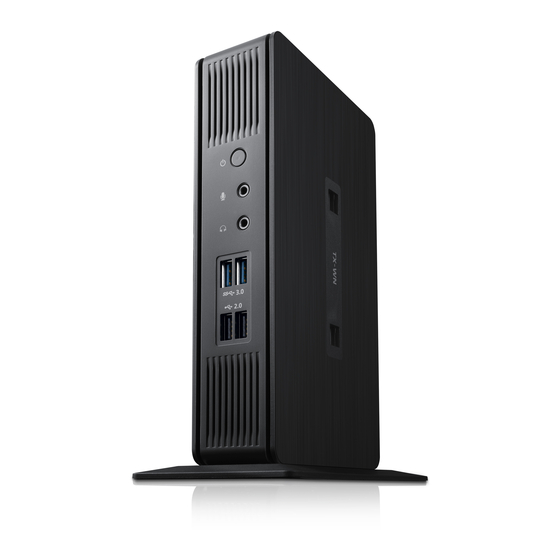
Page 18: Parts
Preparations Parts 1.2.1 Front view The color and shape of parts may differ from what is shown. Specifications are subject to change without notice to improve quality. (3.0) (2.0) (3.0) (2.0) Ports Description Power on or off the product. Connect to a microphone. Connect to an audio output device such as headphones. - Page 19 Preparations Ports Description (2.0) Connect to a USB device. Speaker 1 Preparations...
-
Page 20: Reverse Side
Preparations 1.2.2 Reverse Side The color and shape of parts may differ from what is shown. Specifications are subject to change without notice to improve quality. (2.0) SERIAL DVI-I OUT DVI-D OUT DC 14V (2.0) SERIAL DVI-I OUT DVI-D OUT DC 14V Ports Description... -
Page 21: Installation
Preparations Installation 1.3.1 Attaching the cradle The color and shape of parts may differ from what is shown. Specifications are subject to change without notice to improve quality. This product can be installed in portrait or landscape orientation. Vertical Type Horizontal Type 1 Preparations... -
Page 22: Anti-Theft Lock
Preparations 1.3.2 Anti-theft Lock An anti-theft lock allows you to use the product securely even in public places. The locking device shape and locking method depend on the manufacturer. Refer to the user guide provided with your anti-theft locking device for details. The lock device is sold separately. DVI-D OUT DVI-D OUT To lock an anti-theft locking device:... -
Page 23: Using "Windows Embedded Standard
This manual describes the functions provided by the WES Client. However, it does not explain general functionalities of WES. For more general information on Windows 7, refer to Windows 7 Help provided by Microsoft. 2 Using "Windows Embedded Standard 7" (TX-WN) -
Page 24: Connection To Use "Windows Embedded Standard
The port names may vary depending on the monitor. For details on how to change the input source for your monitor, refer to the monitor user manual. The monitor images in this manual are for reference only. Monitor is sold separately. 2 Using "Windows Embedded Standard 7" (TX-WN) -
Page 25: Connection Using The Dvi Cable
The [DVI-D OUT] port only supports digital output. 2.2.3 Connecting a Microphone Connect the microphone to [ ] on the front of the product. 2.2.4 Connecting to Headphones Connect the headphones to [ ] on the front of the product. 2 Using "Windows Embedded Standard 7" (TX-WN) -
Page 26: Lan Connection
Connect a device that supports USB 3.0 to the USB 3.0 port for optimal performance. Wake up function is not supported on USB 3.0 ports. Keyboard and mouse devices are required to connect to USB 2.0. 2 Using "Windows Embedded Standard 7" (TX-WN) -
Page 27: Connecting The Power
The color and shape of parts may differ from what is shown. Specifications are subject to change without notice to improve quality. For details on how to connect the power cable to the monitor, refer to the monitor user manual. 2 Using "Windows Embedded Standard 7" (TX-WN) -
Page 28: Logon
(In the case of logging off, the configuration is remembered when loggin in again.) For more information on the Enhanced Write Filter, refer to the Program Help. 2 Using "Windows Embedded Standard 7" (TX-WN) -
Page 29: Programs
PCs. Note that this option is less secure than the next option (option 3). To allow a remote PC to access your PC using a Remote Desktop or RemoteApp version requiring a network level authentication, select "Allow connections only from computers 2 Using "Windows Embedded Standard 7" (TX-WN) - Page 30 All Programs Accessories Remote Desktop Connection] or double- click the Remote Desktop Connection icon to open Remote Desktop Connection. Enter the host computer name. You can configure detailed settings by clicking the Options button. 2 Using "Windows Embedded Standard 7" (TX-WN)
- Page 31 - Display : The Remote Desktop Connection sends and receives compressed screen data. If you set the resolution and color quality to the high option, the speed may become slow. - Local Resources : Specify whether to use the hard disks and ports. 2 Using "Windows Embedded Standard 7" (TX-WN)
- Page 32 PC. - Experience : Specify the connection speed and the menu items you want to use on the remote PC connected. The settings specified will be shared with the host PC. 2 Using "Windows Embedded Standard 7" (TX-WN)
- Page 33 OK. The Remote Desktop window will open and you will see the desktop settings, files, and programs that are on the host computer. For more information on Remote Desktop Connections, visit the Microsoft web site. 2 Using "Windows Embedded Standard 7" (TX-WN)
- Page 34 (saved in a cache) are saved to a flash volume and the EWF is disabled. After restarting your computer, the configurations and file system information for the client are written to a flash volume. 2 Using "Windows Embedded Standard 7" (TX-WN)
- Page 35 Session Status Current session : Displays the volumes being protected by the FBWF and a list of the folders and files on those volumes that are excepted from protection by the FBWF. 2 Using "Windows Embedded Standard 7" (TX-WN)
-
Page 36: Configuring Utilities
Select the Reconnect at logon checkbox in the Map Network Drive dialog box. If the EWF or FBWF is enabled, the changes are saved on the disk. 2 Using "Windows Embedded Standard 7" (TX-WN) -
Page 37: Recover The System
Boot the client via the network. Recover the system using the Windows Embedded Standard image and the Backup/ Recovery Utility saved on the PXE server via the network. For more information, refer to the PXE Server User Manual. 2 Using "Windows Embedded Standard 7" (TX-WN) - Page 38 DISK is configured as follows. Deleting or changing partitions may disable booting or the Standalone restore solution. BOOT_AGENT WES7 BACKUP Drive Letter is not defined Drive Letter is not defined Data saved by the user and customized settings are deleted after a system restore. 2 Using "Windows Embedded Standard 7" (TX-WN)
-
Page 39: Magicrms Pro
Using "Windows Embedded Standard 7" (TX- MagicRMS Pro 2.4.1 About MagicRMS Pro MagicRMS Pro program can be used to remotely control a Samsung network monitor. The design of the user-oriented interface makes it easy and convenient to use. Using MagicRMS Pro, you can schedule a task to be performed at a specified time on a network monitor. -
Page 40: Magicrms Pro Server
For further details on how to use the MagicRMS Pro Agent, see help for MagicRMS Pro Agent. 2 Using "Windows Embedded Standard 7" (TX-WN) -
Page 41: Wireless Network
Wireless Network (optional) Connecting to a wireless LAN using Windows If there is an AP nearby, conveniently connect to a wireless LAN using the wireless LAN access method provided by Windows. Click the Network connection icon on the task bar. Select an AP to connect from the displayed list of available APs. -
Page 42: Successful Wireless Lan Connection
Wireless Network (optional) Successful wireless LAN connection The wireless LAN icon on the task bar as shown below indicates that it is correctly connected to the Internet. Failed wireless LAN connection 3.3.1 Failed to connect to a wireless LAN The " "... -
Page 43: An Ap Is Found But Internet Access Is Not Available
Wireless Network (optional) 3.3.3 An AP is found but Internet access is not available This issue may occur when a higher priority is given to a wireless LAN AP with low signal strength. Click an AP with higher signal strength and try again. Currently connected AP, signal strength is low AP that has... -
Page 44: Troubleshooting Guide
Troubleshooting Guide Requirements Before Contacting Samsung Customer Service Center 4.1.1 Check the following. Installation issue The product cannot power on. Check that the power cable is connected properly. (Refer to "2.2.7 Connecting the Power") Sound issue There is no sound. -
Page 45: Specifications
This device is a Class B digital apparatus. [Recommendation] - EU Only Hereby, Samsung Electronics, declares that this [Thin Client] is in compliance with the essential requirements and other relevant provisions of Directive 1999/5/EC. The official Declaration of Conformity may be found at http://www.samsunglfd.com, go to Support >... -
Page 46: Power Consumption
Dispose unwanted electronics through an approved recycler. To find the nearest recycling location, go to our website: www.samsung.com/recyclingdirect or call, (877) 278 - 0799 CALIFORNIA USA ONLY (Applicable for networking models only.) This Perchlorate warning applies only to primary CR(Manganese Dioxide) Lithium coin cells in the product sold or distributed ONLY in California USA "Perchloate Material - special handling may apply, See www.dtsc.ca.gov/hazardouswaste/... -
Page 47: Appendix
Appendix Contact SAMSUNG WORLD WIDE If you have any questions or comments relating to Samsung products, please contact the SAMSUNG customer care center. NORTH AMERICA U.S.A 1-800-SAMSUNG (726-7864) http://www.samsung.com CANADA 1-800-SAMSUNG (726-7864) http://www.samsung.com/ca (English) http://www.samsung.com/ca_fr (French) MEXICO 01-800-SAMSUNG (726-7864) http://www.samsung.com... - Page 48 (Dutch) http://www.samsung.com/be_fr (French) BOSNIA 05 133 1999 http://www.samsung.com BULGARIA 07001 33 11 , normal tariff http://www.samsung.com CROATIA 062 SAMSUNG (062 726 7864) http://www.samsung.com CYPRUS 8009 4000 only from landline http://www.samsung.com (+30) 210 6897691 from mobile and land line Appendix...
- Page 49 808 20 - SAMSUNG (808 20 7267) http://www.samsung.com RUMANIA 08008 SAMSUNG (08008 726 http://www.samsung.com 7864) TOLL FREE No. SERBIA 0700 Samsung (0700 726 7864) http://www.samsung.com SLOVAKIA 0800 - SAMSUNG (0800-726 786) http://www.samsung.com SPAIN 902 - 1 - SAMSUNG (902 172 678) http://www.samsung.com Appendix...
- Page 50 Appendix EUROPE SWEDEN 0771 726 7864 (SAMSUNG) http://www.samsung.com SWITZERLAND 0848-SAMSUNG http://www.samsung.com/ch (7267864, CHF 0.08/min) (German) http://www.samsung.com/ch_fr (French) 0330 SAMSUNG (7267864) http://www.samsung.com ARMENIA 0-800-05-555 http://www.samsung.com AZERBAIJAN 088-55-55-555 http://www.samsung.com BELARUS 810-800-500-55-500 http://www.samsung.com GEORGIA 0-800-555-555 http://www.samsung.com KAZAKHSTAN 8-10-800-500-55-500 http://www.samsung.com (GSM: 7799) KYRGYZSTAN 00-800-500-55-500 http://www.samsung.com...
- Page 51 1800 3000 8282 1800 266 8282 INDONESIA 0800-112-8888 http://www.samsung.com 021-5699-7777 JAPAN 0120-327-527 http://www.samsung.com MALAYSIA 1800-88-9999 http://www.samsung.com NEW ZEALAND 0800 SAMSUNG (0800 726 786) http://www.samsung.com PHILIPPINES 1-800-10-SAMSUNG (726-7864) http://www.samsung.com for PLDT 1-800-3-SAMSUNG (726-7864) for Digitel 1-800-8-SAMSUNG (726-7864) for Globe 02-5805777 SINGAPORE 1800-SAMSUNG (726-7864) http://www.samsung.com...
- Page 52 Appendix MIDDlE EAST MOROCCO 080 100 2255 http://www.samsung.com OMAN 800-SAMSUNG (726-7864) http://www.samsung.com/ae (English) http://www.samsung.com/ae_ar (Arabic) SAUDI ARABIA 9200-21230 http://www.samsung.com/ae (English) http://www.samsung.com/ae_ar (Arabic) TURKEY 444 77 11 http://www.samsung.com U.A.E 800-SAMSUNG (726-7864) http://www.samsung.com AFRICA ANGOLA 91-726-7864 http://www.samsung.com BOTSWANA 0800-726-000 http://www.samsung.com CAMEROON 7095- 0077 http://www.samsung.com...
-
Page 53: Responsibility For The Pay Service (Cost To Customers)
If a product damage is caused by; external impact or drop. use of supplies or separatly sold product unspecified by Samsung. repair from a person besides an engineer of outsourcing service company or partner of Samsung Electronics Co., Ltd. remodeling or repairing the product by customer. -
Page 54: Correct Disposal
Appendix Correct Disposal Correct Disposal of This Product (Waste Electrical & Electronic Equipment) (Applicable in countries with separate collection systems) This marking on the product, accessories or literature indicates that the product and its electronic accessories (e.g. charger, headset, USB cable) should not be disposed of with other household waste at the end of their working life. - Page 55 Index Checking the Contents Connection to Use Windows Embedded Standard 7 Contact SAMSUNG WORLD WIDE Copyright Correct Disposal General Installation Parts Power consumption Requirements Before Contacting Samsung Customer Service Center Responsibility for the Pay Service (Cost to Customers) Safety Precautions Using "Windows Embedded Standard 7"...
Need help?
Do you have a question about the TX-WN and is the answer not in the manual?
Questions and answers