
Related Manuals for Bticino H/L 4684


Summary of Contents for Bticino H/L 4684
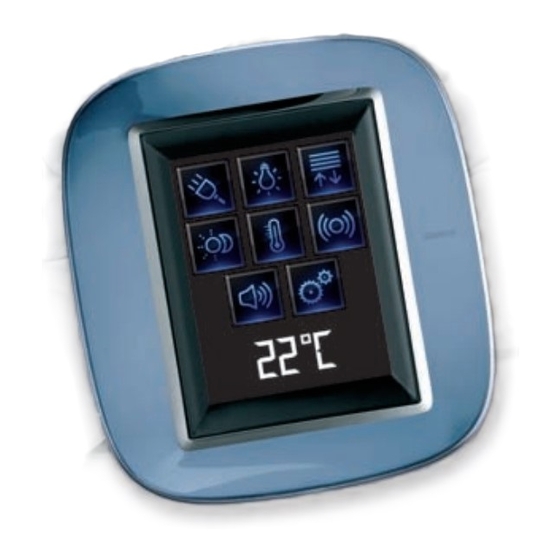
- Page 1 Touch screen a colori Colour Touch screen H/L 4684 - AM 5864 Manuale utente User manual...
-
Page 3: Table Of Contents
Indice Introduzione Personalizzazione Il Touch screen Setup ■ ■ Descrizione generale Sveglia ✔ ✔ La Home page Beep ✔ ✔ La pagina funzioni Orologio ✔ ✔ Le frecce di navigazione Taratura ✔ ✔ La pagina di default Password ✔ ✔ Versione ✔... -
Page 5: Introduzione 5
Introduzione Il Touch scree ■ Descrizione general ✔ La Home pag ✔ La pagina funzion ✔ Le frecce di navigazion ✔ La pagina di defaul ✔... -
Page 6: Il Touch Screen
Introduzione Il Touch screen La Home page ✔ ■ Descrizione generale Nella Home page, sono presenti le icone che rappresentano le ap- ✔ plicazioni che puoi gestire e l’icona setup (sempre presente). In fase di programmazione è possibile inserire ulteriori informazioni come Il Touch screen a colori è... -
Page 7: La Pagina Funzioni
Introduzione La pagina funzioni Le frecce di navigazione ✔ ✔ Dalla Home page, selezionando l’applicazione desiderata si accede Le frecce presenti nella parte bassa del display hanno le seguenti alla pagina delle funzioni. funzioni: Basta toccare l’icona del comando per accendere una luce, alzare le tapparelle di casa o attivare uno scenario. -
Page 8: La Pagina Di Default
Introduzione La pagina di default ✔ Con il software di configurazione TiDisplayColorIP è possibile definire una pagina di Default che verrà presentata sul display dopo un periodo di inattività del Touch screen. Data L’installatore potrà scegliere come pagina di Default la Home page, una pagina tra quelle delle applicazioni, oppure creare una nuova pagina contenente le informazioni di Ora, Data e Temperatura. -
Page 9: Utilizzo
Utilizzo Le applicazion ■ Scenar ✔ Illuminazion ✔ Automazion ✔ Cancello (illuminazione/videocitofonia ✔ Controllo carich ✔ Termoregolazion ✔ Antifurt ✔ Diffusione sonor ✔ Diffusione sonora multicanal ✔ Contenuti Multimedial ✔ Scenari evoluti e schedulat ✔ Videocitofoni ✔ Supervisione impiant ✔... -
Page 10: Le Applicazioni 1
Utilizzo Le applicazioni ■ Con il Touch screen puoi gestire le seguenti applicazioni del sistema: L’icona Setup, sempre presente nella Home page, ti permette di accedere alla pagina delle impostazioni del Touch screen (Sveglia, Beep, Orologio ecc.). Scenari Antifurto Diffusione Illuminazione sonora Diffusione... - Page 11 Utilizzo Scenario della centralina scenari Scenari ✔ Ti permette di attivare gli scenari che sono stati precedentemente memorizzati in una o più “centraline scenari” e “moduli scenari” del tuo sistema My Home. NOTTE Tocca l’icona scenari Il display visualizza la pagina nella quale sono presenti gli scenari che puoi attivare.
- Page 12 Utilizzo Creazione nuovo scenario Cancellazione di uno scenario Se decidi di cancellare uno scenario Tocca l'icona per iniziare la Tocca l'icona per terminare da te impostato, tocca l'icona programmazione di un la programmazione. nuovo scenario. Tocca l'icona per tornare al menù degli scenari da te impostati.
- Page 13 Utilizzo Illuminazione Luce singola ✔ Ti permette di accendere, spegnere, regolare una singola luce o Questo comando consente di accendere e spegnere una gruppi di luci. singola luce. Luce cucina Tocca l’icona illuminazione Il display visualizza la pagina nella quale sono presenti le luci che puoi Gruppo di luci comandare.
- Page 14 Utilizzo Insieme Dimmer Luce Temporizzata fissa Questo comando consente di Questo comando consente di 12:10 accendere, spegnere e regola- accendere una luce per un re contemporaneamente più Luci camere solo tempo impostato tramite luci con variatore di intensità Temporizzazione a tempo fisso il software di configurazione.
-
Page 15: Cancello (Illuminazione/Videocitofonia) 1
Utilizzo Automazione ✔ Permette di comandare tapparelle, cancelli, serrature ecc. Per consentirti una immediata identificazione sono state create delle icone differenziate in base al reale utilizzo dell’automatismo. Tocca l’icona automatismi Il display visualizza la pagina nella quale sono presenti gli automatismi che puoi comandare. - Page 16 Utilizzo Tenda-Serranda-Cancello-Basculante Modalità normale Il movimento di apertura o chiusura inizia toccando l'icona corrispon- Questi comandi ti permettono di aprire e chiudere le tende, le tapparelle dente; durante il movimento l’icona cambia presentando l'icona di Stop ecc. con il semplice tocco di un dito. e l’indicazione del movimento in corso.
- Page 17 Utilizzo Insieme automazione Presa comandata Questo comando ti permette di attivare contemporaneamente più Questo comando, rappresentato da una presa, ti permette di accendere e spegnere un apparecchio generico, potrebbe essere un elettrodo- automatismi, ad esempio potresti con un solo tocco abbassare o alzare mestico o altro.
-
Page 18: Controllo Carichi 1
Utilizzo Irrigazione Controllo carichi ✔ Questo comando ti permette di accendere e spegnere l’impianto di Questo comando ti permette di forzare la priorità impostata per la irrigazione. centralina Gestione Energia. L’icona indica quando l’irrigazione è in funzione. Tocca l’icona Risparmio Energia Il display visualizza la pagina nella quale sono presenti i carichi che Acceso Spento... -
Page 19: Termoregolazione 1
Utilizzo Termoregolazione ✔ Questo comando ti permette di tenere sotto controllo la tempera- Toccando l'icona Centrale si accede ad una pagina di visualizzazione tura in tutta la casa e regolarla zona per zona secondo l’esigenza del dello Stato della Centrale, nella stessa pagina è presente l'icona momento. - Page 20 Utilizzo Modalità Settimanale Modalità Manuale Selezionando un programma tra i 3 estivi o i 3 invernali (impostati Consente di impostare una temperatura costante in tutte le zone del precedentemente nella centrale) il tuo impianto funzionerà in modo tuo impianto. automatico seguendo la programmazione impostata. Per confermare il programma da impostare toccare l'icona Toccando le icone diminuisci o aumenti il valore di temperatura...
- Page 21 Utilizzo Modalità Temporizzato (solo per Centrale 4 Zone) Modalità Festivo Consente di eseguire la modalità manuale su tutte le zone per un Consente di selezionare un particolare profilo giornaliero per un pe- tempo determinato. riodo determinato. Il programma viene eseguito fino alla data e all'ora programmata, al termine della quale sarà...
- Page 22 Utilizzo Modalità Feriale Modalità Scenari (solo per Centrale 99 Zone) Questa modalità ti consente di mantenere l'impianto in Antigelo o Selezionando uno scenario tra i 16 estivi o i 16 invernali, il tuo impianto Protezione termica fino alla data e all'ora impostate, al termine sarà funzionerà...
- Page 23 Utilizzo Modalità OFF La sonda termica L’offset locale della sonda è la regolazione della manopola posta sulla Toccando l'icona è possibile mettere in OFF tutte le zone dell'im- sonda presente in ogni zona del tuo impianto di termoregolazione. pianto. Se la sonda è posta in ❄ (antigelo/protezione termica) o in OFF, dal Touch screen non sarà...
- Page 24 Utilizzo Zone (con funzione fan-coil) Zone (Centrale 99 zone) Se è presente la sonda con la funzione di regolazione della velocità Premendo l'icona Zone la pagina prevede la visualizzazione del nome del fan-coil questa pagina oltra alla visualizzazione visualizzazione della zona, la visualizzazione della temperatura misurata, l'imposta- del nome della zona, della Temperatura misurata e impostata prevede zione della temperatura se in modalità...
- Page 25 Utilizzo Zone (Centrale 4 zone) Sonde esterne Premendo l'icona Zone la pagina prevede la visualizzazione del nome Se sull’impianto sono presenti delle sonde radio esterne, tramite l’appo- della zona, la visualizzazione della Temperatura misurata e impostata sita zona è possibile visualizzare la temperatura da esse misurata. e lo stato della sonda (-3 -2 -1 0 +1 +2 +3).
- Page 26 Utilizzo Zone non controllate Se sull’impianto sono presenti delle sonde atte alla sola misurazione della temperatura (zone non controllate) tramite l’apposita zona è possibile visualizzare la temperatura da esse misurata. ZONE NON CONTROLLATE 28.5°C...
-
Page 27: Antifurto 2
Utilizzo Antifurto Attiva/disattiva le zone ✔ Questo comando ti permette di controllare lo stato dell’impianto Quando l’antifurto è disinserito puoi disattivare (o riattivare) una o più zone dell’impianto, questo ti permette di personalizzare il fun- antifurto (inserito/disinserito) e delle singole zone. zionamento dell’impianto secondo le tue esigenze. -
Page 28: Diffusione Sonora 2
Utilizzo Inserisci/disinserisci l’antifurto Che tipo di allarme si è verificato? Se in tua assenza si sono verificati degli allarmi, al tuo rientro in casa Per modificare lo stato dell’impianto tocca l’icona (per inserire). troverai una videata simile a quella dell’esempio con le seguenti in- (per disinserire). - Page 29 Utilizzo Diffusione sonora Sorgente musicale ✔ Puoi controllare completamente il tuo impianto di diffusione sonora. Puoi scegliere tra il Sintonizzatore radio (art. F500 coax) e una sorgente esterna (Aux), come ad esempio un lettore CD (controllato tramite il Tocca l’icona diffusione sonora Controllo Stereo art.
- Page 30 Utilizzo Sintonizza la radio Amplificatore Il Touch screen ti permette di sintonizzare la radio del tuo impianto di Questo comando ti permette di accendere, spegnere un amplificatore diffusione sonora ed anche di memorizzare i tuoi canali preferiti. e regolarne il volume tramite - e +, il livello del volume viene rappre- sentato graficamente sul display.
-
Page 31: Diffusione Sonora Multicanale 3
Utilizzo Diffusione sonora multicanale ✔ Esempio: Esempio: sottomenù "Generale" sottomenù dell’Ambiente 1 Puoi controllare completamente il tuo impianto di diffusione sonora multicanale. In questo caso la sorgente scelta In questo caso la sorgente scelta è la radio. è il CD (Aux). Tocca l’icona diffusione sonora multicanale Nell’esempio il display visualizza due ambienti configurati (Soggiorno e Camera) e l’insieme di tutti gli amplificatori (Generale). - Page 32 Utilizzo Radio Esempio: sottomenù della Radio Esempio: sottomenù della sorgente "Radio" sorgente "CD" Amplificatori casa In questa pagina trovi tutti i controlli di sintonizzazione della radio (per maggiori dettagli vedi pag. 30) Radio BT SOGGIORNO Radio Cambia brano Amplificatori casa Radio BT Torna alla pagina precedente...
-
Page 33: Contenuti Multimediali 3
Utilizzo Contenuti Multimediali ✔ Oltre alle normali sorgenti dell’impianto di diiffusione sonora è possibile Scegliere tra le sorgenti disponibili la sorgente multimediale: dal Touch screen accedere a conrtenuti multimediali presenti in rete, quali la Radio IP e il Media Server Tocca l’icona diffusione sonora o diffusione multicanale Nell’esempio il display visualizza l'ambiente configurato (Soggiorno). - Page 34 Utilizzo Sorgenti Multimediali: Radio IP In questa pagina vengono visualizzate due opzioni per la gestione dei Selezionando sul display, appare una nuova pagina che consente contenuti multimediali tramite rete Ethernet. di controllare tramite il player le Radio IP. Nome della radio Multimedia Radio IP Radio BT 3...
- Page 35 Utilizzo Sorgenti Multimediali: Media Server Musica Radio IP Selezionando un PC (es. Pc3: BTicino) sul display viene caricata Servers una nuova pagina che ti consente Album di visualizzare le cartelle (Imma- gini, Musica, Playlist e Video) contenute all'interno del player...
- Page 36 Utilizzo The Best Of Informazioni della traccia in riproduzione Selezionando un artista (es. U2) verranno visualizzati tutti gli album dell'artista scelto. Beautiful Day.mp3 Selezionando l'Album (es. The Brano: One Best Of ) verranno visualizzate Artista: U2 le tracce contenute all'interno Numb.mp3 dell'album.
- Page 37 Utilizzo Scenari evoluti e schedulati Scenario schedulato ✔ Selezionando questa applicazione, in funzione della configurazione Questo scenario permette di inviare un insieme di comandi in seguito al verificarsi di una o più azioni o ad un’ora stabilita. effettuata dall’installatore e personalizzata alle soluzioni My Home È...
- Page 38 Utilizzo Scenario evoluto Modifica la condizione oraria Per modificare la condizione oraria tocca Questo scenario permette di inviare un comando ad un’ora stabilita e al verificarsi di un’azione. È possibile creare fino a 20 scenari. Per questo scenario le due azioni possibili sono: –...
- Page 39 Utilizzo Modifica la condizione su dispositivo Nel caso sia configurata una "condizione su dispositivo", nella pagina di modifica "condizione oraria" è presente la freccia per accedere ad una delle seguenti pagine: Condizione stato luce Condizione valore dimmer Condizione valore audio Condizione valore temperatura puoi variare lo stato della luce.
- Page 40 Utilizzo Videocitofonia ✔ In funzione dell’impianto e della configurazione effettuata, puoi Quando giunge una chiamata dal posto esterno il display visualizza la seguente pagina. comandare per ogni posto esterno l’apertura della serratura e/o In questo caso, per il posto esterno sono presenti i comandi "Luce l’accensione luce scale.
-
Page 41: Supervisione Impianto 4
Utilizzo Supervisione impianto ✔ Ti permette di visualizzare e comandare i dispositivi STOP&GO (prece- Ogni tipologia di stato avrà un'icona dedicata: dentemente configurati) presenti nel tuo impianto My Home. Tocca l’icona supervisione impianto Il display visualizza la pagina nella quale sono presenti i dispositivi STOP&GO (visibili a seconda dell’installazione effettuata). - Page 42 Utilizzo STOP&GO STOP&GO PLUS STOP&GO STOP&GO PLUS Entrando nella pagina di detta- Entrando nella pagina di detta- STOP&GO STOP&GO PLUS glio del dispositivo STOP&GO glio del dispositivo STOP&GO PLUS è possibile forzare il riarmo è presente l'icona per at- nel caso in cui lo stato dello tivare o disattivare il riarmo STOP&GO presentasse un proble- automatico.
- Page 43 Utilizzo STOP&GO BTest STOP&GO BTest Entrando nella pagina di detta- STOP&GO BTest glio del dispositivo STOP&GO BTest è possibile attivare o di- sattivare la funzione autotest toccando l'icona Se attivata, tramite le icone è possibile impostare la fre- Riarmo Autotest quenza (numero di giorni tra un test e il successivo) di autotest.
- Page 44 Utilizzo...
-
Page 45: Personalizzazione 4
Personalizzazione Setu ■ Svegli ✔ ✔ Orologi ✔ Taratur ✔ Passwor ✔ Version ✔... -
Page 46: Sveglia 4
Personalizzazione Setup Sveglia ✔ ■ Puoi personalizzare alcune funzioni del Touch screen accedendo a Tocca l’icona per attivare o disattivare la sveglia. questa pagina. Sveglia attiva Sveglia disattiva Tocca l’icona Il display visualizza la pagina di setup. SVEGLIA SVEGLIA Tocca per abilitare Tocca per disabilitare Per impostare l’ora di attivazione della sveglia, tocca l’icona SVEGLIA... - Page 47 Personalizzazione Se è configurata la diffusione Si potranno scegliere le condizioni della diffusione sonora all’attiva- zione della sveglia (sorgente, amplificatori, volume). sonora, nell’angolo in basso a Una volta destra è presente l’cona che ti permette di accedere alla pagina di configurazione della Sempre diffusione sonora per la sveglia, in caso di dif fusione sonora...
- Page 48 Personalizzazione Beep Orologio ✔ ✔ Puoi attivare e disattivare il segnale acustico udibile al tocco delle zone. Per accedere alle pagine di impostazione dell’orologio tocca l’icona OROLOGIO SVEGLIA Viene visualizzata la seguente pagina. Utilizza le frecce per impostare BEEP ora, minuti e secondi, ad ogni tocco aumenti o decrementi di una unità, tenendo appoggiato il dito aumenti o decrementi...
-
Page 49: Taratura 4
Personalizzazione Taratura Utilizza le frecce per impostare ✔ giorno, mese e anno, ad ogni Per accedere alla pagina che ti permette di regolare la precisione del tocco aumenti o decrementi di una unità, tenendo appoggiato tocco sul display, tocca il dito aumenti o decrementi velocemente. -
Page 50: Password 5
Personalizzazione Password Sul display viene proposta la pagina per la digitazione della password ✔ (vedi pagina precedente): Se l’utilizzo del Touch screen è protetto da password toccando il display Digita la password esistente; viene visualizzata la seguente pagina. Conferma con Utilizza i tasti numerici per digi- Se la password è... -
Page 51: Versione 5
Versione ✔ Per accedere alla pagina che ti permette di visualizzare le informa- zioni del Touch screen, tocca l’icona dopo 10 secondi ritorna alla pagina Setup. VERSIONE art. H/L 4684 FIRMWARE: 12.40.5 PIC REL: 12.40.5 HARDWARE: 3.0.0 T.S. n. 0... - Page 52 Manutenzione e soluzione ad eventuali problemi Pulizia Hai dimenticato la password Pulire unicamente con un panno soffice. In questo caso puoi risolvere il problema togliendo e ridando l’alimen- Non utilizzare solventi, materiali abrasivi o corrosivi. tazione al Touch screen, dopo l’accensione del display puoi utilizzare le funzioni prima che intervenga il blocco;...
- Page 53 BTicino SpA fornisce la possibilità di inviare o rendere disponibile, su richiesta, ad un costo non superiore rispetto a quello che si sosterrebbe per la distribuzione fisica della fonte, una copia completamente leggibile del corrispondente codice di risorsa della Service_Pack_BTicino.
- Page 55 Index Introduction Customisation The Touch Screen Setup ■ ■ General description Alarm clock ✔ ✔ The Home page Beep ✔ ✔ The functions page Clock ✔ ✔ Navigation arrows Calibration ✔ ✔ The Default page Password ✔ ✔ Version ✔ The applications ■...
- Page 57 Introduction Touch Screen ■ General description ✔ Home page ✔ The functions page ✔ Navigation arrows ✔ The Default page ✔...
-
Page 58: The Touch Screen
Introduction The Touch Screen The Home page ✔ ■ General description There are icons in the Home page which represent the applications ✔ that you can manage as well as the setup icon (always present). When programming, it is possible to enter more information such as the date, The colour Touch Screen is the room control that can enable you to time and temperature (the possibility to enter information depends on achieve a centralised management for all My Home functions in a... - Page 59 Introduction The functions page Navigation arrows ✔ ✔ You can access the functions page by selecting the required application The arrows at the bottom part of the display have the followings from the Home page. functions: All you need to do is touch the icon of a command to switch on a light, pull up your rolling shutter or activate a scenario.
- Page 60 Introduction The Default page ✔ The TiDisplayColorIP configuration software enables you to specify a Default page which will be shown on the display after a period of inactivity of the Touch Screen. Date The installer can choose the Home page or a page included in the applications as the Default page;...
- Page 61 The applications ■ Scenarios ✔ Lighting ✔ Automation ✔ Gate (lighting/video door-entry system) ✔ Load control ✔ Temperature control ✔ Burglar alarm ✔ Sound System ✔ Multi-channel sound system ✔ Multimedia contents ✔ Improved scenarios and schedulers ✔ Video door-entry system ✔...
- Page 62 The applications ■ The Touch Screen enables you to manage the following applications The Setup icon, always present in the Home page, can let you access the of the system: Touch Screen setup page (Alarm clock, Beep, Clock, etc.). Scenarios Burglar alarm Sound Lighting...
- Page 63 Scenario of the Scenario unit Scenarios ✔ Lets you activate scenarios that have been previously stored in one or more “scenario units” and “scenario modules” of your my Home system. NIGHT Touch the scenario icon The display will show the page where you can find the scenarios you can activate.
- Page 64 Creating a new scenario Removing a scenario Touch the icon to remove a scenario Touch the icon to start Touch the icon to end programmed by you a new scenario programming. programming procedure. Touch the icon to return to the menu of the scenarios programmed by you.
- Page 65 Lighting Single light ✔ Lets you switch on, switch off, adjust a single light or group of lights. This control lets you switch a single light on and off. Touch the lighting icon Kitchen light The display will show the page where you can find the lights you can control.
- Page 66 Dimmer Assembly Fixed timed light This control lets you switch on, This control lets you switch on 12:10 switch off and adjust several a light for only one set du- lights simultaneously with a Room lights ration using the configuration dimmer.
- Page 67 Automation ✔ Lets you control shutters, gates, door locks, etc. In order for you to have an immediate identification, different icons have been created according to the actual use of the automation Touch the automation control unit icon control unit. The display will show the page where you can find the automation control units that you can control.
- Page 68 Curtain - Shutter - Gate – Up-and-over Normal Mode The opening or closing movement will start by touching the correspon- These controls allow you to open and close the curtains, shutters, etc. ding icon; during the movement the icon changes showing the Stop with a simple touch of your finger.
- Page 69 Automation assembly Controlled plug This control lets you to activate several automation control units simul- This control, represented by a plug, lets you switch on and off a generic device (a household appliance or any other device). taneously; for example, you could lower or lift all your house shutters Here again, the icon indicates the status of the device controlled.
-
Page 70: Load Control
Watering system Load control ✔ This control lets you switch the watering system on and off. This control allows you to force the priority set for the Energy mana- The icon indicates when the watering system is in operation. gement unit. Touch the Energy Management icon The display will show the page where you can find the loads that you can control. -
Page 71: Temperature Control
Temperature control ✔ This control enables you keep the temperature under control in Touch the Control Unit icon to access a page displaying the Control the whole house and to adjust each zone according to your current Unit status. The same page also shows the icon that gives access needs. - Page 72 Weekly Mode Manual Mode By selecting one of the 3 summer or winter programs (previously set in This can be used to set a constant temperature in all the zones of the the control unit), the system can operate in automatic mode following system.
- Page 73 Timed Mode (only for 4 Zone Control Unit) Holiday Mode It can be used to perform manual mode on all zones for a set period. This is used to select a certain daily profile for a set time. This program runs until the set time and date, after which the current selected weekly program will be restored.
- Page 74 Working Day Mode Scenario Mode (only for 99 Zone Control Unit) This mode can be used to keep the system in Anti-freeze or Thermal If you select one of the 16 summer or the 16 winter scenarios, your sy- protection mode until the set date and time. Once this time has expired, stem can operate in automatic mode following the scenario selected.
- Page 75 OFF Mode Thermal probe The local offset of the probe is the adjustment of the knob placed on the Touch this icon to switch all system zones OFF. probe situated in every zone of your temperature control system. If the probe is set to ❄ (antifrost/thermal protection) or OFF position, no adjustment will be possible from the Touch Screen;...
- Page 76 Zones (with fan-coil function) Zones (99 zone Control Unit) If the probe for the regulation of the fan-coil speed is installed, in If you press the Zone icon, the zone name will be displayed, together addition to displaying the name of the zone and the set and measured with the temperature measured, the temperature setting, if in manual temperature, this page will also enable selecting one of the following mode, the activation of the manual/automatic mode, the display of the...
- Page 77 Zones (4 zone Control Unit) External probes Press the Zone icon to display the zone name, the temperature measu- If the system includes external radio probe, the temperature detected red and set, and the probe status (-3 -2 -1 0 +1 +2 +3). by them may be displayed through the appropriate zone.
- Page 78 Non-controlled zones If the system includes temperature measurement probes only (non- controlled zones), the temperature detected by them can be displayed through the appropriate zone. NON-CONTROLLED ZONES GARAGE 28.5°C...
- Page 79 Burglar alarm Activate/deactivate the zones ✔ This control allows you to control the status of the burglar alarm system When the burglar alarm is disabled, you can deactivate (or reactivate) one or more zones of the system; this will allow you customise the (enabled/disabled) and on single zones.
- Page 80 Enable/disable the burglar alarm What type of alarm occurred? If alarms have occurred while you were out, as soon as you get home Press the icon to change the status of the system: (to enable). you will find a screen similar to the one in the example with the fol- (to disable).
- Page 81 Sound System Music source ✔ You can check your sound system completely. You can choose between the Radio tuner (item F500 coax) and an external source (Aux), for instance a CD unit (controlled with the Stereo Control item L4561N or connected by means of a RCA input item Touch the sound system icon HC/HS/L/N/NT 4560).
- Page 82 Tuning in the radio Amplifier The Touch Screen lets you tune in your sound system radio and store This control lets you switch on / off an amplifier and adjust its volume your favourite channels. using – e +; the volume level is shown graphically on the display. Radio Audio source...
- Page 83 Multi-channel sound system ✔ Example: Example: “General” sub-menu submenu of the Room 1 You can check your multi-channel sound system completely. In this case, the selected source In this case, the selected source Touch the multi-channel sound system icon is the radio. is CD (Aux).
- Page 84 Radio Example: submenu of the Radio Example: submenu of the “Radio” source “CD” source Home amplifiers In this page you can find all the radio tuning controls (for more details, see pag. 82) Radio BT LIVING ROOM Radio Change track Home amplifiers Radio BT Go to the...
- Page 85 Multimedia contents ✔ In addition to the standard sound system sources, the Touch Screen Select the multimedia sound source among the available ones: can also be used to access network multimedia contents, such as IP Radio and Media Server. Touch the sound system or multichannel diffusion system icon In the example the display shows the configured zone (Living room).
- Page 86 Multimedia Sources: IP Radio This page displays the two options for the management of the multi- Select on the display to load a new page that can be used to control media sources using the Ethernet network. the IP Radios through the player. Name of the radio Multimedia IP Radio...
- Page 87 Multimedia Sources: Media Server Music IP Radio When a PC is selected (e.g. Pc3: BTicino), the display will show a Servers new page with all folders (Ima- Album ges, Music, Playlist and Video) of the player preset for listening to music.
- Page 88 The Best Of Current track details Select an artist (e.g. U2) to display all the CD of the selected artist. Select the Album (e.g. The Best Beautiful Day.mp3 Of ), to display all the tracks in Track: One the CD. Artist: U2 Numb.mp3 Album: The Best Of...
- Page 89 Improved scenarios and schedulers Scheduled scenario ✔ When you select this application – depending on the configuration This scenario allows you to send a series of commands after one or more actions have occurred or at a predetermined time. made by the installer and customised according to the MY HOME It is possible to manage up to 20 of the 300 scenarios configured in the solutions in your system –...
- Page 90 Improved scenario Change hour condition To change the hour condition, touch This scenario allows you to send a command at a predetermined time or after an action has occurred. It is possible to create up to 20 scenarios. For this scenario, the two possible actions are: - Enable/Disable scenario A command that allows you to enable/disable the scenario without Improved scenario...
- Page 91 Change the condition on device If a “condition on device” is configured, there is an arrow in the “hour condition” edit page used for accessing one of the following pages: Light status condition Dimmer value condition Audio value condition Temperature value condition you can change the status of you can change the dimming you can change the audio value...
- Page 92 Video door-entry system ✔ Depending on the type of system and configuration, you can control When there is a call from the entrance panel, the following page will be displayed. the door lock opening and/or the staircase light activation for each In this case, the entrance panel will have “Staircase light”...
- Page 93 Systems supervision ✔ This can be used to display and control the STOP&GO devices (previou- Each type of status will have its own dedicated icon: sly configured) installed in the My Home system. Touch the system supervision icon The display shows the page of the STOP&GO devices (visible depending on the type of installation).
- Page 94 STOP&GO STOP&GO PLUS STOP&GO STOP&GO PLUS The detail page of the STOP&GO Enter the detail page of the STOP&GO STOP&GO PLUS STOP&GO PLUS device to for- device contains the icon. ce the reset, if any problems This can be used to enable or are shown by the status of the disable automatic reset.
- Page 95 STOP&GO BTest STOP&GO BTest Enter the STOP&GO BTest details STOP&GO BTest page to enable or disable the self-test function, by touching icon. If activated, use the icons to set the self-test interval (number of days between tests). Reset Self-test...
- Page 97 Customisation Setu ■ Alarm clock ✔ Beep ✔ Clock ✔ Calibration ✔ Passwor ✔ Versio ✔...
-
Page 98: Alarm Clock
Customisation Setup Alarm clock ✔ ■ You can customise some functions of the Touch Screen by accessing Touch the icon to enable or disable the alarm clock. this page. Alarm clock activated Alarm clock deactivated Touch the icon The setup page will be displayed. ALARM ALARM CLOCK... - Page 99 Customisation If the sound system is configured, You will be able to choose the conditions of the sound system as soon as the alarm clock (source, amplifiers, volume) is activated. the icon at the bottom right Once corner, will let you access the configuration page of the sound system for the alarm clock;...
- Page 100 Customisation Beep Clock ✔ ✔ You can enable and disable the audible signal when zones are touched. Touch the icon to access the setup pages of the clock. CLOCK ALARM The following page will be displayed: CLOCK Use the arrows to set the hour, BEEP minutes and seconds;...
- Page 101 Customisation Calibration Use the arrows to set the day, ✔ month and year; every touch will To access the page which allows you to adjust the touch accuracy of allow you to increase or decrease by one unit; when you press your the display, touch the icon.
- Page 102 Customisation Password The display will show the page for typing in the password (see pre- ✔ vious page): If the Touch Screen is protected with a password, the following page Type in the existing password; will appear when the display is touched. Confirm with Use the numeric keys to enter the If the password is correct, you...
- Page 103 ✔ To access the page which allows you to display the Touch Screen information, touch the icon, after 10 seconds go back to the Setup page. VERSION art. H/L 4684 FIRMWARE: 12.40.5 PIC REL: 12.40.5 HARDWARE: 3.0.0 T.S. n. 0...
- Page 104 Maintenance and Troubleshooting Cleaning Forgot your password? Clean only with a soft cloth. In this case you can solve the problem by disconnecting and reconnec- Do not use solvents or abrasive/corrosive materials. ting the Touch Screen; after switching on the display, you can use the functions before the stopping process starts.
-
Page 105: English
A fully readable copy of the corresponding Service_Pack_BTicino resource code can be made available, or can be sent by BTicino SpA, at a cost not exceeding the cost of the physical distribution of the source. Please request the above by sending an e-mail in English language to the following address: admin-myopen@myopen-bticino.it... - Page 108 Timbro Installatore Installer stamp BTicino SpA Via Messina, 38 20154 Milano - Italy www.bticino.it Servizio Clienti...
Need help?
Do you have a question about the H/L 4684 and is the answer not in the manual?
Questions and answers
si può sostituire il vetro rotto del touch e mal funzionante