Table of Contents
Advertisement
Quick Links
Advertisement
Table of Contents

Subscribe to Our Youtube Channel
Related Manuals for Bticino H/L 4684


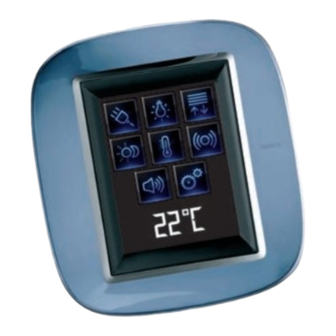
Summary of Contents for Bticino H/L 4684
- Page 1 H/L 4684 - AM 5864 Colour Touch Screen User guide 01/11-01 PC...
-
Page 3: Table Of Contents
Colour Touch Screen 1 Introduction 3 Customisation 1.1 The Touch Screen 3.1 Setup 1.1.1 General description 3.1.1 Alarm clock 1.1.2 The Home page 3.1.2 Beep 1.1.3 The functions page 3.1.3 Clock 1.1.4 Navigation arrows 3.1.4 Display 1.1.5 The Default page 3.1.5 Password 2 Use 3.1.6 Version... - Page 5 Colour Touch screen Introduction Descrizione The Touch Screen...
-
Page 6: Introduction
1 Introduction The Touch Screen 1.1.2 The Home page 1.1.1 General description There are icons in the Home page which represent the applications that you can manage as well as the setup icon (always present). When The colour Touch Screen is the room control that can enable you to programming, it is possible to enter more information such as the date, achieve a centralised management for all My Home functions in a simple time and temperature (the possibility to enter information depends on... -
Page 7: The Functions Page
Colour Touch Screen 1.1.3 The functions page 1.1.4 Navigation arrows You can access the functions page by selecting the required application The arrows at the bottom part of the display have the followings from the Home page. functions: All you need to do is touch the icon of a command to switch on a light, pull up your rolling shutter or activate a scenario. -
Page 8: The Default Page
1 Introduction 1.1.5 The Default page The TiDisplayColorIP configuration software enables you to specify a Default page which will be shown on the display after a period of inactivity of the Touch Screen. Date The installer can choose the Home page or a page included in the appli- cations as the Default page;... - Page 9 Colour Touch screen Descrizione The applications...
-
Page 10: Use
2 Use The applications The Touch Screen enables you to manage the following applications The Setup icon, always present in the Home page, can let you access the of the system: Touch Screen setup page (Alarm clock, Beep, Clock, etc.). Temperature control Scenarios 99 zones + Air condi-... -
Page 11: Lighting
Colour Touch Screen Single light 2.1.1 Lighting Lets you switch on, switch off, adjust a single light or group of lights. This control lets you switch a single light on and off. Touch the lighting icon Kitchen light The display will show the page where you can find the lights you can control. - Page 12 2 Use Dimmer Assembly Fixed timed light This control lets you switch on, This control lets you switch on 12:10 switch off and adjust several a light for only one set lights simultaneously with a durationusing the configura- Room lights Fixed timing disabled dimmer.
-
Page 13: Automation
Colour Touch Screen 2.1.2 Automation Lets you control shutters, gates, door locks, etc. In order for you to have an immediate identification, different icons have been created according to the actual use of the automation control unit. Touch the automation control unit icon The display will show the page where you can find the automation control units that you can control. -
Page 14: Gate (Lighting / Video Door-Entry System)
2 Use Curtain - Shutter - Gate – Up-and-over Normal Mode The opening or closing movement will start by touching the corre- These controls allow you to open and close the curtains, shutters, etc. sponding icon; during the movement the icon changes showing the with a simple touch of your finger. - Page 15 Colour Touch Screen Automation assembly Controlled plug This control, represented by a plug, lets you switch on and off a generic This control can be used to activate several automations at the same time. device (a household appliance or any other device). For example, with a single touch it would be possible to lower or rise all Here again, the icon indicates the status of the device controlled.
- Page 16 2 Use Watering system This control lets you switch the watering system on and off. The icon indicates when the watering system is in operation. touch to switch on touch to switch off...
-
Page 17: Scenarios
Colour Touch Screen Scenario of the Scenario unit 2.1.4 Scenarios Lets you activate scenarios that have been previously stored in one or more “scenario units” and “scenario modules” of your my Home system. Touch the scenario icon NIGHT The display will show the page where you can find the scenarios you can activate. - Page 18 2 Use Creating a new scenario Removing a scenario Touch the icon to remove a sce- Touch the icon to start Touch the icon to end nario programmed by you a new scenario programming. programming procedure. Touch the icon to return to the menu of the scenarios programmed by you.
-
Page 19: Improved Scenarios And Schedulers
Colour Touch Screen Scheduled scenario 2.1.5 Improved scenarios and schedulers When you select this application – depending on the configuration made This scenario allows you to send a series of commands after one or more by the installer and customised according to the MY HOME solutions in actions have occurred or at a predetermined time. - Page 20 2 Use Improved scenario Change hour condition To change the hour condition, touch This scenario allows you to send a command at a predetermined time or after an action has occurred. It is possible to create up to 20 scenarios. For this scenario, the two possible actions are: - Enable/Disable scenario A command that allows you to enable/disable the scenario without oper-...
- Page 21 Colour Touch Screen Change the condition on device If a “condition on device” is configured, there is an arrow in the “hour con- dition” edit page used for accessing one of the following pages: Light status condition Dimmer value condition Audio value condition Temperature value condition you can change the status of the...
-
Page 22: Temperature Control + Air Conditioning
2 Use 2.1.6 Temperature control + Air conditioning This control enables monitoring the temperature of the whole house, Touch the Control Unit icon to access a page displaying the Control Unit adjusting it according to the zone, based on actual requirements. In addi- status. - Page 23 Colour Touch Screen Weekly Mode Manual Mode By selecting one of the 3 summer or winter programs (previously set in This can be used to set a constant temperature in all the zones of the the control unit), the system can operate in automatic mode following system.
- Page 24 2 Use Timed Mode (only for 4 Zone Control Unit) Holiday Mode It can be used to perform manual mode on all zones for a set period. This is used to select a certain daily profile for a set time. This program runs until the set time and date, after which the current selected weekly program will be restored.
- Page 25 Colour Touch Screen Working Day Mode Scenario Mode (only for 99 Zone Control Unit) This mode can be used to keep the system in Anti-freeze or Thermal If you select one of the 16 summer or the 16 winter scenarios, your system protection mode until the set date and time.
- Page 26 2 Use OFF Mode Thermal probe The local offset of the probe is the adjustment of the knob placed on the Touch this icon to switch all system zones OFF. probe situated in every zone of your temperature control system. If the probe is set to ❄...
- Page 27 Colour Touch Screen Zones (with fan-coil function) Zones (99 zone Control Unit) If the probe for the regulation of the fan-coil speed is installed, in addi- If you press the Zone icon, the zone name will be displayed, together with tion to displaying the name of the zone and the set and measured tem- the temperature measured, the temperature setting, if in manual mode, perature, this page will also enable selecting one of the following speeds:...
- Page 28 2 Use Zones (4 zone Control Unit) External probes Press the Zone icon to display the zone name, the temperature measured If the system includes external radio probe, the temperature detected by and set, and the probe status (-3 -2 -1 0 +1 +2 +3). them may be displayed through the appropriate zone.
- Page 29 Colour Touch Screen Non-controlled zones Air conditioning If the system includes temperature measurement probes only (non- Touch the “Air Conditioning” icon to access a page where it will be controlled zones), the temperature detected by them can be displayed possible to display all the objects (splitters) previously connected and through the appropriate zone.
- Page 30 2 Use Advanced mode 23.5°C 23.5°C LIVING ROOM LIVING ROOM Send the Cold Control Switch the Cold Dehumidify control on Dehumidify Return to the previous page Switch the splitter off Return to the previous page Switch the splitter off...
- Page 31 Colour Touch Screen With the advanced mode, the splitter can be managed in the same way as with a remote control. Touch the icon to manually manage the splitter. Touch the icon to scroll through the various splitter operating modes Automatic (automatic, cooling, heating, dehu- midifier, ventilation).
-
Page 32: Burglar Alarm
2 Use 2.1.7 Burglar alarm Activate/deactivate the zones This control allows you to control the status of the burglar alarm system When the burglar alarm is disabled, you can deactivate (or reactivate) one or more zones of the system; this will allow you customise the operation (enabled/disabled) and on single zones. - Page 33 Colour Touch Screen Enable/disable the burglar alarm What type of alarm occurred? If alarms have occurred while you were out, as soon as you get home Press the icon to change the status of the system (to enable). you will find a screen similar to the one in the example with the fol- (to disable).
-
Page 34: Sound System
2 Use 2.1.8 Sound System Music source You can check your sound system completely. You can choose between the Radio tuner and an external source (Aux), for instance a CD unit controlled with the Stereo Control or connected by Touch the sound system icon means of a RCA input. - Page 35 Colour Touch Screen Tuning in the radio Amplifier The Touch Screen lets you tune in your sound system radio and store This control lets you switch on / off an amplifier and adjust its volume your favourite channels. using – e +; the volume level is shown graphically on the display. Radio Audio source...
- Page 36 2 Use Power amplifier This control can be used to switch on/off, and manage, the new power The following page will appear: amplifier. Radio Normal Treble Living room Bass Power Amplifier Equalizer Touch the icons to select the equalization curve: ON/OFF icon, to Open the power switch the power...
-
Page 37: Multi-Channel Sound System
Colour Touch Screen Bass adjustment 2.1.9 Multi-channel sound system Touch the icons to adjust the bass level between -10 and +10: You can check your multi-channel sound system completely. Touch the multi-channel sound system icon In the example, two configured rooms are displayed (Living room and Bedroom) as well as the assembly of all the amplifiers (General). - Page 38 2 Use Example: Example: Radio “General” sub-menu submenu of the Room 1 In this case, the selected source is In this case, the selected source is the radio. CD (Aux). Radio Example: submenu Radio “Radio” source Home amplifiers In this page you can find all the radio tuning controls (for more details, see pag.
-
Page 39: Multimedia Contents
Colour Touch Screen 2.1.10 Multimedia contents In addition to the standard sound system sources, the Touch Screen can also be used to access network multimedia contents, such as IP Radio and Media Server. Touch the sound system or multichannel diffusion system icon In the example the display shows the configured zone (Living room). - Page 40 2 Use Multimedia Sources: IP Radio Select the multimedia sound source among the available ones: This page displays the two options for the management of the multime- dia sources using the Ethernet network. Multimedia Multimedia IP Radio Living room Servers Radio BT 1 Radio BT 2 The following functions are included in the top part of the submenu:...
- Page 41 IP Radios through the player. IP Radio Name of the radio Servers Radio BT 3 Go to the Stop previous radio Pc1: BTicino Play Go to the following Pc2: BTicino radio Pc3: BTicino Select Servers from the display to display a new page showing...
- Page 42 Music The Best Of When a PC is selected (e.g. Pc3: Select an artist (e.g. U2) to display BTicino), the display will show a all the CD of the selected artist. Album Beautiful Day.mp3 new page with all folders (Images, Select the Album (e.g.
- Page 43 Colour Touch Screen Current track details Track: One Artist: U2 Album: The Best Of Time: 01:16 of 04:35 Go to the Stop previous track Play Go to the following track Return to the Return to the main page previous page of the sound system...
-
Page 44: Video Door-Entry System
2 Use 2.1.11 Video door-entry system Depending on the type of system and configuration, you can control When there is a call from the entrance panel, the following page will be displayed. the door lock opening and/or the staircase light activation for each In this case, the entrance panel will have “Staircase light”... -
Page 45: Energy Management
Colour Touch Screen 2.1.12 Energy management Load management (with load management central unit installed) The load management central unit provides control of the power engaged, preventing the power meter from cutting the power off, by excluding the Oven loads based on the priorities set by the installer. Touch the Load control icon. - Page 46 2 Use Load management (without load management central unit) If no load management central unit is installed on the system, this applica- tion enables checking the current load consumptions. Touch the Load management icon Oven Access the load information Oven page to display the current con- sumption.
- Page 47 Colour Touch Screen Systems supervision This can be used to display and control STOP&GO devices (previously con- Each type of status will have its own dedicated icon: figured) and to check the My Home system loads for correct operation. Touch the system supervision icon The display shows the page of the STOP&GO devices (visible depending on the type of installation).
- Page 48 2 Use STOP&GO STOP&GO PLUS STOP&GO STOP&GO PLUS The detail page of the STOP&GO Enter the detail page of the STOP&GO STOP&GO PLUS device contains the icon. This STOP&GO PLUS device to force the can be used to enable or disable reset, if any problems are shown automatic reset.
- Page 49 Colour Touch Screen STOP&GO BTest Load Diagnostic The “Load diagnostic” function can be used to check that the loads are working correctly, through the measurement of the earth leakage current consumed by the same. STOP&GO BTest Load diagnostic Enter the STOP&GO BTest details STOP&GO BTest page to enable or disable the self-test function, by touching...
- Page 50 2 Use Consumption/Production Display It can be used to monitor home energy consumption levels. Touch the icons to scroll through the energy manage- ment page. Touch the Consumption/Production Display icon The following control functions are included: The display shows the page of the monitored consumptions. Electricity consumption/production control.
- Page 51 Colour Touch Screen Electricity Days The daily information display is split into: Touch the icon to display the electricity consumption or production information: Current day Previous days cycle between days/months/ ELECTRICITY ELECTRICITY ELECTRICITY last 12 months Scroll days/ 30.09.09 30.09.09 29.09.09 months Graphic display...
- Page 52 2 Use Touch the icon to display the consumption information in graphic Touch the icon to display the consumption information in table format. format. ELECTRICITY 30.09.09 30.09.09 Hours 0,425 kWh/hours 0,350 2,40 0,200 0,180 0,150 1,20 0,200 0,400 0,435...
- Page 53 Colour Touch Screen Months Last 12 months Touch the icon to switch from “day” view to “month” view: Touch the icon to switch from “month” view to “last 12 months” view: ELECTRICITY ELECTRICITY Graphic display of 08.09 Last 12 months daily consump- tions for the month...
- Page 54 2 Use...
- Page 55 Colour Touch screen Customisation Descrizione Setup...
-
Page 56: Customisation
3 Customisation Setup 3.1.1 Alarm clock You can customise some functions of the Touch Screen by accessing Touch the icon to enable or disable the alarm clock. this page. Touch the icon Alarm clock activated Alarm clock deactivated The setup page will be displayed. ALARM CLOCK ALARM CLOCK Touch to enable... - Page 57 Colour Touch Screen You will be able to choose the conditions of the sound system as soon as Touch the corresponding the alarm clock (source, amplifiers, volume) is activated. icon to set the alarm clock to only once once, always, Mon-Frid, Sat-Sun. If the sound system is config- always ured, the icon...
-
Page 58: Beep
3 Customisation 3.1.2 Beep 3.1.3 Clock You can enable and disable the audible signal when zones are touched. Touch the icon to access the setup pages of the clock. CLOCK ALARM CLOCK The following page will be displayed: Use the arrows to set the hour, BEEP minutes and seconds;... -
Page 59: Display
Colour Touch Screen 3.1.4 Display Use the arrows to set the day, month and year; every touch will Touch to access the display control page. allow you to increase or decrease by one unit; when you press your The following page will appear: finger, increasing or decreasing will be faster. - Page 60 3 Customisation Screen cleaning Only clean using a soft cloth. Touch the icon. The screen is deactivated for a certain amount of Do not use solvents, abrasive, or corrosive materials. time that can be set by the user using the software. The display shows the following page: Do not use solvents or corrosive products...
- Page 61 Colour Touch Screen Calibration Brightness To access the page which allows you to adjust the touch accuracy of To select the Screensaver mode brightness level touch the icon. the display, touch the icon. BRIGHTNESS CALIBRATION The following page will be displayed: The display shows the brightness level selection screen.
- Page 62 Touch the icon to display the Touch Screen network card setup page: function: SCREEN SAVER NETWORK The following page will appear: The following page will appear: H/L 4684 No screensaver. Touch Screen 0 Line. 00:03:50:00:18:c7 169.254.253.4 Balls. Subnet mask 255.255.0.0...
- Page 63 Colour Touch Screen 3.1.5 Password The display will show the page for typing in the password (see previ- ous page): If the Touch Screen is protected with a password, the following page will Type in the existing password; appear when the display is touched. Confirm with Use the numeric keys to enter the If the password is correct, you...
-
Page 64: Version
VERSION No reaction pressure In this case you can solve the problem by disconnecting and reconnect- ing the Touch Screen. Hold down and repeat the calibration procedure. art. H/L 4684 FIRMWARE: 5.0.2 PIC REL: 12.40.5 HARDWARE: 3.0.3 T.S. n. 0 Please note: the use of radio devices will not guarantee the correct indication of the Touch Screen status. - Page 65 A fully readable copy of the corresponding Service_Pack_BTicino resource code can be made available, or can be sent by BTicino SpA, at a cost not exceeding the cost of the physical distribution of the source. Please request the above by sending an e-mail in English language to the following address: admin-myopen@myopen-bticino.it...
- Page 66 BTicino SpA Via Messina, 38 20154 Milano - Italy www.bticino.com BTicino SpA reserves at any time the right to modify the contents of this booklet and to comunicate in any form and modality, the charges brought to the same.
Need help?
Do you have a question about the H/L 4684 and is the answer not in the manual?
Questions and answers