Table of Contents
Advertisement
Quick Links
INSTALLER: LEAVE THIS MANUAL WITH THE APPLIANCE.
CONSUMER: RETAIN THIS MANUAL FOR FUTURE REFERENCE.
NEVER LEAVE CHILDREN OR OTHER AT RISK INDIVIDUALS ALONE WITH THE APPLIANCE.
CERTIFIED UNDER: ANSI Z21.60 / CSA 2.26 DECORATIVE GAS APPLIANCES FOR INSTALLATION IN SOLID-FUEL BURNING APPLIANCES
GL22N, GL28N, GL32N
NATURAL GAS
GL22P, GL28P, GL32P
PROPANE
CERTIFIED FOR CANADA AND UNITED STATES USING ANSI/CSA METHODS.
SAFETY INFORMATION
WARNING
!
If the information in these instructions are
not followed exactly, a fi re or explosion
may result causing property damage,
personal injury or loss of life.
- Do not store or use gasoline or other fl ammable
vapors and liquids in the vicinity of this or any
other appliance.
- WHAT TO DO IF YOU SMELL GAS:
•
Do not try to light any appliance.
•
Do not touch any electrical switch; do
not use any phone in your building.
•
Immediately call your gas supplier from
a neighbour's phone. Follow the gas
supplier's instructions.
•
If you cannot reach your gas supplier,
call the fi re department.
- Installation and service must be performed by a
qualifi ed installer, service agency or the supplier.
This appliance may be installed in an aftermarket,
permanently located, manufactured home (USA
only) or mobile home, where not prohibited by
local codes.
This appliance is only for use with the type of gas
indicated on the rating plate.
Phone (705)721-1212 • Fax (705)722-6031 • www.napoleonfi replaces.com • ask@napoleonproducts.com
$10.00
OPERATING INSTRUCTIONS
Wolf Steel Ltd., 24 Napoleon Rd., Barrie, ON, L4M 0G8 Canada /
103 Miller Drive, Crittenden, Kentucky, USA, 41030
INSTALLATION AND
GL28
GL22
GL32
C E R T I F I E D
1.37
W415-1101 / A / 07.24.12
1
Advertisement
Table of Contents

Subscribe to Our Youtube Channel
Related Manuals for Napoleon GL22N


Summary of Contents for Napoleon GL22N
-
Page 1: Safety Information
This appliance is only for use with the type of gas indicated on the rating plate. Wolf Steel Ltd., 24 Napoleon Rd., Barrie, ON, L4M 0G8 Canada / 103 Miller Drive, Crittenden, Kentucky, USA, 41030 Phone (705)721-1212 • Fax (705)722-6031 • www.napoleonfi replaces.com • ask@napoleonproducts.com $10.00... -
Page 2: Table Of Contents
TABLE OF CONTENTS INSTALLATION OVERVIEW INTRODUCTION GENERAL INSTRUCTIONS GENERAL INFORMATION MINIMUM HEARTH SIZE RATING PLATE INSTALLATION BATTERY INSTALLATION GAS PIPING AND BURNER PLACEMENT DAMPER STOP INSTALLATION FINISHING SAND OR GLASS MEDIA PLACEMENT GRATE INSTALLATION CHARCOAL LUMPS/EMBERS LOG PLACEMENT 4.4.1 GL22 4.4.2 GL28 4.4.3... -
Page 3: Introduction
2.0 INTRODUCTION WARNING • THIS APPLIANCE IS HOT WHEN OPERATED AND CAN CAUSE SEVERE BURNS IF CONTACTED. • ANY CHANGES OR ALTERATIONS TO THIS APPLIANCE OR IT’S CONTROLS CAN BE DANGEROUS AND IS PROHIBITED. • Do not operate appliance before reading and understanding operating instructions. Failure to operate appliance according to operating instructions could cause fi... -
Page 4: General Instructions
GENERAL INSTRUCTIONS WARNING ALWAYS LIGHT THE PILOT WHETHER FOR THE FIRST TIME OR IF THE GAS SUPPLY HAS RUN OUT, WITH THE GLASS DOOR OPENED OR REMOVED. PROVIDE ADEQUATE CLEARANCE FOR SERVICING AND OPERATING THE APPLIANCE. PROVIDE ADEQUATE VENTILATION. NEVER OBSTRUCT THE FRONT OPENING OF THE APPLIANCE. OBJECTS PLACED IN FRONT OF THE APPLIANCE MUST BE KEPT A MINIMUM OF 48”... -
Page 5: General Information
14” D’INSTRUCTIONS WOLF STEEL LTD. 14” GL28 20” 20” 29” 24 NAPOLEON ROAD, BARRIE. ONTARIO L4M 0G8 CANADA 14” 22” GL32 22” 33” SERIAL NUMBER/NO. DE SERIE: W385-0677 A THE RATING PLATE IS CHAINED TO THE LEG OF THE VALVE CASE AND SHOULD BE TUCKED UNDER THE VALVE HOUSING. -
Page 6: Installation
3.0 INSTALLATION WARNING THIS APPLIANCE MUST BE INSTALLED IN A SOLID-FUEL BURNING FIREPLACE WITH A WORKING FLUE AND CONSTRUCTED OF NON-COMBUSTIBLE MATERIAL. The appliance and gas logs function as a system. If the appliance is not drafting properly and spilling into the room (check with a match or a smoke stick), reposition the damper clamp until a positive draft is obtained by opening the damper. -
Page 7: Damper Stop Installation
Check gas connections with a gas detection device to test for leaks in the system. Soapy water mixture can also be used to check for leaks. Once all the gas connections are tested for leaks, start the appliance. Follow the lighting instructions to ensure the appliance is working properly before fi... -
Page 8: Finishing
FINISHING SAND OR GLASS MEDIA PLACEMENT Using sand for natural gas models (GL22N, GL28N, GL32N) or glass for propane models (GL22P, GL28P, GL32P), spread the media evenly over the burner pan with a gradual downward slope toward the front of the burner pan. -
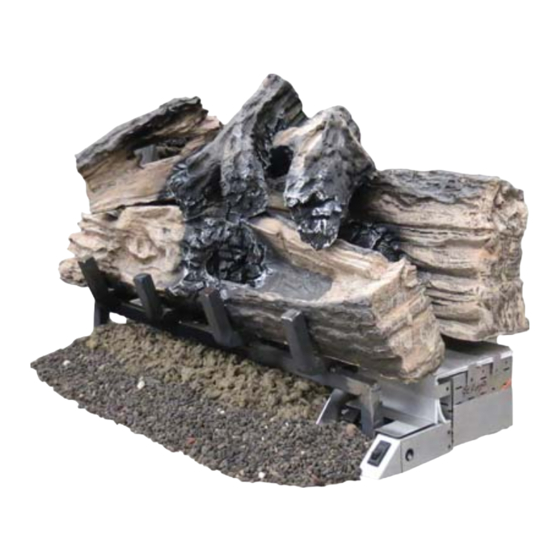
Page 9: Log Placement
76.1A Phazer logs, exclusive to Napoleon Appliances, provide a unique and realistic glowing effect that is different in every installation. Failure to follow these log placement instructions may increase sooting. Log colours may vary. During the initial use of the appliance, the colours will become more uniform as colour pigments burn in during the heat activated curing process. -
Page 10: Gl28
4.4.2 GL28 Place log (#1) onto the two pins and Place log (#2) directly onto the grate Place log (#3) onto the grate and ensure the log is pushed fl ush against and ensure it is pulled to the front left ensure it is pulled to the front right the burner support, to the rear of the side of the grate. -
Page 11: Optional Remote Installation (Not Supplied)
MOBILE HOME INSTALLATION This appliance is also certifi ed to be installed as an OEM (Original Equipment Manufacturer) installation in a manufactured home (U.S. only) or mobile home and must be installed in accordance with the manufacturer’s instructions and the Manufactured Home Construction and Safety Standard, Title 24 CFR, Part 3280, in the United States or the Mobile Home Standard, CAN/CSA Z240 MH Series, in Canada. -
Page 12: Wiring Diagram
WIRING DIAGRAM WARNING DO NOT WIRE 110 VOLTS TO THE VALVE OR WALL SWITCH. This appliance comes equipped with a battery pack. Install four AA batteries into the holder and connect to the wire harness. Connect the battery holder to the wire harness before using the appliance. It must be connected to the 6 volt battery pack (supplied). -
Page 13: Operation
6.0 OPERATION If the fi replace is equipped with decorative glass doors, they must be fully opened when operating this gas log set. Keep burner and control compartment clean. OPERATING AND LIGHTING INSTRUCTIONS WARNING IF YOU DO NOT FOLLOW THESE INSTRUCTIONS EXACTLY, A FIRE OR EXPLOSION MAY RESULT CAUSING PROPERTY DAMAGE, PERSONAL INJURY OR LOSS OF LIFE. -
Page 14: Adjustments
ADJUSTMENTS PILOT BURNER ADJUSTMENT Adjust the pilot screw to provide properly sized fl ame. Turn in a clockwise direction to reduce the gas fl ow. Check Pressure Readings: Inlet pressure can be checked by turning screw (A) counter- clockwise 2 or 3 turns and then placing pressure gauge tubing over the test point. -
Page 15: Maintenance
8.0 MAINTENANCE MAINTENANCE MAINTENANCE WARNING MAINTENANCE TURN OFF THE GAS AND REMOVE BATTERIES BEFORE SERVICING THE APPLIANCE. APPLIANCE MAY BE HOT, DO NOT SERVICE UNTIL APPLIANCE HAS COOLED. DO NOT USE ABRASIVE CLEANERS. CAUTION: Label all wires prior to disconnection when servicing controls. Wiring errors can cause improper and dangerous operation. - Page 16 COMPONENTS REF NO. PART NO. DESCRIPTION GL-681 LOG SET GL22 GL-682 LOG SET, GL28 GL-683 LOG SET GL32 W010-1866 PILOT ASSEMBLY (LP 2-WAY) W010-1865 PILOT ASSEMBLY (NG 2-WAY) W010-2832 GRATE ASSEMBLY (GL32) W010-2838 BURNER PAN ASSEMBLY (GL32) W010-2851 DAMPER STOP ASSEMBLY (GL22/28/32) W190-0029 CONTROL, IPI IGNITION BOARD W445-0021...
- Page 17 W415-1101 / A / 07.24.12...
-
Page 18: Troubleshooting
10.0 TROUBLESHOOTING MAINTENANCE MAINTENANCE WARNING MAINTENANCE TURN OFF THE GAS AND ELECTRICAL POWER BEFORE SERVICING THE APPLIANCE. APPLIANCE MAY BE HOT, DO NOT SERVICE UNTIL APPLIANCE HAS COOLED. DO NOT USE ABRASIVE CLEANERS. SYMPTOM PROBLEM TEST SOLUTION Pilot will not light. Battery. - Page 19 SYMPTOM PROBLEM TEST SOLUTION Carbon is being Air shutter has become Ensure air shutter opening is free of lint or other deposited on blocked. obstructions. glass, logs, Flame is impinging on the Check that the glass, logs, rocks or media are rocks, media glass, logs, rocks, media correctly positioned and remove them from direct...
-
Page 20: Warranty
All parts replaced under the President’s Limited Lifetime Warranty Policy are subject to a single claim. During the fi rst 10 years NAPOLEON® will replace or repair the defective parts covered by the lifetime warranty at our discretion free of charge. From 10 years to life, NAPOLEON® will provide replacement parts at 50% of the current retail price. -
Page 21: Service History
12.0 SERVICE HISTORY 43.1 W415-1101 / A / 07.24.12... - Page 22 13.0 NOTES 44.1 W415-1101 / A / 07.24.12...
- Page 23 44.1 W415-1101 / A / 07.24.12...
- Page 24 W415-1101 / A / 07.24.12...
Need help?
Do you have a question about the GL22N and is the answer not in the manual?
Questions and answers
Please provide me with specificactions about size of ventilation to outside requires the GL32 propane would require. High of the tube chimney and diameter of tube. Size of the space of the fireplace.
For the Napoleon GL22N propane fireplace:
- Ventilation size requirement (chimney height): Minimum chimney height is 56.62 inches, measured from the hearth to the top of the chimney.
- Tube diameter: NOT SPECIFIED.
- Ventilation opening: The fireplace chimney must have a permanent vent opening to the atmosphere.
Tube diameter is not provided in the context.
This answer is automatically generated