IKEA SY Manual
Hide thumbs
Also See for SY:
- Instruction manual (84 pages) ,
- User manual (10 pages) ,
- Instruction manual (84 pages)
Table of Contents
Advertisement
Available languages
Available languages
Advertisement
Chapters
Table of Contents

Subscribe to Our Youtube Channel
Related Manuals for IKEA SY


Summary of Contents for IKEA SY
- Page 1 E F G Design and Quality IKEA of Sweden...
- Page 3 ENGLISH 中文 繁中 日本語...
-
Page 4: Table Of Contents
ENGLISH CONTENTS Warning/Safety Safety Precautions ......................................................For safe operation ......................................................To extend the service life of your sewing machine ........................................... Repair or adjustment ......................................................Parts of the sewing machine ..................................................Sewing machine accessories ..................................................Key to symbols on the sewing machine ............................................... Preparations Get started .......................................................... -
Page 5: Warning/Safety
ENGLISH WARNING/SAFETY Thank you for choosing our product. • Do not drop or insert any object into any opening in the sewing machine. This sewing machine is one of the latest household sewing machines and • Do not use the sewing machine outdoors. has many advanced features. -
Page 6: For Safe Operation
ENGLISH For safe operation: Repair or adjustment • Never look away from the needle while sewing. And do not touch the In the event a repair or adjustment is needed, please consult the hand wheel, take-up lever, needle or other moving parts. troubleshooting guide in the back of the manual. -
Page 7: Parts Of The Sewing Machine
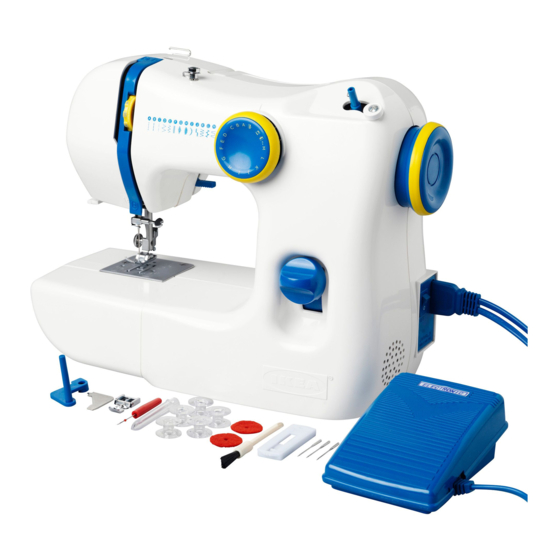
ENGLISH PARTS OF THE SEWING MACHINE Front Back E F G 1. Accessories compartment 9. Spool pin 17. Needle 2. Bobbin case 10. Handle 18. Thread guide 3. Tension control 11. Bobbin winder 19. Needle holder screw 4. Take up lever 12. -
Page 8: Sewing Machine Accessories
ENGLISH SEWING MACHINE ACCESSORIES Presser foot Spool pin Bobbins (comes installed on the Additional spool pin to Wind bobbin thread machine) be placed on top of the onto these bobbins. Used when you sew existing one. straight stitch, zigzag stitch, decorative stitch and blind stitch (see page 15, 16, 17 and 18). -
Page 9: Key To Symbols On The Sewing Machine
ENGLISH KEY TO SYMBOLS Thread tension Decorative stitch See page 23 for how to adjust the thread G, H, I, J. See page 17 for how to sew decorative tension. stitch. Reverse button By pressing and holding this button and then pressing the foot control you can sew backwards to secure the thread at a seam end. -
Page 10: Preparations Get Started
ENGLISH PREPARATIONS Get started Connecting the machine to the power supply Make sure that the voltage and frequency of the sewing machine are the same as in your main power supply before you plug in the machine. The voltage and the frequency are shown on the label on the bottom of the sewing machine. -
Page 11: Wind Bobbin Thread
ENGLISH Wind bobbin thread 1. Pull out the hand wheel. 2. Unwind some of the thread and feed it through the top thread guide and round the bobbin winding thread guide. 3. Feed the thread through one of the holes in the bobbin, from the inside to the outside, and then put the bobbin onto the bobbin winder. -
Page 12: Install The Bobbin
ENGLISH Install the bobbin 1. Remove the accessories compartment by pulling it leftwards. Then open the bobbin case by pushing down the latch on the left on the cover. Pull out the little latch on the bobbin case and pull the bobbin case straight out of the machine. -
Page 13: Thread The Top Thread And Needle
ENGLISH Thread the top thread and needle 1. Start by moving the take up lever to its highest position by turning the hand wheel towards you. Also lift up the presser foot. E F G 2. Place the spool of sewing thread onto the spool pin so that the thread comes from the back of the spool. -
Page 14: Pull Up The Bobbin Thread
ENGLISH Pull up the bobbin thread 1. Lift the presser foot and hold the top thread in your left hand. 2. Turn the hand wheel slowly towards you until the needle reaches its lowest position. Then continue to turn the wheel until the needle reaches its highest position. -
Page 15: Start Sewing Straight Stitch
ENGLISH START SEWING Foot Stich Thread tension Straight stitch Choose the straight stitch by turning the stitch selector dial to either A, B or C. You can adjust the stitch length by choosing the slots in between A, B and C. The thread tension should be from 2-6. Make sure the presser foot is properly attached (page 21). -
Page 16: Zigzag Stitch
ENGLISH Foot Stich Thread tension Zigzag stitch Choose the zigzag stitch by turning stitch selector dial to either D, E, F or K. You can adjust the stitch length by choosing the slots in between D, E, F and K. The thread tension should be from 1-5. Make sure the presser foot is properly attached (page 21). -
Page 17: Decorative Stitch
ENGLISH Foot Stich Thread tension Decorative stitch Choose the decorative stitch by turning stitch selector dial to either G, H, I or J. The thread tension should be from 6-8. Make sure the presser foot is properly attached (page 21). 1. -
Page 18: Blind Stitch
ENGLISH Foot Stich Thread tension Blind stitch Choose the blind stitch by turning stitch selector dial to either L or M. The thread tension should be from 1-4. Make sure the presser foot is properly attached (page 21). 1. Move the needle upwards by turning the hand wheel towards you. Fold the fabric as shown in picture. -
Page 19: Buttonholes
ENGLISH Foot Stich Buttonholes Make sure that the buttonhole foot is properly attached (see page 21). Choose setting on the stitch selector and pull the top and bobbin threads to the left. 1. Slide the buttonhole foot forwards to measure the length of the buttonhole. -
Page 20: Zip
ENGLISH Foot Stich Thread tension Choose the straight stitch by turning stitch selector dial to either A, B or C. The thread tension should be from 1-4. Make sure the zip foot is properly attached (page 21). 1. Move the needle upwards by turning the hand wheel towards you. Install the zip foot so that the needle can only sew to the left of the foot. -
Page 21: Maintenance
ENGLISH MAINTENANCE Remove a presser foot 1. Turn the hand wheel towards you to move the needle into the highest position. Lift the presser foot. 2. Press the lever on the back of the presser foot holder to release the presser foot. -
Page 22: Change The Needle
ENGLISH Change the needle 1. Turn the hand wheel towards you to lift the needle. Then lower the presser foot. 2. Release the needle by turning the needle holder screw anti-clockwise. The screw may be very tight the first time you unscrew it. Remove the needle from the needle holder. -
Page 23: Adjust Thread Tension
ENGLISH RIGHT Adjust thread tension Top thread If you need to adjust the thread tension, you usually only have to alter the top thread. The bobbin thread tension is set during manufacture, and any Bobbin thread adjustments are only required for special threads and fabrics. 1. -
Page 24: Clean The Feed Dogs
ENGLISH Clean the feed dogs It is important that you clean the feed dogs regularly to keep the sewing machine working optimally.* 1. Remove the needle and the presser foot (see pages 21 and 22). Unscrew the needle plate. 2. Clean fibres and dust from the teeth of the feed dogs using the brush. 3. -
Page 25: Clean The Shuttle Assembly
ENGLISH Clean the shuttle assembly Dismantle the shuttle assembly 1. Move the needle to its highest position, remove the accessories compartment and open the cover.* Bobbin Bobbin case 2. Remove the bobbin case by releasing the little latch and pulling the bobbin case out. - Page 26 ENGLISH Install the shuttle assembly 1. Hold the shuttle by the pin and carefully insert it into the shuttle race. It must form a circle with the shuttle driver. 2. Insert the retaining ring so that the lower pin fits into the groove at the bottom.
-
Page 27: Trouble Shooting
ENGLISH TROUBLE SHOOTING Warning! Be sure to always turn the hand wheel towards you (counterclockwise). Turning it the other way may cause damage to the needle or fabric, and you may be injured. PROBLEM CAUSE SOLUTION The stitches form loops •... - Page 28 ENGLISH TROUBLE SHOOTING Warning! Be sure to always turn the hand wheel towards you (counterclockwise). Turning it the other way may cause damage to the needle or fabric, and you may be injured. PROBLEM CAUSE SOLUTION The bobbin thread • The bobbin has been installed incorrectly into the •...
- Page 29 ENGLISH...
- Page 30 中文 内容 警告/安全 安全预防措施 ........................................................安全操作注意事项 ......................................................延长使用寿命的注意事项 ....................................................维修或调整注意事项 ......................................................缝纫机部件 .......................................................... 缝纫机配件 .......................................................... 关于符号的解答 ......................................................... 准备工作 准备开始 ..........................................................绕底线 ..........................................................安装梭芯 ..........................................................穿面线 ..........................................................拉出底线 ..........................................................开始缝制 直线线缝 ..........................................................曲折线缝 ..........................................................装饰线迹 ..........................................................暗缝线 ..........................................................扣眼 ............................................................拉链缝制 ..........................................................维护...
-
Page 31: 警告/安全
中文 警告/安全 感谢您使用我们的产品。 • 拔插头时请捏住插头, 勿拽电源线。 本款缝纫机是最新潮的家用缝纫机之一, 拥有诸多先进功能。 欲全面了解本款 • 请勿用手指触碰运行中的任何部件, 要特别留意缝纫机针。 缝纫机的功能和使用方法, 请在使用机器前仔细阅读本使用说明书。 • 请务必使用合适的针板, 针板使用不当会引起断针。 • 请勿使用弯针, 使用前务必检查机针。 请妥善保管本说明书, 以备日后参考。 • 缝制过程中请勿推拉布料, 以免导致机针弯曲或断针。 • 穿面线或底线、 更换机针或压脚时, 请务必先将缝纫机电源开关置于“OFF” 安全预防措施: 位置, 关闭电源。 为避免灼伤、 起火、 触电和人身伤害等危险, 请务必认真阅读并遵循以下安全 • 打开机盖、 添加润滑油或进行本说明书中规定的维护或调整操作时, 请务必 预防措施: 拔下电源插头。 • 无人看管时切勿接通电源, 使用后或清洁前请务必拔下电源插头。 • 缝纫机仅用于本说明书规定的用途。 • 务必使用本说明书中推荐的配件。 • 严禁将本缝纫机作为玩具使用。 • 身体、... -
Page 32: 安全操作注意事项
中文... -
Page 33: 缝纫机部件
中文 缝纫机部件 正面 背面 E F G 1. 配件箱 9. 线柱 17. 缝针 2. 梭匣 10. 手柄 18. 导线器 3. 松紧调节器 11. 绕线器 19. 针托螺丝 4. 拉杆 12. 梭芯自停装置 20. 针板 5. 剪刀 13. 回针按钮 21. 手轮 6. 上线导线器 14. 踏板 22. -
Page 34: 缝纫机配件
中文 缝纫机配件 压脚 (已装配在缝纫机上) 线筒轴 梭芯 用于缝制直线线迹、 曲折 在已有线筒轴的顶端安装 把底线缠绕在梭芯上。 线迹、 装饰线迹及暗缝线 另一线筒轴。 迹 (详见第41, 42, 43及 44页) 。 拉链压脚 毡垫 螺丝刀 装拉链时使用 (详见第46 在上线的线饼下放置一个 用于调整及维修。 页) 。 毡垫, 令其旋转时更平滑、 安静。 锁扣眼压脚 拆线刀 缝锁扣眼时使用 (详见第 用于拆除线迹。 45页) 。 缝针 刷子 参见第48页,... -
Page 35: 关于符号的解答
中文 关于符号的解答 缝线张力 装饰线迹 如何调节缝线张力参见第49页。 G、 H、 I、 J. 参见第43页, 了解如何缝纫装饰线 迹。 回针按钮 按下并握住这个按钮, 然后踩下踏板, 往后缝纫, 用于紧固缝线末端的线。 暗缝线 直线线缝 L,M。 参见第44页, 查看如何缝暗线。 A、 B、 C档, 如何缝制直线线缝参见第41页。 曲折线缝 扣眼 D、 E、 F、 K档, 如何缝制曲折线缝请参见第42页。 参见第45页, 了解如何缝制锁扣眼。... -
Page 36: 准备开始
中文 准备工作 准备开始 给缝纫机接上电源。 接通电源前, 请确保缝纫机的电压和频率与主电源输出的电压和频率相一 致。 缝纫机底部的标签上显示了其电压和频率。 1. 确保电源开关是断开的。 2. 将电源线插入缝纫机的插座。 3. 将电源线插入墙面插座。 4. 按下电源开关。 5. 拉出线柱, 多余部分留在上面。 如何使用踏板 踩踏板的轻重决定缝纫的速度。 踩地越重, 缝纫机转得越快。 松开踏板, 机 器就会自动停止缝纫。 小贴士! 欲了解缝制速度如何, 请在穿线之前踩下踏板试验一 下。... -
Page 37: 绕底线
中文 绕底线 1. 拉出手轮。 2. 拉出部分线, 穿过顶线导线器, 绕在底线导线器上。 3. 将线头由内向外穿过一个梭心孔, 然后将梭心放在绕线器上。 4. 将绕线器滑向右侧, 紧靠梭心自停装置。 5. 抓住线头松的一端, 踩动踏板, 固定完毕后, 放开线头, 梭心绕线完毕后, 将 脚从踏板上移开。 E F G 6. 移动手轮至原始位置, 将绕线器滑向左侧, 剪断线头。 E F G E F G... -
Page 38: 安装梭芯
中文 安装梭芯 1. 向左拉并卸下配件箱。 然后把盖子左边的闩子向下推, 打开梭匣。 拉出梭匣 上的小闩子, 并直接把梭匣拉出缝纫机。 2. 在梭匣内安装梭芯。 3. 把缝线拉进梭匣的凹槽内。 4. 把缝线从夹线簧内往外拉, 拉进开口处。 使缝线伸出梭匣15cm长。 往外拉 线时, 梭芯应该呈顺时针旋转。 5. 把梭匣放回缝纫机, 使梭匣上的针与洞口正好吻合。 合上机盖, 把配件箱放 回原位。... -
Page 39: 穿面线
中文 穿面线 1. 向内旋转手轮, 将挑线杆移至最高位置, 抬起压脚即可开始。 2. 将缝线线筒置于线筒轴上, 从线筒轴背面引出面线。 E F G 3. 将面线穿过面线导线器。 4. 将面线从张力调节器 (箭头1) 向下拉, 绕过张力调节器圆环然后向上引出 ( 箭头2) 。 K L M 5. 将面线从右至左穿过挑线杆。 (箭头3) 6. 将面线向下拉, 使其穿过穿线口。 最后, 将面线从前往后穿过机针针孔。 E F G E F G E F G E F G... -
Page 40: 拉出底线
中文 拉出底线 1. 抬高压脚, 用左手握住上线。 2. 缓慢朝里旋转手轮, 直至缝针到达最低点。 继续旋转手轮, 直至缝针到达 最高点。 3. 用左手小心地向上拉上线。 此时, 上线会带出绕圈的底线。 4. 向缝纫机背面 (远离自己的方向) 拉上线和底线, 拉出15cm的距离。... -
Page 41: 直线线缝
中文 开始缝制 脚 缝针 线张力 直线线缝 将线缝旋钮调至A、 B或C档, 选择直线线缝, 选择A、 B、 C三档之间的凹槽可以 调整线迹长度。 缝线张力应设置在2-6之间, 确保压脚已正确安装 (安装方法 见第47页) 。 1. 向内旋转手轮, 调高机针, 抬起压脚, 放入布料。 向内旋转手轮, 将机针调低 至要开始缝制的布料上方。 放下压脚, 确保面线和底线从压脚下面向后引 出。 2. 小心踩动踏板, 开始缝制。 按下反向按钮并踩动踏板, 向后缝制几针, 加固 线头, 然后松开按钮, 继续向前缝制。 3. 如要改变缝制方向, 至转弯处停下 (无需将机针和布料分离) , 然后抬起压 脚,... -
Page 42: 曲折线缝
中文 脚 缝针 线张力 曲折线缝 将线缝旋钮调至D、 E、 F或K档, 选择曲折线缝。 选择D、 E、 F和K档之间的凹槽 可调整线迹长度。 缝线张力应设置在1-5之间。 确保压脚已正确安装 (安装方 法见第47页) 。 1. 向内旋转手轮, 调高机针, 抬起压脚, 放入布料。 向内旋转手轮, 将机针调低 至要开始缝制的布料上方。 放下压脚, 确保面线和底线从压脚下面向后引 出。 2. 小心踩动踏板, 开始缝制。 3. 如要改变缝纫方向, 至转弯处停下 (无需将机针和布料分离) , 然后抬起压 脚, 以机针为中心调转布料即可。 调转后放下压脚, 继续缝制。 4. 缝制完毕后, 拿起布料并往后拉伸约15cm。 用剪刀剪断缝线并留出适当长 度,... -
Page 43: 装饰线迹
中文 脚 缝针 线张力 装饰线迹 旋转线迹选择器转盘至G、 H、 I或J刻度, 选择装饰线迹。 缝线松紧度应设置在 6-8之间, 并请确保压脚安装正确 (第47页) 。 1. 朝里旋转手轮, 使针向上移动。 抬起压脚, 放入布料。 向里旋转手轮, 使 针向下运动, 穿过布料要开始缝纫的地方。 调低压脚。 确保向缝纫机背面 拉动压脚下的上线和底线。 2. 小心踩动踏板, 开始缝纫。 3. 如 要改变缝纫方向, 如缝至转弯处, 就将缝针留在布料内, 然 后抬高压脚, 围绕缝针调转布料。 调低压脚, 继续缝纫。 4. 完成后, 拿起布料并往后拉伸15cm。 用剪刀剪断缝线, 留下适当长度, 以 便下次缝纫。 小贴士! 可在正式缝制之前先用碎布料试验一下, 查看是否需要调整设置。... -
Page 44: 暗缝线
中文 脚 缝针 线张力 暗缝线 将线迹选择器转盘拨到L或M, 选择暗缝线。 缝线松紧度应设置在1-4之间; 确 保压脚安装正确 (第47页) 。 1. 朝里旋转手轮, 使针向上移动。 如图所示, 对折布料。 抬起压脚, 放入布料。 向里旋转手轮, 使针向下移动, 并穿过布料对折部分的左边缘。 调低压脚。 确保向缝纫机背面拉动压脚下的上线和底线。 2. 小心踩动踏板, 开始缝纫。 3. 完成后, 拿起布料并往后拉伸15cm。 用剪刀剪断缝线, 留下适当长度, 以便 下一次缝纫。 小贴士! 可在正式缝制之前先用碎布料试验一下, 查看是否需要调整设置。... - Page 45 中文 脚 缝针 扣眼 确保锁扣眼压脚已正确安装 (详见第47页) 。 选择线迹选择器上的设置 , 向左拉上线和底线。 1. 将锁扣眼器向前滑动, 测量扣眼长度。 使用锁扣眼压脚上的刻度。 调低锁扣 眼压脚和缝针。 慢慢缝锁扣眼的一边, 直至锁扣眼压脚的底端。 完成时缝 针应位于左边。 2. 改变线迹设置 , 再缝几针。 完成时指针位于右边。 3. 更改线迹设置为 , 重新缝制, 直到与锁扣眼压脚上的刻度对齐。 完成时缝 针应位于右边。 4. 改变线迹设置 , 再缝几针。 完成时缝针位于左边。 5. 完成后, 拿起布料并往后拉伸15cm。 用剪刀剪断缝线, 留下适当长度, 以便 下一次缝纫。 用拆线刀剪开扣眼。 小贴士!...
-
Page 46: 拉链缝制
中文 脚 缝针 线张力 拉链缝制 将线缝旋钮调至A、 B或C档, 选择直线线缝。 缝线张力应设置在1-4之间, 确 保拉链压脚已正确安装 (安装方法见第XX页) 。 1. 向内旋转手轮, 调高机针。 调整拉链压脚, 使机针只能在压脚左边缝制。 2. 用销钉将拉链固定在布料上, 将布料放在拉链压脚下, 将面线和底线向后引 出, 然后放下拉链压脚。 3. 缝制拉链的右侧时, 将拉链牙置于拉链压脚一边, 顺其边缘进行缝制。 缝至 顶部之前, 抬起拉链压脚 (无需将机针和布料分离) , 拉开拉链, 放下拉链压 脚, 缝制右侧剩余部分。 按下反向按钮, 向后缝制几针, 紧固线头, 然后松开 按钮, 再向前缝制几针。 4. 改变拉链压脚的位置,... -
Page 47: 拆卸压脚
中文 维护 拆卸压脚 1. 朝里旋转手轮, 使缝针移至最高点。 抬高压脚。 2. 按住压脚板背面的拉杆, 松开压脚。 请勿强行拆卸压脚。 安装压脚 1. 放对压脚的位置, 使压脚上的缝针位于压脚板凹槽的正下方。 调低压脚板。 2. 再次抬起压脚板时, 压脚就安装好了。... -
Page 48: 更换缝针
中文 更换缝针 1. 朝里旋转手轮, 抬起缝针。 然后调低压脚。 2. 逆时针转动针托上的螺丝, 松开缝针。 第一次转动时, 螺丝可能非常紧。 从 针托上取下缝针。 3. 在针托上安装新的缝针, 安装时将扁平的那端背向自己。 尽量把缝针往针托 里面推。 4. 牢牢拧紧针托上的螺丝。 请勿使用弯曲或钝的缝针, 因为它们经常损坏布料。 此缝纫机使用标准缝针尺 寸90/14。... -
Page 49: 调整底线松紧
中文 正确 调整底线松紧 顶线 如需调整底线松紧, 一般只需更换上线。 生产缝纫机时底线松紧就已设定, 只 有特殊缝线和布料才需另作调整。 底线 1. 完美缝纫的缝线紧紧锁在每层布料之间。 2. 如果上线太紧, 底线就会出现在布料右侧。 适度调松上线即可解决问题。 错误 解决方案 3. 如果上线太松, 就会出现在布料背面。 适度收紧上线。 顶线 调整底线松紧 偶尔需要收紧底线时, 可将梭匣上的调整螺钉向右旋转。 如 底线 需适度放松底线, 可将螺钉向左旋转。 将梭匣内的底线往外 拉, 以确认底线松紧。 如感到轻微的阻力, 则松紧度正好。 错误 解决方案 顶线 底线 小贴士! 大多数布料所需的缝线张力为3至5之间。 可在正式缝制之前先用碎布 料试验一 下, 查看是否需要调整设置。... -
Page 50: 清理狗牙器
中文 清理狗牙器 一定要定期清理狗牙器, 保证缝纫机的最佳工作状态。 * 1. 拆下缝针和压脚 (详见第47页及第48页) 。 拧下针板。 2. 用刷子清理狗牙器牙槽内的布料和灰尘。 3. 重新给缝纫机安装针板、 压脚及缝针。 *警告! 离开缝纫机或为其更换零部件时, 一定要拔掉电源插头。... -
Page 51: 清理摆梭装置
中文 清理摆梭装置 拆卸摆梭装置。 1. 将缝针移至最高位置, 卸下配件箱, 打开盖子。 * 线筒 梭匣 2. 松开小闩子, 向外拉并取出梭匣。 3. 把梭床杆推向一边。 拉开摆梭中心的别针, 抬高扣环和摆梭。 4. 使用刷子清理各个部件上的灰尘和线头。 扣环 摆梭 摆梭杆 拉杆 拉杆 *警告! 离开缝纫机或为其更换零部件时, 一定要拔掉电源插头。... - Page 52 中文 安装摆梭装置 1. 握住梭针, 小心地将它放入梭床。 必须使它跟摆梭杆形成一个圆圈。 2. 插入扣环, 底下的针就正对着底部的凹槽。 3. 用梭床杆固定扣环。 4. 最后, 把梭匣放入缝纫机, 合上机盖, 并将配件箱放回原位。...
-
Page 53: 故障排除方法
中文 故障排除方法 警告! 确保手轮始终朝你的方向转动 (逆时针) 。 反向转动会损坏缝针和布料, 也可能使你受伤。 问题 原因 解决方案 线迹打结。 • 上线没有正确穿入针内。 • 应从前往后穿针。 • 底线没有正确穿入梭匣。 • 在梭匣中正确穿入底线 (详见第38页) 。 线迹皱缩或布料起皱。 • 缝针相对布料来说太大了。 • 选用小号缝针。 • 纱线张力太紧。 • 调整上缝线张力 (见第49页) 。 布料缝制得不均匀。 • 缝线品质不佳。 • 选用质量更好的针。 • 底线没有正确穿入梭匣。 • 在梭匣中正确穿入底线 (详见第38页) 。 • 缝纫过程中拉扯布料。 • 让缝纫机自动送料。 缝纫机噪声大, 缝纫难度 • 狗牙器或针托上残留绒毛或油渍。 • 清理狗牙器和针托 (详见第50页) 。 大。... - Page 54 中文 故障排除方法 警告! 确保手轮始终朝你的方向转动 (逆时针) 。 反向转动会损坏缝针和布料, 也可能使你受伤。 问题 原因 解决方案 底线断线。 • 梭芯在梭匣内的安装有误。 • 在梭匣中正确安装梭芯 (详见第38页) 。 • 底线没有穿好。 • 正确穿入底线 (详见第38页) 。 • 底线太紧。 • 调松底线 (详见第49页) 。 上线断线。 • 上线没有穿好。 • 重新给缝纫机和缝针穿线 (详见第39页) 。 • 上线太紧。 • 调松缝线 (详见第49页) 。 • 缝线相对缝针太粗或太细。 • 更换缝线。 • 缝针没有安装好。 • 卸下缝针, 并重新安装 (详见第48页) 。 • 缝线卡在线柱上。...
- Page 55 中文...
- Page 56 繁中 內容 警告/安全 安全預防措施 ........................................................安全操作說明 ........................................................為了延長縫紉機的使用壽命 .................................................... 維修或調整 .......................................................... 縫紉機部位名稱 ........................................................縫紉機配件 .......................................................... 符號圖示 ..........................................................準備 開始 ............................................................捲底線 ..........................................................安裝線軸 ..........................................................上線穿線 ..........................................................拉底線 ..........................................................開始縫紉 直線縫 ..........................................................鋸齒縫 ..........................................................裝飾縫紉 ..........................................................暗針縫 ..........................................................釦眼 ............................................................安裝拉鍊 ..........................................................保養...
-
Page 57: 警告/安全
繁中 警告/安全 感謝你選購我們的產品。 • 在使用縫紉機的房間內 ,請勿使用液化氣體(噴霧)產品。 此縫紉機是最新款家庭縫紉機, 具有多種進階功能。使用之前 ,請仔細閱讀使 • 切斷縫紉機電源時,需先將電源開關切換至”OFF” , 再將插頭 用說明書內的所有功能介紹與操作說明。 拔除。 • 拔除插頭時, 應握著插頭處 , 而不是拉著電源線。 請保留說明書, 以供參考。 • 請保持讓手指遠離縫紉機所有會動作的部位 。 尤其是車針的 意。 安全預防措施: • 須使用適合的針板 , 以免導致斷針。 務必詳細閱讀並依照下列安全預防措施使用縫紉機, 以免造成燙傷、 起火 、觸 • 請勿使用彎曲的車針。使用前務必要檢查車針是否受損。 電或個人傷害的危險: • 縫紉時, 不可推擠或拉扯布料, 以免造成車針彎曲或導致斷 • 穿線或重新安裝車針、壓布腳之前 ,須將電源開關切換至”O • 當縫紉機的電源插頭插在插座時, 不可遠離 , 更不可無人看顧縫紉機。使用 • 打開上蓋、... -
Page 58: 安全操作說明
繁中 安全操作說明: 維修或調整 • 縫紉時視線須專注於車針, 且不可碰觸手輪、拉柄、 車針或縫紉機其他會動 需要維修或調整時,請參照使用說明書後面的故障排除說明。 作的部位 。 • 須關掉電源及將牆壁插座的插頭拔除的情況: 說明書的內容和記載的產品 ,隨時都會有所改變,將不另行通知。 –結束縫紉 –需重新安裝或拆卸車針或任何其他零件 –使用時發生停電 –保養縫紉機 –需遠離使用中的縫紉機 • 腳踏板上切勿堆放任何物品。 • 將縫紉機插頭直接插入牆壁插座, 不要使用延長線。 為了延長縫紉機的使用壽命 : • 存放縫紉機時, 應避免存放在會受到日光直接照射和溼氣較高的地方 。不可 在靠近暖爐 、熨斗 、鹵素燈、 或其他熱源的地方 ,使用或存放縫紉機。 • 請使用中性的肥皂或清潔劑, 來清理縫紉機外殼。不可使用含苯、稀釋劑或 研磨成份的清潔劑, 以免損傷外殼和縫紉機。 • 使用縫紉機時須格外小心注意 , 應避免發生掉落或碰撞的情況。 • 務必依照說明書中的指示操作, 以確保正確的重新放置或安裝任何零件、壓 布腳、 車針或其他部件。... -
Page 59: 縫紉機部位名稱
繁中 縫紉機部位名稱 前 後 E F G 1. 配件盒 9. 線輪柱 17. 車針 2. 線軸盒 10. 把手 18. 針柱線導引 3. 穿線拉柄 11. 捲底線裝置 19. 車針柄旋鈕 4. 拉柄 12. 線軸阻擋裝置 20. 針板 5. 切線器 13. 倒退縫操作鈕 21. 手輪 6. 線導引板 14. 腳踏板 22. -
Page 60: 縫紉機配件
繁中 縫紉機配件 壓布腳 壓布腳 線軸 線輪柱 (安裝於縫紉機) 將額外的線輪柱安裝在原 捲動線軸上的底線。 縫紉直線縫、鋸齒縫、裝 有的線輪柱上方 。 飾性縫紉和暗針縫(請看 第67、68、69和70頁)。 拉鍊壓布腳 毛氈墊 起子 可用來安裝拉鍊(請看第 放在上線線輪下方 , 以便 可用來調整及保養。 72頁)。 使線輪滑順、 安靜的轉 動。 開釦眼壓布腳 拆線刀 用於縫紉釦眼(請看第71 可用來拆線。 頁)。 車針 清潔刷 更換車針方法,請看第74 可用來清除送布齒上的灰 頁 。 塵與纖維(請看第77頁)。... -
Page 61: 符號圖示
繁中 符號圖示 縫線緊度 裝飾縫紉 調整縫線緊度的方法,請看第75頁 。 將針趾旋鈕設定為G、H、I 、 J。請看第69頁 ,裝飾 縫紉的方法。 倒退縫操作鈕 按住操作鈕, 再踩腳踏板 , 即可往後縫紉 , 牢固結 尾處的車線。 暗針縫 直線縫 將針趾旋鈕設定為L 、M。請看第70頁 ,暗針縫的 將針趾旋鈕設定為A 、B、C。請看第67頁 , 直線縫 方法: 的方法。 鋸齒縫 釦眼 將針趾旋鈕設定為D、E、F、K 。鋸齒縫的方法,請 開釦眼的方法,請看第71頁 。 看第68頁 。... - Page 62 繁中 準備 開始 連接縫紉機電源。 插上插頭前 ,需確認縫紉機的電壓和頻率與主電源相符。電壓和頻率數據標 示於縫紉機底部的標籤上 。 1. 確認電源關閉。 2. 將電源線插頭插入縫紉機插座。 3. 將電源線插頭插入牆面插座。 4. 打開電源。 5. 拉出線輪柱 , 並放上額外的線輪柱。 使用腳踏板方法 可利用踩踏腳踏板的力度來改變縫紉速度。踩的力度越大 ,縫紉速度越快。如 果把腳從踏板上移開 ,縫紉機會自動停止縫紉。 小秘訣!穿線前可試著踩腳踏板 , 以了解如何控制縫紉速度。...
-
Page 63: 捲底線
繁中 捲底線 1. 拉出手輪。 2. 鬆開一些縫線, 並將縫線穿過上線導引板 ,繞過底線導引板。 3. 將縫線從裡到外穿過線軸的其中一個線孔 , 再將線軸放在捲底線裝置上 。 4. 將捲底線裝置滑至右側, 靠著線軸阻擋裝置的位置。 5. 拉著鬆開的線頭 ,踩著腳踏板 , 當縫線固定時, 放開線頭。線軸完全捲好 時,鬆開腳踏板。 E F G 6. 將手輪推回原來位置 , 再將捲底線裝置滑回左側, 剪斷縫線。 E F G E F G... -
Page 64: 安裝線軸
繁中 安裝線軸 1. 往左拉出配件盒 , 再往下推動盒蓋左側的彈簧鎖, 打開線軸盒。拉開線軸盒 上的小彈簧鎖, 並直接將線軸盒從縫紉機上拉出。 2. 將線軸安裝至線軸盒。 3. 將縫線導入線軸盒溝槽。 4. 再將縫線拉至壓縮彈簧底下和開口處 , 並預留15公分縫線在線軸盒外。拉 動縫線時, 線軸應以順時針方向轉動。 5. 將線軸盒裝回縫紉機,使線軸盒的線輪柱安裝在孔眼 , 再蓋上蓋子,將配 件盒放回原處。... -
Page 65: 上線穿線
繁中 上線穿線 1. 首先 , 朝自己的方向轉動手輪 ,將穿線拉柄移至最高位置 , 抬起壓布腳。 2. 將線軸放在線輪柱上 ,使縫線從線軸後方朝前旋出。 E F G 3. 將縫線穿過上線導引。 4. 把縫線往下拉 , 並穿過穿線拉柄(箭頭1),繞過穿線拉柄後, 再往上拉(箭頭 2)。 K L M 5. 使縫線由右往左穿過穿線拉柄(箭頭3)。 6. 把縫線往下拉 , 並穿過針柱線導引。最後, 由前至後將線穿過針孔 。 E F G E F G E F G E F G... -
Page 66: 拉底線
繁中 拉底線 1. 抬起壓布腳, 並用左手拉著上線的線頭。 2. 朝自己的方向慢慢地轉動手輪 , 直到車針降至最低位置。再繼續轉動手輪 , 直到車針升至最高位置。 3. 小心地用左手往上拉起上線的線頭 , 一起將底線線圈拉起。 4. 將上線與下線同時往縫紉機後方拉出15公分。... -
Page 67: 直線縫
繁中 開始縫紉 壓布腳 縫紉 縫線緊度 直線縫 將針趾旋鈕轉動至A 、B或C , 再選擇不同線縫刻度來調整針趾長度。縫線緊 度應設定為2-6, 並確保壓布腳是否牢固(請看第73頁)。 1. 朝自己的方向轉動手輪 ,使車針往上移動。抬起壓布腳,將布放在底下 。再 朝自己的方向轉動手輪 ,往下移動車針, 放在想開始縫紉的地方 。放下壓布 腳,確保壓布腳底下的上線和底線往縫紉機後方拉動。 2. 慢慢地踩下腳踏板 ,開始縫紉。踩腳踏板時按下倒退縫操作鈕,往後縫紉 幾針, 牢固車線。 3. 如果想在轉角處改變方向 ,將車針留在布裡。抬起壓布腳,繞著車針轉動布 的方向 , 再放下壓布腳,繼續縫紉。 4. 完成縫紉後, 牢固結尾處的車線(請看第2點),提起布料,往後拉動約15公 分。用剪刀剪斷縫線, 留下適當的縫線長度 , 以便下次縫紉。 小秘訣!開始縫紉前 , 可先用一小塊布測試縫紉, 以調整任何設定。你也可以利 用針板上的縫紉符號 ,確認直線縫紉。... -
Page 68: 鋸齒縫
繁中 壓布腳 縫紉 縫線緊度 鋸齒縫 將針趾旋鈕轉動至D、E、F或K , 再選擇不同線縫刻度來調整針趾長度。縫線 緊度應設定為1-5, 並確保壓布腳是否牢固(請看第73頁)。 1. 朝自己的方向轉動手輪 ,使車針往上移動。抬起壓布腳,將布放在底下 。再 朝自己的方向轉動手輪 ,往下移動車針, 放在想開始縫紉的地方 。放下壓布 腳,確保壓布腳底下的上線和底線往縫紉機後方拉動。 2. 慢慢地踩下腳踏板 ,開始縫紉。 3. 如果想在轉角處改變方向 ,將車針留在布裡。抬起壓布腳,繞著車針轉動布 的方向 , 再放下壓布腳,繼續縫紉。 4. 完成縫紉後,提起布料,往後拉動約15公分。用剪刀剪斷縫線, 留下適當的 縫線長度 , 以便下次縫紉。 小秘訣!開始縫紉布料前 , 可先用一小塊布測試縫紉, 以調整任何設定。... -
Page 69: 裝飾縫紉
繁中 壓布腳 縫紉 縫線緊度 裝飾縫紉 將針趾旋鈕轉動至G、H、I或J,縫線緊度應設定為6-8, 並確保壓布腳是否牢 固(請看第73頁)。 1. 朝自己的方向轉動手輪 ,使車針往上移動。抬起壓布腳,將布放在底下 。再 朝自己的方向轉動手輪 ,往下移動車針, 放在想開始縫紉的地方 。放下壓布 腳,確保壓布腳底下的上線和底線往縫紉機後方拉動。 2. 慢慢地踩下腳踏板 ,開始縫紉。 3. 如果想在轉角處改變方向 ,將車針留在布裡。抬起壓布腳,繞著車針轉動布 的方向 , 再放下壓布腳,繼續縫紉。 4. 完成縫紉後,提起布料,往後拉動約15公分。用剪刀剪斷縫線, 留下適當的 縫線長度 , 以便下次縫紉。 小秘訣!開始縫紉布料前 , 可先用一小塊布測試縫紉, 以調整任何設定。... -
Page 70: 暗針縫
繁中 壓布腳 縫紉 縫線緊度 暗針縫 將針趾旋鈕轉動至L或M,縫線緊度應設定為1-4, 並確保壓布腳是否牢固(請 看第73頁)。 1. 朝自己的方向轉動手輪 ,使車針往上移動。如圖片所示 , 摺疊布料。抬起壓 布腳,將布料放在底下 。再朝自己的方向轉動手輪 , 放下車針,使車針穿過 布料摺疊部分的左側。放下壓布腳,確保壓布腳底下的上線和底線往縫紉 機後方拉動。 2. 慢慢地踩下腳踏板 ,開始縫紉。 3. 完成縫紉後,提起布料,往後拉動約15公分。用剪刀剪斷縫線, 留下適當的 縫線長度 , 以便下次縫紉。 小秘訣!開始縫紉布料前 , 可先用一小塊布測試縫紉, 以調整任何設定。... - Page 71 繁中 壓布腳 縫紉 釦眼 確認開釦眼壓布腳是否安裝固定(請看第73頁)。 轉動針趾轉鈕,選擇所需設定 ,將上線和底線拉至左側。 1. 將開釦眼壓布腳往前滑動, 利用開釦眼壓布腳的刻度符號 , 測量釦眼長度。 放下開釦眼壓布腳及車針,慢慢地將釦眼的一邊縫紉至壓布腳尾端, 完成 時車針在左邊位置。 2. 改變針趾轉鈕的設定 ,縫紉幾針, 完成時車針在右邊位置。 3. 改變針趾轉鈕的設定 ,往回縫紉 , 直到對齊開釦眼壓布腳的刻度 , 完成時 車針在右邊位置。 4. 改變針趾轉鈕的設定 ,縫紉幾針, 完成時車針在左邊位置。 5. 完成縫紉後,提起布料,往後拉動約15公分。用剪刀剪斷縫線, 留下適當的 縫線長度 , 以便下次縫紉。最後用拆線刀割開釦眼。 小秘訣!開始縫紉布料前 , 可先用一小塊布測試縫紉, 以調整任何設定。...
-
Page 72: 安裝拉鍊
繁中 壓布腳 縫紉 縫線緊度 安裝拉鍊 將針趾旋鈕轉動至A 、B或C ,縫線緊度應設定為1-4, 並確保拉鍊壓布腳是否 牢固(請看第73頁)。 1. 朝自己的方向轉動手輪 ,使車針往上移動。安裝拉鍊壓布腳,使車針固定在 壓布腳的左側。 2. 將拉鍊壓在布料上 , 再把布料放在拉鍊壓布腳底下 。放下拉鍊壓布腳前 ,將 上線和底線往縫紉機後方拉 。 3. 縫紉拉鍊的右側時,讓拉鍊齒沿著拉鍊壓布腳移動。縫紉至拉鍊頭之前 , 抬起拉鍊壓布腳,拉開拉鍊,將車針留在布料裡。放下拉鍊壓布腳, 再縫紉 右側剩餘的部份。按下倒退縫操作鈕,往後縫紉幾針, 牢固車線。再鬆開倒 退縫操作鈕,往前縫紉幾針。 4. 更換拉鍊壓布腳的位置 ,使車針固定在壓布腳的右側。重複第三步驟,縫紉 拉鍊左側。 小秘訣!開始縫紉布料前 , 可先用一小塊布測試縫紉, 以調整任何設定。... -
Page 73: 拆卸壓布腳
繁中 保養 拆卸壓布腳 1. 朝自己的方向轉動手輪 ,將車針移至最高位置 , 再抬起壓布腳。 2. 按壓壓布腳腳脛後方的控制桿,鬆開壓布腳。不可用蠻力拆下壓布腳。 安裝壓布腳 1. 將壓布腳放置在適當位置 ,使壓布腳栓固定在壓布腳腳脛凹槽的下方 ,慢 慢放下壓布腳腳脛。 2. 再抬起壓布腳腳脛 , 壓布腳即安裝固定。... -
Page 74: 更換車針
繁中 更換車針 1. 朝自己的方向轉動手輪 , 抬起車針, 再放下壓布腳。 2. 以逆時針方向轉動車針柄轉軸,鬆開車針, 再從車針柄拆下車針。第一次旋 動轉軸時,需多用點力才能旋鬆轉軸。 3. 將新車針的針柄平面部份朝向縫紉機,往上推入車針柄, 直到抵住針止擋 處為止。 4. 旋緊車針柄上的螺絲。 不可使用彎曲或變鈍的車針, 以免損害布料。此縫紉機適用標準車針尺寸 90/14。... -
Page 75: 調整縫線緊度
繁中 正確 調整縫線緊度 上線 若需調整縫線緊度 , 只要調整上線即可 。底線緊度已固定 ,僅能更換使用特殊 縫線和布料來調整底線緊度。 底線 1. 最好的縫紉成品 , 即是縫線須縫在布料與布料之間。 2. 如果上線緊度太緊, 底線會出現在布料的右邊, 稍微減少縫線緊度 , 即能 錯誤 處理方法 解決問題。 3. 如果上線緊度太鬆 , 上線會出現在布料的後面 , 稍微增加縫線緊度即能解 決問題。 上線 調整線軸緊度 底線 一般情況下 ,是不需調整底線緊度。若有必要增加線軸緊 度 , 可將線軸盒上的調整螺絲向右轉。如果需稍微減少線軸 緊度 , 可將調整螺絲向左轉。你可將縫線拉出線軸盒 , 以測 錯誤... -
Page 76: 清潔送布齒
繁中 清潔送布齒 須定期清潔送布齒 ,使縫紉機保持最佳狀態。* 1. 拆下車針和壓布腳(請看第73和74頁), 再旋鬆螺絲,拆下針板。 2. 用清潔刷清除送布齒上的布屑和灰塵。 3. 裝回針板 、壓布腳和車針。 警告!不使用時或更換機器零件前 ,須拔掉插頭。... -
Page 77: 清潔梭子配件
繁中 清潔梭子配件 拆下梭子配件 1. 將車針移到最高位置 ,拆下配件盒 , 並打開蓋子。* 線軸 線軸盒 2. 鬆開小彈簧鎖,拆下線軸盒 ,拉出線軸盒。 3. 將梭子拉柄推至旁邊, 再把線輪柱推至梭子中央, 拿出固定環和梭子。 4. 用清潔刷清除零件上的灰塵和線頭。 固定環 梭子 梭子輪軸 拉柄 拉柄 警告!不使用時或更換機器零件前 ,須拔掉插頭。... - Page 78 繁中 安裝梭子配件 1. 用線輪柱固定梭子, 小心地將梭子放入張力架 , 且須與梭子輪軸形成圓形。 2. 安裝固定環 ,使線輪柱底部固定於底部溝槽。 3. 用梭子輪軸拉柄鎖緊固定環。 4. 最後將線軸盒安裝至縫紉機, 蓋上蓋子, 並將配件盒放回原處。...
-
Page 79: 故障排除
繁中 故障排除 警告!務必朝自己的方向(逆時針方向)轉動手輪。若以錯誤方向轉動手輪, 可能造成車針或布料損壞,也可能造成個人傷害的危險。 問題 原因 處理方法 縫線產生線圈 • 上線未正確穿好。 • 由前往後重新穿線。 • 底線未正確穿入線軸盒。 • 將底線正確的穿入線軸盒(請看第64頁)。 縫線或布料皺縮 • 車針過粗 , 不適用於該布料。 • 使用更細的車針。 • 縫線緊度過緊。 • 調整上線緊度(請看第75頁)。 無法正確送布 • 縫線品質不佳。 • 使用更好的線 • 底線未正確穿入線軸盒。 • 將底線正確的穿入線軸盒(請看第64頁)。 • 縫紉時拉動布料。 • 讓縫紉機自動送布。 縫紉時出現噪音及無法正 • 送布齒或車針柄有聚積棉絮 。 • 清潔送布齒和車針柄(請看76頁)。 常縫紉 • 車針受損。 • 安裝不同車針。 車針撞擊線軸盒而導致 • 固定環未固定在正確位置 ,拉柄也未鎖住。 • 依照說明書指示安裝固定環和線軸盒(請看第77和78頁)。 斷針 • 線軸盒未固定在正確位置。 • 縫紉時正常送布。 • 強行送布可能造成車針彎曲或導致斷針。... - Page 80 繁中 故障排除 問題 原因 處理方法 底線斷線 • 線軸錯誤安裝於線軸盒。 • 將線軸正確的安裝在線軸盒(請看第64頁)。 • 底線未正確穿好。 • 正確地安裝底線(請看第64頁)。 • 底線緊度過緊。 • 降低底線緊度(請看第75頁)。 上線斷線 • 上線未正確穿好。 • 重新穿線(請看第65頁)。 • 上線緊度過緊。 • 降低緊度(請看第75頁)。 • 縫線太粗或太細,無法使用車針。 • 安裝不同縫線。 • 車針未正確裝好。 • 拆下車針, 重新安裝(請看第74頁)。 • 線輪柱上的縫線堵塞。 • 拆下上線線軸,將線頭轉到線軸後方 , 並使用毛氈墊。 • 車針受損。 • 安裝新車針(請看第74頁)。 縫紉失敗 • 車針未正確裝好或受損。 • 拆下車針, 重新安裝或安裝新車針(請看第74頁)。 • 使用錯誤的壓布腳。 • 安裝正確的壓布腳。 斷針 • 車針未正確裝好或受損。 • 拆下車針, 安裝新車針(請看第74頁)。 • 縫紉時拉動布料。 • 縫紉時正常送布。 • 縫線太粗。...
- Page 81 繁中...
- Page 82 日本語 目次 安全上の注意 安全に関する注意事項 ......................................................安全にお使いいただくために ....................................................ミシンを長く快適にお使いいただくために ................................................修理・調整 ..........................................................各部の名称 ........................................................... ミシンの付属品 ........................................................記号について ........................................................準備 はじめに ..........................................................下糸の巻き方 ........................................................ボビンのセット ........................................................上糸のかけ方 ........................................................下糸の引き上げ方 ........................................................ 縫ってみましょう 直線縫い ..........................................................ジグザグ縫い ........................................................飾り縫い ..........................................................まつり縫い ..........................................................ボタンホール(ボタン穴)かがり .................................................... ファスナー ..........................................................お手入れ...
-
Page 83: 安全に関する注意事項
日本語 安全上の注意 このたびは本製品をお買い上げいただき、ありがとうございます。 • このミシンは、屋外では使用しないでください。 本製品はさまざまな機能を備えた家庭用ミシンです。ご使用前にこの取扱説明書を • エアスプレーを噴射した場所や、酸素吸入器・酸素濃縮装置・液化酸素・酸素ボン よくお読みになり、製品の各種機能および使用方法をご確認ください。 ベ等を保管または使用している場所ではミシンを使用しないでください。 • ミシンの電源を切るには、 電源スイッチを「OFF」にして、 コンセントからプラグを抜い この取扱説明書は、 いつでも参照できるように大切に保管してください。 てください。 • コンセントからプラグを抜く際は、 コードを引っ張らずに、 プラグ部分を持って抜いて 安全に関する注意事項 ください。 ヤケドや火災、感電、 ケガを防ぐため、 下記の安全に関する注意事項をよくお読みにな • 可動部分には手を触れないでください。針でケガをしないよう、 十分に注意してくだ り、指示に従ってください。 さい。 • 針板は、製品に対応した適切なものをお使いください。適切でない針板を使用する • プラグをコンセントに差し込んだまま、 ミシンのそばを離れないでください。ミシンを と、針が破損するおそれがあります。 使い終わったあとは、 すぐにプラグをコンセントから抜いてください。お手入れの際 • 曲った針は使用しないでください。ご使用前に必ず点検してください。 も、... -
Page 84: 安全にお使いいただくために
日本語 安全にお使いいただくために 修理・調整 • 縫っているときは、針から絶対に目を離さないでください。また、 プーリー、天びん、 ミシンの修理や調整が必要な場合は、取扱説明書の「故障かなと思ったら」を参照 針、 その他の可動部分には手を触れないでください。 してください。 • 次のときは電源スイッチを切り、 電源プラグをコンセントから抜いてください。 - ミシンを使い終わったとき 取扱説明書および製品の仕様は予告なく変更されることがあります。 - 針などのパーツを交換するとき、 または取り外すとき - 使用中に停電したとき - ミシンのお手入れをするとき - ミシンのそばを離れるとき • フットペダルの上にはものを置かないでください。 • 電源プラグは直接コンセントに差し込んでお使いください。延長コードは使用しない でください。 ミシンを長く快適にお使いいただくために • ミシンは直射日光の当たる場所や水気のある場所、湿度の高い場所には保管しな いでください。ポータブルヒーターやアイロン、 ハロゲンランプなどの近くなど、温度の 高い場所で使用・保管しないでください。 • ミシン表面のお手入れには、必ず中性石けんまたは中性洗剤をご使用ください。 ベ ンジンやシンナー、 研磨剤は絶対に使用しないでください。ミシン表面やミシン本体 を傷つけるおそれがあります。... -
Page 85: 各部の名称
日本語 各部の名称 前面 背面 E F G 1. 付属品入れ 9. 糸立て棒 17. 針 2. ボビンケース 10. ハンドル 18. 上糸案内 3. 上糸調子ダイヤル 11. 糸巻きレバー 19. 針止めネジ 4. 天びん 12. 下糸巻き押え 20. 針板 5. 糸切り刃 13. 返し縫いボタン 21. プーリー 6. 上糸案内(上) 14. フットコントローラー 22. 電源スイッチ 7. 下糸巻き案内 15. 押え 23. ソケット 8. 模様選択ダイヤル 16. 押え止めネジ 24. 押え上げ... -
Page 86: ミシンの付属品
日本語 ミシンの付属品 押え(ミシン本体に付属して ボビン 糸立て棒 います) ボビンに下糸を巻き取り 付属の補助糸立て棒は既 直線縫い、 ジグザグ縫い、飾 存の糸立て棒に取り付けて ます。 り縫い、 まつり縫いで使用し 使用します。 ます(93、 94、 95、 96ページ 参照)。 ファスナー押え 糸立て座 ネジ回し ファスナーを縫うときに使用 糸ごまの下にセットします。 調整やお手入れに使用し します(98ページ参照)。 糸ごまがスムーズに静かに ます。 回るようにするためのもの です。 ボタンホール押え シームリッパー ボタンホールを縫うときに使 縫い目をほどくのに使用し 用します(97ページ参照)。 ます。 針 ブラシ 針の交換方法について 送り歯からホコリや糸くず... -
Page 87: 記号について
日本語 記号について 糸調子 飾り縫い 糸調子の調節方法については、 101ページを参照して G、H、I、J。飾り縫いの方法については、 95ページを参 ください。 照してください。 返し縫いボタン このボタンを押し下げながらフットコントローラーを踏み 込むと、返し縫いができます。返し縫いをすると、縫い 目がほどけません。 まつり縫い 直線縫い L、M。まつり縫いの方法については、 96ページを参照 A、B、 C。直線縫いの方法については、 93ページを参 してください。 照してください。 ジグザグ縫い ボタンホール押え D、E、F、K。ジグザグ縫いの方法については、 94ページ ボタンホールを縫うときに使用します(97ページ参照) を参照してください。 。... -
Page 88: はじめに
日本語 準備 はじめに 電源のつなぎ方 ミシンのプラグを差し込む前に、 ミシンの定格電圧と定格周波数がコンセントと同じ であることを確認してください。ミシンの定格電圧と定格周波数は、 ミシン底面のラベ ルに記載してあります。 1. 電源スイッチがオフになっていることを確認します。 2. 電源コードをミシンのソケットに差し込みます。 3. 電源コードをコンセントに差し込みます。 4. 電源スイッチをオンにします。 5. ミシン本体の糸立て棒を引き出し、 付属の補助糸立て棒をセットします。 フットコントローラーの使い方 フットコントローラーの踏み込みの強弱によって、縫う速度を変えることができます。 強く踏み込むほど、縫う速度は速くなります。 ペダルから足を離すと、 ミシンは自動的 に停止します。 アドバイス! ミシンの速度を確かめるため、 ミシンに糸を通す前にフットコントローラー を踏んで試してみてください。... -
Page 89: 下糸の巻き方
日本語 下糸の巻き方 1. プーリーを外側に引き出します。 2. 糸を少し引き出し、上糸案内の穴に通したあと、 下糸巻き案内にかけます。 3. ボビンの穴の1つに内側から外側へ糸を通し、ボビンを糸巻きレバーにはめこみ ます。 4. 糸巻きレバーを、 右の下糸巻き押えの方向に押します。このとき、糸の端を放さない でください。 E F G 5. フットコントローラーを踏み込みます。糸がきれいに巻きついてきたら、糸の端を放 します。糸がボビンに一杯に巻きついたら、 フットコントローラーから足を離します。 6. プーリーを内側に押し戻し、糸巻きレバーを左にスライドします。糸の端を切りま す。 E F G E F G... -
Page 90: ボビンのセット
日本語 ボビンのセット 1. 付属品入れを左にスライドして取り外します。かまカバー左のつまみを下に押して、 ボビンケースを開けます。ボビンケースの小さいつまみを起こし、ボビンケースをミシ ンから引き出します。 2. ボビンをボビンケースに入れます。 3. ボビンケースの糸溝に糸を入れます。 4. 次に糸を調子ばねの下から穴へ通します。ボビンケースから糸を15cm程度引き出 しておきます。糸を引っ張ったときにボビンが時計回りに回るようにしてください。 5. ボビンケースの突起がかまの溝に収まるようにして、ボビンケースをミシンに再びセ ットします。かまカバーを閉じて、 付属品入れを元の位置に戻します。... -
Page 91: 上糸のかけ方
日本語 上糸のかけ方 1. プーリーを手前に回し、天びんを一番上まで上げます。押え上げレバーを引き上げ、 押えも上げます。 E F G 2. 糸ごまの後ろ側から糸が出るように、糸ごまを糸立て棒に差し込みます。 3. 糸案内の穴に糸を通します。 4. 上糸調節の脇のみぞに沿って糸を下へ下ろし(矢印1)、 下まで下ろしたら反対側の みぞへ糸を回して上へ引き上げます(矢印2)。 K L M 5. 糸を天びんに、 右から左へ通します。 6. 糸を下へ引っ張り、糸掛けに通します。最後に糸を針に、 前から後ろへ通します。 E F G E F G E F G E F G... -
Page 92: 下糸の引き上げ方
日本語 下糸の引き上げ方 1. 押えを上げ、上糸を左手に持ちます。 2. プーリーを手前にゆっくり回し、針を一番下まで下げます。 プーリーをさらに回し、針 を一番上まで上げます。 3. 左手で上糸を軽く引きあげると、 下糸が引き出されます。 4. 上糸と下糸を、 いずれも15cm程度の長さになるまで、 ミシンの後ろ側(自分と反対 の方向)へまっすぐに引き出します。... -
Page 93: 直線縫い
日本語 縫ってみましょう 押さえ ステッチ 糸調子 直線縫い 模様選択ダイヤルをA、B、 Cのいずれかに設定して、 直線縫いを選択します。 ダイヤル をA、B、 Cの中間の位置にセットすると、縫い目の長さをさらにこまかく調節できます。 糸調子ダイヤルを2から6の間に設定します。押えが正しく取り付けられていることを 確認してください(99ページ参照)。 1. プーリーを手前に回して針を上げます。押えを上げ、押えの下に生地を置きます。 プ ーリーを手前に回して、生地の縫い始めの位置に針を下ろします。押えを下げます。 上糸と下糸が、押えの下でミシンの後ろ側へ引き出されているようにします。 2. フットコントローラーを軽く踏み込んで縫い始めます。縫い始めがほどけないよう に、 フットコントローラーを踏みながら返し縫いボタンを押し、 後ろ向きに数針縫い ます。返し縫いボタンを離すと、 また前方向に縫い始めます。 3. 生地の角などで縫い方向を変える場合は、針が生地に刺さった状態で押えを上 げ、生地の向きを変えます。押えを下げ、先を縫います。 4. 縫い終わったら、押えを上げて生地を15cmほど後ろへ引き出します。糸切り刃で 糸を切ります。このとき、次回すぐに縫い始められる程度の長さに糸を残しておき ます。 アドバイス! 縫い始める前に、 これから縫う生地の端切れで試し縫いをして、必要に応 じて設定を調整してください。針板の目盛りを使うと、直線縫いがきれいに縫えます。... -
Page 94: ジグザグ縫い
日本語 押さえ ステッチ 糸調子 ジグザグ縫い 模様選択ダイヤルをD、E、F、Kのいずれかに設定して、 ジグザグ縫いを選択します。 ダ イヤルをD、E、F、Kの中間の位置にセットすると、縫い目の長さをさらにこまかく調節で きます。糸調子ダイヤルを1から5の間に設定します。押えが正しく取り付けられている ことを確認してください(99ページ参照)。 1. 最初にプーリーを手前に回して針を上げます。押えを上げ、押えの下に生地を置き ます。 プーリーを手前に回して、生地の縫い始めの位置に針を下ろします。押えを 下げます。上糸と下糸が、押えの下でミシンの後ろ側へ引き出されているようにし ます。 2. フットコントローラーを軽く踏み込んで縫い始めます。 3. 生地の角などで縫い方向を変える場合は、針が生地に刺さった状態で押えを上 げ、生地の向きを変えます。押えを下げ、先を縫います。 4. 縫い終わったら、押えを上げて生地を15cmほど後ろへ引き出します。糸切り刃で 糸を切ります。このとき、次回すぐに縫い始められる程度の長さに糸を残しておき ます。 アドバイス! 縫い始める前に、これから縫う生地の端切れで試し縫いをして、必要に 応じて設定を調整してください。... -
Page 95: 飾り縫い
日本語 押さえ ステッチ 糸調子 飾り縫い 模様選択ダイヤルをG、H、I、Jのいずれかに設定して、飾り縫いを選択します。糸調子 ダイヤルを6から8の間に設定します。押えが正しく取り付けられていることを確認して ください(99ページ参照)。 1. プーリーを手前に回して針を上げます。押えを上げ、押えの下に生地を置きます。 プ ーリーを手前に回して、生地の縫い始めの位置に針を下ろします。押えを下げます。 上糸と下糸が、押えの下でミシンの後ろ側へ引き出されているようにします。 2. フットコントローラーを軽く踏み込んで縫い始めます。 3. 生地の角などで縫い方向を変える場合は、針が生地に刺さった状態で押えを上 げ、生地の向きを変えます。押えを下げ、先を縫います。 4. 縫い終わったら、押えを上げて生地を15cmほど後ろへ引き出します。糸切り刃で 糸を切ります。このとき、次回すぐに縫い始められる程度の長さに糸を残しておき ます。 アドバイス! 縫い始める前に、これから縫う生地の端切れで試し縫いをして、必要に 応じて設定を調整してください。... -
Page 96: まつり縫い
日本語 押さえ ステッチ 糸調子 まつり縫い 模様選択ダイヤルをLまたはMに設定して、 まつり縫いを選択します。糸調子ダイヤル を1から4の間に設定します。押えが正しく取り付けられていることを確認してください (99ページ参照)。 1. プーリーを手前に回して針を上げます。生地を図のように折ります。押えを上げ、押 えの下に生地を置きます。 プーリーを手前に回して、生地の折り山の左端にわずか に針がかかるように針を下ろします。押えを下げます。上糸と下糸が、押えの下でミ シンの後ろ側へ引き出されているようにします。 2. フットコントローラーを軽く踏み込んで縫い始めます。 3. 縫い終わったら、押えを上げて生地を15cmほど後ろへ引き出します。糸切り刃で 糸を切ります。このとき、次回すぐに縫い始められる程度の長さに糸を残しておき ます。 アドバイス! 縫い始める前に、これから縫う生地の端切れで試し縫いをして、必要に 応じて設定を調整してください。... -
Page 97: ボタンホール(ボタン穴)かがり
日本語 押さえ ステッチ ボタンホール(ボタン穴)かがり ボタンホール押えが正しく取り付けられていることを確認してください(99ページ参 照)。模様選択ダイヤルを の記号に設定し、上糸と下糸を左に引きます。 1. ボタンホール押えを手前にスライドさせ、 ボタンホールの長さに合わせます。長さを 測るには、ボタンホールのガイドライン(目盛り)を利用してください。ボタンホール の左側を、 ボタンホール押えの端まで、 ゆっくり縫います。針が左側にある状態で 縫い終えます。 2. 模様選択ダイヤルを の記号に変更し、数針縫います。針が右側にある状態で縫 い終えます。 3. 模様選択ダイヤルを の記号に変更し、左側と同じ長さだけ縫います。針が右側 にある状態で縫い終えます。 4. 模様選択ダイヤルを の記号に変更し、数針縫います。針が左側にある状態で縫 い終えます。 5. 縫い終わったら、押えを上げて生地を15cmほど後ろへ引き出します。糸切り刃で糸 を切ります。このとき、次回すぐに縫い始められる程度の長さに糸を残しておきま す。シームリッパーでボタンホールを切り開きます。 アドバイス! 縫い始める前に、これから縫う生地の端切れで試し縫いをして、必要に 応じて設定を調整してください。... -
Page 98: ファスナー
日本語 押さえ ステッチ 糸調子 ファスナー 模様選択ダイヤルをA、B、 Cのいずれかに設定して、 直線縫いを選択します。糸調子 ダイヤルを1から4の間に設定します。 ファスナー押えが正しく取り付けられていることを 確認してください(XXページ参照)。 1. プーリーを手前に回して針を上げます。押えの左側に針が落ちるよう、 ファスナー押 えの位置を調節してください。 2. ファスナーを生地にまち針でとめるか、 仮縫いして固定します。生地をファスナー押 えの下に入れます。上糸と下糸をミシンの後ろ側へ引いてから、 ファスナー押えを下 ろします。 3. ファスナーの右側を生地に縫い付けるとき、 ファスナーの歯がファスナー押えと平行 になるようにします。 ファスナーの一番上まで縫ってしまう前にファスナー押えを上 げ、針を生地に刺したままファスナーを開けます。 ファスナー押えを下げ、 右側の残り の部分を縫います。縫い終わりがほどけないよう返し縫いします。返し縫いボタン を押して後ろ向きに少しだけ縫ったらボタンを離し、 前方向に数針縫います。 4. 反対側を縫います。 ファスナー押えの右側だけを縫うように、 ファスナー押えの位置 を変えます。手順3と同様にして、 ファスナーの左側を生地に縫い付けます。 アドバイス! 縫い始める前に、これから縫う生地の端切れで試し縫いをして、必要に 応じて設定を調整してください。... -
Page 99: 押えの取り外し方
日本語 お手入れ 押えの取り外し方 1. プーリーを手前に回して、針を一番上まで上げます。押えを上げます。 2. 押えホルダーの裏側にあるレバーを上げて、押えを外します。押えを外すとき、強い 力をかけないでください。 押えの取り付け方 1. 突起が押えホルダーの溝の真下にくるように、押えを置きます。押えホルダーを下 げます。 2. 押えホルダーをもう一度上げると、押えが固定されます。... -
Page 100: 針の交換
日本語 針の交換 1. プーリーを手前に回して針を上げます。次に押えを下げます。 2. 針止めネジを反時計回りに回して、針をゆるめます。ネジを初めてゆるめるときは、 ネジが非常に固いことがあります。針棒から針を外します。 3. 新しい針の平面部を自分と反対の方へ向けて、針棒に差し込みます。針が針棒内 の奥に突き当たるまで押し込みます。 4. 針止めネジをしっかり締めます。 曲がった針やすり減った針は使わないでください。生地を傷める原因になります。本 製品は、規格サイズ90/14の針を使用します。... -
Page 101: 上糸調子のとり方
日本語 正 上糸調子のとり方 上糸 糸調子を調整する必要がある場合、通常は上糸だけを調整します。 下糸調子は製造 過程で設定されているため、調整が必要になるのは特殊な糸や生地を使う場合だ 下糸 けです。 1. 糸調子が正しいと、上糸と下糸が布の中間で交差します。 誤 対処方法 2. 上糸が強すぎると、生地の表側に下糸が出ます。この場合は、上糸調子を少し弱 めます。 3. 上糸が弱すぎると、生地の裏に上糸が出ます。この場合は上糸調子を少し強め 上糸 ます。 下糸 下糸調子のとり方 下糸調子を強める必要はあまりありませんが、 もし必要な場合 は、ボビンケースの調節ネジを右に回します。 下糸調子を少し弱 誤 対処方法 める場合は、調節ネジを左に回します。 下糸調子を確認するに は、 ボビンケースから糸を引き出してみます。わずかに抵抗があれ ば、糸調子は正常です。 上糸 下糸 アドバイス! ほとんどの生地で、糸調子は3~5の間です。縫い始める前に、 これから縫 う生地の端切れで試し縫いをして、必要であれば設定を調整してください。... -
Page 102: 送り歯の掃除
日本語 送り歯の掃除 ミシンがいつも快適に動作するよう、送り歯を定期的に掃除してください。 * 1. 針と押えを取り外します(99 、 100ページ参照)。針板のネジをゆるめて外します。 2. ブラシを使って、送り歯からホコリや糸くずを取り除きます。 3. 針板、押え、針を元通りに取り付けます。 *注意! ミシンのそばを離れるときや部品を交換するときは、 その前に必ずコンセントか らミシンのプラグを抜いてください。... -
Page 103: かまの掃除
日本語 かまの掃除 かまの解体の仕方 1. 針を一番上まで上げ、 付属品入れを取り外してかまカバーを開けます。 * ボビン ボビンケース 2. ボビンケースの小さいつまみを起こして、 ボビンケースを取り出します。 3. 大がまふた押えを左右に開きます。 中がまの中央にある突起を引いて、大がまふた と中がまを外します。 4. かま内部や周辺のホコリや糸くずをブラシで取り除きます。 大がまふた 中がま かまの駆動装置 大がまふた押え 大がまふた押え *注意! ミシンのそばを離れるときや部品を交換するときは、 その前に必ずコンセントか らミシンのプラグを抜いてください。... - Page 104 日本語 かまの取り付け方 1. 中がまの突起を持ち、大がまにそっとはめ込みます。 中がまとかまの駆動装置が 円を描くようにはめてください。 2. 大がまふたの下部の突起が、かまの下部の溝に合うようにして取り付けます。 3. 大がまふた押えを閉じて、大がまふたをしっかりロックします。 4. 最後にボビンケースをミシンに取り付けます。かまカバーを閉じて、 付属品入れを元 の位置に戻します。...
-
Page 105: 故障かなと思ったら
日本語 故障かなと思ったら 警告! プーリーは必ず手前に(反時計回りに)回してください。逆向きに回すと、針や生地を傷めたり、 ケガをするおそれがあります 問題 原因 対処方法 縫い目に輪ができる • 上糸が針に正しく通っていません。 • 針の前から後ろへ糸を通してください。 • 下糸がボビンケースに正しく通っていません。 • 下糸をボビンケースに正しく通してください(90ページ参照) 縫い目または生地にしわが • 生地に対して針が太すぎます。 • 細い針を使ってください。 よる • 糸調子が強すぎます。 • 上糸調子を調整してください(101ページ参照)。 生地が均等に送られない • 糸の品質がよくありません。 • 品質のよい糸を使ってください。 • 下糸がボビンケースに正しく通っていません。 • 下糸をボビンケースに正しく通してください(90ページ参照)。 • 縫っているとき生地を引っ張っていませんか。 • 生地が自動的に送られるよう、 手は生地に軽く添えるだけにしてくださ い。... - Page 106 日本語 故障かなと思ったら 警告! プーリーは必ず手前に(反時計回りに)回してください。逆向きに回すと、針や生地を傷めたり、 ケガをするおそれがあります 問題 原因 対処方法 下糸が切れる • ボビンがボビンケースに正しく取り付けられていません。 • ボビンをボビンケースに正しくセットしてください(90ページ参照)。 • 下糸の通し方が正しくありません。 • 下糸を正しく通してください(90ページ参照)。 • 下糸調子が強すぎます。 • 下糸調子を弱めてください(101ページ参照)。 上糸が切れる • 上糸の通し方が正しくありません。 • ミシンに糸をかけ直し、針に糸を正しく通してください(91ページ参照)。 • 上糸調子が強すぎます • 上糸調子を弱めてください(101ページ参照)。 • 針に対して、糸が太すぎるかまたは細すぎます。 • 糸を交換してください。 • 針が正しく取り付けられていません。 • 針を外して付け直してください(100ページ参照)。 • 糸立て棒で糸がからまっています。 •...
- Page 107 日本語...
- Page 108 © Inter IKEA Systems B.V. 201 1 AA-516804-4...
Need help?
Do you have a question about the SY and is the answer not in the manual?
Questions and answers