Table of Contents
Advertisement
Mod Con
INSTALLATION
START-UP
MAINTENANCE
PARTS
Models
1000 / 1700*
*Boilers with a Suffix of HL Equipped with High and Low Gas
Pressure Switches
THIS MANUAL IS FOR USE WITH REV. 1 MOD CON 1000 and 1700 BOILERS
MANUFACTURED AFTER AUGUST 13, 2013
Heat Exchanger Bears the ASME "H" Stamp
This manual must only be used by a qualified heating installer/service technician. Read all instructions in this manual before installing.
Perform steps in the order given. Failure to comply could result in substantial property damage, severe personal injury, or death.
NOTICE: HTP reserves the right to make product changes or updates without notice and will not be held liable for typographical errors
in literature.
NOTE TO CONSUMER: PLEASE KEEP ALL INSTRUCTIONS FOR FUTURE REFERENCE.
120 Braley Rd. P.O. Box 429
East Freetown, MA 02717
www.htproducts.com
LP- 428 REV. 9.2.14
Advertisement
Table of Contents

Subscribe to Our Youtube Channel
Related Manuals for HTP MODCON1000


Summary of Contents for HTP MODCON1000
- Page 1 Perform steps in the order given. Failure to comply could result in substantial property damage, severe personal injury, or death. NOTICE: HTP reserves the right to make product changes or updates without notice and will not be held liable for typographical errors in literature.
- Page 2 IF THE INFORMATION IN THIS MANUAL IS NOT FOLLOWED EXACTLY, A FIRE OR EXPLOSION MAY RESULT, CAUSING PROPERTY DAMAGE, PERSONAL INJURY, OR LOSS OF LIFE. DO NOT STORE GASOLINE OR OTHER FLAMMABLE VAPORS AND LIQUIDS IN THE VICINITY OF THIS OR ANY OTHER APPLIANCE. WHAT TO DO IF YOU SMELL GAS ...
-
Page 3: For The Installer
In some circumstances, the property owner or his/her agent assumes the role, and at government installations, the commanding officer or departmental official may be the AHJ. NOTE: HTP, Inc. reserves the right to modify product technical specifications and components without prior notice. FOR THE INSTALLER This manual must only be used by a qualified heating installer/service technician. -
Page 4: Table Of Contents
Code for the Installation of Heat Producing Appliances (latest version), from American Insurance Association, 85 John Street, New York, NY 11038. The latest version of the National Electrical Code, NFPA No. 70. NOTE: The gas manifold and controls met safe lighting and other performance criteria when the boiler underwent tests specified in ANSI Z21.13 –... - Page 5 F. PREVENT COMBUSTION AIR CONTAMINATION ........................14 G. REMOVING A BOILER FROM A COMMON VENT SYSTEM ....................15 H. UNCRATING AND MOVING BOILER ............................15 PART 4 – BOILER PIPING ................................ 15 A. GENERAL PIPING INFORMATION ............................16 B. RELIEF VALVE ..................................16 C.
- Page 6 G. OUTDOOR SENSOR ................................43 H. INDIRECT SENSOR (TOP BOILER CONNECTION) ....................... 43 I. OPTIONAL 0-10 VOLT BUILDING CONTROL SIGNAL ......................43 J. OPTIONAL HIGH GAS PRESSURE SWITCH .......................... 44 K. OPTIONAL LOW GAS PRESSURE SWITCH .......................... 44 L. OPTIONAL FLOW SWITCH ..............................44 M.
-
Page 7: Part 1 - General Safety Information
Due to low water content of the boiler, improperly sizing the boiler in regard to heating system load will result in excessive boiler cycling and accelerated component failure. HTP DOES NOT warrant failures caused by improperly sized boiler applications. DO NOT oversize the boiler to the system. -
Page 8: Boiler Operation
These chemicals can attack gaskets and seals in water boilers, are poisonous if consumed, and can cause injury or death. Consider piping and installation when determining boiler location. NOTE: Damages resulting from incorrect installation or from use of products not approved by HTP, Inc. ARE NOT covered by warranty. PART 2 – BEFORE YOU START A. -
Page 9: Optional Equipment
Indirect Tank Sensor (optional) – Monitors storage tank temperature. C. OPTIONAL EQUIPMENT Below is a list of optional equipment available from HTP. These additional options may be purchased through your HTP distributor. Remote System Sensor (Part # 7250P-324) ... -
Page 10: Part 3 - Prepare Boiler Location
Stainless to PVC Vent Adapter (6” - Part # 7350P-275, 8” Part # 7350P-375) Intake / Exhaust Screen (6” – Part # SSV6.6, 8” – Part # SSV8.6) NOTE: When using an optional system sensor, pipe insulation must be wrapped around it to improve temperature measurement accuracy and increase overall system efficiency. -
Page 11: Flooring
6. Clean and flush system when reinstalling a boiler. NOTE: This boiler must be installed within the prescribed clearances. If local building codes require additional clearance, these codes supersede HTP’s. It is recommended to make note of the boiler model and serial number before finalizing installation. B. FLOORING Assure that the floor and structure of the installation location are sufficient to support the full installed weight of the boiler, including water content of the heat exchanger and related piping. -
Page 12: Clearances For Service Access
Figure 2 – Specifications and Dimensions D. CLEARANCES FOR SERVICE ACCESS See Figure 3 for recommended service clearances. If you do not provide the minimum clearances shown, it might not be possible to service the boiler without removing it from the space. Space must be provided with combustion / ventilation air openings correctly sized for all appliances located in the same space as the boiler. -
Page 13: Exhaust Vent And Intake Pipe
Figure 3 – Service Clearances Check with your local Authority Having Jurisdiction for requirements when installing boiler. Please read the entire manual before attempting installation. Failure to properly take factors such as boiler venting, piping, condensate removal, and wiring into account before installation could result in wasted time, money, and possible property damage and personal injury. -
Page 14: Indoor Combustion Air Installation In Confined Or Unconfined Space
2. INDOOR COMBUSTION AIR INSTALLATION IN CONFINED OR UNCONFINED SPACE This appliance requires fresh, uncontaminated air for safe operation and must be installed in a mechanical room where there is adequate combustion and ventilating air. NOTE: To prevent combustion air contamination, see Table 1. Combustion air from the indoor space can be used if the space has adequate area or when air is provided through a duct or louver to supply sufficient combustion air based on the appliance input. -
Page 15: Removing A Boiler From A Common Vent System
NOTE: DAMAGE TO THE BOILER CAUSED BY EXPOSURE TO CORROSIVE VAPORS IS NOT COVERED BY WARRANTY. (Refer to the limited warranty for complete terms and conditions). G. REMOVING A BOILER FROM A COMMON VENT SYSTEM Do not install the boiler into a common vent with any other boiler. This will cause flue gas spillage or boiler malfunction, resulting in possible substantial property damage, severe personal injury, or death. -
Page 16: General Piping Information
Plumbing of this product should only be done by a qualified, licensed plumber in accordance with all local plumbing codes. The boiler may be connected to an indirect water heater to supply domestic hot water. HTP offers 119 and 175 gallon size indirect water heaters in stainless steel or glass-lined construction. -
Page 17: System Water Piping Methods
All piping methods shown in this manual use primary/secondary connection to the boiler loop. This is to avoid the possibility of inadequate flow through the boiler. For other piping methods, consult your local HTP representative, or refer to Boiler Piping Details in this manual. -
Page 18: Circulator Sizing
Minimum boiler flow rates are listed in the table below. MODEL MINIMUM BOILER FLOW RATE (GPM) MODCON1000 MODCON1700 Table 3 – Minimum Boiler Flow Rates The boiler heat exchanger does have a pressure drop which must be considered in system design. Refer to the graph in Figure 5 for pressure drop through the boiler heat exchanger. - Page 19 Friction Feet Flow GPM Friction Feet Flow GPM MODCON1000 MODCON1700 Table 4 – Temperature Rise Chart Figure 6 represents the combined flow rates and pipe sizes when using multiple boilers to design the manifold system for the primary circuit. To size, simply add up the number of boilers and the required flow rates for the system design temperature.
-
Page 20: Fill And Purge Heating System
Figure 6 – Multiple Boiler Manifold Piping H. FILL AND PURGE HEATING SYSTEM Attach the hose to balance and purge hose connector or drain valve and run hose to nearest drain. Close the other side of the balance and purge valve or the shut off valve after the drain. ... -
Page 21: Zoning With Zone Valves
2. The glycol solution should be tested at least once a year and as recommended by the glycol manufacturer. 3. Anti-freeze solutions expand more than water. For example: A 50% by volume solution expands 4.8% in volume for a temperature increase from 32 F to 180 F, while water increases 3% over the same temperature rise. -
Page 22: Boiler Piping Details
5. Piping shown is Primary/Secondary. 6. The minimum pipe size for connecting an HTP indirect fired water heater is 1”. 7. The minimum pipe size for connecting a Mod Con boiler is 3” for both the 1000 and 1700 models. - Page 23 5. Piping shown is Primary/Secondary. 6. The minimum pipe size for connecting an HTP indirect fired water heater is 1”. 7. The minimum pipe size for connecting a Mod Con boiler is 3” for both the 1000 and 1700 models. See Multiple Boiler Manifold Piping chart, Figure 6 in this manual, when sizing and installing a multiple boiler system.
- Page 24 Figure 9 – Single Boiler Space Heating FIGURE NOTES: 1. This drawing is meant to demonstrate system piping concept only. 2. Install a minimum of 12 diameters of straight pipe upstream of all circulators. 3. Install a minimum of 6 diameters of straight pipe up and downstream of all closely spaced tees. 4.
- Page 25 Figure 10 – Cascaded Boilers – Space Heating FIGURE NOTES: 1. This drawing is meant to demonstrate system piping concept only. 2. Install a minimum of 12 diameters of straight pipe upstream of all circulators. 3. Install a minimum of 6 diameters of straight pipe up and downstream of all closely spaced tees. 4.
-
Page 26: Part 5 - Venting, Combustion Air And Condensate Removal
PART 5 – VENTING, COMBUSTION AIR AND CONDENSATE REMOVAL The boiler must be vented as detailed in this Venting Section. Ensure exhaust vent and intake piping complies with these instructions regarding vent system. Inspect finished exhaust vent and intake piping thoroughly to ensure all joints are well secured, airtight, and comply with all applicable code requirements, as well as with the instructions provided in this manual. -
Page 27: Requirements For Installation In Canada
When installing AL29-4C vent piping, install a PVC-to-stainless adapter at the boiler vent connection, and at the termination when using an HTP PVC termination kit. DO NOT mix AL-29-4C piping from different manufacturers unless using adapters specifically designed for the purpose by the manufacturer. -
Page 28: Exhaust Vent And Intake Pipe Location
Cellular foam core piping may be used on air inlet piping only. E. EXHAUST VENT AND INTAKE PIPE LOCATION – ANSI Z223.1 / NFPA 54 for US and CAN/CSA B149.1 for Canada – Exit Terminals for Direct-Vent Venting Systems Figure 11 DETERMINE EXHAUST VENT AND INTAKE PIPE LOCATION –... - Page 29 Condensate from the boiler is slightly acidic with a pH of 3.2 - 4.5. To avoid long term damage to the drainage system and to meet local code requirements, HTP recommends neutralizing the condensate with a Condensate Neutralizer Kit (Part # 7350P-611). The neutralizer kit connects to the drain system and contains marble chips that neutralize the pH level of the water vapor.
- Page 30 Figure 12 – Condensate Piping NOTE: Blow water into the condensate collector to remove any foreign matter that may block the line. NOTES: 1. Condensate line must be pitched at least 1/4" per foot to properly drain. If this cannot be done, or a very long length of condensate hose is used, you must increase the condensate line to a minimum of 1”...
-
Page 31: Exhaust Vent And Intake Pipe Sizing
LENGTH (INTAKE AND EXHAUST) OF VENT 6” 16’ 6” 16’ 150’ MODCON1000 8” 16’ 8” 16’ 150’ MODCON1700 Table 7 – Exhaust Vent and Intake Pipe Sizing 1. The equivalent length of friction loss in elbows, tees, and other fittings are listed in Table 8. -
Page 32: Boiler Removal From A Common Vent System
NOTE: For Canadian Installations, it is required that Non Metallic Vent Installations conform to ULC S636. Where plastic venting is not allowed, HTP recommends AL294C Stainless Steel Venting be used for Exhaust venting installations and “B” vent for intake air. - Page 33 Take extra precaution to adequately support the weight of vent pipes terminating through the roof. Failure to properly support roof terminated vent piping could result in property damage, serious personal injury, or death due to flue gas leakage. Figure 14 – Sidewall Venting with Stainless Steel All vent pipes must be glued, properly supported, and the exhaust must be pitched a minimum of ¼”...
- Page 34 Figure 15 – Two Pipe Roof Venting with Tee and Coupling All vent pipes must be glued, properly supported, and the exhaust must be pitched a minimum of ¼” per foot back to the boiler to allow drainage of condensate. Exhaust connection insertion depth should be a minimum of 2 ½” for 1000 models and 3” for 1700 models. When placing support brackets on vent piping, the first bracket must be within 1’...
- Page 35 Figure 16 – Unbalanced Venting NOTE: Exhaust vent must always be piped vertically in an unbalanced venting configuration. Take extra precaution to adequately support the weight of vent pipes terminating through the roof. Failure to properly support roof terminated vent piping could result in property damage, serious personal injury, or death due to flue gas leakage. All vent pipes must be glued, properly supported, and the exhaust must be pitched a minimum of ¼”...
-
Page 36: Room Air, Indoor Combustion, And Ventilation Air Installation Requirements
2. ROOM AIR, INDOOR COMBUSTION, AND VENTILATION AIR INSTALLATION REQUIREMENTS When using an indoor combustion air installation, the mechanical room MUST be provided with properly sized openings, and/or be of sufficient volume to assure adequate combustion air and proper ventilation for all gas fired appliances in the mechanical room to assure adequate combustion air and proper ventilation. -
Page 37: Part 6 - Gas Piping
Top Opening, Bottom Top Opening, Bottom Total Opening, in Opening, in Opening, in Opening, in MODCON1000 1000 1000 2000 MODCON1700 1700 1700 3400 Table 9 – Indoor Combustion Air Sizing The above requirements are for the boiler only; additional gas fired appliances in the mechanical room will require an increase in the net free area and/or volume to supply adequate combustion air for all appliances. -
Page 38: Gas Piping
Do not attempt to support the weight of gas piping with the boiler or its accessories. The gas valve and blower will not support the weight of the piping. Failure to follow this warning could result in substantial property damage, severe personal injury, or death. The gas connection on the boiler is 3”... -
Page 39: Check Inlet Gas Pressure
D. CHECK INLET GAS PRESSURE The gas valve is equipped with an inlet gas pressure tap that can be used to measure the gas pressure to the unit. To check gas pressure, perform the steps listed below: 1. IMPORTANT! Before you connect to the inlet pressure, shut off the gas and electrical power to unit. 2. -
Page 40: Gas Valve
E. GAS VALVE Figure 22 – Mod Con 1000 Gas Valve LP- 428 REV. 9.2.14... - Page 41 Figure 23 – Mod Con 1700 Gas Valve Do not do a gas conversion on this boiler without an officially approved conversion kit and instructions supplied by HTP. Failure to use a conversion kit when converting the boiler to fire on Natural or LP gas will result in extremely dangerous burner operation, leading to fire, explosion, severe injury or death.
-
Page 42: Part 7 - Field Wiring
PART 7 – FIELD WIRING To avoid electrical shock, turn off all power to the appliance prior to opening an electrical box within the unit. Ensure the power remains off while any wiring connections are being made. Failure to follow these instructions could result in component or product failure, serious injury, or death. -
Page 43: Low Voltage Connections
1. There is no connection required if an indirect water heater is not used in this installation. 2. The boiler will operate an indirect fired water heater with either a thermostat type aquastat installed in the indirect tank, or an HTP 7250P-325 tank sensor. -
Page 44: Optional High Gas Pressure Switch
NOTE: Installing the optional flow switch will disable the built-in low water cutoff. If a flow switch and a low water cutoff are necessary for the installation, purchase and install the optional UL353 LWCO (available from HTP, Part # 7350P-601). In this installation, it is recommended to install the flow switch kit first. -
Page 45: Wiring Of The Cascade System Communication Bus
Avoid running communication cables parallel and close to or against high voltage (120 volt or greater) wiring. HTP recommends that the maximum length of communication bus cables not exceed 200 feet. - Page 46 Figure 25 Figure 26 – Cascade Resistor Plug Installation Detail LP- 428 REV. 9.2.14...
- Page 47 Figure 27 – Mod Con Cascade Master and Follower Wiring LP- 428 REV. 9.2.14...
- Page 48 Figure 28 – Mod Con Internal Connection Diagram – LP-428-K LP- 428 REV. 9.2.14...
-
Page 49: Part 8 - Start-Up Preparation
PART 8 – START-UP PREPARATION Thoroughly clean and flush any system that has used glycol before installing the boiler. Provide the customer with a material safety data sheet (MSDS) on the fluid used. A. CHECK / CONTROL WATER CHEMISTRY Chemical imbalance of your water can cause severe damage to your boiler and associated equipment, and may also affect efficiency. You may have to have your water quality professionally analyzed to determine whether you need to install a water softener. -
Page 50: Freeze Protection (When Used)
B. FREEZE PROTECTION (WHEN USED) NEVER use automotive or standard glycol antifreeze, or ethylene glycol made for hydronic systems. Use only freeze-protection fluids certified by fluid manufacturer as suitable for use with stainless steel boilers, verified in fluid manufacturer’s literature. Thoroughly clean and flush any system that has used glycol before installing the new boiler. -
Page 51: Check For Gas Leaks
h. Disconnect the wires that are connected to the THERMOSTAT terminals of the customer connection board. Apply power to the boiler. The display will show the temperature of the water in the boiler. Press the ▼ and ENTER keys simultaneously and hold for 1 second. -
Page 52: Final Checks Before Starting Boiler
If the condensate outlet on the boiler is lower than the drain, you must use a condensate removal pump, available from HTP (554200). This pump is equipped with two leads that can be connected to an alarm or another type of warning device to alert the user of a condensate overflow, which, if not corrected, could cause property damage. -
Page 53: Part 9 - Start-Up Procedure
PART 9 – START-UP PROCEDURE FOR YOUR OWN SAFETY READ BEFORE OPERATING 1. This boiler does not have pilot. It is equipped with an ignition device which automatically lights the burner. Do not try to light the burner by hand. 2. -
Page 54: Operating Instructions
recommended you use the Menu Maps in the back of this manual and the detailed menu instructions printed in this section to help in menu navigation. UP AND DOWN ARROW KEYS – ▼▲ are used to navigate between the various functions displayed in the menu. After the function is enabled for editing by pushing the ENTER key, the ▼▲... -
Page 55: Programming The System Setting
Clock Settings (NOTE: The clock will reset if the boiler is powered off for more than a week.) SCREEN DESCRIPTION Function: Changes the clock from 12 hour mode (8:45 PM) to 24 hour mode (20:45). To change to 24 hour mode, CLOCK MODE (12/24) press the ENTER key. - Page 56 Function 7 Warm Weather Shutoff When used with an outdoor sensor, warm weather shut down will disable the boiler if the programmed outdoor WARM WEATHER OFF temperature is exceeded. Default: 68 F (Range: 41 F to 122 Function 8 Min Outdoor Temp Sets the minimum outdoor design temperature for the system.
-
Page 57: Resetting The Maintenance Schedule
Extra Boiler Mode EXTRA BOILER MODE Allows for a non HTP boiler to be controlled when the cascade output has risen above the percent of the cascade firing rate set in this parameter. Factory Default: Off (Range: 50% - 100%). -
Page 58: Part 10 - Start-Up Procedures For Installer
Press the ▼ key once. This screen displays the domestic hot water temperature set point on the top line. The actual temperature measured by the tank or return line sensor (HTP 7250P-325) is displayed on the bottom line. If a mechanical DHW SET aquastat is used in place of the recommended sensor, the second line will display ‘OFF’... - Page 59 Press the ▼ key once. The current outdoor temperature is displayed on the top line. If there is no outdoor sensor connected to the OUTDOOR boiler, this line will display ‘OFF’ in place of the temperature. If the outdoor sensor is shorted, this line will display FLUE ‘ON’...
-
Page 60: Bottom Boiler (Master) Menu Only
Press the ▼ key once. This screen displays the tenth oldest lockout fault that occurred in the boiler controller. The top line will alternate FAULT HISTORY between the words ‘FAULT HISTORY’ and the fault encountered. The bottom line displays the date and time the 08/28/2009 Fr 5:19A fault occurred. -
Page 61: Part 11 - Shutdown
COMBUSTION SETTINGS ON ALL MODELS Natural Gas Propane LP Fan Speed Ignition High Ignition High 5 – 50 5 – 50 Carbon Monoxide PPM 35 - 100 < 150 35 - 100 < 150 Carbon Dioxide (CO 8 - 10% 8 ½... -
Page 62: Boiler Fault
C. BOILER FAULT 1. When a fault condition occurs, the controller will illuminate the red “FAULT” indication light and display a fault message in the screen. The alarm output will also activate. Most fault conditions cause the CH pump to run in an attempt to cool the boiler. 2. - Page 63 Fault Code LOU 1. Check line voltage. It must be between 100 and 128 volts. 2. If available, connect PC, and using HTP service software check the 24v supply This display indicates that display in the lower left corner of the screen. The number displayed here must be the 24 volt power supply on greater than 128 and should be no greater than 250.
- Page 64 Fault Code F01 Check to see if the boiler with the F01 code This code indicates that one of the safety interlock switches displayed has any of the optional switches present in the unit has tripped. There are several interlock installed.
- Page 65 Fault Code F06 This display indicates that the return temperature of the boiler 1. Check circulator pump operation. is excessive. If accompanied by the red FAULT light and 2. Assure that there is adequate flow through the LOCKOUT flashing on the display, the return sensor boiler by accessing the status menu and assuring that temperature has exceeded 230 F and a serious safety issue...
- Page 66 Fault Code F16 1. Check flue system for obstructions. 2. Check proper communication between boilers. FLAP OPEN Flapper valve physically stuck open. 3. Check operation of flapper valve. 4. Check wiring between valve and controller. 5. Replace valve-flapper. Fault Code F20 The condensate trap is full.
-
Page 67: Part 13 - Maintenance
Figure 29 PART 13 – MAINTENANCE In unusually dirty or dusty conditions, care must be taken to keep appliance cabinet door in place at all times. Failure to do so VOIDS WARRANTY! Allowing the appliance to operate with a dirty combustion chamber will hurt operation. Failure to clean the heat exchanger as needed by the installation location could result in appliance failure, property damage, personal injury, or death. -
Page 68: Combustion Chamber Coil Cleaning Instructions For Heater
The combustion chamber insulation in this product contains ceramic fiber material. Ceramic fibers can be converted to cristobalite in very high temperature applications. The International Agency for Research on Cancer (IARC) has concluded, “Crystalline silica inhaled in the form of quartz or cristobalite from occupational sources is carcinogenic to humans (Group 1).”... - Page 69 d. Re-connect all wiring connections. e. Inspect the gas valve to assure the O-ring is in place. f. Replace the (4) screws on the aluminum connector on the gas valve. Turn the gas back on. (IMPORTANT: CHECK FOR GAS LEAKS BEFORE TURNING THE APPLIANCE ON!) g.
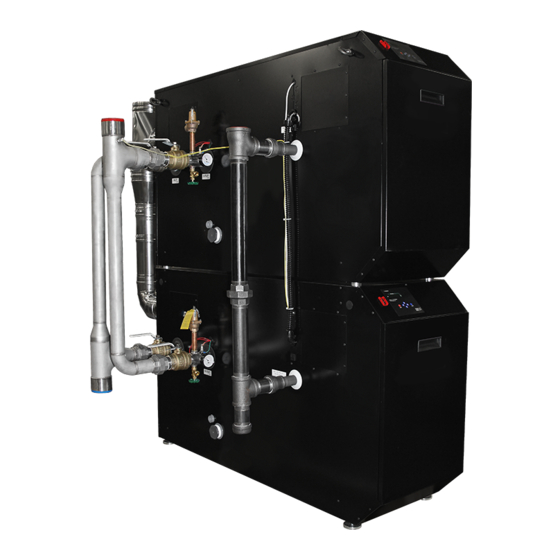
- Page 70 Figure 31 – MOD CON 1000 External Parts Blowout LP- 428 REV. 9.2.14...
- Page 71 Figure 32 – MOD CON 1700 External Parts Blowout LP- 428 REV. 9.2.14...
- Page 72 Figure 33 LP- 428 REV. 9.2.14...
- Page 73 Figure 34 – LP-445-S LP- 428 REV. 9.2.14...
- Page 74 Figure 35 – LP-428-V LP- 428 REV. 9.2.14...
- Page 75 Figure 36 LP- 428 REV. 9.2.14...
-
Page 76: Boiler Start-Up Report
BOILER START-UP REPORT LIGHT OFF ACTIVITIES DATE COMPLETED ________________ 1) Fill the Check all piping and gas connections, verify all are tight heating system Pressurize system (12 – 15 PSI) ____ PSI Add water to prime condensate cup Percentage of glycol in system (0-50%) ____% Verify near heater piping is properly supported 2) Check gas... - Page 77 The boiler requires minimal periodic maintenance under normal conditions. However, in unusually dirty or dusty conditions, periodic vacuuming of the cover to maintain visibility of the display and indicators is recommended. Periodic maintenance should be performed once a year by a qualified service technician to assure that all the equipment is operating safely and efficiently.
- Page 78 LP- 428 REV. 9.2.14...
- Page 79 LP- 428 REV. 9.2.14...
-
Page 80: Maintenance Notes
MAINTENANCE NOTES LP- 428 REV. 9.2.14... -
Page 81: Htp Customer Installation Record Form
HTP CUSTOMER INSTALLATION RECORD FORM The following form should be completed by the installer for you to keep as a record of the installation in case of a warranty claim. After reading the important notes at the bottom of the page, please also sign this document.
Need help?
Do you have a question about the MODCON1000 and is the answer not in the manual?
Questions and answers