Table of Contents
Advertisement
Quick Links
Advertisement
Table of Contents

Related Manuals for Pyle Vintage PVTTBT8


Summary of Contents for Pyle Vintage PVTTBT8
- Page 1 PVTTBT8 Retro Belt-Drive Bluetooth Turntable with USB-to-PC Connection...
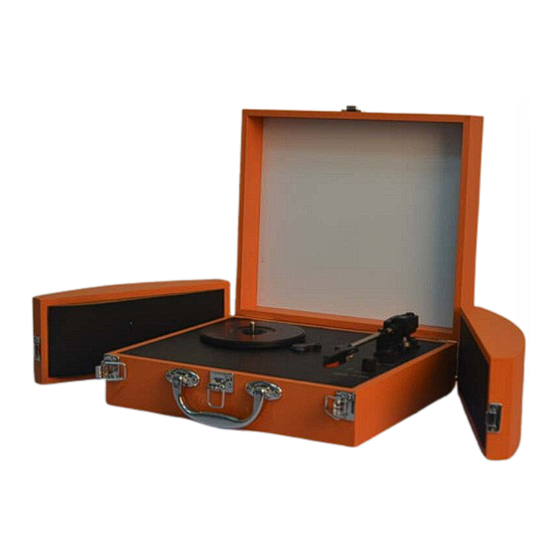
- Page 2 TURNTABLE PARTS 1. Tone Arm 2. Speakers 3. Tone Arm Rest 4. Function Selection Knob 5. Power/Volume Control Switch 6. Power Led Light Indicator 7. BT Led light indicator 8. Internal Battery Charging Led light Indicator 9. Speaker Buckles 10. Turntable Player Lock 11.
- Page 3 POWER ON THE UNIT Connect the power adaptor to an electrical outlet (120V-60Hz); Or make sure that the rechargeable battery has been fully charged. Then, turn the Power/Volume Control knob clockwise to switch on the unit. The Power led light indicator will light up(6). CHARGING INTERNAL BATTERY Once connected to the power adaptor, the internal battery is atomatically charging, the red led light indicator(8) will light red.
- Page 4 RECORD YOUR VINYL TO YOUR WINDOWS PC Audacity Recording Software Your USB turntable is compatible with any recording software that supports USB Audio devices. We have included Audacity, which is free software, distributed under the General Public License(GPL), However you may prefer to use a variety of 3rd party software packages. BEFORE STARTING THE SOFTWARE Make sure that your USB turntable is plugged into the computer with the supplied USB cable, and both the computer and the turntable are plugged in and on.
- Page 5 4. Press Stop 5. SAVE YOUR FILE NOW by clicking on ‘File’ -> ‘Save Project’. Select the destination and file name for the project and click ‘Save’. 6. You have completed the recording process. (See Figure 2) Figure 2: Recording Sample Adjusting Your Audio Level (Optional) 1.
- Page 6 are described further in the software’s help section as well as on the web (See Figure 4). Figure 4: Effect Drop Down List b. Normalize should be used to have the correct volume on the recording. (See Figure 5) Figure 5: Normalize Cleaning Your Audio (Optional) 1.
- Page 7 If you wish to clean up the entire recording, use “Select All” under the “Edit Menu” (See Figure 5. Repeat Step 2 to bring up the “Noise Removal” Window. 6. Adjust the amount of audio that you would like to filter by moving the slider in the “Noise Removal”...
- Page 8 TIPS FOR BETTER TURNTABLE PERFORMANCE 1. When opening or closing the turntable cover, handle it gently, gripping it either at the centre or at each side. 2. Do not touch the needle tip with your fingers; avoid bumping the needle against the turntable platter or record edge.
Need help?
Do you have a question about the Vintage PVTTBT8 and is the answer not in the manual?
Questions and answers