Advertisement
Advertisement
Table of Contents

Subscribe to Our Youtube Channel
Related Manuals for SMK-Link VP3720


Summary of Contents for SMK-Link VP3720
- Page 1 SMK-Link Electronics ™ Universal Projector Remote Control Cover VP3720 Version 2.0 - 06/15 Page...
-
Page 2: Table Of Contents
Table of Contents Regulatory Information ..............1 Getting Started ................3 Setting your Projector ..............4 Entering Library Codes ..............4 Learning From Another Remote ...........5 Searching For A Code ..............6 Show Current Code ..............7 Factory Reset ................8 Remote Control Layout ..............9 Appendix: Library Codes List ............11 Page... -
Page 3: Regulatory Information
Regulatory Information Regulatory Compliance This device complies with Part 15 of the FCC Rules. Operation is subject to the following two conditions: (1) This device may not cause harmful interference, and (2) This device must accept any interference received, including interference that may cause undesired operation. FCC Certification This equipment has been tested and found to comply with the limits for a Class B digital device, pursuant to Part 15 of the FCC rules. -
Page 4: Declaration Of Conformity
Canada technical specifications were met. Declaration of conformity Hereby, SMK-Link Electronics Corporation declares that this product is in compliance with the essential requirements and other relevant provisions of Directive 1999/5/EC. All trademarks and registered trademarks mentioned in this document are the property of their respective owners. -
Page 5: Getting Started
Getting Started The Universal Projector Remote control uses two AA batteries. • Remove the battery cover by pressing down on the battery door and sliding in the direction of the arrow. • Remove any wrapping from two AA batteries and insert them into the back of the remote control. -
Page 6: Setting Your Projector
Setting your Projector Entering Library Codes To test a five-digit code to see if it controls your projector, please complete the following steps. Available codes are listed in the Appendix. Some brands have multiple codes which work for different models. •... -
Page 7: Learning From Another Remote
Learning From Another Remote If you have access to the original remote control for your projector or wish to learn from other remote controls, place the two remote controls end pointing towards one another approximately two to three inches apart. •... -
Page 8: Searching For A Code
Remote. The status LED will flash. – On the other remote control, press and hold the key you wish the Universal Projector Remote to learn. – If learning was successful, the status LED will flash once.If learning was unsuccessful, the status LED will flash three times. •... - Page 9 • Press the Menu key to enter Automatic Code Search Menu mode. The LED will blink off one second and turn on again. • Press the Zoom + key to search through codes from the beginning of the Library in ascending order. •...
-
Page 10: Show Current Code
Show Current Code Complete the following steps to display the current library code. • Press and hold both the Up and Down arrows simultaneously for 3 seconds. • The status LED will turn off while both keys are pressed but will turn solid red after three seconds. -
Page 11: Factory Reset
Factory Reset The Universal Projector Remote Control can be reset to factory default. All user programmed codes and learned codes will be erased. • Press and hold both the Up and Down arrows simultaneously for 3 seconds. • The status LED will turn off while both keys are pressed but will turn solid red after three seconds. -
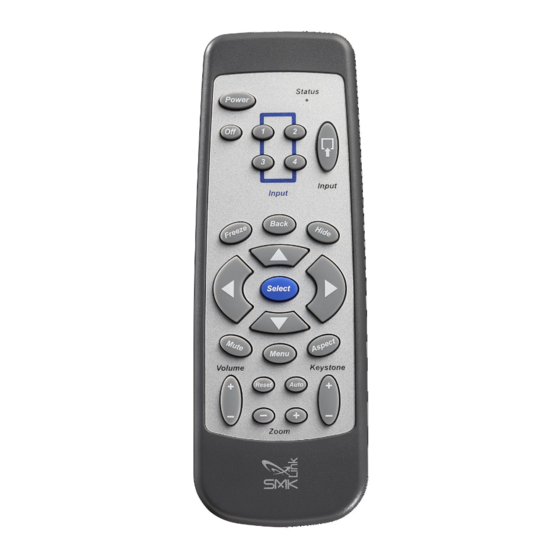
Page 12: Remote Control Layout
Remote Control Layout Note: Not all brands support all keys. Unused keys may be ignored or customized through learning. Power: Turn the projector on. Some brands use this key for both power on and power off. Off: Some brands of projectors have a dedicated key to turn the projector off. - Page 13 Hide: Turns the screen black. Status Aspect: Switch between 4:3 and 16:9 modes. Power Volume +, Volume -: Turn the projector volume up or down. Mute: Turn the projector’s sound to the Input Input lowest setting. Back Freeze: Freezes the image on the screen. Reset: Send reset or exit command to Select projector, also used to exit setup.
-
Page 14: Appendix: Library Codes List
Appendix: Library Codes List Brand 11122 11411 11413 12341 13324 13414 13421 14433 11144 ACER 11231 14344 11213 11232 BENQ 11132 14411 14434 14441 BOXLIGHT 11122 11211 11224 11333 11411 12123 12124 12324 12424 12431 CANON 11133 21131 CASIO 11121 COMPAQ 11334 DELL... - Page 15 Brand GREAT WALL 14412 HITACHI 11122 11234 11411 11412 11413 12133 12134 12141 12231 12232 12233 12333 12334 12341 12432 12433 12434 13134 13141 13142 13143 13241 13242 13323 13324 13331 13414 13421 13422 13441 13442 14114 14121 14122 14123 11141 INFOCUS 11121...
- Page 16 Brand PANASONIC 11114 11243 11321 11331 12113 12114 12121 12222 12223 12224 12321 12322 12323 12421 12422 12423 13122 13123 13124 13231 13232 13233 13234 13311 13312 13313 13411 13412 13413 13434 14112 14113 14341 14342 14343 PHILIPS 11223 PIONEER 11212 PLUS 11332...
- Page 17 Brand SHARP 11123 11311 11323 11443 11444 12111 12213 12214 12221 12244 12311 12312 12313 12411 12412 12413 12414 13112 13113 13114 13121 13131 13212 13213 13214 13222 13314 13321 13322 13342 13343 13344 13431 13432 13433 13443 13444 14111 14124 14131 14132...
- Page 18 SMK-Link Electronics www.smklink.com 3601-B Calle Tecate, Camarillo, CA 93012, USA Phone: (888) 696-3500 Email:pcsupport@smkusa.com Page...
- Page 19 Page...
- Page 20 Page...
Need help?
Do you have a question about the VP3720 and is the answer not in the manual?
Questions and answers