Table of Contents
Advertisement
Advertisement
Table of Contents

Related Manuals for SMK-Link X-Link VP3701


Summary of Contents for SMK-Link X-Link VP3701
- Page 1 Universal Remote Control User’S Guide Page 1...
- Page 2 Page 2...
-
Page 3: Table Of Contents
Contents Agency Certifications ................ 5 Getting Started - Overview ............... 7 Control 6 different Devices ............7 Setting up the perfect system ........... 7 Setting up the Remote for Xbox 360™ ........8 Setting up the Remote for other devices ........8 Four-Digit Code Set-Up Method ........ - Page 4 Remote Control Layout ..............21 Functions by Device Type ............. 21 Television / Set Top Boxes ........... 21 Cable / Satellite / DVR ..........22 DVD ................24 Xbox 360™ ..............25 Setup Codes by Device ..............26 TV ..................26 DVD ..................
-
Page 5: Agency Certifications
Agency Certifications USA - FCC CFR 47 Part 15, Subpart B This equipment has been tested and found to comply with the limits for a class B digital device, pursuant to part 15 of the FCC Rules. These limits are designed to provide reasonable protection against harmful interference in a residential installation. -
Page 6: Legal Information
Legal Information X-Link, SMK-Link and the SMK-Link Logo are trademarks of SMK-Link Electronics corporation. Microsoft, Xbox, and Xbox360 are trademarks or registered trademarks of Microsoft Inc.. All other trademarks are trademarks or registered trade- marks of their respective holders. Page 6... -
Page 7: Getting Started - Overview
Getting Started - Overview Before you begin, please insert two AA batteries as labeled on the remote control. Control 6 different Devices X-Link™ Universal Remote Control controls up to six different devices. One of the device buttons is automatically set for the Xbox 360™. -
Page 8: Setting Up The Remote For Xbox 360
Setting up the Remote for Xbox 360™ Your remote comes set from the factory to control the Xbox 360™. By default, the XBX button controls the Xbox 360™. If you do not have the Xbox 360™ you can program the remote to control something else when you select the XBX button. -
Page 9: Four-Digit Code Set-Up Method
Four-Digit Code Set-Up Method Step 1: Turn on the device you wish to program into your X- Link™ remote using the remote that came with that device. Step 2: Find the four-digit code numbers assigned to your brand of device from the list in the back of this manual. The codes are listed by device type and then by brand name. - Page 10 as well. If the code is not valid, the device button will flash 4 times. Either way, the device button will turn off and you will exit setup mode. Step 5: Point X-Link™ towards your device and press the pow- er button.
-
Page 11: Learning And Teaching Set-Up Method
Learning and Teaching Set-Up Method You can either start from a blank device and “learn” all the keys or you can start with a four-digit device code and customize it to meet your needs. Step 1: Line up X-Link™ with the remote you want to “learn” from, head to head about one to two inches apart on a solid surface. - Page 12 Step 5: Press and hold the key on the other remote control you wish X-Link™ to learn. After about one second the device button will blink once to indicate successful learning or 4 times to indicate that it did not learn the key. Step 6: Repeat from step 4 until you have learned all of the keys you wish to teach.
-
Page 13: Forgetting Learned Keys
• If you are having trouble, move away from any Plasma TV, avoid fluorescent lighting and direct sunlight. • Some original remotes require you to tap the button to learn rather than holding it during learning. • Learning only works on individual keys. Macros cannot be learned. -
Page 14: Forgetting A Device
Step 4: Press keys you wish to forget until you are done. When you are done, you can either wait 10 seconds to time out or press another device button to exit. Note: If you had previously entered a four-digit device code, the forgotten keys will return to their original settings. -
Page 15: Forgetting All Devices
Forgetting all Devices Step 1: Enter factory-reset mode by holding down two device buttons for 3 seconds. After 3 seconds all of the device but- tons turn on to confirm you are in factory-reset mode. Step 2: Enter the code 9999 to erase the prior four-digit code and any learned keys for all devices. - Page 16 regardless of what device you are using, when you change the volume, it is sent to the TV. This is called “punch through.” When you press any key on X-Link, the device button will light to show what device is receiving that command. For example, when you are watching a DVD and hit Pause, the DVD button will light.
-
Page 17: Setting Sound Master
Setting Sound Master The sound master can be set for any device that supports volume up and volume down. To change from the default TV as master to another device: Step 1: Enter setup mode by holding the device button you wish to make master down for 3 seconds. -
Page 18: Advanced Configuration
Advanced Configuration If you wish to independently control the volume without us- ing punch through, punch through can be turned off (and back on) for any device. For example, if you have a surround sound system, you may wish to turn off punch through for the TV so you can still control it’s volume when the TV device button is selected. -
Page 19: Turning On Punch Through For A Device
Turning on Punch Through for a Device If you accidentally turned punch through off for a device, it is simple to re-enable it. Step 1: To turn punch through back on for a device, enter setup mode by holding the device button down for 3 seconds. After 3 seconds all of the device buttons will blink to confirm that you are in setup mode. -
Page 20: Device Buttons
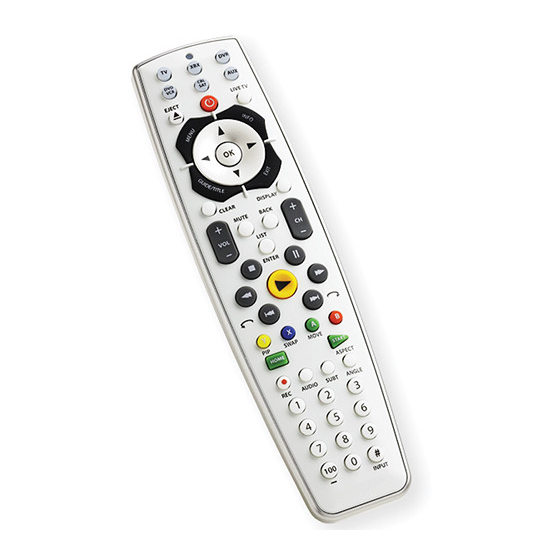
Device Buttons Power Eject Live TV / O EJECT Menu Info Navigation Guide/Title Exit CLEAR DISPLAY BACK Volume Controls Channel Controls LIST ENTER Transport Controls PIP Controls / Colored Buttons Home Start HOME START Record Controls Number Pad Input Dash Page 20... -
Page 21: Remote Control Layout
Remote Control Layout Functions by Device Type Different keys have different meanings depending upon the type of device you are controlling. The best way to become familiar with your remote control is to experiment, but here are some hints to guide you. Television / Set Top Boxes Turn On/Off: To turn the TV on or off, press the TV device but- ton and press the Power... -
Page 22: Cable / Satellite / Dvr
Subtitles: Pressing the Subt button turns on closed caption- ing or subtitles for some models of TVs. PIP Controls: The bottom row of colored buttons offer control over Picture-in-Picture modes. Cable / Satellite / DVR List: On some devices with DVR capabilities, pressing the List LIST button will bring up a list of recorded programs. - Page 23 Menu: Pressing the Menu button brings up the main menu for your device. Guide: Pressing the Guide / Title button brings up the listing of available and upcoming showings. Info: Pressing info brings up the details for the currently playing show.
-
Page 24: Dvd
Menu: Pressing the Menu button brings up the top menu of the DVD or Blu-Ray disc. Guide / Title: Pressing the Guide / Title button brings up the Title Menu (for DVDs with Title Menus). Info: Pressing Info gives you play statistics Rewind and Fast Forward: Press the Rewind or Fast For- ward... -
Page 25: Xbox 360
Xbox 360™ The keys on the X-Link™ universal remote control operate in much the same way as they do on the Xbox 360™ game con- troller with the following exceptions: Volume: Volume keys are sent to your TV set so you do not need to use the original TV remote. -
Page 26: Setup Codes By Device
Setup Codes by Device Audiovox 1017 1052 1095 1130 1177 Citizen 1017 1045 1047 1048 1051 1203 1259 1260 1293 1329 1052 1060 1062 1083 1175 1330 1334 1336 1338 1387 1177 1188 1207 1208 1216 1308 1372 1373 1374 1449 1417 1470 1493 1224 1293 1387 1403 1483 Abex... - Page 27 Durabrand 1039 1052 1076 1086 1181 1033 1037 1038 1127 1293 1387 1220 1227 1387 1417 1489 Gibralter 1017 1018 1045 1174 1175 1433 1490 1492 1187 1188 1460 1479 Janeil 1064 1483 Dwin 1178 1218 1466 Go Video 1219 1041 1056 1189 1430 Dynatech 1420...
- Page 28 1245 1017 1045 1046 1047 1060 Penney 1175 1176 1179 1186 1187 Magnasonic 1216 1293 1175 1187 1188 1208 1209 1188 1207 1214 1215 1224 Magnavox 1017 1031 1038 1041 1045 1224 1420 1227 1409 1417 1423 1460 1047 1048 1056 1070 1081 Multitech 1052 1185 1387 1420 1480 1481 1484 1485 1490...
- Page 29 1206 Schneider 1478 1017 1045 1052 1187 1387 Pyle 1261 1286 Scimitsu 1187 Starlite 1052 1387 Quasar 1055 1180 1212 1409 1485 Scotch 1047 1227 1490 Studio Experience 1170 1491 Scott 1017 1045 1047 1050 1052 Superscan 1038 1178 1217 1248 1271 Quelle 1094 1421 1427 1477 1053 1139 1187 1227 1387...
-
Page 30: Dvd
Toshiba 1005 1006 1007 1008 1017 Wyse 1250 CyberHome 2027 2067 2244 2245 2246 1060 1061 1077 1079 1080 Yamaha 1017 1045 1046 1047 1175 Cytron 2136 1082 1085 1087 1178 1179 1187 1188 1296 1360 1468 Daewoo 2088 2089 2235 1187 1224 1271 1273 1274 Yapshe 1202... -
Page 31: Vcr
2213 2224 Qwestar 2097 Xbox 2069 Klipsch 2250 2034 2035 2039 2069 2213 Yamaha 2015 2103 2211 2223 Konka 2234 2224 Zenith 2085 2089 2221 2226 Koss 2097 2164 2219 Regent 2218 Landel 2230 2089 Lasonic 2132 Rotel 2029 Lenoxx 2218 2228 Rowa 2214... - Page 32 2052 2176 2178 Multitech 2048 2060 2176 Sharp 2062 2063 2186 Go Video 2052 2056 2175 Shogun 2052 2176 Goldstar 2056 2064 2177 2259 Nikko 2177 Singer 2178 Gradiente 2048 2060 Niveus Media 2254 Sonic Blue 2252 Harley Davidson 2060 Noblex 2052 2176 Sony...
-
Page 33: Cable
Cable Hitachi 3011 Signature 3011 Hytex 3144 SL Marx 3020 Illico 3125 Sony 3006 3118 3010 3011 3012 3014 3033 Jasco 3018 3112 Standard Component 3030 3111 3144 3145 Jerrold 3005 3009 3011 3023 3033 Starcom 3023 3033 3112 Adelphia 3007 3056 3108 3110 3112 Stargate... -
Page 34: Satellite
Satellite Echostar 3034 3047 3131 3133 3138 M & B 3157 3139 3159 Magnavox 3054 3096 Einhell 3159 Manata 3159 AB Sat 3159 Elap 3159 Maspro 3159 AccessHD 3098 Elsat 3159 3158 Alba 3159 Engel 3159 3157 Alltech 3159 Europa 3158 Medion 3159... -
Page 35: Audio
3083 3084 Universum 3158 AudioSource 4158 4221 Sat Team 3159 US Digital 3137 Audiotronic 4093 Satcom 3157 3158 Viewsat 3089 Audiovox 4085 4122 Satec 3159 Visiosat 3159 B & K 4091 4141 4290 Satplus 3156 Voom 3136 Bang & Olufsen 4134 Schneider 3156... - Page 36 Farenheit 4298 Logitech 4168 Pioneer 4024 4025 4026 4027 4028 Felston 4278 Luxman 4169 4176 4231 4057 4066 4112 4117 4118 Fisher 4103 4314 4130 4129 4142 4143 4144 4145 Fonmix 4186 Magnadyne 4232 4146 4147 4148 4149 4175 Fosgate 4166 4249 Magnavox 4060 4093 4115 4117 4127...
-
Page 37: Tv/Dvd/Vcr
TV/DVD/VCR SuperTech 4307 Klipsch 4136 2250 Sylvania 4131 Koss 4102 2164 Teac 4085 4119 4122 4080 2096 Home Theatre Technics 4022 4048 4178 Magnavox 4060 2075 Techwood 4128 4308 4137 2251 Teknika 4211 Onkyo 4077 2094 in a Box Thorens 4093 Panasonic 4019... -
Page 38: Combo Tv/Vcr
Combo TV/ Combo TV/ Combo DVD/ Model Model Model Citizen 1216 2260 Akai 1142 2137 Apex 2026 2256 Colt 1213 2258 Apex 1091 2024 Broksonic 2210 2210 Daewoo 1216 2260 Audiovox 1095 2110 CineVision 2108 2208 Emerson 1216 2260 Axion 1143 2138 Emerson... - Page 39 Page 39...
- Page 40 Thank You! Thank you for purchasing SMK-Link’s X-Link™ Universal Remote control for Xbox 360™. This User’s Guide is designed to help guide you through setting up your X-Link™ Universal Remote Control. Since we support so many different devices, the setup codes for more obscure devices can be found on our website.
Need help?
Do you have a question about the X-Link VP3701 and is the answer not in the manual?
Questions and answers