Table of Contents
Advertisement
For use with machines having Code Numbers: 9134, 9842, 9958, 10316, 10327
Safety Depends on You
Lincoln arc welding equipment
is designed and built with safety
in mind. However, your overall
safety can be increased by
proper installation. . . and
thoughtful operation on your
part. DO NOT INSTALL,
OPERATE OR REPAIR THIS
EQUIPMENT WITHOUT READ-
ING THIS MANUAL AND THE
SAFETY PRECAUTIONS CON-
TAINED THROUGHOUT. And,
most importantly, think before
you act and be careful.
World's Leader in Welding and Cutting Products
22801 St. Clair Ave. Cleveland, Ohio 44117-1199 U.S.A. Tel. (216) 481-8100
RETURN TO MAIN INDEX
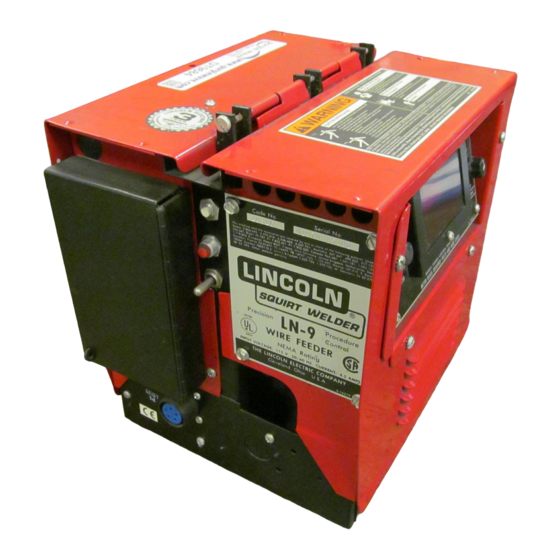
LN-9 Wire Feeder
SERVICE MANUAL
Sales and Service through subsidiaries and Distributors Worldwide
SVM127-A
November, 1996
Premier Manufacturer of Industrial Motors
Advertisement
Chapters
Table of Contents
Troubleshooting

Subscribe to Our Youtube Channel
Related Manuals for Lincoln Electric LN-9 SVM127-A


Summary of Contents for Lincoln Electric LN-9 SVM127-A
- Page 1 LN-9 Wire Feeder For use with machines having Code Numbers: 9134, 9842, 9958, 10316, 10327 Safety Depends on You Lincoln arc welding equipment is designed and built with safety in mind. However, your overall safety can be increased by proper installation. . . and thoughtful operation on your part.
-
Page 2: Safety
Miami, Florida 33135 or CSA Standard W117.2-1974. A Free copy of “Arc Welding Safety” booklet E205 is available from the Lincoln Electric Company, 22801 St. Clair Avenue, Cleveland, Ohio 44117-1199. BE SURE THAT ALL INSTALLATION, OPERATION, MAINTENANCE AND REPAIR PROCEDURES ARE PERFORMED ONLY BY QUALIFIED INDIVIDUALS. -
Page 3: Electric Shock Can Kill
ELECTRIC SHOCK can kill. 3.a. The electrode and work (or ground) circuits are electrically “hot” when the welder is on. Do not touch these “hot” parts with your bare skin or wet clothing. Wear dry, hole-free gloves to insulate hands. - Page 4 WELDING SPARKS can cause fire or explosion. 6.a. Remove fire hazards from the welding area. If this is not possible, cover them to prevent the welding sparks from starting a fire. Remember that welding sparks and hot materials from welding can easily go through small cracks and openings to adjacent areas.
- Page 5 PRÉCAUTIONS DE SÛRETÉ Pour votre propre protection lire et observer toutes les instructions et les précautions de sûreté specifiques qui parraissent dans ce manuel aussi bien que les précautions de sûreté générales suiv- antes: Sûreté Pour Soudage A L’Arc Protegez-vous contre la secousse électrique: Les circuits à...
-
Page 6: Table Of Contents
MASTER TABLE OF CONTENTS FOR ALL SECTIONS Safety ...i-iv Installation...Section A Technical Specifications ...A-2 Installing the LN-9 2-Roll and 4-Roll Models ...A-3 Installing the LN-9F 2-Roll and 4-Roll Models ...A-3 Electrical Connections - LN-9 and LN-9F ...A-4 Machine Grounding...A-12 Work Cable Connection ...A-12 Connecting the Gun Cable to the Wire Feeder ...A-13 Operation...Section B Safety Instructions...B-2... -
Page 7: Installation Section
Section A-1 - INSTALLATION SECTION - Installation ...Section A Technical Specifications ...A-2 Installing the LN-9N and LN-9S 2-Roll and 4-Roll Models ...A-3 Attaching the Wire Reel Stand ...A-3 Mounting the Unit ...A-3 Installing the LN-9F 2-Roll and 4-Roll Models ...A-3 Mounting the Wire Feed Unit...A-3 Mounting the Control Box ...A-3 Connecting the Wire Feed Unit to the Control Box ...A-3... -
Page 8: Installation
TECHNICAL SPECIFICATIONS — LN-9 Supplied by power source: 115 VAC, 50/60 Hz., 350 VA 50 to 600 inches per minute (1.27 to 15.2 meters per minute) VOLTAGE CONTROL RANGE OPERATION: - 20 - 40 STORAGE: - 40 .030 through 3/32" (0.8 through 2.4 mm) .045 through .120"... -
Page 9: Installing The Ln-9F 2-Roll And 4-Roll Models
INSTALLING THE LN-9N and LN-9S 2-ROLL AND 4-ROLL MODELS ATTACHING THE WIRE REEL STAND Both 2-Roll and 4-Roll LN-9 model wire feeders are shipped without a wire reel stand. The screws and washers for mounting a wire reel stand are included with the LN-9 (fastened in their respective mounting holes). -
Page 10: Electrical Connections - Ln-9 And Ln-9F
ROUTING THE ELECTRODE The electrode supply may be either from reels, Readi- Reels, spools, or bulk packaged drums or reels. Observe the following precautions: • The electrode must be routed to the wire feed unit so that the bends in the wire are at a minimum. The force required to pull the wire from the reel into the wire feed unit must be kept at a minimum. -
Page 11: Connecting The Power Input Cable Assembly To The Ln-9Ne Or Ln-9Se
FIGURE A.2 – STRAIN RELIEF CLAMP ELECTRODE CABLE CONNECTING THE POWER INPUT CABLE ASSEMBLY TO THE LN-9NE or LN-9SE The hand crank drive rolls will feed all the wires used on the extension. The rolls have been stenciled for identification. 1. -
Page 12: Connecting The Power Input Cable Assembly To The Ln-9F
7. If using welding currents over 450 amperes, con- nect a length of 1/0 cable between the brass block on the hand crank and the input strap located in the wire drive unit. Tape this cable to the extension assembly. Proper cable lengths are as follows: 22-1/2 ft. -
Page 13: Connecting The Power Input Cable Assembly To Power Sources
CONNECTING THE POWER INPUT CABLE ASSEMBLY TO POWER SOURCES WARNING Turn input supply power to the power source OFF before connecting the LN-9 or LN-9F wire feeder. Connect to an appropriate Lincoln power source as fol- lows: 1. If using a multipurpose source (such as the DC- 250, DC-400 and DC-600), be sure it is properly set for the welding process being used. - Page 14 FIGURE A.5 – CONNECTION OF LN-9 TO DC-250, DC-400, AND CV/CVI POWER SOURCES ELECTRIC SHOCK can kill. Above diagram shows electrode connected positive. To change polarity, turn power off, reverse the electrode and work leads at the power source and position the switch on power source to proper polarity. * Does not apply to DC-400 below code 9200 with polarity switch.
- Page 15 FIGURE A.6 – CONNECTION OF LN-9 TO DC-600 POWER SOURCES ELECTRIC SHOCK can kill. Above diagram shows electrode connected positive. To change polarity, turn power off, reverse the electrode and work leads at the power source and position the switch on power source to proper polarity. For optimum performance with the LN-9, DC-600’s with codes 8288 and above are preferred.
- Page 16 A-10 FIGURE A.7 – CONNECTION OF LN-9 TO DC-1000 POWER SOURCES ELECTRIC SHOCK can kill. Above diagram shows electrode connected positive. To change polarity, turn power off, reverse the electrode and work leads at the power source, position the positive - negative switch on power source to correspond to the polarity of the electrode cable connection. N.A.
- Page 17 A-11 FIGURE A.8 – CONNECTION OF LN-9 TO PULSE POWER 500 POWER SOURCES ELECTRIC SHOCK can kill. Above diagram shows electrode connected positive. To change polarity, turn power off, reverse the electrode and work leads at the power source and properly set the feeder polarity switch. N.A.
-
Page 18: Machine Grounding
A-12 MACHINE GROUNDING LN-9 wire feeders are grounded to the power source through the input cable. The power source grounding cable must be properly connected to electrical ground. See your power source operating manual for details. WORK CABLE CONNECTION Connect a work lead of sufficient size and length between the proper output terminal on the power source and the work. -
Page 19: Connecting The Gun Cable To The Wire Feeder
A-13 A-13 INSTALLATION CONNECTING THE GUN CABLE TO FIGURE A.9 – GUN CABLE CONNECTIONS THE WIRE FEEDER A variety of gun and cable assemblies are available for the LN-9 models. See the Accessories section of this manual. Lay the cable out straight. Insert the connector on the welding conductor cable into the brass conductor block on the front of the wire drive unit. - Page 20 A-14 A-14 NOTES LN-9 Wire Feeder...
- Page 21 Section B-1 - OPERATION SECTION - Operation ...Section B Safety Instructions...B-2 General Description ...B-3 Recommended Processes and Equipment...B-3 DC Constant Voltage Power Sources ...B-3 Controls and Settings...B-4 Circuit Protection and Automatic Shutdown ...B-7 Avoiding Ground Lead Protector (GLP) Activation ...B-7 Drive Roll Installation and Pressure Setting ...B-9 Changing Wire Feed Rolls and Guide Tubes for 2-Roll Wire Feeders ...B-9 Setting the Idler Roll Spring Pressure (2-Roll Wire Drives) ...B-10...
-
Page 22: Operation
SAFETY INSTRUCTIONS Read and understand this entire section of operating instructions operating the machine. • Always wear dry insulating gloves. OPERATION WARNING ELECTRIC SHOCK can kill. • Do not touch electrically live parts such as output terminals or internal wiring. •... -
Page 23: General Description
GENERAL DESCRIPTION The LN-9 2-Roll and 4-Roll semiautomatic wire feeder models feature the precise "set and forget" digital pro- cedure control. They are designed to achieve higher quality control and weld quality levels more easily. The arc voltage and wire feed speed can be set on a digital meter before the arc is struck and the procedure remains precisely set day in and day out. -
Page 24: Controls And Settings
CONTROLS AND SETTINGS Operator controls for LN-9N, NE, S and SE models are shown in Figure B.1. Controls for LN-9F models are shown in Figure B.2. Refer to these figures and the fol- lowing descriptions of the controls. ELECTRODE POLARITY SWITCH: switch is located inside the wire drive section on the LN-9 model and on the front panel of both the LN-9F 2-Roll and 4-Roll control box. - Page 25 FIGURE B.1 – WIRE FEEDER CONTROLS FOR LN-9N, NE, S, SE CIRCUIT BREAKER GROUNDING LEAD PROTECTOR (GLP) RESET SWITCH HOT-COLD TRIGGER INTERLOCK SWITCH WIRE-FEED DIRECTION SWITCH OPERATION VOLTS CONTROL WIRE SPEED CONTROL ELECTRODE POLARITY SWITCH LN-9 Wire Feeder METER READING SWITCH DIGITAL METER...
- Page 26 OPERATION FIGURE B.2 – WIRE FEEDER CONTROLS FOR LN-9F LN-9F CONTROL BOX BOTTOM VIEW LN-9 Wire Feeder...
-
Page 27: Circuit Protection And Automatic Shutdown
CIRCUIT BREAKER AND GROUNDING LEAD PRO- TECTOR (GLP) RESET SWITCH: These protection circuit devices are located on the front rail of the LN-9 model and bottom panel of the LN-9F models. See the topic "Circuit Protection and Automatic Shutdown" later in this section of the manual. DIGITAL METER: A three-digit digital meter is provid- ed to set and monitor the welding procedure. -
Page 28: Automatic Shutdown
If such a grounding lead fault occurs, the meter will still be on and will be reading. The trigger circuit will not operate, however. To release the circuit, press the "GLP Reset" button. See Figure B.1 or B.2 for the location of this button. -
Page 29: Drive Roll Installation And Pressure Setting
DRIVE ROLL INSTALLATION AND PRESSURE SETTING CHANGING WIRE FEED ROLLS AND GUIDE TUBES FOR TWO-ROLL WIRE FEEDERS To change drive or idle rolls on a two-roll wire feeder, refer to Figure B.3 and perform the following steps: 1. Loosen idle roll spring pressure screw. 2. -
Page 30: Setting The Idler Roll Spring Pressure (2-Roll Wire Drives
B-10 6. Loosen the ingoing guide tube clamping screw. Install the all steel guide tube through the rear brass block. Tighten the locking screw. 7. Replace the large ingoing guide tube into rear brass block. 8. Install the outgoing guide tube with its plastic insert through front brass block. -
Page 31: Changing Wire Feed Rolls And Guide Tubes For 4-Roll Wire Feeders
B-11 CHANGING WIRE FEED ROLLS AND GUIDE TUBES FOR 4-ROLL WIRE FEED- To change drive rolls on a 4-roll wire feeder, refer to Figure B.4 and perform the following steps: 1. Release both quick release levers. 2. Remove clamping collars from both drive shafts. 3. - Page 32 B-12 For Aluminum Wire Each set of rolls should have their pressure set independent of the other. To do this, release and open the other quick release arm while making each adjustment. Follow the procedure below for each adjustment. 1. With low idle roll pressure, load the feeder so it’s ready for welding.
- Page 33 B-13 B-13 OPERATION FIGURE B.4 – INSTALLING DRIVE ROLLS ON A 4-ROLL FEEDER LN-9 Wire Feeder...
-
Page 34: Wire Loading
B-14 WIRE LOADING LOADING AND FEEDING READI-REELS OR SPOOLS LOADING A 22 TO 30 LB. READI-REEL PACKAGE USING THE MOLDED PLASTIC K363-P TYPE ADAPTER: 1. Make certain that the threaded locking collar is tight and securely locks the adapter on the spindle. See Figure B.5. -
Page 35: Loading A 15 To 30 Lb. Spool
B-15 7. To remove the Readi-Reel from the adapter, depress the retaining spring tab with thumb while pulling the Readi-Reel cage from the molded adapter with both hands. Do not remove the adapter from the spindle. LOADING A 15 TO 30 LB. SPOOL (12"... -
Page 36: Loading 50 And 60 Lb. Coils And Brake Adjustment
B-16 LOADING 50 AND 60 LB. COILS AND BRAKE ADJUSTMENT (K299 or K303 Wire Reel Stand) 1. To remove the wire reel from its shaft, grasp the spring loaded knob and pull it out. This straightens the knob so that it seats into the shaft when released. -
Page 37: Loading And Feeding 13-14 Lb. Innershield Coils
B-17 ELECTRODE FEEDING 1. Turn the reel until the free end of the electrode is accessible. 2. While tightly holding the electrode, cut off the bent end. Straighten the first 6 inches. 3. Cut off the first inch. Insert the free end through the incoming guide tube. -
Page 38: Making A Test Weld And Adjusting Response And Starting Characteristics
B-18 MAKING A TEST WELD AND ADJUSTING LN-9 RESPONSE AND STARTING CHARACTERISTICS ADJUST THE POWER SOURCE DC-250, DC-400, or DC-600* 1. Connect electrode lead to terminal of desired polarity. 2. Set toggle switch to same polarity as the electrode cable connection. 3. -
Page 39: Adjust The Ln-9 Controls
B-19 ADJUST THE LN-9 CONTROLS 1. Set the "Electrode Polarity" switch to same polarity as the electrode lead. 2. Connect the "Direct Work Lead" if it is going to be used. 3. Check that "Feed Direction" is set to forward. 4. -
Page 40: Procedure At End Of Coil
B-20 MAKING A WELD 1. Inch the electrode through the gun and cable and then cut the electrode within approximately 3/8" of the end of the contact tip for solid wire and within approximately 3/4" of the extension guide for cored wire. -
Page 41: Auxiliary Equipment Contacts
Section C-1 Accessories ...Section C Auxiliary Equipment Contacts ...C-2 Optional Equipment and Accessories ...C-2 Power Input Cable Assemblies (K196, K595, K596)...C-2 Wire Reel Stands and Mountings...C-2 50-60 lb. Wire Reel Mounting Stand (K303) ...C-2 50-60 lb. Readi-Reel Mounting Stand (K445) ...C-2 Attaching the Wire Reel Stands ...C-3 Wire Reel Door Kit (M-11514) ...C-3 Spindle for Readi-Reels and 2"... -
Page 42: Auxiliary Equipment Contacts
AUXILIARY EQUIPMENT CONTACTS The power for 115 volt AC auxiliary equipment can be obtained from the terminals inside the LN-9 control box. The contacts are “hot” whenever the trigger is pressed or the unit is welding. The current draw of this circuit must not exceed 1/4 ampere. -
Page 43: Attaching The Wire Reel Stands
ATTACHING THE WIRE REEL STANDS The mounting hardware for mounting the stands is included with the LN-9. Screws and washers are inserted in their respective mounting holes. To con- nect: 1. Remove the three 3/8 in. hex head bolts from the back of the wire feed unit. -
Page 44: Gun And Cable Assemblies
GUN AND CABLE ASSEMBLIES A variety of standard Lincoln and Magnum gun and cable assemblies are available for the LN-9 in 10 ft., TABLE C.1 – LN-9 GUN AND CABLE ASSEMBLIES Process Model Gas Metal Arc Welding K497 K498 Magnum K470 Magnum K471 Magnum K478 Magnum K479... -
Page 45: Wire Feeder Accessories
WIRE FEEDER ACCESSORIES BURNBACK DELAY KIT (K202) Provides a precise control of the electrode burnback at the end of the weld. Prevents crater sticking and provides proper stickout for starting the next weld. Recommended especially when welding with small (.030-1/16") diameter wire at high wire feed speeds. Also recommended when the semiautomatic gun is mounted in a fixture or on the Squirtmobile in a way that prevents the gun from lifting from the work at the... -
Page 46: Swivel Platform (K178-1
SWIVEL PLATFORM (K178-1) For all LN-9 wire reel stand combinations. For mount- ing wire feeder-wire reel stand assembly on top of suit- able Lincoln Idealarc power sources. Recommended input cable assembly length is 10 feet (3m) when using the K178-1. Bolt the platform to the lift bail according to instructions supplied with the platform (M16260). -
Page 47: Magnetic Separator (K58
ACCESSORIES SQUIRTMOBILE ® (K62) Self-propelled trackless carriage carries K114 gun on long welds for automatic welder economy without high fixture costs. Requires K161 power pack. MECHANIZED TRAVEL POWER PACK (K161-CABLE LENGTH) Includes travel mag-amp circuit required when using either a K62 Squirtmobile or K110 mechanized hand travel unit with a K114 gun. - Page 48 TABLE C.2 – DRIVE ROLL AND GUIDE TUBE KITS Wire Size Solid Steel Electrode .030 - .035” (0.8 - 0.9 mm) .045 - 0.052” (1.2 - 1.4 mm) 1/16” (1.6 mm) .068 - 3/32” (1.7 - 2.4 mm) Cored Electrode .045 - 0.052”...
-
Page 49: Gun And Cable Maintenance
Section D-1 Maintenance ...Section D Routine Maintenance...D-2 Drive Rolls and Guide Tubes...D-2 Wire Reel Mounting – 50 and 60 lb. Coils ...D-2 Wire Reel Mounting – Readi-Reels and Spools...D-2 Periodic Maintenance ...D-2 Control Box ...D-2 Wire Drive Motor and Gear Box...D-2 Gun and Cable Maintenance...D-3 Gun Cable Connector Requirements...D-3 TABLE OF CONTENTS... -
Page 50: Safety Precautions
SAFETY PRECAUTIONS WARNING ELECTRIC SHOCK can kill. • Only qualified personnel should perform this maintenance. • Turn the input supply power OFF at the disconnect switch or fuse box before working on this equipment. • Do not touch electrically hot parts. ROUTINE MAINTENANCE DRIVE ROLLS AND GUIDE TUBES After feeding any coil of wire, inspect the drive roll sec-... -
Page 51: Gun And Cable Maintenance
GUN AND CABLE MAINTENANCE For instructions on periodic maintenance for the weld- ing gun and cables, refer to the manual for your specif- ic model of welding gun. Also see IM-294. GUN CABLE CONNECTOR REQUIREMENTS TO PERMIT PROPER CONNECTION TO LINCOLN LN-9 AND LN-9F WIRE FEEDER The following Figures D.1 and D.2 should serve as a guide to determine if a particular gun or switch can be... - Page 52 FIGURE D.3 – GENERAL COMPONENT LOCATIONS MAINTENANCE LN-9 Wire Feeder 1. CONTROL PC BOARD 2. TRIGGER PC BOARD 3. T1 TRANSFORMER 4. POWER PC BOARD 5. BOX ASSEMBLY 6. DRIVE/IDLE ROLL ASSEMBLY 7. GEAR BOX 8. DRIVE MOTOR 9. TACHOMETER 10.
-
Page 53: Theory Of Operation Section
Section E-1 -THEORY OF OPERATION SECTION- Theory of Operation ...Section E General Description ...E-2 Power Input Circuits...E-2 Trigger and Shutdown Circuit ...E-3 Arc Voltage, Wire Speed Control and Metering...E-4 Printed Circuit Board Functions...E-5 POWER SOURCE OUTPUT TRIGGER (#2 ) TRIGGER CIRCUIT CONNECTOR BREAKER... -
Page 54: Theory Of Operation
THEORY OF OPERATION GENERAL DESCRIPTION The LN-9 is a semiautomatic wire feeder that allows the user to preset the arc voltage and wire feed speed. The wire feed speed is internally monitored and regu- FIGURE E.2 – POWER INPUT CIRCUITS POWER SOURCE OUTPUT TRIGGER (#2 ) TRIGGER CIRCUIT... -
Page 55: Trigger And Shutdown Circuit
THEORY OF OPERATION FIGURE E.3 – TRIGGER AND SHUTDOWN CIRCUIT POWER SOURCE OUTPUT TRIGGER (#2 ) TRIGGER CIRCUIT CONNECTOR BREAKER INPUT CONNECTOR CONTROL BOARD VOLTAGE BOARD METER 10VAC 28VAC BOARD VOLTS SPEED SWITCH TRIGGER AND SHUTDOWN CIRCUIT When the gun trigger switch is activated (closed), the trigger board completes the trigger signal path. -
Page 56: Arc Voltage, Wire Speed Control And Metering
THEORY OF OPERATION FIGURE E.4 – ARC VOLTAGE, WIRE SPEED CONTROL AND METERING POWER SOURCE OUTPUT TRIGGER (#2 ) TRIGGER CIRCUIT CONNECTOR BREAKER INPUT CONNECTOR CONTROL BOARD VOLTAGE BOARD METER 10VAC 28VAC BOARD VOLTS SPEED SWITCH ARC VOLTAGE, WIRE SPEED CONTROL AND METERING The arc voltage, which is sensed at the work piece and motor gear box, is connected through a polarity switch... -
Page 57: Printed Circuit Board Functions
THEORY OF OPERATION PRINTED CIRCUIT BOARD FUNCTIONS POWER BOARD The input power (115VAC) is applied to the power board, and from that the power board develops the DC field voltage for the wire drive motor. The SCR circuit- ry, used to control the motor armature voltage, is also contained on the power board. - Page 58 NOTES LN-9 Wire Feeder...
-
Page 59: Troubleshooting & Repair Section
Section F-1 TROUBLESHOOTING & REPAIR SECTION Troubleshooting & Repair Section ...Section F How to Use Troubleshooting Guide ...F-2 PC Board Troubleshooting Procedures ...F-3 Troubleshooting Guide ...F-4 - F-22 Test Procedures T1 Transformer Test ...F-23 T2 Transformer Test ...F-26 Wire Drive Motor and Tach Feedback Test ...F-30 Voltmeter Accuracy Test ...F-34 Meter Circuit Accuracy Test...F-37 Wire Speed Accuracy Test ...F-42... -
Page 60: How To Use Troubleshooting Guide
TROUBLESHOOTING & REPAIR HOW TO USE TROUBLESHOOTING GUIDE Service and repair should be performed by only Lincoln Electric Factory Trained Personnel. Unauthorized repairs performed on this equipment may result in danger to the technician and machine operator and will invalidate your factory warranty. For your safety and to avoid Electrical Shock, please observe all safety notes and precautions detailed throughout this manual. -
Page 61: Troubleshooting And Repair
• If the PC Board uses protective shorting jumpers, don’t remove them until installation is complete. • If you return a PC Board to The Lincoln Electric Company for credit, it must be in the static-shielding bag. This will prevent further damage and allow prop- er failure analysis. -
Page 62: Troubleshooting Guide
If for any reason you do not understand the test procedures or are unable to perform the test/repairs safely, con- tact the Lincoln Electric Service Department for electrical troubleshooting assistance before you proceed. Call 216-383-2531 or 1-800-833-9353. - Page 63 OFF. If for any reason you do not understand the test procedures or are unable to perform the test/repairs safely, con- tact the Lincoln Electric Service Department for electrical troubleshooting assistance before you proceed. Call 216- 383-2531 or 1-800-833-9353.
- Page 64 If for any reason you do not understand the test procedures or are unable to perform the test/repairs safely, con- tact the Lincoln Electric Service Department for electrical troubleshooting assistance before you proceed. Call 216-383-2531 or 1-800-833-9353.
- Page 65 If for any reason you do not understand the test procedures or are unable to perform the test/repairs safely, con- tact the Lincoln Electric Service Department for electrical troubleshooting assistance before you proceed. Call 216- 383-2531 or 1-800-833-9353. detailed in the beginning of this manual.
- Page 66 If for any reason you do not understand the test procedures or are unable to perform the test/repairs safely, con- tact the Lincoln Electric Service Department for electrical troubleshooting assistance before you proceed. Call 216-383-2531 or 1-800-833-9353.
- Page 67 "OFF" position. If for any reason you do not understand the test procedures or are unable to perform the test/repairs safely, con- tact the Lincoln Electric Service Department for electrical troubleshooting assistance before you proceed. Call 216-383-2531 or 1-800-833-9353.
- Page 68 If for any reason you do not understand the test procedures or are unable to perform the test/repairs safely, con- tact the Lincoln Electric Service Department for electrical troubleshooting assistance before you proceed. Call 216-383-2531 or 1-800-833-9353.
- Page 69 If for any reason you do not understand the test procedures or are unable to perform the test/repairs safely, con- tact the Lincoln Electric Service Department for electrical troubleshooting assistance before you proceed. Call 216-383-2531 or 1-800-833-9353. detailed in the beginning of this manual.
- Page 70 NOT activated. If for any reason you do not understand the test procedures or are unable to perform the test/repairs safely, con- tact the Lincoln Electric Service Department for electrical troubleshooting assistance before you proceed. Call 216-383-2531 or 1-800-833-9353.
- Page 71 PC board repeatedly fails. If for any reason you do not understand the test procedures or are unable to perform the test/repairs safely, con- tact the Lincoln Electric Service Department for electrical troubleshooting assistance before you proceed. Call 216-383-2531 or 1-800-833-9353.
- Page 72 If for any reason you do not understand the test procedures or are unable to perform the test/repairs safely, con- tact the Lincoln Electric Service Department for electrical troubleshooting assistance before you proceed. Call 216-383-2531 or 1-800-833-9353. detailed in the beginning of this manual.
- Page 73 If for any reason you do not understand the test procedures or are unable to perform the test/repairs safely, con- tact the Lincoln Electric Service Department for electrical troubleshooting assistance before you proceed. Call 216-383-2531 or 1-800-833-9353.
- Page 74 "hunting." If for any reason you do not understand the test procedures or are unable to perform the test/repairs safely, con- tact the Lincoln Electric Service Department for electrical troubleshooting assistance before you proceed. Call 216-383-2531 or 1-800-833-9353. detailed in the beginning of this manual.
- Page 75 If for any reason you do not understand the test procedures or are unable to perform the test/repairs safely, con- tact the Lincoln Electric Service Department for electrical troubleshooting assistance before you proceed. Call 216-383-2531 or 1-800-833-9353. detailed in the beginning of this manual.
- Page 76 If for any reason you do not understand the test procedures or are unable to perform the test/repairs safely, con- tact the Lincoln Electric Service Department for electrical troubleshooting assistance before you proceed. Call 216-383-2531 or 1-800-833-9353.
- Page 77 If for any reason you do not understand the test procedures or are unable to perform the test/repairs safely, con- tact the Lincoln Electric Service Department for electrical troubleshooting assistance before you proceed. Call 216-383-2531 or 1-800-833-9353.
- Page 78 If for any reason you do not understand the test procedures or are unable to perform the test/repairs safely, con- tact the Lincoln Electric Service Department for electrical troubleshooting assistance before you proceed. Call 216-383-2531 or 1-800-833-9353.
- Page 79 Welding is good. If for any reason you do not understand the test procedures or are unable to perform the test/repairs safely, con- tact the Lincoln Electric Service Department for electrical troubleshooting assistance before you proceed. Call 216-383-2531 or 1-800-833-9353.
- Page 80 If for any reason you do not understand the test procedures or are unable to perform the test/repairs safely, con- tact the Lincoln Electric Service Department for electrical troubleshooting assistance before you proceed. Call 216-383-2531 or 1-800-833-9353. detailed in the beginning of this manual.
-
Page 81: Materials Needed
F-23 TROUBLESHOOTING & REPAIR Service and repair should be performed by only Lincoln Electric factory trained personnel. Unauthorized repairs performed on this equipment may result in danger to the technician or machine operator and will invalidate your factory warranty. For your safety and to avoid electrical shock, please observe all safety notes and precautions detailed throughout this manual. -
Page 82: Test Procedure
F-24 TROUBLESHOOTING & REPAIR T1 TRANSFORMER TEST (continued) FIGURE F.1 – LEAD #532 AT POWER PC BOARD LEAD 31 TEST PROCEDURE 1. Remove input power to the LN-9 wire feed- 2. Using the phillips head screw driver, remove the screws holding the left side cover assembly. - Page 83 F-25 TROUBLESHOOTING & REPAIR T1 TRANSFORMER TEST (continued) FIGURE F.2 – SECONDARY LEADS #601 AND #602 AT LEAD SPLICES 6. Using the volt/ohmmeter, check for 10VAC at secondary leads #601 and #602. Typically, these leads are yellow. Place the probes at the lead splices.
-
Page 84: T2 Transformer Test
F-26 TROUBLESHOOTING & REPAIR Service and repair should be performed by only Lincoln Electric factory trained personnel. Unauthorized repairs performed on this equipment may result in danger to the technician or machine operator and will invalidate your factory warranty. For your safety and to avoid elec- trical shock, please observe all safety notes and precautions detailed throughout this manual. - Page 85 F-27 TROUBLESHOOTING & REPAIR T2 TRANSFORMER TEST (continued) FIGURE F.3 – “PROTECTION CIRCUIT TROUBLESHOOTING” NAMEPLATE TROUBLESHOOTING NAMEPLATE TEST PROCEDURE 1. Remove input power to the LN-9 wire feed- 2. Using the phillips head screw driver, remove the screws holding the left side cover assembly.
-
Page 86: Circuit Breaker
F-28 TROUBLESHOOTING & REPAIR T2 TRANSFORMER TEST (continued) FIGURE F.4 – T2 PRIMARY LEADS #32A AT 5 AMP CIRCUIT BREAKER AND #531 AT R1 RESISTOR CIRCUIT BREAKER LEAD 32A 4. Locate the T2 transformer primary lead #32A connected to the 5 amp circuit break- er. - Page 87 F-29 TROUBLESHOOTING & REPAIR T2 TRANSFORMER TEST (continued) FIGURE F.5 – T2 SECONDARY LEADS #621 AND #620 ON TRIGGER PC BOARD WARNING Electric Shock can kill. • With 7. Insulate the T2 transformer primary leads #531 and #32A and apply 115 VAC power. See the Wiring Diagram and Figure F.4.
-
Page 88: Wire Drive Motor And Tach Feedback Test
TROUBLESHOOTING & REPAIR WIRE DRIVE MOTOR AND TACH FEEDBACK TEST Service and repair should be performed by only Lincoln Electric factory trained personnel. Unauthorized repairs performed on this equipment may result in danger to the technician or machine operator and will invalidate your factory warranty. For your safety and to avoid elec- trical shock, please observe all safety notes and precautions detailed throughout this manual. - Page 89 F-31 TROUBLESHOOTING & REPAIR WIRE DRIVE MOTOR AND TACH FEEDBACK TEST (continued) FIGURE F.6 – LEAD #539, #541, #626B AND #627B AT POWER PC BOARD TERMINAL STRIP TEST PROCEDURE 1. Remove input power to the LN-9 wire feed- 2. Remove any electrode wire or disengage the drive rolls.
- Page 90 F-32 WIRE DRIVE MOTOR AND TACH FEEDBACK TEST (continued) 6. Apply 115 VAC power. WARNING ELECTRIC SHOCK can kill. • With 7. With the gun trigger activated or the gun ter- minals jumpered together (see the Wiring Diagram), check the motor armature volts at leads #541(+) and #539(-).
- Page 91 F-33 TROUBLESHOOTING & REPAIR WIRE DRIVE MOTOR AND TACH FEEDBACK TEST (continued) FIGURE F.7 – LEADS #525, #510, #555 ON CONTROL PC BOARD TACH FEEDBACK TEST PROCEDURE 1. Locate tach PC board leads #510, #525 and #555 on the control PC board. See Figure F.7.
-
Page 92: Voltmeter Accuracy Test
TROUBLESHOOTING & REPAIR VOLTMETER ACCURACY TEST Service and repair should be performed by only Lincoln Electric factory trained personnel. Unauthorized repairs performed on this equipment may result in danger to the technician or machine operator and will invalidate your factory warranty. For your safety and to avoid elec- trical shock, please observe all safety notes and precautions detailed throughout this manual. - Page 93 F-35 TROUBLESHOOTING & REPAIR VOLTMETER ACCURACY TEST (continued) FIGURE F.8 – VOLTMETER CONNECTION POINT TEST PROCEDURE Perform the following checks with the LN-9 wire feeder connected to a Lincoln CV welding power source according to the proper connection dia- gram. (See the Installation section of this man- ual.) See Figure F.8 for this test.
- Page 94 F-36 TROUBLESHOOTING & REPAIR VOLTMETER ACCURACY TEST (continued) WARNING ELECTRIC SHOCK can kill. • With power applied, there are high voltages inside the wire feeder. Do not reach into the wire feeder or touch any internal part of the wire feeder while power is applied.
-
Page 95: Meter Circuit Accuracy Test
TROUBLESHOOTING & REPAIR METER CIRCUIT ACCURACY TEST Service and repair should be performed by only Lincoln Electric factory trained personnel. Unauthorized repairs performed on this equipment may result in danger to the technician or machine operator and will invalidate your factory warranty. For your safety and to avoid elec- trical shock, please observe all safety notes and precautions detailed throughout this manual. -
Page 96: Mounting Screws
F-38 TROUBLESHOOTING & REPAIR METER CIRCUIT ACCURACY TEST (continued) FIGURE F.9 – METER PC BOARD LOCATIONS AND COVER MOUNTING SCREWS TEST PROCEDURE 1. Remove input power to the LN-9 wire feeder. 2. Lift the right side cover assembly and remove the two screws holding the meter cover to the right side assembly. - Page 97 F-39 TROUBLESHOOTING & REPAIR METER CIRCUIT ACCURACY TEST (continued) FIGURE F.10 – METER PC BOARD TEST POINTS 510C 5. Test for AC supply to the meter PC board. Check for 8 to 11 VAC from lead #601 to #602. See Figure F.10. Note: The coating will have to be removed from the test points.
- Page 98 F-40 TROUBLESHOOTING & REPAIR METER CIRCUIT ACCURACY TEST (continued) Test Digital Meter Accuracy. (For LN-9 models above code 7980 with separable digital meter and meter boards only). 1. Use a test meter with at least 3-1/2 digits and +/- .5% accuracy. 2.
- Page 99 F-41 TROUBLESHOOTING & REPAIR METER CIRCUIT ACCURACY TEST (continued) Test Meter PC Board Accuracy. (Metric Models Only) 1. Use a test meter with at least 3-1/2 digits and +/- .5% accuracy. 2. Connect the + probe to lead called for in the table below and the - probe to lead #510C.
-
Page 100: Wire Speed Accuracy Test
TROUBLESHOOTING & REPAIR WIRE SPEED ACCURACY TEST Service and repair should be performed by only Lincoln Electric factory trained personnel. Unauthorized repairs performed on this equipment may result in danger to the technician or machine operator and will invalidate your factory warranty. For your safety and to avoid elec- trical shock, please observe all safety notes and precautions detailed throughout this manual. - Page 101 F-43 TROUBLESHOOTING & REPAIR WIRE SPEED ACCURACY TEST (continued) TEST PROCEDURE Perform the following checks with the LN-9 wire feeder connected to a Lincoln CV welding power source according to the proper connection dia- gram. (See the Installation section of this manu- al.) A.
-
Page 102: Out Of Voltage Range Shut Down Test
TROUBLESHOOTING & REPAIR OUT OF VOLTAGE RANGE SHUT DOWN TEST Service and repair should be performed by only Lincoln Electric factory trained personnel. Unauthorized repairs performed on this equipment may result in danger to the technician or machine operator and will invalidate your factory warranty. For your safety and to avoid elec- trical shock, please observe all safety notes and precautions detailed throughout this manual. - Page 103 1/8 AMP FUSE 5. Connect to a Lincoln Electric CV power source per connection diagram. Installation section of this manual. 6. Start welding and observe the ACTUAL volt- age reading on the LN-9 digital meter. The actual voltage must match the SET voltage within +/- 0.5V.
- Page 104 F-46 TROUBLESHOOTING & REPAIR OUT OF VOLTAGE RANGE SHUT DOWN TEST (continued) 8. If the ACTUAL voltage reading is zero, the sensing leads may be faulty. Check the con- tinuity (zero ohms) of leads #21 and #67. Lead #21 must have continuity to the work- piece, and #67 must have continuity to the electrode.
-
Page 105: General Power Supply Tests
TROUBLESHOOTING & REPAIR GENERAL POWER SUPPLY TESTS Service and repair should be performed by only Lincoln Electric factory trained personnel. Unauthorized repairs performed on this equipment may result in danger to the technician or machine operator and will invalidate your factory warranty. For your safety and to avoid elec- trical shock, please observe all safety notes and precautions detailed throughout this manual. - Page 106 F-48 TROUBLESHOOTING & REPAIR GENERAL POWER SUPPLY TESTS (continued) TEST PROCEDURE 1. Remove input power to the LN-9 wire feeder. 2. Using the phillips head screw driver, remove the screws from the left side cover assembly. 3. Lift the left side cover assembly. 4.
- Page 107 F-49 TROUBLESHOOTING & REPAIR GENERAL POWER SUPPLY TESTS (continued) CHECKPOINT LOCATION DESCRIPTION CONTROL P.C. BOARD CONNECTOR SUPPLY FROM PLUG CONTROL P.C. CHECK - 10 VDC BOARD SUPPLY FROM CONNECTOR PLUG VOLTAGE P.C. BOARD UPPER CONNECTOR SUPPLY FROM PLUG NEXT TO "F"...
-
Page 108: Digital Meter And Meter Pc Board Removal And Replacement
TROUBLESHOOTING & REPAIR DIGITAL METER AND METER PC BOARD REMOVAL AND Service and repair should be performed by only Lincoln Electric factory trained personnel. Unauthorized repairs performed on this equipment may result in danger to the technician or machine operator and will invalidate your factory warranty. For your safety and to avoid elec- trical shock, please observe all safety notes and precautions detailed throughout this manual. - Page 109 F-51 TROUBLESHOOTING & REPAIR DIGITAL METER AND METER PC BOARD REMOVAL AND REPLACEMENT (continued) METER PC BOARD REMOVAL PROCEDURE 1. Remove input power to the LN-9 wire feeder. FIGURE F.12 – METER PANEL ASSEMBLY SCREWS METER 3. Lift the right side cover assembly. FIGURE F.13 –...
-
Page 110: Mounting Nuts
F-52 TROUBLESHOOTING & REPAIR DIGITAL METER AND METER PC BOARD REMOVAL AND REPLACEMENT (continued) FIGURE F.14 – METER PC BOARD REMOVAL 5. Using the 5/16" nut driver, remove the four nuts mounting the meter PC board to the meter assembly. See Figure F.14. 6. -
Page 111: Reed Switch (Cr2) Removal And Replacement
TROUBLESHOOTING & REPAIR REED SWITCH (CR2) REMOVAL AND REPLACEMENT Service and repair should be performed by only Lincoln Electric factory trained personnel. Unauthorized repairs performed on this equipment may result in danger to the technician or machine operator and will invalidate your factory warranty. For your safety and to avoid elec- trical shock, please observe all safety notes and precautions detailed throughout this manual. - Page 112 F-54 TROUBLESHOOTING & REPAIR REED SWITCH (CR2) REMOVAL AND REPLACEMENT (continued) FIGURE F.15 – CR2 REED SWITCH LOCATION AND COMPONENTS LEAD 628 LEAD 529 SELF-TAPPING PROCEDURE 1. Remove input power to the LN-9 wire feeder. 2. Lift the right side cover assembly. 3.
-
Page 113: T1 Transformer Removal And Replacement
TROUBLESHOOTING & REPAIR T1 TRANSFORMER REMOVAL AND REPLACEMENT Service and repair should be performed by only Lincoln Electric factory trained personnel. Unauthorized repairs performed on this equipment may result in danger to the technician or machine operator and will invalidate your factory warranty. For your safety and to avoid elec- trical shock, please observe all safety notes and precautions detailed throughout this manual. - Page 114 F-56 TROUBLESHOOTING & REPAIR T1 TRANSFORMER REMOVAL AND REPLACEMENT (continued) FIGURE F.16 – PRIMARY LEAD #31 AT R1 RESISTOR PROCEDURE 1. Remove input power to the LN-9. 2. Using the phillips head screw driver remove the screws holding the left side cover assem- bly.
- Page 115 F-57 TROUBLESHOOTING & REPAIR T1 TRANSFORMER REMOVAL AND REPLACEMENT (continued) 6. Disconnect leads #526 and #527 from the power PC board terminals. See Figure F.17. FIGURE F.17 – LEADS #526 AND #527 AT POWER PC BOARD 7. Disconnect yellow leads #601 and #602 from the lead splices.
- Page 116 F-58 TROUBLESHOOTING & REPAIR T1 TRANSFORMER REMOVAL AND REPLACEMENT (continued) 8. Remove the two phillips head screws from the control PC board mounting panel. 9. Using the 11/32" wrench, remove the nut and screw from the top of the PC board mounting panel.
- Page 117 F-59 TROUBLESHOOTING & REPAIR T1 TRANSFORMER REMOVAL AND REPLACEMENT (continued) FIGURE F.20 – TERMINAL STRIP MOUNTING TRANSFORMER MOUNTING SCREWS 11. Using the 5/16" wrench, remove the nuts and lockwashers mounting the terminal strip to the mounting panel. See Figure F.20. 12.
-
Page 118: Tach Pc Board Removal And Replacement
TROUBLESHOOTING & REPAIR TACH PC BOARD REMOVAL AND REPLACEMENT Service and repair should be performed by only Lincoln Electric factory trained personnel. Unauthorized repairs performed on this equipment may result in danger to the technician or machine operator and will invalidate your factory warranty. For your safety and to avoid elec- trical shock, please observe all safety notes and precautions detailed throughout this manual. - Page 119 F-61 TROUBLESHOOTING & REPAIR TACH PC BOARD REMOVAL AND REPLACEMENT (continued) FIGURE F.21 – TACH ASSEMBLY COVER SCREWS SCREWS PROCEDURE 1. Remove input power to the LN-9 wire feeder. 2. Using the Phillips head screw driver, remove the screws holding the left side cover assem- bly.
-
Page 120: Troubleshooting And Repair
F-62 TROUBLESHOOTING & REPAIR TACH PC BOARD REMOVAL AND REPLACEMENT (continued) 5. Remove control PC board leads #510, #525 and #555. See Figure F.22. FIGURE F.22 – CONTROL PC BOARD LEADS 6. Hold the nut in place with the 3/8" wrench. With the phillips head screw driver, remove the locking screw from the rotating disc. - Page 121 F-63 TROUBLESHOOTING & REPAIR TACH PC BOARD REMOVAL AND REPLACEMENT (continued) FIGURE F.24 – TACH COMPONENT ASSEMBLY TACH PC BOARD REASSEMBLY 8. Upon reassembly the spacers must be used to assure that the disc rotates freely and smoothly within the sensor "window" on the printed circuit board.
-
Page 122: Drive Motor Removal And Replacement
TROUBLESHOOTING & REPAIR DRIVE MOTOR REMOVAL AND REPLACEMENT Service and repair should be performed by only Lincoln Electric factory trained personnel. Unauthorized repairs performed on this equipment may result in danger to the technician or machine operator and will invalidate your factory warranty. For your safety and to avoid electrical shock, please observe all safety notes and precautions detailed throughout this manual. - Page 123 F-65 TROUBLESHOOTING & REPAIR DRIVE MOTOR REMOVAL AND REPLACEMENT (continued) FIGURE F.25 – TOP MOTOR PLATE SCREWS REMOVE FROM OPPOSITE SIDE PROCEDURE 1. Remove input power to the LN-9 wire feeder. 2. Using the phillips head screw driver, remove the screws holding the left side cover assem- bly.
- Page 124 F-66 TROUBLESHOOTING & REPAIR DRIVE MOTOR REMOVAL AND REPLACEMENT (continued) FIGURE F.26 – GLASTIC MOUNTING SCREWS NUTS AND WASHERS (4-ROLL FEEDERS) 11. Remove the three screws that hold the glas- tic mounting to the See Figure F.26. NOTE: Four- roll drive units have nuts and wash- ers also.
-
Page 125: Mounting Bolts
F-67 TROUBLESHOOTING & REPAIR DRIVE MOTOR REMOVAL AND REPLACEMENT (continued) FIGURE F.27 – MOTOR AND WIRE DRIVE REMOVAL MYLAR INSULATOR GLASTIC MOUNTING BOARD MOUNTING BOLTS (4) 13. Lift the right side cover assembly and care- fully lift and slide the motor and wire drive assembly partially out of the LN-9 box assembly. -
Page 126: Gearbox Assembly
F-68 TROUBLESHOOTING & REPAIR DRIVE MOTOR REMOVAL AND REPLACEMENT (continued) 15. With the slot head screw driver, remove the three screws, lock and insulators holding the drive motor to the gear box assembly. See Figure F.28. 16. Carefully remove the motor and spacer plate. REASSEMBLY 17. -
Page 127: Retest After Repair
F-69 F-69 TROUBLESHOOTING & REPAIR RETEST AFTER REPAIR Retest the LN-9 wire feeder: If it fails any test and the test requires removing or replacing any mechanical part that could affect the wire feeder's electrical characteristics. If you repair or replace any electrical compo- nent. - Page 128 F-70 F-70 NOTES LN-9 Wire Feeder...
- Page 129 ELECTRICAL DIAGRAMS TABLE OF CONTENTS ELECTRICAL DIAGRAM SECTION Electrical Diagram Section ...Section G Wiring Diagram...G-2 Operating Schematic...G-3 Meter Board (L6687) Schematic ...G-4 Trigger Board (M13861) Schematic ...G-5 Tachometer Board Schematic ...G-6 LN-9 Wire Feeder...
- Page 130 NOTES LN-9 Wire Feeder...
-
Page 131: Electrical Diagrams
Wiring Diagram VOLTS-SPEED SELECTOR SWITCH BURNBACK P.C. BOARD (OPTIONAL) JUMPER CONNECTOR IS REMOVED AND HARNESS CONNECTOR IS PLUGGED INTO OPTIONAL CONTACTOR DROP OUT DELAY P.C. BOARD METER METER PANEL ASSEMBLY GROUND GND. N.F. CASE GND. TACH PICK UP P.C. BOARD BLACK BLUE WHITE... - Page 132 TRIGGER SUPPLY TRANSFORMER CODE NUMBER. 150VAC TRANSIENT PROTECTOR UNLESS OTHERWISE SPECIFIED TOLERANCE THIS SHEET CONTAINS PROPRIETARY INFORMATION EQUIP. THE LINCOLN ELECTRIC CO. LN-9 AND LN-9F (METRIC) THE LINCOLN ELECTRIC CO. ON HOLE SIZES PER E2056 OWNED BY AND IS 3-25-94A TYPE ON 2 PLACE DECIMALS IS .02...
- Page 133 NOTE: Lincoln Electric assumes no responsibility for liablilities resulting from board level troubleshooting. PC Board repairs will invalidate your factory warranty. Individual Printed Circuit Board Components are not available from Lincoln Electric. This information is provided for reference only. Lincoln Electric discourages board level troubleshooting and repair since it may compromise the quality of the design and may result in danger to the Machine Operator or Technician.
- Page 134 NOTE: Lincoln Electric assumes no responsibility for liablilities resulting from board level troubleshooting. PC Board repairs will invalidate your factory warranty. Individual Printed Circuit Board Components are not available from Lincoln Electric. This information is provided for reference only. Lincoln Electric discourages board level troubleshooting and repair since it may compromise the quality of the design and may result in danger to the Machine Operator or Technician.
- Page 135 NOTE: Lincoln Electric assumes no responsibility for liablilities resulting from board level troubleshooting. PC Board repairs will invalidate your factory warranty. Individual Printed Circuit Board Components are not available from Lincoln Electric. This information is provided for reference only. Lincoln Electric discourages board level troubleshooting and repair since it may compromise the quality of the design and may result in danger to the Machine Operator or Technician.
Need help?
Do you have a question about the LN-9 SVM127-A and is the answer not in the manual?
Questions and answers