
Subscribe to Our Youtube Channel
Related Manuals for BionX Ride+


Summary of Contents for BionX Ride+
- Page 1 OWNER’S MANUAL Electric Bicycle powered by IT IS IMPORTANT TO READ THE WARNINGS AND INSTRUCTIONS IN THIS MANUAL BEFORE RIDING YOUR NEW BICYCLE.
- Page 3 ENGLISH This Electric bicycle manual is additional to the manual provided with your bicycle. © 2013 Trek Bicycle Corporation. All rights reserved. No texts, details, or illustrations from this Manual may be reproduced or distributed, or become the subject of unauthorized use for commercial purposes. Additional manuals for using the Electric bicycle may be ordered as separate items from Trek Bicycle.
-
Page 4: Important To Read Before The First Ride
LED indicator or beeps every 30 minutes. • Only charge the battery pack with the included BionX charger. • When the battery pack is not in use, store it with a 100% charge in a dry, cool place, between 5°C and 25°C, preferably 5-10°C. - Page 5 mportant to read before the fIrst rIde 5. Be careful when transporting a RIDE+ bike. • An E-bike is heavier than a normal bike. If transporting on a vehicle, be aware of the maximum load capacity of the vehicle’s roof, towing hook and/or of the applied bike carrier. Refer to the manual of the vehicle and bike carrier for details.
-
Page 6: Table Of Contents
Contents Page Important to read before the first ride Congratulations on your new electric bicycle! 1. Quick start BionX G2 controller RIDE+ Pro controller Charging Rear rack battery packs Downtube battery pack 2. Description Specific parts for the electric bicycle... -
Page 7: Congratulations On Your New Electric Bicycle
ongratulatIons Congratulations on your new electric bicycle! Your electric bicycle is a bike with electric pedal assistance. This means that you can pedal it as a normal bike, or that the bike can assist you in your pedaling. The electric bicycle will assist you when you are pedaling. The amount of assistance depends on the force you exert on the pedals. -
Page 8: Quick Start
This device can be used to select a higher or lower assist or regeneration level without removing your hands off the handlebars. The red throttle button on the BionX remote is a convenient help to move the bike without pedaling (up to 4 km/h) walking next to the E-bike. -
Page 9: Ride+ Pro Controller
- rIde+ p uICk start ro Controller 1.2 RIDE+ Pro controller • Switching system On/Off Push any of the two upper buttons briefly to switch the system ‘On’. Push the button to switch the system Off. When switched On, the bike is in cycle mode (zero assist). • Assistance/Regeneration Level Push the ‘+’... -
Page 10: Charging
uICk start hargIng 1.3 Charging • Power supply The charging process is the same for both battery pack types. They can be charged using the power supply, on the bike or removed from the bike. RIDE+ R250-2, R320 & R420 RIDE+ C420 NOTICE. -
Page 11: Rear Rack Battery Packs
uICk start attery aCks 1.4 Rear rack battery packs • Removing the battery pack Insert the key in the lock, twist the key clockwise (1,2). Now slide the battery pack rearwards out of the rear rack (3,4). After you remove the battery pack, don’t forget to take the keys out of the lock. • Placing the battery pack Slide the battery pack into the rack, electrical-contact side first (1). Carefully push all the way forward, also through a slightly higher resistance at the end (2,3). Now turn the key of the lock counter clockwise until the battery pack is locked and take the key out of the lock (4). Do not ride the bike with the lock open. EN-8... -
Page 12: Downtube Battery Pack
uICk start owntube attery 1.5 Downtube battery pack • Removing the battery pack Insert the key in the lock, twist the key clockwise until the lock springs out (1,2). When the lock springs out, the lever of the battery pack will be released. Now take the key from the lock and pull the lever of the battery pack so that it slides upwards - parallel to the down tube - until it releases from the rail (3). When the battery pack is not on the bike, always use the protective cover on the contacts on the frame to protect the electrical system from water (5). Contacts at the bottom side of the down tube. • Placing the battery pack Position the battery over the downtube (with some space between the seat tube and the lower end of the battery pack, 1). Now, slide the battery pack down onto the rail (2). Use the lever to lower the battery pack carefully during the last phase of sliding, so that the connectors engage (3). Be sure that the connector at the bottom of the battery pack and the connector on the docking engage properly. When the battery pack is fully in place, push the lock in until it clicks (4). -
Page 13: Description
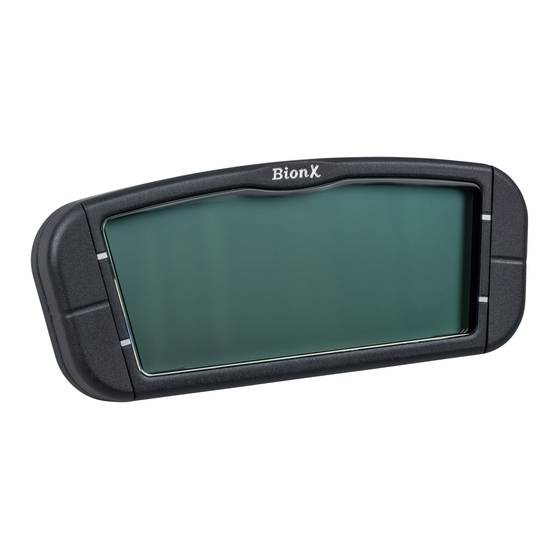
esCrIptIon 2. Description 2.1 Specific parts for the electric bicycle There are several models of electric bicycles, with different equipment options. Find the options that are on your electric bicycle. In the pictures of the bikes you will find the battery pack (1), the motor ‘front or rear’ (2), the controller (3), the brake switch (4), and the wiring harness (5). • Battery packs There are four types of battery packs for RIDE+ bicycles: 1. ”RIDE+ R250-2” battery pack, rack type, containing 30 Li-Mn (Li-Ion) cells, 37 V, 6.6 Ah, max. 244 Wh. - Page 14 escription • Controllers 1. B ionX G2 controller. Controls all functions: On/Off, the four assist levels, the four regenerative levels and lights On/Off. It also functions as a bicycle computer, measuring speed and distance, and shows the battery charge level. 2. R IDE+ Pro controller. Controls all functions: On/Off, the four assist levels, the four regenerative levels and lights On/Off. It also functions as a bicycle computer, measuring speed and distance, and shows the battery charge level. All the information can be provided in different languages (see ‘programming’). • Brake Switch T he right-hand brake lever of cable-activated brakes contains a switch that cuts off the power to the motor, and switches the motor to generation mode as soon as the right-hand brake lever is pulled.
-
Page 15: Assistance/Regeneration
– r ssIstanCe egeneratIon 2.2 Assistance/Regeneration The system has four levels of assistance. When the system is set to assistance, the electric motor drives the rear or front wheel and assists you in your pedaling. Additionally, the system has four levels of regeneration. When the system is set to regeneration, the electric motor is used as a dynamo and generates electricity for charging the battery pack. Going downhill, you can reduce your speed by regulating the amount level of regeneration as the created resistance acts as a motor brake. -
Page 16: Bontrager Satellite Elite Forklight
ontrager atellIte lIte Ight 2.3 Bontrager Satellite Elite ForkLight* The Bontrager Satellite Elite ForkLight comes in a RIDE+ and non-RIDE+ version. The RIDE+ version can be operated via the controller on the handlebar. The energy that is needed to power the RIDE+ lights comes from the battery pack. Both lights always work simultaneously. Depending on model. •... -
Page 17: Km/H 'Fast Electric Bike
‘f ’ leCtrIC 3. 40 ‘Fast Electric Bike’* km/h The ’40 km/h fast electric bike’ is an electric bicycle of which the assistance does not stop at 25 km/h but at 40 km/h. This higher assist speed makes it the perfect electric bicycle for people who like riding faster than 25 km/h. Note, though, that the actual maximum speed that you can reach depends first and foremost on how strongly you pedal. *NOTICE. ‘Fast’ E-bicycles are only available in Germany, Austria and Switzerland. 3.1 Legal rules Legally, the 40 km/h fast electric bike is no longer considered being a ‘bicycle’ but a ‘lightweight moped’. It has type approval as such. NOTICE . -
Page 18: Instructions For Use
4. Instructions for Use There are two types of controllers: BionX ‘G2’ and ‘RIDE+ Pro’. 4.1 BionX ‘G2’ controller 1• Speed indication 2• Service Indication* 3• Current assistance level 4• On/‘+’ button 5• ‘-’ Button 6• Distance, Odometer, Chronometer, Average speed 7• Battery charge level 8• Mode-switch button 9• On/Off button 10• Current generation level. *WARNING. If the Service Indication (a steady or blinking wrench symbol) is visible on the display, refer immediately to paragraph 7.1 for instructions. - Page 19 nstruCtIons for assistance. For less assistance press button ‘-’. When there is no assistance level shown and the bicycle icon is visible on the screen, there is no assistance. Pedaling is then the same as on a normal bicycle. To switch from any level of regeneration to the first assist level, press and hold the ‘+‘ button. WARNING.
- Page 20 For fast E-bikes: assist up to 25 km/h (pedaling not needed) • Installation of the BionX remote for non-equipped bikes To connect the BionX remote to the system, the remote connector can be plugged into the receiver connector of the controller docking. After that, the brake generator connector can be plugged into the remote connector. The red throttle button on the BionX remote is a convenient help to move the bike without pedaling (up to 4 km/h) walking next to the E-bike.
-
Page 21: Ride+ Pro Controller
nstruCtIons for 4.2 RIDE+ Pro controller 1• Speed indication 2• Battery charge level 3• ‘+’ button 4• Distance, Odometer, Chronometer, Average speed, Clock 5• ‘-’ button 6• Current assistance level 7• Current generation level 8• Mode-switch button 9• On/Off button 10• Light indicator, On or Off 11• Service Indication*. *WARNING. If the Service Indication (a steady or blinking wrench symbol) is visible on the display, refer immediately to paragraph 7.1 for instructions. • Switching system On/Off Press any of the two top buttons briefly to switch the system On. The battery pack will beep four times, the system will perform a short self-check (shown on the display as a countdown in the ‘speed’-field), and the system will activate (switch to ‘On’). - Page 22 nstruCtIons for • Regeneration When the bicycle regenerates electricity for the battery, the system is in generation mode. There are four levels of regeneration. The level of regeneration is shown by the arrows at the bottom of the screen. To increase the regeneration level, press button ‘-’. For regenerative level 1 press once. Press again to increase the regeneration level to a higher level. For a lower regeneration level press button ‘+’.
- Page 23 nstruCtIons for • Mountain mode The “Mountain Mode” allows for longer uphill riding before the motor shows power reduction due to so-called “temperature-derating”. As “Mountain Mode” limits the maximum motor torque the motor will stay cooler for a longer period of time. Select this option by going to assistance level 4 and then press-and-hold the ‘+’ button for 2 seconds. To return to assistance level 4, press the ‘-‘ button once. • Changing the language option of the controller The RIDE+ Pro controller allows you to change the language that is displayed on the screen. See the part ‘programming’ later in this manual to set the correct language. •...
-
Page 24: Rear Rack Battery Packs
nstruCtIons for 4.3 Rear rack battery packs • Battery pack size Depending on the model, your bike will be equipped with either a “RIDE+ R250-2”, “RIDE+ R320” or a “RIDE+ R420” battery pack. Removal, charging and putting back are the same for all battery packs. • ‘ RIDE+ R250-2’ battery pack, containing 30 Li-Mn (Lithium-Ion) cells, 37 V, 6.6 Ah, max. 244 Wh. • ‘ RIDE+ R320’ battery pack, containing 39 Li-Mn (Lithium-Ion) cells, 48 V, 6.6 Ah, max. 317 Wh. • ‘ RIDE+ R420’ battery pack, containing 39 Li-Mn (Lithium-Ion) cells, 48 V, 8.5 Ah, max. 408 Wh. • Bontrager Interchange System compatibility The ‘RIDE+ R250-2’, ‘R320’ and ‘R420’ battery packs are compatible with the Bontrager Interchange System. This means you can mount a(n optional) Bontrager Interchange basket or pannier on the rear rack of the bike by removing the plug from the battery pack. •... -
Page 25: Downtube Battery Pack
nstruCtIons for 4.4 Downtube battery pack • Battery pack size ‘ RIDE+ C420’ down tube battery pack, containing 52 Li-Mn (Lithium-Ion) cells, 48 V, 8.8 Ah, max. 423 Wh. • Bottle cage holder A bottle cage can be mounted on the C420 battery pack by installing the ‘bottle cage holder’. This adapter can be mounted by 2 bolts. Subsequently, the bottle cage can be mounted on the adapter. Only use the 4 bolts that are delivered with the holder to prevent damage to the battery cells inside. • Removing the battery pack Put the key in the lock, twist the key clockwise until the lock springs out (step 1,2, see next page). When the lock springs out, the lever of the battery pack will be released. Now take the key from the lock and pull the lever of the battery pack so that it slides upwards -parallel to the down tube- until it releases from the rail (step 3). When the battery pack is not on the bike, always use the protective cover on the contacts on the frame to protect the electrical system from water (step 5). Be sure to fasten the cord of the protective cover in a safe way to the frame. EN-22... - Page 26 nstruCtIons for Contacts at the bottom side of the down tube. • Replacing battery pack Position the battery pack over the down tube (with some space between the seat tube and the lower end of the battery pack, step 1 below). Now, slide the battery pack down onto the rail (2). Use the lever to lower the battery pack carefully during the last phase of sliding, so that the connectors engage (3). Be sure that the connector at the bottom of the battery pack and the connector on the docking engage properly. When the battery pack is fully in place, push the lock in until it clicks (4). Do not ride the bike with the lock open. EN-23...
-
Page 27: Lighting
nstruCtIons for 4.5 Lighting The front and rear lights, as well as the display light, are switched ‘On’ and ‘Off’ on the RIDE+ controller. When the battery pack shows ‘empty’, there is still enough capacity left to run the lights for about two hours. The onboard software ensures that - as long as the bike is moving - the lights can operate for an indefinite period of time using the dynamo function of the motor as the power source. -
Page 28: Battery Pack Care
nstruCtIons for The light at the charging port of the battery pack will turn red. It will turn yellow as soon as charging starts. As soon as the yellow light on the battery charging port turns green, the battery pack is fully charged. Disconnect both the connector from the battery pack and the power source. Charging a fully discharged battery pack usually takes about three to five hours (depending of its maximum capacity). After one hour of charging, the battery pack will already be charged up to 80% of its capacity. The battery packs with the round charging connector can be left connected to the power indefinitely. -
Page 29: Warnings And Suggestions For Use
nstruCtIons for Tip: The battery packs with the round charging connector can be left connected to the power indefinitely. The power supply electronics will take care of the correct charging procedure. However, you will save energy by disconnecting the power supply when the light in the charging port has turned green. The warranty does not cover improper follow-up of battery care instructions. - Page 30 nstruCtIons for Range for a fully charged ‘RIDE+ R250-2’ battery pack Terrain/Assistance level 1 (25%) 2 (50%) 3 (100%) 4 (200%) Flat terrrain 50-80 km 40-65 km 30-50 km 25 - 35 km Hilly terrrain 40-70 km 30-55 km 20-40 km 15 - 25 km Mountainous terrrain 25-40 km 20-35 km 15-25 km 10 - 20 km Range for a fully charged ‘RIDE+ R320’ battery pack Terrain/Assistance level 1 (25%) 2 (50%)
-
Page 31: Programming
aIntenanCe 4.9 Programming This section explains how you set the odometer units (miles or kilometers), the clock, the wheel diameter and how you can swap the functionality of the buttons and select the correct language. To enter programming mode, press buttons ‘On/Off’ and ‘Mode-switch’ for two seconds. Four zeros will appear, with the first zero blinking. Enter the appropriate code by pressing button ‘+’ for a higher value, ‘-’ for a lower value. Press button ‘On/Off’ to select a value and move to the next digit. After entering the correct value for the fourth digit, press button ‘On/Off’ to move into the chosen menu. In the programming menu, buttons ‘+’ and ‘-’ will move to a higher or lower value. Pressing button ‘On/Off’ will save the entry and move you to the next step, or back to the regular display. Codes: 2001 to switch between miles and kilometers. -
Page 32: Maintenance
aIntenanCe 5. Maintenance After the first two to three weeks of use, or 300 km, have your dealer check the spokes in the rear wheel. The motor is of the ‘brushless’ type and requires no maintenance. Check the connections of the system every two to three months. Make sure that no dirt or moisture can get into the ‘docking station’ (connector) when the battery pack is not on the bike. If you notice anything like this, clean with a smooth, dry brush. 5.1 Cleaning When cleaning the bike, use a sponge and/or a soft brush. For the battery pack case, a damp cloth suffices. Use little water. Keep water away from the electrical connections. NOTICE. Do not use a jet-wash. The powerful water-jet may damage the electronics. 5.2 Removal and refitting of wheels for bikes with a rear wheel motor Removal and refitting of the rear wheel is best left to your dealer. -
Page 33: Removal And Refitting Of Wheels For Bikes With A Front Wheel Motor
aIntenanCe NOTICE. On bikes without a derailleur, the chain may not be adjusted too tight (measured at the most tight point in the chain), else the RIDE+ system does not work properly and can the rider lose control of the bike while riding. - Page 34 aIntenanCe 6. T ighten the wheel nuts equally and evenly to a torque of 40 Nm. Otherwise the system might not work properly. If you do not have access to a torque wrench, you can use a normal wrench, but ask your dealer to check the tightening torque of the nuts at the earliest opportunity. 7. R econnect the front brake. Rollerbrake bikes: make sure that the bolt for the brake arm is securely tightened.
-
Page 35: Technical Description
eChnICal desCrIptIon 6. Technical description 6.1 Bike specifics Motor Brushless motor Maximum continuous power output 250 W Maximum assisted speed 25 km/h Wheel nut torque 40 Nm Max. load bike (rider & luggage) 125 kg Total weight bike (incl. battery pack) 23.4 -28.0 kg (depending on model) 6.2 Battery packs RIDE+ R250-2 RIDE+ R320 RIDE+ R420... -
Page 36: Problem Solving
roblem solvIng 7. Problem solving 7.1 Drive problems • The Service Indication is visible on the display of the controller. When it shows, this means that the electronic system recognizes a problem. First try solving the problem by switching the RIDE+ system Off and back On. If the error persists, visit your dealer immediately for repairs. The Service Indication can mean the battery pack has been impacted or mis-handled, causing an electrical fault. -
Page 37: Display Problems
roblem solvIng • The charging light turns green after only 10 minutes of charging Please make sure the system is turned Off before you connect the power supply to a power source or before you remove the battery pack to charge it. 7.3 Display problems •... -
Page 38: Limited Warranty
ImIted warranty 8. Limited warranty Trek Bicycle Corporation warrants the motor, the battery pack and the controller against defects in workmanship and materials for a period of two (2) years for the original owner. This warranty does not cover: • N ormal wear and tear, • I mproper assembly, • I mproper follow-up maintenance, • I nstallation of parts or accessories not originally intended for, or compatible with, the bicycle as sold, • D amage or failure due to accident, misuse, abuse, or neglect, • L abor charges for part replacement or changeover, • U nderperformance of the battery pack if it has been fully discharged and charged more than, 600 times within the two year warranty period. -
Page 39: Contact
ontaCt 9. Contact Addresses and telephone numbers: Trek Benelux/Bikeurope B.V Basicweg 12a NL 3821 BR Amersfoort The Netherlands Telephone: +31 (0)33 450 90 60 Internet: www.trekbikes.com Diamant Trek Fahrrad GmbH Stettbachstrasse 2 CH-8600 Dübendorf Switzerland Telephone for Germany: 0180-350 70 10 Telephone for Austria: 0820 820 121 Internet: www.diamantrad.com Villiger Trek Fahrrad GmbH Stettbachstrasse 2 CH-8600 Dübendorf Switzerland Telephone: +41 (0)44 824 85 00 Internet: www.villigerbikes.ch For Service and Warranty, please contact your local dealer. Part number 321466 Rev D, September 2013, Fourth Edition.
Need help?
Do you have a question about the Ride+ and is the answer not in the manual?
Questions and answers