
Subscribe to Our Youtube Channel
Related Manuals for Revolabs FLX2 10-FLX2-200-POTS


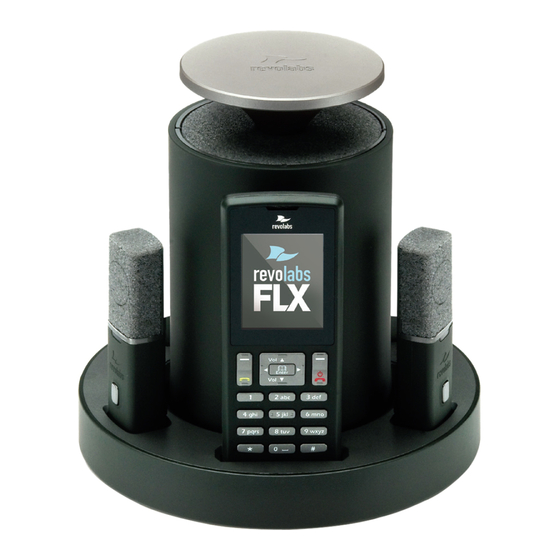
Summary of Contents for Revolabs FLX2 10-FLX2-200-POTS
- Page 1 REVOLABS FLX2 Wireless Conference System for analog phone lines System Guide Models: 10-FLX2-200-POTS 10-FLX2-020-POTS 10-FLX2-002-POTS 10-FLX2-101-POTS...
- Page 2 © 2011 REVOLABS, INC. All rights reserved. No part of this document may be reproduced in any form or by any means without express written permission from Revolabs, Inc. Product specifications are subject to change without notice. Revolabs FLX2 System Guide – Analog 10-FLX2SYSGUIDE-EN May 2011 (Rev 1.1)
-
Page 3: Introduction
Do not open the casings of any of the components of the FLX2 Conference Phone Do not use any other accessories than Revolabs’ originals intended for use with this product. Use of non-original accessories may result in loss of performance, damage to the product, fire, electric shock or injury. -
Page 4: Table Of Contents
Contents Introduction ............................3 Safety Warnings ............................. 3 Contents ..............................4 General Information ..........................6 Quick setup for Telephone Conference Calls ................7 Description .............................. 9 Unpacking ................................9 Installing FLX2 Components ......................10 FLX2 Base Station ............................10 FLX2 Charger Base ............................11 FLX Dialer ................................. - Page 5 Home .................................. 33 Call ..................................34 Setup ................................... 34 Power On/Off the System Components ..................39 Troubleshooting ..........................40 Warning Messages ............................40 Microphone, Speaker, or Dialer not connecting to Base Station ..........40 Microphone, Speaker, or Dialer not paired with Base Station ............41 LED Indicators ..............................
-
Page 6: General Information
General Information The Revolabs FLX2 Conference Phone includes several components which, in the sum, make up the conferencing phone. The components are the Charge Base, Speaker, Microphones and Dialer (handset). In addition, the Base Station receives the wireless signals from those components and... -
Page 7: Quick Setup For Telephone Conference Calls
Speaker, the Microphones, and the Dialer for at least 8 hours or overnight before starting to use the system. Please note that the Revolabs FLX2 Conference Phone comes with two different power supplies. Please ensure that you are using the correct power supply when connecting the Base Station and the Charger Base. - Page 8 Making a call To make a conference call, take at least one of the Microphones out of the Charger Base, and take the Dialer out of the Charger Base. You can remove all Microphones and the Speaker if you wish, but this is not required. Use the Dialer to enter the number you want to call, including any leading digits your telephone connection might require.
-
Page 9: Description
Description The Revolabs FLX2™ Wireless Conference Phone is a unique marriage of innovative technology and ergonomic design, allowing for an unparalleled experience when making telephone calls, video conference calls, or using it with your Bluetooth enabled cell phone or computer to make speaker phone calls. -
Page 10: Installing Flx2 Components
The Base Station is the wireless receiver and sender of the audio stream from the Microphones and to the Speaker, as well as to the Dialer. It features the ability to connect two Revolabs FLX Microphones and one Speaker wirelessly. The Base Station is designed to optimize audio and video conferencing by providing consistent audio input from all participants. -
Page 11: Flx2 Charger Base
FLX2 Charger Base The FLX2 Charger Base, shown below, provides charging capabilities for all battery operated system components, including the Dialer, the Speaker, and the Microphones, by allowing them to charge in one simple and organized location. The FLX2 Charger Base is not required while in a conference call, however it can maintain the charge of the FLX Speaker and FLX Dialer while a call is in progress. -
Page 12: Flx Dialer
FLX Dialer The FLX Dialer equips the user with an intuitive and interactive tool for configuring and operating the FLX System. The Dialer is not only used to make and answer conference calls, but it is also used for configuring the system settings, answering a call using the handset, and monitoring the system components. -
Page 13: Flx Speaker
FLX Speaker The FLX Speaker, shown below, is a wireless active omnidirectional speaker that has been designed and optimized specifically for use with the FLX Conferencing System. The Speaker is equipped with a pairing button on the bottom and 4 LED indicators on the top to display the activity of the Speaker and the mute status of the system. -
Page 14: Flx Microphones
FLX Microphones The FLX Microphones provide a sleek and unobtrusive form factor allowing for closer proximity to the participants and creating the best audio available to the far end. They are equipped with a button for pairing and muting, an LED indicator to display mute status and battery charge level, and an internal buzzer to warn if the Microphones have lost connection to the Base Station. -
Page 15: Initial Setup
Initial Setup After unpacking the FLX2 Conferencing System, there are a few initial setup tasks that must be performed before a call can take place or any system configuration can be changed. Connecting System Cables The FLX2 Base Station and Charger Base each have a power supply that needs to be connected, as shown below. - Page 16 Handset Mode Handset mode allows a telephone call to take place through the handset speaker and microphone located in the FLX Dialer. This allows a single user to make and receive a private call. It also provides the ability for the FLX2 System to act as a personal desk phone.
-
Page 17: Placing A Telephone Call
Placing a Telephone Call 1. From the home screen on the FLX Dialer enter the phone number to be called. 2. Once the number is entered completely, press the green ‘call’ button to initiate the phone call. 3. If any Microphones are out of the Charger Base and active, the call will default to ‘speaker mode’... -
Page 18: Ignoring An Incoming Telephone Call
Ignoring an Incoming Telephone Call 1. When the FLX2 System identifies an incoming call, it will play the ring tone through the FLX Speaker. 2. The FLX Dialer will display the caller ID information for the incoming call. 3. A call can be ignored in one of two fashions. a. -
Page 19: Active Call Management
Active Call Management The FLX2 System has many call features that can be used when receiving or making phone calls. These features can be controlled via the FLX Dialer during the call. Caller ID 1. If the incoming caller is in the Contact List, Caller ID will display both name and number of the incoming contact. - Page 20 Placing a Call on Hold 1. Access Active Call Menu by pressing the ‘Enter’ key during a call. Select menu item ‘Hold’. 2. To resume the call press the ‘Resume’ key. 3-Way Calling 1. Press the ‘Enter’ key and select ‘Conference’. 2.
-
Page 21: Charging Components During A Call
Charging Components during a Call Each system component will respond differently when placed in or out of the charger during an active telephone call. The following is a description of what can be expected. Dialer When the Dialer is placed into the Charger Base during a call in ‘speaker mode’, the call will not be affected and the Dialer will enter its charging mode. -
Page 22: Managing The Device Registry
Managing the Device Registry The FLX2 Bluetooth interface has a device registry where it activates, stores and recalls party Bluetooth devices being used by FLX2 for Bluetooth Calls. Device List 1. Go to the Menu Bluetooth. Select ‘Device List’. Adding a Device 1. - Page 23 Viewing Device Details 1. Go to the Menu Bluetooth. Select ‘Device List’. 2. Select desired device and press the ‘Enter’ key or the ‘Select’ key to view device details 3. Device Information screen is shown with device name, address, BT version, and date/time the device was first connected.
-
Page 24: Making A Call Via Bluetooth
Making a call via Bluetooth 1. With the Bluetooth connection enabled, dial a number from the Bluetooth device. The call will be conducted using the FLX Speaker and Microphones. Answering a call via Bluetooth 1. You can answer a Bluetooth call either directly from your FLX system only if at least one microphone is out of the charging bay, and switched on. -
Page 25: Flx2 System Configuration
FLX2 System Configuration There are many features to the FLX2 System that can be modified and configured using the FLX Dialer. The following is a list of those features and their options. Menu Hierarchy Device Audio System Recent Bluetooth Home Call Contacts Setup... -
Page 26: Recent Calls
Recent Calls The Recent Calls call log stores the contact information from calls placed or received, allowing the user to review recent calls, redial a recent call, or store a recent call in the system directory. Recent Call Log 1. Access recent call log by browsing: Menu Recent Calls 2. - Page 27 View Recent Call Information 1. Access the recent call log by browsing: Menu Recent Calls or pressing the green ‘Call’ button while no call is in progress. 2. You can view a recent call one of two ways: a. In the recent call list, select the entry you want to view, and press the ‘View’...
-
Page 28: Contacts
Delete Call History 1. Access the recent call log by browsing: Menu Recent Calls or pressing the green ‘Call’ button while no call is in progress. 2. In the Recent Call menu, press ‘Enter’ to open the Options Menu. 3. - Page 29 Add a Contact 1. Browse to the Contacts menu: Menu Contacts. 2. Press the ‘New’ key to create a new contact. 3. Edit the name in alphanumeric mode. Pressing ‘Clear’ while editing the name will delete the character left of the cursor. Press ‘Done’ when finished editing the name.
- Page 30 Search for Contact 1. Browse to the Contacts menu: Menu Contacts. 2. Use the keys (0-9) to apply a filter a. Once a key is pressed the title line will read ‟Contact()‟ and display the characters being typed. b. The search string can be up to 5 characters long.
-
Page 31: Audio Control
Set Speed Dial 1. Browse to the Contacts menu: Menu Contacts, scroll to the desired contact, and selects the ‘View’ key to access the contact. 2. The contact view screen shows the current name and number. Pressing the ’Edit’ key will open the Edit Contact menu. - Page 32 Ringer 1. Browse to the Ringer menu: Menu Audio Controls Ringer. 2. Choose ‘Ringer Volume’ in the Ringer Settings menu to adjust the Ringer Volume. 3. Press the up and down buttons to increase and decrease the volume. 4.
-
Page 33: Device Status
Device Status 1. Browse to Device Status: Menu Device Status. 2. The Device Status screen shows status for the Microphones and the Speaker. System Information The following is a list of FLX Dialer menus that allow the user to retrieve system information. -
Page 34: Call
Call When selecting ‘Call’ in the menu, the Dialer will open the Dialer menu, allowing dialing a number. Setup Setup is divided into a generic area of features that are not password protected and Advanced Setup, which requires a password. Display 1. - Page 35 Advanced Setup The following is a list of advanced configuration settings that are protected by a 4 digit password for administrator access only. The default password is 7386 (revo). This password should be changed by the system administrator. Advanced Audio 1.
- Page 36 Setting System Name 1. Go to Menu Setup Advanced Setup Admin Settings Set System Name. 2. Change the current System Name to the new name, and press Enter. Reset Defaults 1. Go to Menu Setup Advanced Setup Admin Settings ...
- Page 37 Pairing All FLX2 wireless components are paired before the system is shipped, providing much of the system setup already completed. While pairing should not be required for the system to work, sometimes components can require pairing if a part is shipped separately.
- Page 38 that the pairing failed. The Dialer will display a ‘Pairing Timeout’ message. In that case the pairing procedure should be repeated. Microphone 1. To pair a Microphone, turn off the Microphone by holding the mute button until the LED turns red if it is not already turned off. 2.
-
Page 39: Power On/Off The System Components
Power On/Off the System Components During normal use and operation of the FLX2 System, there is no need to turn off any part of the system. However, if the system is going to be stored without the Charger Base powered on, then each component should be powered off until further use. Dialer On/Off To power off the FLX Dialer, hold down the red ‘end call’... -
Page 40: Troubleshooting
Troubleshooting Warning Messages Speaker/Microphone Link Lost If a FLX Microphone or FLX Speaker loses connection to the FLX2 Base Station, the LED indicator will begin flashing a sequence of red – yellow - green - yellow and start emitting a beeping notification. To reconnect the Microphone or Speaker move it back into range of the Base Station. -
Page 41: Microphone, Speaker, Or Dialer Not Paired With Base Station
Base Station after a few seconds. If the fault in the Base Station continues (every fifth double flash is skipped) please contact Revolabs support. 3. Are the Dialer, Microphone, and Speaker out of reach of the Base Station? Please bring the components closer to the Base Station to see whether this resolves the issue. -
Page 42: Led Indicators
LED Indicators Device LED Indicator Status Microphone in Charger Base Steady Red Charging Steady Green Fully charged Microphone is powered off: o Microphone is not seated properly o Charger tray is powered off Microphone not in Charger Base Microphone is powered off Single green flash every second On, connected, battery charged, un-muted Two Red flashes every second... -
Page 43: Reset To Factory Defaults
Device LED Indicator Status “All Mic Mute” is ON, all microphones muted Flashing Yellow* – Red – Yellow* – Searching for a connection to the Base Station Green Alternating slow Red - Green flash Speaker is not paired to a Base Station Speaker is powered off: o Speaker is not seated properly o Charger tray is powered off... -
Page 44: Technical Specifications
Technical Specifications Models The Revolabs FLX2 System is available with a variety of configurations to provide the best audio capture in the industry. The following is a list of the available models. All of these models work with analog telephone lines. - Page 45 Microphones Dimensions Microphones 94.2 x 24.6mm x 18.5mm (omnidirectional Microphone) Weight 28.6g (omnidirectional Microphone) Bandwidth 80-11,000 Hz from Microphone to Analog OUT. This is reduced for telephone calls based on the bandwidth supported by the phone transport. Battery life (talk time) 8 hours Charge time 2 hours...
-
Page 46: Regulatory Information
FCC Notice to Users Users are not permitted to make changes or modify the equipment in any way. Changes or modifications not expressly approved by Revolabs, Inc. could void the user‟s authority to operate the equipment. This device complies with Part 15 of the FCC Rules. Operation is subject to the following two conditions: (1) this device may not cause harmful interference, and (2) this device must accept any interference received, including interference that may cause undesired operation. -
Page 47: Restricted Use With Certain Medical Devices
Restricted use with certain medical devices Hearing Aids Some devices may interfere with some hearing aids. In the event of such interference, you may want to consult with your hearing aid manufacturer to discuss alternatives. Other Medical Devices If you use any other personal medical device, consult the manufacturer of your device to determine if it is adequately shielded from RF energy. - Page 48 E C Declaration of Conformity Manufacturer’s Name: Revolabs Manufacturer’s Address: 144 North Road, Suite 3250 Sudbury, MA 01776 U.S.A. Model: Model Numbers Base 10-FLXBASEEU-POTS Charger Base 10-FLXCHGEU-01 Speaker 10-FLXSPEAKEREU-01 Microphone Omni 10-FLXMICEU-OM Microphone Directional 10-FLXMICEU-DR Microphone lapel 10-FLXMICEU-WB Dialer 10-FLXHDDIALEREU-01...
- Page 49 If trouble is experienced with this equipment, Model 10-FLXBASE-POTS, for repair or warranty information, please contact Revolabs Customer Service at 1-800-326-1088 or on the web at www.revolabs.com. If the equipment is causing harm to the telephone network, the telephone company may request that you disconnect the equipment until the problem is resolved.
-
Page 50: Warranty
MAINTENANCE OR USE OF ITS PRODUCTS. Limitation of Liability TO THE FULL EXTENT ALLOWED BY LAW, REVOLABS EXCLUDES FOR ITSELF AND ITS SUPPLIERS ANY LIABILITY, WHETHER BASED IN CONTRACT OR TORT (INCLUDING NEGLIGENCE), FOR INCIDENTAL, CONSEQUENTIAL, INDIRECT, SPECIAL, OR PUNITIVE DAMAGES OF ANY KIND, OR FOR LOSS OF REVENUE... -
Page 51: Technical Support
States, excluding their conflicts of laws principles. Warranty and Limitation of Liability. Technical Support If you are experiencing technical problems or if you have questions about the operation, configuration or troubleshooting of any Revolabs product, please email support@revolabs.com or call 1-800-326-1088...
Need help?
Do you have a question about the FLX2 10-FLX2-200-POTS and is the answer not in the manual?
Questions and answers