Advertisement
Advertisement
Table of Contents

Subscribe to Our Youtube Channel
Related Manuals for Extech Instruments 45170CM


Summary of Contents for Extech Instruments 45170CM
- Page 1 USER GUIDE 5‐in‐1 Environmental Meter with CFM/CMM Model 45170CM ...
-
Page 2: Power On/Off
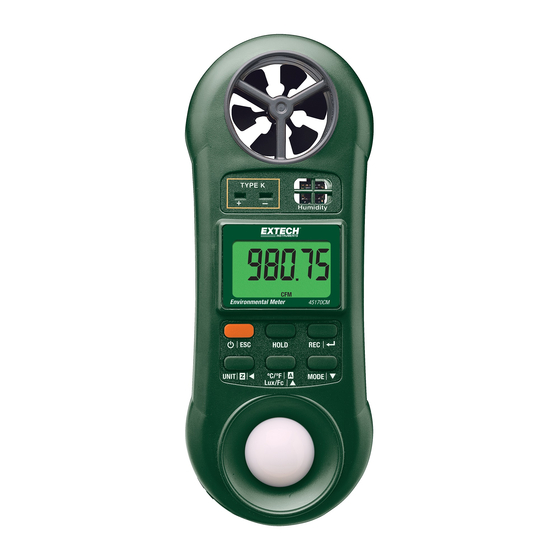
Introduction Thank you for choosing the Extech Model 45170CM, 5‐in‐1 Environmental Meter. The 45170CM measures Air Flow, Air Velocity, Relative Humidity, Temperature, and Light Level. This device is shipped fully tested and calibrated and, with proper use, will provide years of reliable service. Please visit our website (www.extech.com) to check for the latest version of this User Guide, Product Updates, and Customer Support. Meter Description Vane Airflow Sensor Type K Thermocouple Input Jack Display Power / ESC Button Unit /Zero/ Button C°/F° / Lux/Ft‐cd / Area / ▲Button Light Sensor RH and Air Temperature Sensors Hold Button 10. Rec / Enter Button 11. Mode / ▼ Button Note: Battery compartment on back of meter. Power ON‐OFF Press the Power/ESC button to turn power ON or OFF. The meter will perform a short self‐test when it is switched ON. If the meter does not switch ON, please check the status of the battery. 45170CM‐en‐GB_V1.1 1/15 ... - Page 3 2. Plug the thermocouple into the meter's thermocouple input jack on the face of the meter. If no thermocouple is connected, or if the thermocouple is defective, the meter will display dashes. 3. Press the °C/°F button to select the desired temperature unit of measure. D. Light Measurements 1. Use the Mode button to step to the Light Meter mode (Light). For convenience, the LCD display is orientated 180° from all of the other function displays. 2. Press the Lux/Ft‐cd button to select Lux or Footcandle units of measure. 3. Before making measurements ‘zero’ the meter by blocking the light sensor (to cause a ‘no light’ condition) and pressing the Z button. The reading should zero. 4. To measure light, position the meter so that the light source shines as directly as possible on the meter’s light sensor dome. Note the reading on the display. E. Airflow (CFM, CMM) Measurements 1. Use the Mode button to select the Air Flow mode (AirFL). In Airflow mode, the meter can measure the volume of air moving through a duct, for example. The display will show the CFM (cubic feet per minute) or CMM (cubic meters per minute) unit icon on the bottom of display. Use the UNIT button to toggle CFM and CMM units. 2. Press the Area button (A) and then use the and ▲▼ buttons to program the area value. Press the REC / Enter button to save the area value. See the ‘Useful Equations’ section for help on calculating the area of a duct or other airway. 3. For air flow measurements the area units are meters squared or feet squared. The lower display will show m‐2 (for CMM) or F‐2 (for CFM). 4. The area setting range is 0.001 to 30.000 meters squared or 0.01 to 322.92 feet squared. 5. After programming the area, face the anemometer sensor into the wind source and note the CFM or CMM air volume reading. 45170CM‐en‐GB_V1.1 1/15 ...
-
Page 4: Battery Replacement
3. Press the Rec again and the REC MIN symbol, along with the minimum value, will appear on the display. 4. To erase (reset) the recorded Max or Min values press the HOLD button once (while in the Record mode with either the MAX or the MIN icon showing). 5. Press and Hold the Rec button for 2 seconds to exit the Min/Max Data Record Mode and to return to the normal mode. REC and MAX/MIN icons will disappear. Data Hold Press the HOLD button to freeze the reading in the display. The 'HOLD' icon will appear on the upper right‐hand side of the display. Press the HOLD button again to return to normal operation (the 'HOLD' hold icon will disappear). Auto Power OFF The meter will automatically turn off after 10 minutes if no keys are pressed during this period. Note that the Auto power off function is disabled in the Max/Min recording mode. Battery Replacement When the low battery icon appears or when the meter will not switch ON please replace the battery. The battery compartment is located on the back of the meter, secured by a Phillips head screw. Open the compartment and replace the 9V battery observing correct polarity. Do not switch the meter ON until the battery compartment is secured with the screw. Never dispose of used batteries or rechargeable batteries in household waste. As consumers, users are legally required to take used batteries to appropriate collection sites, the retail store where the batteries were purchased, or wherever batteries are sold. Disposal: Do not dispose of this instrument in household waste. The user is obligated to take end‐of‐life devices to a designated collection point for the disposal of electrical and electronic equipment. Useful Equations Area equations: Cubic equations: CFM (ft /min) = Air Velocity (ft/min) x Area (ft ) CMM (m /min) = Air Velocity (m/sec) x Area (m ) x 60 45170CM‐en‐GB_V1.1 1/15 ... -
Page 5: Measurement Specifications
0.1% ±4% RH (from 10% to 70%RH) ±4%rdg +1.2% RH (> 70% RH) Light (Auto Ranging ) 0 to 2,200 Lux 1 Lux ±5% rdg +8 digits 1,800 to 20,000 Lux 10 Lux 0 to 204.0 Fc 0.1 Fc 170 to 1,860 Fc 1 Fc General Specifications Display Dual, Multifunction LCD display Sensors RH: Thin film capacitance humidity sensor Temperature: Thermistor (or optional external Type K Thermocouple) Air sensor: Low friction vane wheel Light: Photo diode with color correction Min/Max Min/Max recalls the highest/lowest reading Data Hold Data Hold freezes the display Operating conditions 0 to 50 C (32 to 122 F) / < 80% RH Power supply 9 Volt Battery Dimensions / Weight Instrument: 156 x 60 x 33mm (6.1 x 2.4 x 1.3”) Vane: 31mm ( 1.2”) diameter / 160 g (5.7 oz) Copyright © 2015 FLIR Systems, Inc. All rights reserved including the right of reproduction in whole or in part in any form www.extech.com 45170CM‐en‐GB_V1.1 1/15 ...
Need help?
Do you have a question about the 45170CM and is the answer not in the manual?
Questions and answers