Advertisement
Quick Links
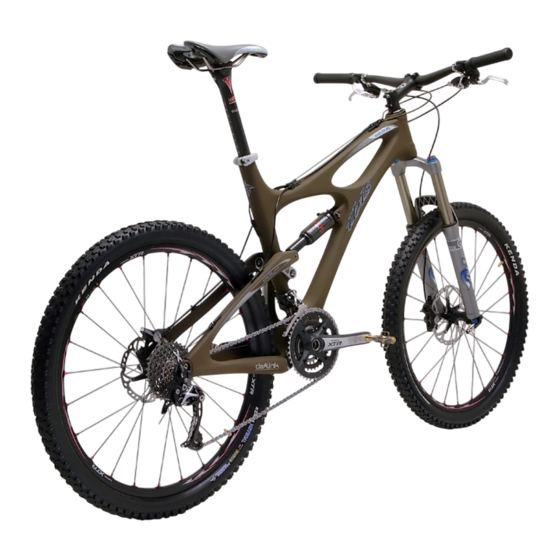
Congrats on your purchase of an Ibis Mojo Carbon.
We've chosen a nice little medley of components for you in our SX, XT XTR and WTF
At Ibis we think you should be spending a lot more time riding your bike and a lot
groups. If you choose not to use our kits and want to build from scratch, here's a bit of
less time working on your bike. We've designed the Mojo with that in mind. First, two
info to help you on your shopping spree:
requests:
1) Read this guide!
The Mojos (both Carbon and SL) are designed for a
2) Perform the proper setup!
140mm travel front fork, but 130 through 160mm travel
forks also work well. The fork that comes with the Mojo
You'll be glad you did. After the initial
Carbon is the Fox Float RLC with 140mm travel, or the
tuning, there shouldn't be a whole lot
130 mm Manitou MRD in the WTF Group.
to do to keep the Mojo humming
along for a long time.
Disk brake only, with an international standard mounting.
The carbon fiber monocoque frame is extremely strong, and should provide years of
trouble-free use, provided you care for it properly and don't overly huck every 50 foot
gap you see.
Mojo Carbon Paint
There is a protective clear coat applied over the carbon weave. Although painted with
to protect the frame and seatpost against corrosion. If your bike
high-quality polyurethane enamel, it is subject to scratching and can wear through with
is frequently wet, you might consider treating the frame / seatpost a few
repeated rubbing of cables or chain slap. You have been provided with a set of ad-
times a year.
hesive vinyl protectors to guard against cable rub and chain slap. After the bike is
We do not recommend using grease on your seatpost in an Ibis Carbon
fully assembled move the bike through its suspension travel and apply the circular vinyl
frame. We do recommend using either the FSA or the Tacx Carbon Assem-
pieces to the frame so that the cables rub the vinyl not the clearcoat. There is a clear
bly Compounds. Not only are they corrosion inhibitors, they also contain
vinyl chainstay protector on the Mojo Carbon. We also have an aftermarket neoprene
a suspension of microscopic plastic beads which increase friction, thus de-
chainstay protector manufactured for us by LizardSkins available online at the Ibis store
creasing the clamping force needed to secure the seatpost.
or from your Ibis dealer.
Keep your bike clean, and inspect it often. Although each and every bike gets tested at
the factory for strength, it never hurts to look at the areas where the 'tubes' join, where
the shocks and dropouts mount and any other areas that may receive stress during us-
age. Check for loose bearings, headsets, shocks and forks and such. Visually inspect
the bike before each ride and also during each cleaning.
Here's a little advice on how to set up the cabling on your Mojo. The derail-
leur housing and rear brake hydraulic hose can be routed around the op-
posite side of the stem. The length of housing between the rear top tube stop
and the upper swing arm stop for the rear derailleur should be kept as short
as possible to keep it from bowing out and contacting your leg.
Front Derailleur
The Mojo Carbon uses the in-
tegrated headset based on the
Cane Creek IS standard (aka the
36° / 45° or 41 mm standard). These
are available from Cane Creek and prob-
ably others. On our kits we use the Cane
Creek IS2.
The seatpost diameter is 31.6 mm.
Your Ibis seat tube comes pre-treated
Piece of Innertube
with a coating of non-conductive LPS-1 lubricant
We recommend you use a piece innertube about 3 cm long, feeding the rear
brake and derailleur cables through it just behind the seat tube as shown.
The Mojo Carbon uses a 34.9 mm top
pull, bottom swing derailleur.
There are two heavy duty Riv-Nut inserts on the underside of the down tube to allow the
mounting of a bottle cage. We've put it there primarily for a spare water bottle, a tool kit
or for a battery if you're night riding.
Please don't attempt to retrieve a water bottle from this cage location
during riding!
There are extra long socket head screws provided for you use in these holes. They are
longer than your average screw. We suggest using a heavy-duty cage for holding bat-
teries since the lighter weight cages don't seem to hold up to this sort of abuse.
Rear Brake
Working on the links is much easier without
the shock, so remove the bolts that hold the
Rear Derailleur
shock in place with two 4 mm and two 6 mm
Allen wrenches.
At the beginning of this setup guide, we mentioned that we were believers in the ride-
your-bike-more/work-on-your-bike-less school of thought. In this section of pivot bear-
ing replacement, that philosophy shows.
The pivot assemblies on the Mojo Carbon are designed to easily removed and re-
placed. We send you new pivots before you take your old ones out, so there is almost
no downtime for the maintenance. No bearings to press out or axles hammer. A couple
of hex keys and a little twisting and the whole assembly is ready for replacement.
New upper and lower pivot assemblies are available in the »buy« section of our web-
site, or you can have your dealer order them from Ibis for you. Replacement is super
simple requiring no special tools:
Be prepared to support the swing arm once it is removed from the front end of the
bike.
Note: We recommend removing the shock completely when working on the links,
the additional swing arm movement that is possible with the shock removed greatly
facilitates working on the suspension bits. As mentioned, it's best to remove the front
derailleur too. We suggest taking the civilized route outlined below.
Pull the swing arm and the
01
lower link away from the front
triangle. It may take a bit of
cajoling to get it removed from
Put your freshly cleaned mojo in a workstand.
Remove the front derailleur and the cranks.
the shaft thats in the frame. Try
to pull more or less straightly
backwards.
02
Remove the axle in the lower link
03
that passes through the swingarm
Rotate the swingarm up to
using two 5 mm Allen wrenches
gain better access and remove
and detach the lower link from
the upper link screws at the
the swingarm. It may take a bit of
seattube using a 5 mm Allen
cajoling to get it removed from the
wrench.
shaft that's in the frame.
09
04
Remove the upper links from the
front triangle. It may take a bit of
cajoling to get it removed from the
shaft that's in the frame. It'll help
to slightly spread the stays of the
swingarm apart to get the links off.
05
Remove the axle in the lower link that
passes through the front triangle with
To reassamble your bike follow the steps 01 to 10 in reverse order.
two 6 mm Allen wrenches.
Remember to use a little loctite blue thread locker on all fasteners during reassembly
otherwise all your pretty bits will be strewn along the trail.
06
Notice that the two upper links are being
pulled across the seat tube where the front
derailleur mounts.
07
08
Remove the remaining
screws in the upper links
of the swingarm with a 5
mm Allen wrench as well.
10
CONGRATS! You have your mojo in pieces
now.
Advertisement

Related Manuals for ibis Mojo Carbon


Summary of Contents for ibis Mojo Carbon
- Page 1 Put your freshly cleaned mojo in a workstand. At Ibis we think you should be spending a lot more time riding your bike and a lot groups. If you choose not to use our kits and want to build from scratch, here’s a bit of leur housing and rear brake hydraulic hose can be routed around the op- mounting of a bottle cage.
- Page 2 Here’s a complete parts listing for Mojo Carbon. Find these online at the 'buy' portion This part is really important. With the purchase of your new Ibis Mojo Carbon, you have 0.50 inches (12 mm) of sag. Sit on your bike in a nor-...
Need help?
Do you have a question about the Mojo Carbon and is the answer not in the manual?
Questions and answers