Skoda Bolero Owner's Manual
Infotainment systems
Hide thumbs
Also See for Bolero:
- Operating instructions manual (60 pages) ,
- Owner's manual (54 pages) ,
- Manual (26 pages)

Related Manuals for Skoda Bolero


Summary of Contents for Skoda Bolero
- Page 1 SIMPLY CLEVER OWNER'S MANUAL OWNER'S MANUAL Amundsen and Bolero infotainment systems...
- Page 2 5L0012720DB...
- Page 4 Preface This manual is intended for the Bolero and Amundsen infotainment systems (hereinafter referred to only as Device). Please read these Operating Instructions carefully, because the operation in accordance with these instructions is a prerequisite for proper use of the unit.
-
Page 5: Table Of Contents
Apple CarPlay Table of Contents MirrorLink Important information about this manual Navigation Notes Navigation (Amundsen) Abbreviations Navigation description New destination Familiarization with the unit My destinations Introductory information Import my destinations Important notes Equipment overview Route guidance Device operation and settings Tour Device operation Traffic reports... -
Page 6: Important Information About This Manual
(for example, phone, music player, etc.). Information on the compatibility of external devices can be found on ŠKODAIn- ternet pages http://infotainment.skoda-auto.com . The Pictures in these Operating Instructions are for illustrative purposes only. The illustrations can differ in minor details from your vehicle; they are only in- tended to provide general information. -
Page 7: Notes
Information Search Notes When searching for information in the Operating Instructions, we recommend using the Index at the end of the manual. Structure of these Operating Instructions The Operating Instructions are hierarchically divided into the following areas. Main chapters (e.g. Introductory information) - the title of the main chapter is ■... -
Page 8: Abbreviations
Abbreviation Definition Abbreviations A program identification of the radio station, which allows a PI code Abbreviation Definition group sort of radio stations Planar map display Personal identification number Spatial map display A system for the transmission of additional information for FM radio reception ®... -
Page 9: Familiarization With The Unit Introductory Information
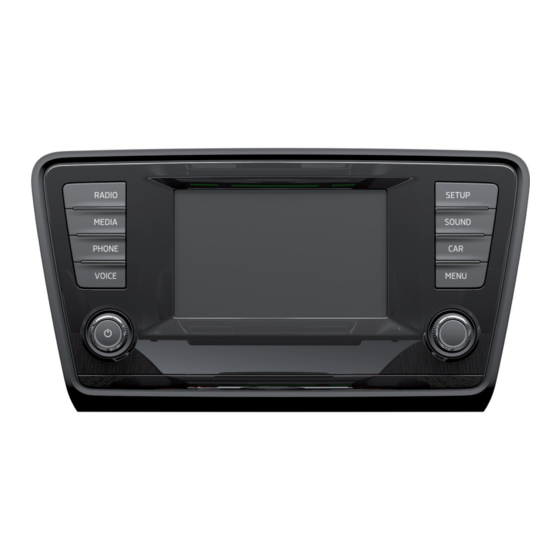
Information on use, updating and compatibility Read and observe on page 6 first. Refer to the ŠKODA Internet pages http://infotainment.skoda-auto.com for information on the compatibility of external devices as well as software up- dates and navigation data. Component protection ... - Page 10 Bolero Amundsen Description of the device - Displays the unit menus » page 8 Touch screen » page 7 SD memory card slot (SD1) SD memory card slot (SD2) Touch screen The unit is equipped with a touch screen which can be operated with a light touch or swipe of a finger.
-
Page 11: Fig. 2
› Warning: 12 V battery low. Please start the engine or switch off the info- Display of TMC traffic reports Traffic » page 60 tainment system. - The vehicle battery is low, start the engine or turn the Menu SmartLink »... -
Page 12: Device Operation And Settings
Menu point with “checkbox” Device operation and settings Open a submenu of the menu point with the “pop-up window” Device operation Status line In some menus a status bar located at the top of the screen shows the time ... -
Page 13: Voice Control
By pressing the function key a list of matching entries opens . If less than 5 Alphanumeric with keyboard entries were found, a list of the found entries opens automatically. Fig. 4 Voice control Example of the keyboard display ... -
Page 14: Function Requirements
Activation of voice control is indicated by an acoustic signal and the device Function requirements screen will display a collection of basic voice commands for the current menu. Read and observe on page 10 first. Switching off voice control Voice control can be switched off in one of the following ways. -
Page 15: Not Recognizing A Voice Command
After switching on the voice control, the function buttons that can be selected Correction of a voice command input with a voice command are highlighted in green. Read and observe on page 10 first. During voice control operation, the following symbols appear in the device screen. - Page 16 Menu Radio Voice command Operation Voice command Operation Show road signs on map Switch the traffic sign display in the Nearest station in the selected fre- screen on/off Turn off road signs on map Next station quency range Show favourites Show or hide favourites icons in the ...
-
Page 17: Device Settings
The following language menu is displayed: › › Select the device language. Press the button (Bolero). Volume - Volume settings ■ › ■ Traffic reports - Adjustment of traffic announcements volume (TP) Press the function key Automatic to set a language to match the MAXI DOT Navigation announcements - sets the volume for the navigation an- ■... -
Page 18: Bluetooth Settings
The messages are generated by the device. The flawless clarity (e.g. road or Voice control settings city name) cannot always be guaranteed. › Press the button → → Voice control. Note Dialogue style: - Setting the message style (long / short) ■... - Page 19 Media Codec: ... - Version of the media codecs ■ ® ■ Update software - Software update (e.g. Bluetooth or station logos) The information on available software updates is to be obtained from a ŠKODA partner or on the following ŠKODA Internet pages. http://infotainment.skoda-auto.com Familiarization with the unit...
-
Page 20: Multimedia Radio
Read and observe on page 17 first. Multimedia Display main menu Radio › Press the button. Main Menu - Information and function keys » Fig. 5 Operation The selected radio station (description or frequency) Introduction Radio Text (AM, FM) / Description of the group (DAB) Preset station buttons for favourite channels This chapter contains information on the following subjects: Choice of radio range (FM / AM / DAB) -
Page 21: List Of Available Stations
› Alphabet - alphabetical order according to station name List of available stations › Group - Sort according to program identification of the broadcast program › Genre - Group sorting of stations according to genre (visible when RDS and AF functions are turned on »... -
Page 22: Store Preferred Station
Remove station logo Store preferred station › In the Radio menu, press the function key → Station logos. Read and observe on page 17 first. A menu with preset buttons for stations is displayed. › For each broadcasting range there are 15 preset buttons to store the preferred Press the preset button for the station, which a logo is to be removed from. -
Page 23: Settings
Radio DAB text and images presentation Settings › In the Radio menu, press the function key . Fig. 7 Sound - Sound settings Station information ■ Scan - Auto-play all available stations in the current frequency band, each ■ station for around five seconds Arrow buttons: - Setting the function of the station change (function keys ... - Page 24 Auto-save station logos- Automatic storage of the station logos ■ DAB traffic announcements - Switch on/off DAB traffic announcements ■ Other DAB announcements - Switch on/off other announcements (e.g., ■ warnings, regional weather, sports reports, financial news) DAB - DAB station tracking - Switch on/off automatic DAB station tracking ■...
-
Page 25: Media
Depending on the audio source type: Media › Folder / Title list › Multimedia database Operation Menu settings Media Introduction Note This chapter contains information on the following subjects: Information concerning the given title appears on the screen, if they are stor- ■... -
Page 26: Playback
Playback Folder / track list The unit will play the contents of the connected audio source according to the Fig. 10 alphabetically sequenced directory and file name. Folder / Title list Operating modes Operation Action Play / Pause Press Press ... -
Page 27: Audio Sources
■ Sound - Sound settings Multimedia database Mix/repeat including subfolders- Switching the title display including sub- ■ directory Fig. 11 ® ■ Bluetooth - Settings for the Bluetooth function Multimedia database Remove safely: - safe removal of the audio source ■... -
Page 28: Sd Card
Read and observe on page 24 first. SD card The USB input is in the centre console and is identified with the symbol . Fig. 12 The exact location of the input » Vehicle Operating Instructions. Insert the SD card The USB input audio source can be connected directly or via a connecting ca- ble. -
Page 29: Aux - Input
® Connect the Bluetooth player Connecting AUX audio sources › › Connect the player to the device - follow the same instructions as for pairing Insert the plug of the audio source in the corresponding well. › the device with a telephone »... -
Page 30: Supported Audio Sources And File Formats
Supported audio file formats Supported audio sources and file formats Maximum Codec type Max bit Multi- Read and observe on page 24 first. File suffix sampling Playlists (File formats) rate channel rate Supported audio sources Windows Media File sys- Source Interface Type... -
Page 31: Pictures
Image settings Pictures Rotate the image 90° anticlockwise Rotate the image 90° clockwise Image viewer Display the initial image size while retaining the aspect ratio Introduction Guidance to GPS coordinates (Amundsen; the display only occurs if the im- ... - Page 32 Repeat slide show - Switching on/off the slideshow repeat ■ guidance. An image with GPS coordinates can be created and imported in the application “MyDestination”. More information can be found on the ŠKODA Internet pages www.infotainment.skoda-auto.com. Supported image sources and file formats Supported image sources Source Type...
-
Page 33: Connectivity Telephone
Connectivity Telephone Telephone Fig. 16 Telephone: Main menu Introductory information Introduction This chapter contains information on the following subjects: Telephone Settings Function problems Read and observe on page 30 first. ® This chapter covers the operation of a Bluetooth device connected to the tel- ›... -
Page 34: Pair And Connect
Message Meaning Settings The telephone scans for available Read and observe on page 30 first. Netw. search… wireless networks. › Press the button → . The telephone has no connection to a wireless network, if necessary, it does No network Hands-free phone - Switching a call to the telephone / back to the device ■... - Page 35 Please refer to the compatibility of telephones as well as updates which are main telephone. ® available for the Bluetooth device, and are available on the ŠKODA Internet pages. Coupling - connected telephone http://infotainment.skoda-auto.com › Press the button → → Find telephone. ® Telephone search A search for available Bluetooth devices takes place.
- Page 36 › Enter the same PIN code into the device that is in the telephone and con- The device is displayed in the telephone to be connected to as SKODA BT ..firm ... is replaced with the last four symbols of the vehicle identification number Version 3 (VIN) of your vehicle.
-
Page 37: Telephone Functions
Disconnection Administering paired devices › Select the device you want from the list of paired devices. › ® Select the desired profile from the list of available Bluetooth profiles » Fig. 17 - . › Press the function key Disconnect . Delete the paired device ›... - Page 38 Press the function key is displayed only when the prefix function » page Enter a telephone number and dial Settings is shown. The prefix can, for example, be used for international calls. Breakdown and info numbers The breakdown and info numbers are free of charge. Charges are only made for a telephone call in accordance with the fare conditions of your telephone service provider.
- Page 39 › Select the desired telephone number. During updating, the number of imported contacts to the device memory/the number of contacts in the telephone is displayed. Contact details › In the list of telephone contacts, press the function key next to the desired Manage preferred contacts contact »...
- Page 40 End dialling / reject incoming call / end call Call list Accept incoming call / return to held call Mute the ringer Fig. 21 Restore ringer Call list Hold a call Deactivate the microphone Activate the microphone ...
-
Page 41: Text Messages (Sms)
Hold a conference - leave the conference temporarily (the conference Open a list for quick answer provided short messages (called templates) continues in your absence) Creating and sending the message Return to the held conference Open the list of messages in ... - Page 42 By pressing the function key more recipients can be added. Received text message › Press the function key . When you receive a new message, the number of new messages received is The message is sent. displayed next to the function key, and at the same time the icon in the sta- tus bar ...
-
Page 43: Smartlink
Note SmartLink We recommend that you use extension cords from ŠKODA Original Accesso- ■ ries. Introductory information The device saves the last 10 connected devices. ■ With some connected devices, it is necessary that the connected device is Introduction ■... -
Page 44: Android Auto
List of connected devices Settings Read and observe on page 40 first. Fig. 26 › List of connected devices Press the button → → . Select device - Display a list of connected devices ■ Pref. connection type: - Select the preferred connection type (if different ■... - Page 45 If route guidance is active at this moment in the device, then this is terminated During the connection establishment a device request can also occur requiring ™ by starting the route guidance in the Android Auto application. This is also the installation or update of the necessary application.
-
Page 46: Apple Carplay
Connection set-up Apple CarPlay › Connect the device to the USB input » Vehicle operating instructions. Introduction The main menu of the Apple CarPlay connection is displayed » Fig. The first connection of the device to the device must be made when the vehi- This chapter contains information on the following subjects: cle is not moving. -
Page 47: Mirrorlink
USB port. ™ The list of available applications and devices, which support the MirrorLink MirrorLink function, can be seed in the ŠKODA Internet pages www.infotainment.skoda- auto.com. Introduction This chapter contains information on the following subjects:... - Page 48 › Select the desired device. Start the application › › ™ Confirm the message concerning the connection in the device screen. In the main menu of the MirrorLink connection select the desired applica- tion. ™ In the main menu the MirrorLink connection is shown »...
- Page 49 Function problems ™ If problems occur with the MirrorLink connection, then one of the following messages may occur in the display. Message Meaning …: MirrorLink™ connection not available. Check the connection to the USB input. Error: MirrorLink™ Error: transfer Disconnect the device and reconnect to the USB input. A problem with the playback of audio files.
-
Page 50: Navigation Navigation (Amundsen)
The information on updating the navigation data is to be obtained from a Pop-up windows ŠKODA partner or on the following ŠKODA Internet pages. http://infotainment.skoda-auto.com GPS satellite signal The unit uses the GPS (Global Positioning System) satellite signal for route Main menu guidance. -
Page 51: New Destination
Operation of the radio / media playback New destination Navigation settings Introduction Pop-up windows This chapter contains information on the following subjects: Enter destination Fig. 32 Enter POI Extra window Enter destination on the map Enter destination on GPS coordinates Enter destination in route This chapter covers the input options for a new destination target. - Page 52 › › Press in the Navigation menu the function key → Manage memory → De- If no guidance takes place, then in the menu Navigation, press the function lete user data → Entered cities. key → Options → On map. ›...
-
Page 53: My Destinations
If the menu for setting the alternative routes is turned on, the guidance for List of registered destinations this route type (most economic/fastest/shortest) must be selected before starting. If the destination entry occurs during route guidance, the destination change must be confirmed by pressing the function key Start in addition to confirming in the following menu that appears. -
Page 54: Poi
Route guidance to the stored destination Current vehicle position Store(flagged destination) › Select the desired destination in the list of stored destinations. › Press the function key Start. The current vehicle position can be stored as the so-called “Flagged destina- tion”. - Page 55 Clarification of the address or location Quick selection of a POI Search area address The device enables quick searching for a POI in the following categories. POI search by category Petrol stations POI search by name Restaurants Search and selecting a POI Car parks ...
-
Page 56: Import My Destinations
Update. net pages. › Select the SD card as the source and confirm the import. http://infotainment.skoda-auto.com If there is already the same POI category name in the device, then it will be overwritten during import. Custom destination in vCard-format Custom POI categories can be displayed on the map. -
Page 57: Map
If the menu for setting the alternative routes is turned on, the guidance for Function keys for map operation this route type (most economic/fastest/shortest) must be selected before Function key for the POI starting. Information on the maximum permitted speed If the destination entry occurs during route guidance, the destination change Information in the status line must be confirmed by pressing the function key Start in addition to confirming... - Page 58 If the map scale of the 2D Map or 3D Map is greater than 10 km (5 miles), then For some vehicles it is possible to set an alert when crossing the permitted the map is automatically displayed as 2D and aligned in the direction of north. speed limited set by a road sign - Dynamic Road Sign Display →...
-
Page 59: Route Guidance
› Turn the control knob . Route guidance › Touching the screen with two fingers and pulling them apart or closing them together. Introduction Enabling automatic scaling This chapter contains information on the following subjects: › Press in the Navigation menu the function key → . Destination management Press the function key ... -
Page 60: Destination Management
› Delete - Delete the destination Destination management › Store as - Edit the name and then store the destination › Favourite - Add or remove the destinations as favourites Fig. 41 Destination details Route calculation Fig. 42 Alternative routes ... -
Page 61: Most Common Routes
Detail of driving recommendation that appears near the manoeuvre Most common routes Lane recommendation Read and observe on page 56 first. In the split screen Manoeuvre the device announces TMC traffic obstructions and on motorways, car parks, petrol stations or restaurants. The unit automatically displays up to three of the most frequently travelled routes for the current time and geographical position. -
Page 62: Tour
› - Arrival time at destination Tour setting › - Remaining travel time to the destination › Route type (economic, fastest, shortest) › Fig. 44 Current vehicle position (coordinates) Entering a new tour Finish route guidance Read and observe on page 56 first. -
Page 63: Traffic Reports
Delete the destination Edit tour Route guidance to this destination is continued and then to the next tour destination (previous stopovers are skipped). Fig. 45 Display the destination details Edit tour Tour memory › Press the function key »... - Page 64 Note List of the traffic reports The traffic reports are updated by the device constantly in the background. The reception of traffic reports is always switched on and cannot be turned Fig. 46 off. List of traffic reports Detail of the traffic report Fig.
-
Page 65: Settings
No route guidance is carried out The traffic obstruction is shown in red in the map to the right along the route › Red - All traffic obstructions according to the value set. Route guidance takes place Remove traffic obstruction ›... - Page 66 ■ Avoid routes requiring toll stickers - Switch use of routes requiring toll Advanced settings stickers on/off for route calculation › Available toll stickers - Selection of countries for which a valid toll sticker is Press in the Navigation menu the function key → Advanced settings. ■...
-
Page 67: Index
Destination management Index Destination details Call list Favourite Call list Storage Component protection Abort route guidance Destination memory Conditions for coupling Flagged destination Additional keyboard languages Conference call Detail of the traffic report Address 48, 49 Coupled device Device Administering paired devices connected to a telephone connect to the telephone Alphanumeric with keyboard... - Page 68 Extra window Manoeuvre Images Main menu Display Media File formats Navigation Factory settings Operation Radio Favourite Requirements and limitations SmartLink File formats safe removal of the data source Images Settings Manage favourites Prerequisites and restrictions supported file formats Manage memory Finish route guidance supported sources Manoeuvre...
- Page 69 SD card Edit tour Tour Select audio source Enter address 48, 49 Tour memory Settings Enter destination in route Traffic jam ahead Supported source Favourites Traffic reports (TMC) Finish route guidance Voice control Voice control Foreword Navigation announcements Fuel options MirrorLink Navigation data Connection establishment...
- Page 70 Pop-up windows Setup Audio SmartLink Safe removal of the data source Compass Android Auto Satellite data Manoeuvre Apple CarPlay Menus Screen List of connected devices on / off see device screen Main menu Satellite data MirrorLink Screen display Preferred contacts Settings SD card Principles of device operation...
- Page 71 Dial a telephone number Tour memory Enter a telephone number Traffic Waiter Function problems Detail of the traffic report Voice control Functions dynamic route Import contacts List of the traffic reports Information service Requirements List of paired telephones Traffic jam ahead Main menu Traffic obstruction Manage favourites...
- Page 72 Index...
- Page 73 Index...
- Page 74 Index...
- Page 75 Reprinting, reproduction, translation, or any other use, either in whole or in Issued by: ŠKODA AUTO a.s. part, is not permitted without the written consent of ŠKODA AUTO a.s. © ŠKODA AUTO a.s. 2015 ŠKODA AUTO a.s. expressly reserves all rights relating to copyright laws. Subject to change.
- Page 76 Amundsen and Bolero: Yeti anglicky 05.2015 S90.5614.03.20 5L0012720DB 5L0012720DB...
Need help?
Do you have a question about the Bolero and is the answer not in the manual?
Questions and answers