Table of Contents
Advertisement
Quick Links
Owner's Manual
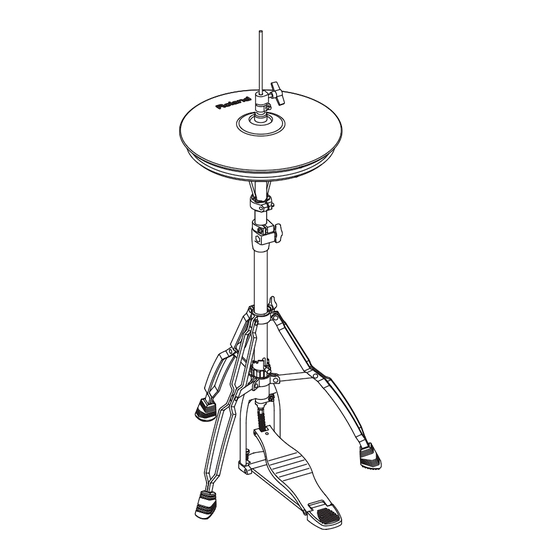
The VH-12 V-Hi-Hat is to be used in combination with the Roland TD-20 or TD-12 Percussion
Sound Module.
When using the VH-12, you will need to make the settings for the sound
module. Refer to p. 8
fig.Structure
* Hi-hat stand is not included.
For details on compatible stands, refer to p. 10.
201a
Before using this unit, carefully read the sections entitled: "USING THE UNIT SAFELY"
and "IMPORTANT NOTES" (p. 2; p. 3). These sections provide important information
concerning the proper operation of the unit. Additionally, in order to feel assured that
you have gained a good grasp of every feature provided by your new unit, Owner's
manual should be read in its entirety. The manual should be saved and kept on hand
as a convenient reference.
202
Copyright © 2004 ROLAND CORPORATION
All rights reserved. No part of this publication may be reproduced in any form without the
written permission of ROLAND CORPORATION.
Advertisement
Table of Contents

Related Manuals for Roland VH-12 V-Hi-Hat


Summary of Contents for Roland VH-12 V-Hi-Hat
- Page 1 Owner’s Manual The VH-12 V-Hi-Hat is to be used in combination with the Roland TD-20 or TD-12 Percussion Sound Module. When using the VH-12, you will need to make the settings for the sound module. Refer to p. 8 fig.Structure * Hi-hat stand is not included.
- Page 2 Do not attempt to repair the unit, or replace parts ....................within it (except when this manual provides specific instructions directing you to do so). Refer all servicing to your retailer, the nearest Roland Service Center, or an authorized Roland • Try to prevent cords and cables from becoming distributor, as listed on the “Information”...
-
Page 3: Important Notes
IMPORTANT NOTES 291a In addition to the items listed under “USING THE UNIT SAFELY” on page 2, please read and observe the following: 558d • This instrument is designed to minimize the extraneous Placement sounds produced when it’s played. However, since sound vibrations can be transmitted through floors and walls to a greater degree than expected, take care not to allow these 354a... -
Page 4: Getting Started
Getting Started Features Package Contents Top Hi-Hat Similar Touch and Feel as with an fig.Top Acoustic Hi-Hat The superior design has taken into account not only the shape of the hi-hat, but also the bounce of the stick, and even the movement caused by playing, making it possible to play with the same feel as an acoustic hi-hat. - Page 5 Mounting on the Hi-Hat Stand * Orient the stopper so that it matches the groove in the top hi- hat. (1) Assembling the Top Hi-Hat fig.Top-02 * Due to the different shape, the clutch included with the hi-hat stand cannot be used with the VH-12. Be sure to use the special VH-12 clutch.
- Page 6 Mounting on the Hi-Hat Stand At this point, position the LINK jack so it’s on the far side of the unit, facing away from the performer. (2) Assembling the Bottom Hi-Hat fig.Bottom-01.e 1. Remove the clutch included with the hi-hat stand from the cymbal rod.
- Page 7 At this point, position the “Roland” logo on the farther side, as viewed from the performer. 2. Use the link cable to connect the bottom hi-hat and the top hi-hat LINK jacks.
- Page 8 Mounting on the Hi-Hat Stand (4) Connecting to a Sound Module (5) Adjusting the Sound Module * To prevent malfunction and/or damage to speakers or other When using the VH-12, you will need to make the devices, always turn down the volume, and turn off the power settings for the sound module.
- Page 9 Mounting on the Hi-Hat Stand (6) Adjusting the Hi-Hat 1. Adjust the gap between the top hi-hat and bottom hi-hat to a clearance of approximately 10 mm, then tighten the clutch screw. fig.Gap.e Clutch Screw 10 mm (3/8") * Although the gap can be adjusted to a clearance that makes playing the hi-hat easier, setting too narrow or wide a gap can cause improper function of the unit and prevent the hi-hat from sounding as you intend.
-
Page 10: Playing Methods
Playing Methods Open/Closed Edge Shot The hi-hat tone changes smoothly and continuously from This playing method involves striking the edge of the top hi- open to closed in response to how far the pedal is pressed. hat with the shoulder of the stick. When played as shown in You can also play the foot closed sound (playing the hi-hat the figure, the “rim-side”... -
Page 11: Troubleshooting
Troubleshooting Hi-hat not closing Sounds are not triggering properly Was the unit adjusted after being Is the trigger type set correctly? connected to the sound module? Make the trigger parameter settings for your sound module. When using the VH-12, be sure to run the automatic offset adjustment on your sound module (p. - Page 12 Information When you need repair service, call your nearest Roland Service Center or authorized Roland distributor in your country as shown below. PHILIPPINES COSTA RICA TRINIDAD NORWAY JORDAN AFRICA G.A. Yupangco & Co. Inc. JUAN Bansbach Instrumentos AMR Ltd Roland Scandinavia Avd.
Need help?
Do you have a question about the VH-12 V-Hi-Hat and is the answer not in the manual?
Questions and answers