Lennox Hearth Products ELITE ME43BK SP Installation And Operation Instructions Manual
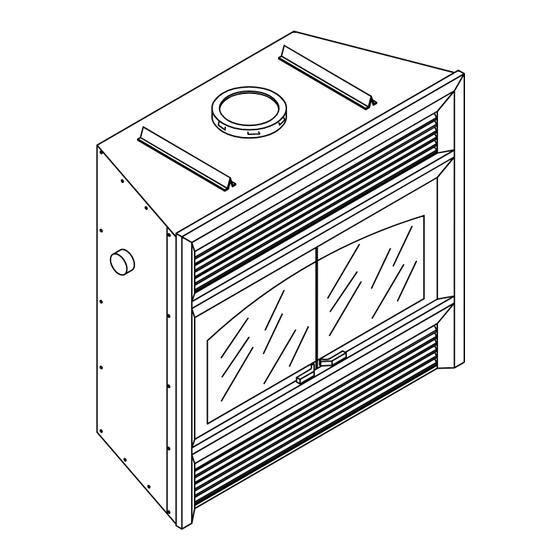
43" wood burning fireplaces elite series
Hide thumbs
Also See for ELITE ME43BK SP:
- Installation and operation instructions manual (24 pages) ,
- Install and operation instructions (24 pages)
Table of Contents
Advertisement
Quick Links
RETAIN THESE INSTRUCTIONS
FOR FUTURE REFERENCE
WARNINGS
•
Hot! Do not touch! The glass and
surfaces of this appliance will be hot
during operation and will retain heat
for a while after shutting off the appli-
ance. Severe burns may result.
•
Carefully supervise children in the
same room as appliance.
Listed to standards:
ULC-S610 & UL-127
Report No. 192-5166
INSTALLATION AND
OPERATION INSTRUCTIONS
43" Wood Burning Fireplaces
P/N 850,027M REV. E 12/2007
MODEL
ME43BK SP
This installation manual will enable you to obtain a safe, efficient and
dependable installation of your fireplace system. Please read and
understand these instructions before beginning your installation.
Do not alter or modify the fireplace or its components under any circum-
stances. Any modification or alteration of the fireplace system, including
but not limited to the fireplace, chimney components and accessories,
may void the warranty, listings and approvals of this system and could
result in an unsafe and potentially dangerous installation.
Lennox™ wood-burning fireplaces are designed for use as a supple-
mental heater. They are not intended for continuous use as a primary
heat source.
•
The fireplace cannot be operated without a door.
Consult your dealer to select the correct door
model.
•
Important! To assure proper alignment of glass
doors: Install this fireplace in a square and
plumb condition, using shims as necessary at
sides and/or bottom.
•
Install the fireplace only as described in these
instructions.
PIME43-F REV. 3
ME43
WARNINGS
Advertisement
Table of Contents

Subscribe to Our Youtube Channel
Related Manuals for Lennox Hearth Products ELITE ME43BK SP


Summary of Contents for Lennox Hearth Products ELITE ME43BK SP
-
Page 1: Operation Instructions
RETAIN THESE INSTRUCTIONS FOR FUTURE REFERENCE WARNINGS • Hot! Do not touch! The glass and surfaces of this appliance will be hot during operation and will retain heat for a while after shutting off the appli- ance. Severe burns may result. •... -
Page 2: Safety Rules
IMPORTANT! GENERAL SAFETY PRECAUTIONS. READ AND UNDERSTAND THESE SAFETY RULES BEFORE YOUR FIRST FIRE. WARNING Never leave children unattended when there is a fire burning in the fireplace. IMPORTANT When burning wood, use SOLID NATURAL DRY WELL-SEASONED WOOD ONLY. Hardwoods are recommended (soft woods tend to burn very quickly). -
Page 3: Table Of Contents
CONGRATULATIONS! In selecting this LENNOX™ wood-burning appliance you have chosen one of the fin- est fireplaces available. The ME43 wood fireplace is a clean burning fireplace that is designed to provide you dependable service as well as warmth and enjoyment for many years to come. -
Page 4: Fireplace Maintenance Creosote
FIREPLACE MAINTENANCE CREOSOTE When wood is burned slowly, it produces tar and other organic vapors which combine with expelled moisture to form a black deposit called creosote. The creosote vapors condense in the relatively cool chimney flue of a slow burning fire. -
Page 5: Operating The Fireplace
OPERATING THE FIREPLACE Fuel The ME43 fireplace is designed to work best when fueled with seasoned cordwood. Hard- woods are preferred to softwoods since the energy content of wood is relative to its density. Hardwoods will result in a longer burning fire and less frequent refueling. -
Page 6: Tools And Building Supplies
Failure to use LHP parts or conduct variations in techniques and construction materials described in this installation manual may create a serious fire hazard and may void the warranty and the WHI listing. 3. Always check your local building codes. The installation must comply with their regulations. Before beginning the instal- lation, consult the local authorities and... -
Page 7: Facing And Mantel
WARNING The top of the fireplace is not zero clearance. Do not place any insulating material in the space above the fireplace for a height of 7 feet from the base of the fireplace. 3. Do not block the fireplace’s hot air vents or air inlets as this will cause the fireplace to overheat. -
Page 8: Hearth Extension
Hearth Extension Requirements (refer to Figure 7) A non-combustible hearth extension must be built in front of the fireplace and extend out on both sides. Hearth extensions must be constructed according to the following guidelines: 1. A layer of sheet metal 0.018" (0.45mm) thick or 3/8"... -
Page 9: Uzy3 Fan Kit Installation
INSTALLATION OF THE FAN KIT MODEL UZY3 Note: This fan kit can easily be installed when the fireplace has a pre-installed junction box. You just have to plug them in. Rating: 120 Volts, 60Hz, .63A. The fans have magnetic blower mounts. The junction box (factory installed on approved fireplaces for the use of this fan kit) must be connected to 110 VAC service before perma- nently enclosing the fireplace. -
Page 10: Framing Dimensions
Corner Installation 23-11/32” (593mm) 21-1/2” (546mm) Back Wall of Chase/Enclosure Including Finising Materials if any Rough Framing Face (Unfinished Shown) * Zero Clearance From Back Spacer to Wall Combustion Air Kit Knock-Out for Ducting Outside Air Intake Figure 10 - Framing Dimensions 7' MIN. OUTSIDE CHASE Rough Framing Face (unfinished shown) -
Page 11: Central Forced Air Kit
CENTRAL FORCED AIR KIT The knock-outs provided on the sides of the ME43 fireplace allow the connection of insulated flexible pipe which enables you to heat adjacent rooms up to 50 feet from the fireplace. The ducting system must be installed as de- scribed below : Fix the adaptor at the side of the fireplace by twist-locking the adaptor to the fireplace. -
Page 12: Chimney System
Insulate joists Same As Ceiling Draft Stops Firestop CTDT Termination Note: Non- Combustible Chase Flashing Must Be Used To Cover Chase Opening Level Solid Continuous Surface Insulation (Thermal Barrier) Figure 14 CHIMNEY SYSTEM The ME43 fireplace is listed only with Security Chimneys™... -
Page 13: Installing The Chimney System
CHIMNEY INSTALLATION INSTRUCTIONS STRAIGHT INSTALLATION Cut and frame the holes in the ceiling, floor and roof where the chimney will pass (see Figure 16). Use a plumb-bob to line up the center of the holes. The hole sizes are indicated in Table 2 for the floor and ceiling holes and in Table 3 on Page 15 for the roof holes. - Page 14 AC Model (Air Cooled Insulated, Galvalume Chimney) Cooling Air Kit For Air Cooled Chimney ACZI Figure 18 Flashing Collar Flashing Outside Combustion Note: The Outside Air Kit (UZI) Air Kit is Mandatory NOTE: DIAGRAMS & ILLUSTRATIONS ARE NOT TO SCALE. Rain Cap Support Attic Radiation Shield...
- Page 15 CHIMNEY COLLAR SPACER (BUILT INTO FLASHING) FLASHING AC CHIMNEY Figure 19A SLOPE 14-3/8" (365mm) 2/12 14-5/8" (371mm) 4/12 15-1/4" (387mm) 6/12 16-1/8" (410mm) 8/12 17-3/8" (441mm) 10/12 18-3/4" (476mm) 12/12 20-3/8" (518mm) cross slope hole size Table 3 Figure 19B ROOF DOWN SLOPE HOLE SIZE ASHT+ S-2100+ 8"...
-
Page 16: Offset Chimney Installation
OFFSET CHIMNEY INSTALLATION The minimum chimney height (including the fireplace) when using elbows is: Fireplace ME43BK SP Model Chimney Model 8" ASHT+/S-2100+/AC Vertical 15 feet (4.57 m) Installation Two (2) Elbows 18 feet (5.49 m) Four (4) Elbows 20 feet (6.10 m) Table 4 After reaching the location requiring the elbow, proceed as follows:... -
Page 17: Chimney Component Chart
Table 5... -
Page 18: Angled Wall Radiation Shield
AIR COOLED STRAPS Figure 20 RAIN CAP INSULATED WALL FRAME 2” X 4” Figure 21 CHIMNEY AC BRACE ACRS (RADIATION SHIELD) STRAPS SUPPORT STORM COLLAR ROOF SUPPORT FLASHING OFFSET SUPPORT ANGLED INSULATED WALL RADIATION SHIELD NOTE: IN COLD FREGIONS IT IS RECOMMEDNED TO ENCLOSE THE CHIMNEY IN AN INSULATED CHASE NOTE: DIAGRAMS &... -
Page 19: Universal Roof Support Installation
UNIVERSAL ROOF SUPPORT INSTALLATION This support has three possible uses: For ASHT+ and S-2100+ chimneys, it must be used on a roof to support the chimney. It may be used on a floor, ceiling or roof above an offset to support the chimney above the offset. -
Page 20: Parts And Components
Installation Accessories Description Outside Air Kit (Required - included with fireplace) Outside Air Coupler to connect outside air UZI to fireplace, UZIAD Outside Air Ducting - includes 4" insulated flex x 10' long, Fireplace Options Trim Kit - Gold Trim Kit - Brushed Nickel Door Capping - Gold Door Capping - Brushed Nickel Blower... - Page 21 Secure Temp High Temp. Insulated Stainless Steel Chimney ASHT+ 8” Diameter, Listed to CAN/UCL-S604 & UL-103HT at 2100 F Description Lengths & Misc. Chimney Components 8” length, 8” Dia., 8L8 12” length, 8” Dia., 8L12 18” length, 8” Dia., 8L18 24”...
-
Page 22: Replacement Parts
ME43 COMPONENTS LISTS Attic Radiation Shield, ACRSA Wall Radiation Shield, 30 , AC, RSM30 Insulated Wall Radiation Shield, 30 , ACRSMI30 Chimney Outside Air Kit (Flex, Insulation, Outside Register And Coupling), ACZI Notes: AC Chimney is Not recommended at elevations above 4000 feet or in cold climates. - Page 23 NOTES...
-
Page 24: Warranty
WARRANTY Your fireplace is covered by a limited warranty. Please read the warranty to be familiar with its coverage. Retain this manual. File it with your other documents for future refer- ence. PRODUCT REFERENCE INFORMATION We recommend that you record the following important information about your fireplace.
Need help?
Do you have a question about the ELITE ME43BK SP and is the answer not in the manual?
Questions and answers