oticon miniRITE Instructions For Use Manual
Hide thumbs
Also See for miniRITE:
- Instructions for use manual (98 pages) ,
- Instructions for use (3 pages) ,
- Instructions for use manual (35 pages)
Table of Contents
Advertisement
Quick Links
Advertisement
Table of Contents

Related Manuals for oticon miniRITE


Summary of Contents for oticon miniRITE
- Page 1 InSTRuCTIonS FOR USE miniRITE...
-
Page 2: Table Of Contents
Instrument view miniRITE Thank you for choosing our product as your means to better hearing. Instrument view miniRITE Power with Power Dome To support your efforts, we have put great care and attention into making sure that your Instrument view miniRITE Power with Mould... -
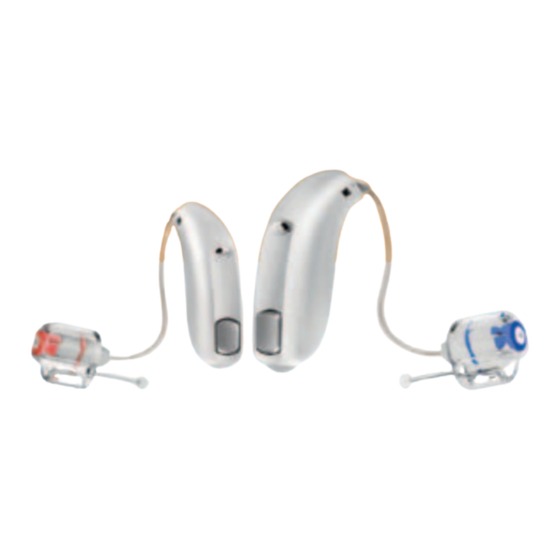
Page 3: Instrument View Minirite 5A
Battery door CauTIon Wax protection Your ear piece The miniRITE Power is a powerful hearing instrument. In case you are fitted with Open Domes: Micro mould miniRITE Power, never allow others to wear your hearing instruments as incorrect or wrongful usage could cause permanent damage to their hearing. -
Page 4: Instrument View Minirite Power With Power Dome 5B
Instrument view miniRITE power with power Dome Microphone openings Speaker Push-button Sound outlet Wax protection Battery door Your ear piece Power Domes: 10mm 12mm Plus dome... -
Page 5: Instrument View Minirite Power With Mould 5C
Instrument view miniRITE power with mould Microphone openings Push-button Sound outlet + wax protection system Battery door Ventilations openings... -
Page 6: Changing Batteries
Changing batteries Your hearing instrument battery size is 312. Batteries perform differently. Ask your hearing care professional for help choosing a high quality battery for your hearing instrument. A worn out battery should be removed immediately. When the battery power is low, you will hear 2 beeps. This pre-warning starts when the battery has only a few hours of operation left. -
Page 7: Turning Your Instruments On And Off
Turning your instruments on and oFF To replace the battery, follow these instructions: • Open the battery door completely by pushing the raised edge in the bottom of Turn on your hearing instrument by closing the battery door completely with the battery the instrument. -
Page 8: Left/Right Ear Marking
Left/Right ear marking putting on your instrument Hearing instruments are fitted to the uniqueness of each ear, which means if you have Place the speaker, with the ear piece attached, into your ear two instruments then your left hearing instrument is programmed differently from your first (1) and then place the instrument behind your ear (2). -
Page 9: Push-Button
push-button The push-button on your hearing instrument can be programmed to one of 3 functionalities. Your hearing instrument has a push-button. Left Right If you have one instrument, the push button can be used for switching between different only program shift: programs. -
Page 10: Programs (Optional)
programs (optional) Press the push-button to switch forwards in the program cycle, e.g. from P1-P2. If you have two Ino Pro instruments, then: Your hearing instrument can have up to 4 different programs. The RIGHT hearing instrument switches forwards in the program cycle, e.g. P1-P2. When switching between the different programs, your hearing instrument will beep. -
Page 11: Volume Control (Optional)
Volume Control (optional) Standby (optional) Only when using two Ino Pro instruments a volume control can be activated. The volume Press the button for a minimum of 3 seconds to set the instrument in standby mode. control allows you to adjust the volume in specific listening situations to the level you feel comfortable with. -
Page 12: Tamper-Resistant Battery Door (Optional)
Tamper-resistant battery door (optional) This is strongly recommended for infants, small children and people with learning difficulties. The battery door is designed only to be opened by using a tool. Use the MultiTool to unlock the door by inserting it into the indent on the door side and then tip it to open. -
Page 13: Auto Phone (Optional)
auto phone (optional) The hearing instrument may have an Auto Phone functionality. When the hearing instrument is close to a telephone receiver, the Auto Phone will activate a Phone Program. When the Phone Program is activiated you will hear a number of beeps. When you end your telephone conversation, the hearing instrument will automatically return to the previous program. -
Page 14: Caring For Your Hearing Instrument
Caring for your hearing instrument Cleaning the instruments A range of dedicated cleaning tools is prepared for the special purpose of cleaning the Your ear canal produces ear wax (cerumen) which may clog up the earpiece. Therefore instrument. These should be used to ensure the best care and performance of your hearing your hearing instrument contains a filter to prevent wax accumulation. -
Page 15: Daily Maintenance With Mould
Daily maintenance with mould Replace the wax protection system The Mould should be cleaned regularly: 1. Remove the tool from the shell. The tool has two ends, one with a new filter and one with the removal tool. • Clean the ventilation opening by pressing the brush through the hole while twisting 2. -
Page 16: Daily Maintenance With Domes
Daily maintenance with Domes Changing the dome The dome is easy to replace. Replace it whenever needed. Clean the speaker unit daily. Use the cloth and rub off any earwax. Use a finger nail and hold the bottom of the dome. Then pull it off. Place the new dome The dome should not be cleaned. - Page 17 avoiding heat, humidity and chemicals Under the dome you will notice a white wax filter attached to the end of the speaker. This is a wax filter that will keep debris from damaging the speaker. If this filter becomes clogged, contact your Hearing Care Professional for service and replacement of the filter. Your hearing instrument must never be exposed to extreme heat e.g.
-
Page 18: Using Your Hearing Instrument
Sit with someone else in a quiet room. Face each other so you can read facial expressions Your hearing instrument may support wireless connectivity with the Oticon ConnectLine easily. You may experience new speech sounds, which can seem a little disturbing in the Streamer. - Page 19 If you find it difficult to obtain a good result while using your mobile telephone, ask your stand the conversation. When you have the receiver in this posi- Hearing Care Professional for more information regarding the Oticon ConnectLine system tion, remember to speak directly into the microphone on the and other available accessories.
- Page 20 Use your hearing instruments all day long The best way to ensure better hearing is to practice listening until you can wear your hearing instruments comfortably all day. In most cases, you will not get the full benefit of the hearing instuments if you use them infrequently. Your hearing instruments will not restore normal hearing.
-
Page 21: Common Problems And Their Solutions
Common problems and their solutions Symptom Possible causes Solutions no sound Worn-out battery Change battery pg. 7 & 8 Clogged sound outlet Clean Mould or dome pg. 24 & 26 Consider replacing wax protection or dome pg. 25 & 27 Intermittent Clogged sound outlet Clean Mould or dome... -
Page 22: International Warranty
International Warranty If you need service Take your hearing instrument to your Hearing Care Profes sional, who may well be able Your hearing instruments are covered by a limited warranty issued by the manufacturer to sort out minor problems and adjustments on the spot. for a period of 12 months from the date of delivery. -
Page 23: Warranty Certificate
Warranty Certificate product approval, precautions and markings Name of Owner: The hearing instrument contains a radio transmitter using short range magnetic induction technology working at 3.84 MHz. The magnetic field strength of the transmitter is Dispenser: < -42 dBμA/m @ 10m. Dispenser Address: The emission power from the radio system is well below international emission limits for Human Exposure. -
Page 24: Mobile Phone
mobile phone “Some hearing instrument users have reported a buzzing sound in their hearing instruments when they are using mobile phones, indicating that the mobile phone and hearing instrument may not be compatible. According to the ANSI C63.19 standard (ANSI C63.19-2006 American National Standard Methods of Measurement of Compatibility Between Wireless Communications Devices and Hearing instruments), the compatibility of a particular hearing instrument and mobile phone can be predicted by adding the rating for the... - Page 25 Warnings The hearing instrument contains a module with: You should familiarize yourself fully with the following general warnings and the entire FCC ID: U28FUNRI03 contents of this booklet before using your hearing instruments. IC: 1350B-FUNRI03 The device complies with Part 15 of the FCC rules and RSS-210 of Industry Canada. Hearing instruments can be dangerous if swallowed or used improperly.
- Page 26 • Some hearing instruments can be supplied with a tamper-resistant battery compart- Dysfunction in hearing instruments ment upon request. This is strongly recommended for infants, small children, and • Hearing instruments may stop functioning, for instance if the batteries have expired or people with learning difficulties.
- Page 27 Active Implants X-ray, CT, MR, PET scanning and electrotherapy • Oticon shows caution and advise to follow the guideline as recommended by manufac- • Remove your hearing instrument for example during X-ray, CT / MR / PET scanning, turers of implantable defibrillators and pacemakers regarding use of mobile phones. If...
- Page 28 Wax protection system Hereby, Oticon A/S declare that this hearing instrument is in compliance with the • Always visually inspect your hearing instruments to ensure that there is no gap essential requirements and other relevant provisions of Directive 1999/5/EC. between the wax protection flange and the tip of the Micro Mould.
- Page 29 people First People First is our promise to empower people to communicate freely, interact naturally and participate actively...
Need help?
Do you have a question about the miniRITE and is the answer not in the manual?
Questions and answers