Table of Contents
Advertisement
Quick Links
Advertisement
Table of Contents

Related Manuals for oticon miniRITE Series


Summary of Contents for oticon miniRITE Series
- Page 1 miniRITE Alta2 Nera2 Ria2 Instructions for use...
- Page 2 Model overview This booklet is valid for Oticon miniRITE in the following hearing aid families and models: Inium Sense Alta2 Pro Nera2 Pro Ria2 Pro Alta2 Nera2 Ria2 The following speakers are available for the above models: Speaker 60 ...
- Page 3 Introduction to this booklet Indication for use This booklet guides you in how to use and maintain your new The hearing aid is intended to amplify and transmit sound to the ear hearing instrument. Please read the booklet carefully including and thereby compensate for impaired hearing within mild to severe- the Warnings section.
-
Page 4: Table Of Contents
Table of content Clean the MicroMold, LiteTip, or Power Mold Replace ProWax filter About Options Identify your hearing instrument speaker and earpiece Optional features and accessories miniRITE Mute the hearing instrument Identify left and right instrument Change programs Battery Change volume Start up Tamper-resistant battery drawer Turn the hearing instrument ON and OFF... -
Page 5: Identify Your Hearing Instrument Speaker And Earpiece
Identify your hearing instrument speaker and earpiece Speakers Earpieces Power mold speakers This will make it easier for you to navigate through this booklet. The hearing aids uses one of A RITE will have one of the following earpieces. the following speakers: Dome (open dome shown)* Ear grip (optional) -
Page 6: Minirite
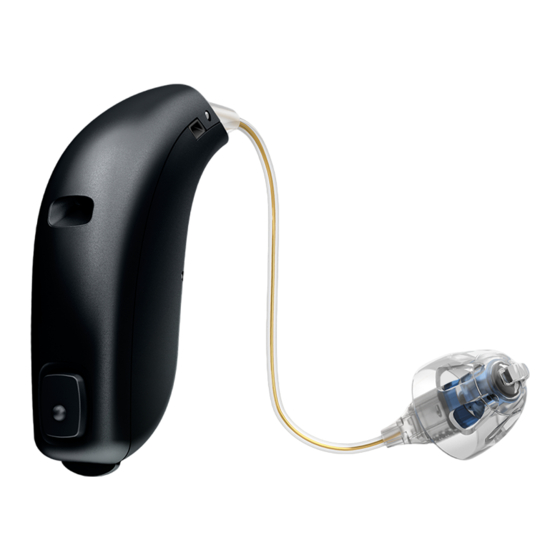
miniRITE What it does What it is Microphone Sound in openings Sound out Speaker Push button Change (60 shown) programs, volume and mute the instrument Contains the battery. Battery drawer Battery drawer is also the on/off switch About Start up Handling Options Warnings More info... -
Page 7: Identify Left And Right Instrument
Identify left and right instrument Battery It is important to distinguish between the left and the right hearing Your hearing instrument is a miniature electronic device that runs on aid, as they may be programmed differently. special batteries. To activate the hearing instrument, you must insert a new battery in the battery drawer. -
Page 8: Turn The Hearing Instrument On And Off
Turn the hearing instrument ON and OFF When to replace a battery The battery drawer is also used to switch the hearing instrument When it is time to replace the battery you will hear two beeps on and off. To preserve the battery, make sure your instrument is repeated in moderate intervals until the battery runs out. -
Page 9: Replace The Battery
Replace the battery 1. Remove 2. Uncover 3. Insert 4. Close MultiTool Fully open the Remove the sticky Insert the new battery Close the battery drawer. The The MultiTool can be used for battery drawer. label from the + side into the battery instrument will play a jingle battery change. -
Page 10: Caring For Your Hearing Instrument
Caring for your hearing instrument MultiTool for handling batteries and cleaning When handling your hearing instrument, hold it over a soft surface The MultiTool contains a magnet which makes it easier to replace the to avoid damage if you drop it. battery in the hearing aid. -
Page 11: Put On The Instrument
Put on the instrument The speaker brings the sound into Step 1 Step 2 Step 3 your ear. The speaker should always be used with an earpiece Ear grip attached. Use only parts (optional) designed for your hearing instrument. If the speaker has an ear grip, place it in the ear so it follows Place the hearing Hold the bend of... -
Page 12: Standard Earpieces: Dome Or Grip Tip
Standard earpieces: dome or Grip Tip Replace dome or Grip Tip Both domes and Grip Tips are made of soft rubber material. There are The earpiece (dome or Grip Tip) should not be cleaned. If the earpiece 4 different types of domes. Check your dome type and size below. is filled with wax, replace it with a new one. -
Page 13: Prowax Minifit Filter
ProWax miniFit filter Replace ProWax miniFit filter The speaker has a white wax filter attached to the end where the 1. Tool 2. Remove 3. Insert earpiece is attached. The wax filter prevents wax and debris from damaging the speaker. If the filter becomes clogged, please replace the wax filter or contact your hearing care professional. -
Page 14: Customized Earpieces: Micromold, Litetip, Or Power Flex Mold
Customized earpieces: Clean the MicroMold, LiteTip, or Power Mold Micromold, LiteTip, or Power flex mold The mold should be cleaned regularly. There are three different types of molds: Micromold, LiteTip, The vent is cleaned and Power flex mold. Micromold and LiteTip are available in two by pressing the brush The mold has a wax filter through the hole,... -
Page 15: Replace Prowax Filter
Replace ProWax filter 1. Tool 2. Remove 3. Insert filter filter Old filter Remove the tool from Push the empty Insert the new wax the shell. The tool pin into the wax filter using the other has two pins, one filter in the mold pin, remove the tool, empty for... -
Page 16: Optional Features And Accessories
Optional features and accessories Mute the hearing instrument The features and accessories described on the following pages are Use the mute function if you need to silence the instrument while optional. Please contact your Hearing Care Professional to find out wearing it. -
Page 17: Change Programs
Change programs To be filled out by the Hearing Care Professional Your hearing instrument can have up to 4 different programs. Program Sound you will hear When to use These are programmed by your Hearing Care Professional. when activated “1 beep” “2 beeps”... -
Page 18: Change Volume
Change volume Quick reset If you wish to return to the standard settings of the instrument When you have two instruments, the push button allows you to programmed by your Hearing Care Professional, simply open and then adjust the volume in both ears. You will hear a click when you turn the close the battery drawer. -
Page 19: Tamper-Resistant Battery Drawer
Tamper-resistant battery drawer Open and close the battery drawer To keep the battery out of reach of infants, small children and people with learning difficulties, a tamper-resistant battery drawer should be used. Use a small screwdriver to open the drawer. Insert the screwdriver into the slit on the back of the hearing IMPORTANT NOTICE instrument. -
Page 20: Wireless Accessories
For more information, please contact your hearing care professional. phones, music players, PCs or an hearing aid. external microphone wirelessly through your hearing aid. For more information, please contact your hearing care professional or visit: www.oticon.global About Start up Handling Options Warnings More info... -
Page 21: Warnings
Warnings Most hearing aids can be supplied with Never attempt to recharge your a tamper-resistant battery drawer upon batteries and never dispose of batteries request. This is strongly recommended by burning them. There is a risk that the You should familiarize yourself fully Usage of hearing aids for infants, small children and people batteries will explode. - Page 22 Warnings Power instrument Interference Special care should be excercised in The hearing aid has been thoroughly selecting, fitting and using a hearing tested for interference, according The hearing aid contains a wireless X-ray/CT/MR/PET scanning and aid where maximum sound pressure to the most stringent international transmitter.
-
Page 23: Troubleshooting Guide
Troubleshooting guide Symptom Possible causes Solutions Worn-out battery Replace the battery No sound Clogged speaker or earpieces (dome, GripTip, micro mold or LiteTip) Clean mold Consider replacing wax filter or dome Clogged sound outlet Clean mold or replace wax filter or dome Intermittent or Moisture Wipe battery with a dry cloth... -
Page 24: Water Resistant
Water resistant Conditions of use Your hearing instrument is water 1. Gently wipe off any water Operating conditions Temperature: +1°C to +40°C resistant which means it is designed 2. Open the battery drawer and Relative humidity: 5% to 93%, non-condensing to be worn in all daily life situations. -
Page 25: Warranty Certificate
Warranty certificate International warranty Name of owner: _____________________________________________________ Your hearing instrument is covered might have under applicable national by an international limited warranty legislation governing sale of consumer Hearing care professional: _____________________________________________ issued by the manufacturer for a goods. Your Hearing Care Professional period of 12 months from the date of may have issued a warranty that goes Hearing care professional address: ______________________________________... -
Page 26: Technical Information
Technical information USA and Canada Operation is subject to the following The hearing instrument contains a Due to the limited space available on The hearing instrument contains a two conditions: radio transmitter using short range the instruments, all relevant approval module with: 1. - Page 27 This Class B digital apparatus by turning the equipment off and The manufacturer declares that this Declaration of Conformity is available complies with Canadian ICES-003. on, the user is encouraged to try to hearing aid is in compliance with the from the manufacturer.
- Page 28 Text marked with a warning symbol must be read before using the device. Toronto, ON M2N 6K1 Manufacturer www.oticon.ca The device is produced by the manufacturer whose name and address are stated next to the symbol. Indicates the medical device manufacturer, as defined in EU Directives 90/385/EEC, 93/42/EEC and 98/79/EC.
- Page 29 Power instrument Description of symbols used on the regulatory packaging label Settings overview for your hearing instrument Keep dry Indicates a medical device that needs to be protected from moisture. Left Right Caution symbol Consult instructions for use for warnings and cautions. Volume control Catalog number Indicates the manufacturer’s catalog number so that the medical device...
Need help?
Do you have a question about the miniRITE Series and is the answer not in the manual?
Questions and answers