oticon miniRITE Instructions For Use Manual
Hide thumbs
Also See for miniRITE:
- Instructions for use manual (98 pages) ,
- Instructions for use (3 pages) ,
- Instructions for use manual (31 pages)
Table of Contents
Advertisement
Quick Links
Advertisement
Table of Contents

Related Manuals for oticon miniRITE


Summary of Contents for oticon miniRITE
- Page 1 Instructions for use miniRITE miniRITE T Oticon Jet...
- Page 3 Model overview This booklet is valid for the Oticon Jet family in the following hearing aid models: miniRITE miniRITE T FW 1.0 Oticon Jet 1 GTIN: (01) 05714464060962 Oticon Jet 2 GTIN: (01) 05714464060979 The following speakers are available for the above models: Speaker 60 ...
- Page 4 Introduction to this booklet This booklet guides you on how to use and maintain your new hearing aid. Ensure you read this booklet carefully, including the Warnings section. This will help you get the most benefit from your hearing aid. Your hearing care professional has adjusted the hearing aids to meet your needs.
- Page 5 The education of the hearing care professional is in accordance with national or regional regulations. About Getting started Daily use Options Tinnitus Warnings More info For your convenience, this booklet contains a navigation bar to help you easily navigate through the different sections.
- Page 6 Intended use Intended use The hearing aid is intended to amplify and transmit sound to the ear. Indications for use Bilateral or unilateral impaired hearing of sensorineural, conductive, or mixed type ranging from a slight (16dB HL*) to profound (95dB HL*) degree of hearing loss, with an individual frequency configuration.
- Page 7 IMPORTANT NOTICE The hearing aid amplification is uniquely adjusted and optimised to your personal hearing capabilities during the hearing aid fitting performed by your hearing care professional.
-
Page 8: Table Of Contents
Table of contents About Your hearing aid, speaker, and earpiece miniRITE miniRITE T Identify left and right hearing aid MultiTool for handling batteries and cleaning Getting started Turn hearing aid ON and OFF When to replace the battery How to replace the battery (size 312) - Page 9 Options Optional features and accessories Change volume Change program Mute your hearing aids Use hearing aid with iPhone and iPad Wireless accessories Other options Tinnitus Tinnitus SoundSupport™ (optional) Guidelines for Tinnitus SoundSupport users Sound options and volume adjustment Limitation on use time Tinnitus SoundSupport warnings Warnings General warnings...
- Page 10 Table of contents More info Troubleshooting Water & dust resistant (IP68) Conditions of use Technical information Australia only Warranty Your individual hearing aid settings Sound indicators...
-
Page 12: Your Hearing Aid, Speaker, And Earpiece
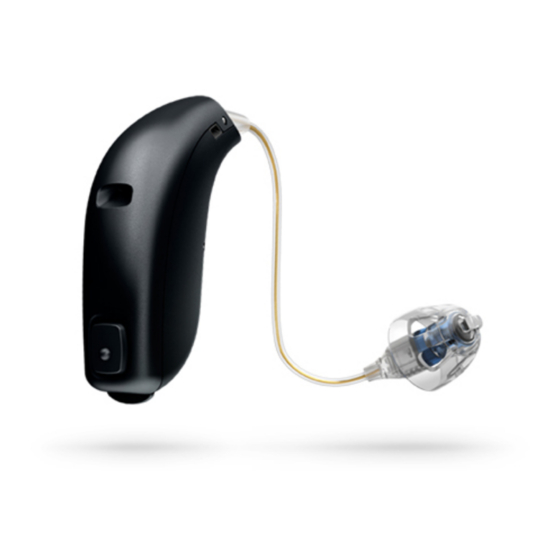
Your hearing aid, speaker, and earpiece Ear grip Ear grip (optional) (optional) miniRITE T miniRITE The hearing aid uses one of the following speakers: Standard Power speakers flex mould speakers About Getting started Daily use Options Tinnitus Warnings More info... - Page 13 The speaker uses one of the following earpieces: Standard earpieces Customised earpieces Open dome Micro mould Bass dome, single vent LiteTip Bass dome, double vent Power dome Grip Tip Available in small and large, left and right, with or without vent. Dome sizes 5 mm* 6 mm...
-
Page 14: Minirite
What it is and does Ear grip Holds the speaker Microphones in place (optional) Sound in Wax filter Protects the speaker from Push-button Mute, change Speaker volume, and Battery drawer Sound out programs Contains the battery Nail grip and functions as an... -
Page 15: Minirite T
T What it is and does Ear grip Holds the speaker Microphones in place (optional) Sound in Wax filter Protects the speaker from Push-button Mute, change volume, and Speaker programs Sound out Battery drawer Contains the battery and functions as an... -
Page 16: Identify Left And Right Hearing Aid
Identify left and right hearing aid It is important to distinguish between the left and the right hearing aid, as they may be programmed differently. You can find left/right colour indicators in the battery drawer and on 60 and 85 speakers. Indicators (either L or R) can also be found on 100 speakers and some earpieces. -
Page 17: Multitool For Handling Batteries And Cleaning
MultiTool for handling batteries and cleaning The MultiTool contains a magnet that makes it easier to replace the battery in the hearing aid. It also contains a brush and wire loop for cleaning and removing earwax. If you need a new MultiTool, please contact your hearing care professional. -
Page 18: Turn Hearing Aid On And Off
Turn hearing aid ON and OFF The battery drawer is used to switch the hearing aid ON and OFF. To save battery life, make sure your hearing aid is switched OFF when you are not wearing it. If you wish to return to the standard settings of the hearing aid, simply open and close the battery drawer (quick reset). -
Page 19: When To Replace The Battery
When to replace the battery When it is time to replace the battery, you will hear three tones repeated in moderate intervals until the battery runs out. Three alternate tones* Four descending tones = The battery is running low = The battery has run out Battery tip To make sure the hearing aid is always working, bring spare batteries with you, or replace the battery before you leave home. -
Page 20: How To Replace The Battery (Size 312)
How to replace the battery (size 312) 1. Remove 2. Uncover 3. Insert Fully open the battery Remove the sticky Insert the new battery label from the drawer. Remove the side into the battery drawer battery. of the new battery. with the + side facing upwards. - Page 21 4. Close MultiTool Close the battery drawer. The The MultiTool can be used to change hearing aid will play a jingle through the battery. Use the magnetic end to the earpiece. remove and insert batteries. Hold the earpiece close to your ear The MultiTool is provided by your to hear the jingle.
-
Page 22: Put On The Hearing Aid
Put on the hearing aid Step 1 Step 2 Step 3 Ear grip (optional) Place the hearing aid Hold the bend of the Gently push the speaker wire between earpiece into your ear behind your ear. your thumb and index canal until the speaker The speaker should finger. -
Page 23: Caring For The Hearing Aid
Caring for the hearing aid When handling the hearing aid, hold it over a soft surface to avoid damage if you drop it. Microphone Clean the microphone openings openings Use the brush of the MultiTool to carefully brush debris away from the openings. -
Page 24: Replace Standard Earpieces
Replace standard earpieces The standard earpiece (dome or Grip Tip) should not be cleaned. If the earpiece is filled with wax, replace it with a new one. Grip Tip should be replaced at least once a month. Step 1 Step 2 Step 3 Push firmly to ensure Hold on to the speaker... - Page 25 IMPORTANT NOTICE If the earpiece is not on the speaker when removed from the ear, the earpiece may still be in the ear canal. For further instructions, consult your hearing care professional.
- Page 26 ProWax miniFit filter The speaker has a white wax filter attached to the end where the earpiece is attached. The wax filter keeps wax ProWax and debris from damaging the speaker. miniFit filter Replace the filter when clogged, or if the hearing aid does not sound normal or contact your hearing care professional.
-
Page 27: Replace Prowax Minifit Filter
Replace ProWax miniFit filter 1. Tool 2. Remove 3. Insert filter filter Final filter Empty Remove the tool Push the empty pin Insert the new wax from the shell. The into the wax filter in filter using the other tool has two pins, the speaker and pull pin, remove the tool, one empty for removal... -
Page 28: Clean Customised Earpieces
Clean customised earpieces The earpiece should be cleaned Clean the vent by inserting the brush regularly. through the hole, twisting it slightly. The earpiece has a white wax filter.* The filter keeps wax and debris from damaging the speaker. Replace the filter when clogged, or if the hearing aid does not sound normal. -
Page 29: Replace Prowax Filter
Replace ProWax filter 1. Tool 2. Remove 3. Insert filter filter Empty filter Old filter Remove the tool Push the empty pin Insert the new wax from the shell. The into the wax filter in filter using the other tool has two pins, the earpiece and pull pin, remove the tool, one empty for removal... -
Page 30: Flight Mode
When flight mode is activated, Bluetooth® is turned off. The hearing aid will still be working. Pressing the push-button on one hearing aid will activate flight mode on both hearing aids. miniRITE miniRITE T To activate and deactivate Press the push-button for at least 7 seconds. A jingle confirms your action. -
Page 31: Optional Features And Accessories
Optional features and accessories The features and accessories described in the following pages are optional. Please contact your hearing care professional for more information about features and accessories. If you experience difficult listening situations, a special program may be helpful. These are programmed by your hearing care professional. Write down hearing situations in which you may need help. -
Page 32: Change Volume
Change volume The push-button allows you to adjust the volume. You will hear a click when you increase or decrease the volume. miniRITE MAXIMUM A short press on the RIGHT hearing aid START-UP VOLUME increases the volume A short press on the... - Page 33 T MAXIMUM START-UP Press button to VOLUME increase volume Press button to decrease volume MINIMUM...
-
Page 34: Change Program
Change program Your hearing aid can have up to four different programs. These are programmed by your hearing care professional. You will hear one to four tones when you change program depending on the program. See the Sound indicator section. About Getting started Daily use Options Tinnitus Warnings More info... - Page 35 If you have two hearing aids, the RIGHT hearing aid switches forwards, e.g. from program 1 to 2, and the LEFT hearing aid switches backwards, e.g. from program 4 to 3. miniRITE T Press up or down between programs You can change continuously between programs - both up and down in the program order.
-
Page 36: Mute Your Hearing Aids
Mute your hearing aids Use the mute function if you need to silence the hearing aid. The mute function only mutes the microphone(s) on the hearing aid. miniRITE miniRITE T Apply a long press (4 seconds) to the button to mute the hearing aid. -
Page 37: Use Hearing Aid With Iphone And Ipad
For assistance in using these products with your hearing aids, contact your hearing care professional or visit: www.oticon.com.au/connectivity To see how to pair your hearing aid with your iPhone, visit: www.oticon.com.au/pairing For information on compatibility, visit: www.oticon.com.au/compatibility... -
Page 38: Wireless Accessories
Wireless accessories As an enhancement to your wireless hearing aid, a range of accessories is available. These can enable you to hear and communicate better in many everyday situations. ConnectClip TV Adapter 3.0 A device that can be used as A device that streams sound from remote microphone and a TV or electronic audio device, to... - Page 39 Oticon ON app from the official app stores. For more information visit www.oticon.com.au or contact your hearing care professional. Apple, the Apple logo, iPhone, iPad, and iPod touch are trademarks of Apple Inc., registered in the U.S. and other countries.
-
Page 40: Other Options
Other options Telecoil – optional for miniRITE T Helps you hear better when using a telephone with a built-in loop, or when you are in buildings with teleloop systems such as theatres, churches, or lecture rooms. This symbol or a similar sign is shown wherever a teleloop has been installed. -
Page 42: Tinnitus Soundsupport™ (Optional)
Tinnitus SoundSupport™ (optional) Intended use of Tinnitus SoundSupport Tinnitus SoundSupport™ is a tool intended to generate sounds to provide temporary relief for patients suffering from tinnitus as part of a tinnitus management program. The target population is the adult population (over 18 years old). Tinnitus SoundSupport is targeted to licensed hearing care professionals (audiologists, hearing aid specialists, or otolaryngologists) who are familiar with the evaluation and treatment of tinnitus and hearing... -
Page 43: Guidelines For Tinnitus Soundsupport Users
Guidelines for Tinnitus SoundSupport users These instructions contain information about Tinnitus SoundSupport, which may have been enabled in your hearing aids by your hearing care professional. Tinnitus SoundSupport is a tinnitus management device intended to generate sound of sufficient intensity and bandwidth to help manage tinnitus. -
Page 44: Sound Options And Volume Adjustment
Sound options and volume adjustment Tinnitus SoundSupport is programmed by your hearing care professional to match your hearing loss and preferences for tinnitus relief. It offers a number of different sound options. Together with your hearing care professional, you can select your preferred sound(s). Tinnitus SoundSupport programs Together with your hearing care professional you decide for which programs you may want to have Tinnitus SoundSupport activated. - Page 45 Volume adjustments with Tinnitus SoundSupport When you select a hearing aid program for which Tinnitus SoundSupport is activated, your hearing care professional can only set the push-button on your hearing aid to work as a volume control for the tinnitus relief sound. Your hearing care professional will set the volume control for the sound generator in one of two ways: A) Change volume in each ear separately, or...
- Page 46 A) How to change Tinnitus SoundSupport volume in each ear separately To increase volume (on one hearing aid only), use a short press on the push- button repeatedly until desired level is reached. The sound will always be louder with the first press(es) until two beeps are heard. Hereafter the volume will decrease.
- Page 47 T A) How to change Tinnitus SoundSupport volume in each ear separately To increase volume (on one hearing aid only), use a short press on the upper part of the push-button repeatedly until desired level is reached. To decrease volume (on one hearing aid only), use a short press on the lower part of the push-button repeatedly until desired level is reached.
-
Page 48: Limitation On Use Time
Limitation on use time Daily use The volume levels of Tinnitus SoundSupport can be set to a level which could lead to permanent hearing damage when used for a prolonged period of time. Your hearing care professional will advise you of the maximum amount of time per day you should use Tinnitus SoundSupport. - Page 49 Important information for hearing care professionals about Tinnitus SoundSupport Device description Tinnitus SoundSupport is a module function that can be enabled in the hearing aids by the hearing care professional. Maximum wearing time The wearing time of Tinnitus SoundSupport will decrease as you increase the level above 80 dB(A) SPL.
- Page 50 If the volume control is activated A warning may be displayed if you activate the tinnitus volume control in the “Buttons & Indicators” screen. This occurs if the relief sound can be listened to at levels that may cause hearing damage. The “Max wearing time”...
-
Page 51: Tinnitus Soundsupport Warnings
Tinnitus SoundSupport warnings If your hearing care professional As with any device, misuse of the sound has activated the sound generator generator feature may cause potentially Tinnitus SoundSupport, please pay harmful effects. Care should be taken to attention to the following warnings. prevent unauthorised use and to keep the device out of reach of children and pets. -
Page 52: General Warnings
General warnings For your personal safety and to ensure Usage of hearing aids correct usage, you should familiarise Hearing aids should be used only as yourself fully with the following general directed and adjusted by your hearing care warnings before using your hearing aids. professional. - Page 53 Battery use Active implants Always use batteries recommended by your The hearing aid has been thoroughly hearing care professional. Batteries of low tested and characterised for human health quality may leak and cause bodily harm. according to international standards for human exposure (Specific Absorption Ratio Never attempt to recharge your batteries - SAR), induced electromagnetic power and...
- Page 54 General warnings The Autophone magnet or MultiTool (which X-ray/CT/MR/PET scanning, has a built-in magnet) should be kept electrotherapy and surgery more than 30 centimetres (1 foot) away Remove your hearing aid before X-ray from the implant, e.g. do not carry it in examinations and CT/MR/PET scans, your breast pocket.
- Page 55 Detached earpiece in ear canal Possible side effects If the earpiece is not on the speaker Hearing aids, moulds or domes may cause when removed from the ear, the earpiece an accelerated accumulation of earwax. may still be in the ear canal. For further The non-allergenic materials used in instructions, consult your hearing care hearing aids may, in rare cases cause a skin...
- Page 56 General warnings Connection to external equipment Modification of hearing aids is not The safety of the hearing aids, when allowed connected to external equipment (with Changes or modifications not expressly an auxiliary input cable and/or USB cable approved by the manufacturer will void the and/or directly), is determined by the warranty of the equipment.
- Page 57 WARNING New and used button/coin batteries are hazardous and should be kept away from children. Button/coin batteries can cause severe or fatal injuries in 2 hours or less if swallowed or placed inside any part of the body. Seek medical attention immediately if this is suspected.
-
Page 58: More Info
Troubleshooting Symptom Possible causes Dead battery No sound Clogged earpieces (dome, Grip Tip, or mould) Hearing aid microphone muted Clogged sound outlet Intermittent or reduced sound Moisture Hearing aid earpiece inserted incorrectly Squealing noise Earwax accumulated in ear canal If your hearing aid plays 8 beeps, 4 times consecutively, your Beeping hearing aid needs a microphone service check Bluetooth connection failed... - Page 59 1) Unpair your hearing aid. 2) Turn Bluetooth off and on again. 3) Open and close battery drawer on hearing aid. 4) Re-pair hearing aid (please visit www.oticon.com.au/pairing). If none of the above solutions work, consult your hearing care professional.
-
Page 60: Water & Dust Resistant (Ip68)
Water & dust resistant (IP68) Your hearing aid is dust tight and 1. Gently wipe off any water. protected against ingress of water, 2. Open the battery drawer and remove which means it is designed to be worn the battery and gently wipe off any in all daily life situations. -
Page 61: Conditions Of Use
Conditions of use Operating conditions Temperature: +1°C to +40°C (34°F to 104°F) Humidity: 5% - 93% relative humidity, non-condensing Atmospheric pressure: 700 hPa to 1060 hPa Transportation and Temperature and humidity shall not exceed the below storage conditions limits for extended periods during transportation and storage: Transportation: Temperature: -25°C to + 60°C (-13°F to 140°F) -
Page 62: Technical Information
ISM band 2.4 GHz. Additional information can be found in the “Technical Data Sheet” on www.oticon.com.au About Getting started Daily use Options Tinnitus Warnings More info... - Page 63 The manufacturer declares that this Declaration of Conformity is available at hearing aid is in compliance with the the headquarters. essential requirements and other relevant provisions of Directive Oticon A/S 2014/53/EU. Kongebakken 9 DK-2765 Smørum This medical device complies Denmark with Medical Device Regulation www.oticon.global/doc...
- Page 64 Australian Sponsor Audmet Australia Pty Ltd Suite 4, Level 4, Building B 11 Talavera Road North Ryde NSW 2113 About Getting started Daily use Options Tinnitus Warnings More info...
- Page 65 Description of symbols and abbreviations used in this booklet Warnings Text marked with a warning symbol must be read before using the device. Manufacturer The device is produced by the manufacturer whose name and address are stated next to the symbol. Indicates the medical device manufacturer, as defined in EU Regulation 2017/745.
- Page 66 Made for Apple badges The device is compatible with iPhone, iPad and iPod touch. Hearing loop This logo incorporates the universal symbol for hearing assistance. The “T” signifies that a hearing loop is installed. Radio Frequency (RF) transmitter Your hearing aid contains an RF transmitter. Global Trade Item Number A globally unique 14-digit number used to identify medical device products including GTIN...
- Page 67 Description of additional symbols used on labels Keep dry Indicates a medical device that needs to be protected from moisture. Catalogue number Indicates the manufacturer’s catalogue number so that the medical device can be identified. Serial number Indicates the manufacturer’s serial number so that a specific medical device can be identified.
- Page 68 International warranty Your device is covered by an warranty does not affect any legal rights international limited warranty that you might have under applicable issued by the manufacturer for a national legislation governing sale of period of 12 months from the date of consumer goods.
-
Page 69: Australia Only
The rights given under this warranty are Australian customers should contact in addition to other rights and remedies Oticon Australia at Suite 4, Level 4, under a law in relation to the good or Building B, 11 Talavera Road, North Ryde... -
Page 70: Warranty
Warranty Certificate Name of owner: __________________________________________________ Hearing care professional: __________________________________________ Hearing care professional’s address: __________________________________ Hearing care professional’s phone: ___________________________________ Purchase date: ___________________________________________________ Model left: ____________________ Serial no.: _________________________ Model right: ___________________ Serial no.: _________________________ About Getting started Daily use Options Tinnitus Warnings More info... -
Page 71: Your Individual Hearing Aid Settings
Your individual hearing aid settings To be filled out by your hearing care professional. Tinnitus SoundSupport: Limitation on use No limitation on use Program Start-up volume (Tinnitus) Max volume (Tinnitus) Max _______ hours per day Max _______ hours per day Max _______ hours per day Max _______ hours per day Max _______ hours per day Max _______ hours per day... - Page 72 Settings overview for your hearing aid Left Right Change volume Change program Mute Tinnitus SoundSupport Volume control indicators Beeps at min/max volume Beeps when changing volume Beeps at start-up volume Battery indicators Low battery warning About Getting started Daily use Options Tinnitus Warnings More info...
-
Page 73: Sound Indicators
Sound indicators Different sounds indicate the hearing aid status. The different indicators are listed on the following pages. Your hearing care professional can set sound indicators to match your preferences. Program Sound When to use 1 tone 2 tones 3 tones 4 tones Continues on next page... - Page 74 Sound Accessories Sound TV Adapter 2 different tones Jingle ConnectClip Volume Sound remote 2 different tones microphone Start-up volume 2 beeps Flight mode Sound Minimum/maximum 3 beeps volume Flight mode active Short jingle Flight mode Volume up/down 1 beep Short jingle inactive Mute Warnings...
- Page 76 0000249489000001...
Need help?
Do you have a question about the miniRITE and is the answer not in the manual?
Questions and answers