Table of Contents
Advertisement
Advertisement
Table of Contents

Subscribe to Our Youtube Channel
Related Manuals for Cascade CMXPro


Summary of Contents for Cascade CMXPro
- Page 1 Owner’s Manual...
- Page 2 CASCADE CMXPro™ CASCADE HEALTH AND FITNESS LLC 17280 WOODINVILLE REDMOND RD NE STE 800 WOODINVILLE WA 98072 PHONE: (425) 402-4062 FAX: (425) 402-4063 EMAIL: info@cascadebiketrainers.com www.cascadebiketrainers.com PLEASE KEEP THIS BOOKLET FOR IMPORTANT WARRANTY INFORMATION & FUTURE REFERENCE. PLEASE FILL IN BELOW...
- Page 3 CONGRATULATIONS You have just become a valued Cascade customer. Our team is committed to making your cycling experience fun and rewarding — offering you detailed product information, expert fitness advice, and direct customer support you can depend on. We want to thank you for purchasing the Cascade CMX Pro indoor group cycle.
- Page 4 FEATURES Smooth, quiet magnetic resistance reduces maintenance and service Durable frame design — Excellent stability, and 350 lb. user load Extra strong bottom bracket design — Fast, simple assembly and service Sweat guard and fender to keep sweat off flywheel ...
- Page 5 OVERVIEW Please review the rest of this Owner’s Manual carefully before you start using your new CMX Pro. The information enclosed here will help you get the most enjoyment out of your workout and includes valuable operating, service, safety, and trouble- shooting information, as well as guidelines for an effective exercise program.
-
Page 6: Table Of Contents
INDEX WARRANTY PAGE 7 SAFETY INSTRUCTIONS/INFORMATION PAGE 8 DELIVERY PAGE 11 DIAGRAM PAGE 12 UNPACKING INSTRUCTIONS PAGE 13 ASSEMBLY INSTRUCTIONS PAGE 15 OPERATING INSTRUCTIONS PAGE 17 GUIDELINES FOR SAFE OPERATION PAGE 18 BASIC OPERATION PAGE 22 GENERAL EXERCISE GUIDELINES PAGE 23 MAINTENANCE INSTRUCTIONS PAGE 25 TROUBLESHOOTING... -
Page 7: Warranty
Contact our Customer Service Department to receive a Return Authorization # prior to shipment Cascade will incur all UPS Ground freight charges for Warranty Parts ordered for a machine that is less than 90 days old. You are responsible for freight charges on warranty parts for machines that are more than 90 days old. -
Page 8: Safety Instructions/Information
SAFETY INSTRUCTIONS/INFORMATION When present, this symbol is an indicator that you should proceed cautiously and be alert as your safety is dependent on your attention to the instructions. WARNING When present, this statement is an indication that there are potential hazards that could result in injury or death. - Page 9 SAFETY INSTRUCTIONS/INFORMATION Injury or death may occur from improper use or over- training. Consult a medical doctor or qualified fitness instructor to determine an exercise program appropriate to your level of fitness. Never attempt to turn the pedal crank arms by hand. a.
- Page 10 SAFETY INSTRUCTIONS/INFORMATION 16. Rider capacity of the CMX Pro is 350lb (159 kg). The safety level of this equipment can only be maintained by following the guidelines in this manual and examining the equipment regularly for damage and wear. Damaged or inoperable components should be replaced immediately and the equipment should not be used until it is repaired.
-
Page 11: Delivery
DELIVERY Upon delivery of your Cascade CMX Pro, take a moment to check the exterior of the box for any damage and make a note of it on the delivery receipt before signing. Make sure your delivery agent has been made aware of any concerns you have and that they have been denoted on the delivery receipt. -
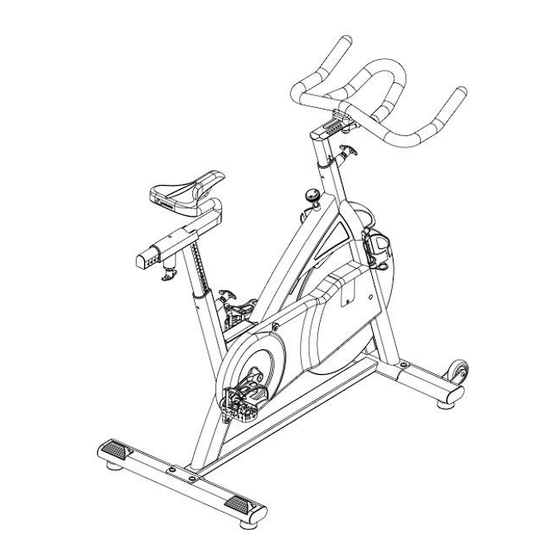
Page 12: Diagram
DIAGRAM Page | 12... -
Page 13: Unpacking Instructions
UNPACKING INSTRUCTIONS Before leaving the manufacturing facility, your Cascade CMX Pro exercise bike was thoroughly inspected and tested for proper operation. To minimize shipping damage, careful attention was given to making your bike ready for shipment. Prior to opening the box, place it in the room of use where there is a large, clear area in order to facilitate an easy assembly. - Page 14 UNPACKING INSTRUCTIONS 6) Stand up the frame and foam supports, then remove the foam pieces from each end of the bike frame. 7) Remove all the parts/pieces from the foam supports. You should have: a. An Owner’s Manual b. All the parts required to assembly the CMX Pro c.
-
Page 15: Assembly Instructions
ASSEMBLY INSTRUCTIONS STABILIZERS/ HANDLEBAR POST AND HANDLEBAR ASSEMBLY 1) Align the front stabilizer (the one with the transport wheels) with the holes in the main frame, below the flywheel. 2) Attach the stabilizer with (2) M8x60mm screws and (4) Washers(two on top of frame and two on bottom of stabilizer). - Page 16 ASSEMBLY INSTRUCTIONS 9) Tighten with the provided Hex key and multi tool. SEAT POST AND SEAT ASSEMBLY 1) Loosen and then pull the T handle on the frame while inserting the seat post as shown. Tighten the T handle. 2) Loosen and then pull down the T handle on the seat post while inserting the seat slider assembly as shown.
-
Page 17: Operating Instructions
5) Although all equipment manufactured by Cascade Health and Fitness has been thoroughly inspected by the manufacturing facility prior to shipment, proper installation and regular maintenance are required to ensure safety. -
Page 18: Guidelines For Safe Operation
GUIDELINES FOR SAFE OPERATION ADJUSTING THE FIT Take a moment to learn how to properly fit your CMX Pro to your body; it will make your workouts a more pleasant and safer experience. The CMX Pro provides more seat and handlebar adjustability than other indoor group cycles, and each adjustment is numbered so you can quickly return the adjustments to your specific settings. - Page 19 GUIDELINES FOR SAFE OPERATION SEAT ADJUSTMENT Adjusting the Seat Height 1) Stand next to the Seat Post and adjust the seat to Hip height 2) Rotate the crank so that the pedals are in the vertical position (12 & 6 o’clock) 3) Place your foot in the toe cage of the pedal closest to the floor and mount the bike...
- Page 20 GUIDELINES FOR SAFE OPERATION ADJUSTING THE SEAT’S FORE/AFT POSITION 1) Sit on your bike with the cranks in the 3 & 9 o’clock positions. A proper fore/aft position of the seat is achieved when the small bump at the top of the shin on your forward leg, directly below the knee cap (tibial tuberosity), is above the pedal axle 2) Dismount to adjust the seat fore or aft for a better fit...
- Page 21 GUIDELINES FOR SAFE OPERATION Adjusting the handlebar’s Fore/Aft Position 1) Dismount the bike and loosen the handlebar forward/aft adjustment lever and slide the handlebars either forward or aft as desired. The forward/aft position should be set to allow the rider to comfortably grasp the handlebars with a slight bend at the elbow.
-
Page 22: Basic Operation
BASIC OPERATION WARNING IF AT ANY TIME DURING YOUR WORKOUT, YOU FEEL CHEST PAIN, EXPERIENCE SEVERE MUSCULAR DISCOMFORT, FEEL FAINT, OR ARE SHORT OF BREATH, STOP EXERCISING IMMEDIATELY. IF THE CONDITION PERSISTS, YOU SHOULD CONSULT YOUR MEDICAL DOCTOR IMMEDIATELY. 1) Pedaling resistance is controlled by the tension knob located beneath the handlebar, on the main part of the frame. -
Page 23: General Exercise Guidelines
GENERAL EXERCISE GUIDELINES SETTING A GOAL The first step to a successful exercise program is to set realistic goals and objectives. Do you want an exercise program that is geared to build muscle, maintain muscle tone, increase aerobic capacity, or lose weight? In order to ensure that you fully receive all the benefits of a sound exercise program, you need to first identify the existence (if any) of risk factors that may influence the design of your exercise program. - Page 24 GENERAL EXERCISE GUIDELINES A general exercise program for achieving and maintaining flexibility should adhere to the following guidelines: Frequency Daily Intensity To a position of mild discomfort Duration 10-30 seconds for each stretch Repetitions 2-6 for each stretch Type Static, with a major emphasis on the low back and hamstrings area because of the high prevalence of low-back pain syndrome in our society Exercise Principles...
-
Page 25: Maintenance Instructions
MAINTENANCE MAINTENANCE INSTRUCTIONS Helpful Hints The safety level given by the design of this equipment can only be maintained when the equipment is regularly examined for damage and wear. Inoperable components should be replaced immediately or the equipment should be put out of use until it is repaired. - Page 26 Cascade does not recommend attempting to service the internal parts of the pedals. If pedals are internally worn it is recommended that they be replaced. Use of lubricants or cleaning solutions other than those so specified will result in diminished performance and a shorter life span for that part.
-
Page 27: Troubleshooting
TROUBLESHOOTING SYMPTOM: SEAT OR HANDLEBAR POST MOVE AFTER LOCKED INTO POSITION Make sure the T handle is tightened. SYMPTOM: CLICKING NOISE WITH EACH PEDAL REVOLUTION Check shoelaces to make sure the aglet is not tapping the bike as the pedals turn Assure pedal straps are tight and that no excess strap on inner part of pedal is catching on the crank arm as it turns Assure that pedals are tight on crank arms... - Page 28 TROUBLESHOOTING SYMPTOM: KNOCKING NOISE OR PLAY FELT IN PEDALS/CRANKS Make sure pedals are tight on crank arms Make sure crank bolts are tight. If loose, apply blue Loctite 242 to threads and tighten crank bolts with 8mm hex wrench If problem persists check the bottom bracket for looseness. If bottom bracket is loose contact authorized service technician for replacement of bottom bracket bearings.
-
Page 29: Specifications
SPECIFICATIONS PHYSICAL DIMENSIONS Length: 42 in (107 cm) Height: 42 in (107 cm) Width: 23in (59 cm) Weight: 96 lbs (44 kgs) SHIPPING CARTON DIMENSIONS Length: 45in (114 cm) Height: 38 in (96.5cm) Width: 12 in (30.5 cm) ... - Page 30 SPECIFICATIONS HANDLEBARS Biomechanically correct with anatomical bend Adjustable up/down and fore/aft Over molded grip for greater comfort Adjustment marks for up/down and fore/aft adjustments STRETCH PADS Foot pads on base of rear stabilizer for stretching SEAT Seat slider allows for extended fore/aft adjustment ...
-
Page 31: Exercise Log
EXERCISE LOG Week #: Monday Tuesday Wednesday Thursday Friday Saturday Sunday Weekly Totals Weekly Goals: Page | 31... - Page 32 EXERCISE LOG Week #: Monday Tuesday Wednesday Thursday Friday Saturday Sunday Weekly Totals Weekly Goals: Page | 32...
- Page 33 EXERCISE LOG Week #: Monday Tuesday Wednesday Thursday Friday Saturday Sunday Weekly Totals Weekly Goals: Page | 33...
- Page 34 CASCADE HEALTH AND FITNESS LLC 17280 WOODINVILLE REDMOND RD NE STE 800 WOODINVILLE WA 98072 PHONE: (425) 402-4062 FAX: (425) 402-4063 EMAIL: info@cascadebiketrainers.com www.cascadebiketrainers.com Page | 34...
Need help?
Do you have a question about the CMXPro and is the answer not in the manual?
Questions and answers