Table of Contents

Advertisement

Honeywell/Ademco
VISTA-20P / PS Series
VISTA – 15P Series
Security Systems

User Guide

Voltech:
(800) 371-1130
service@voltechsecurity.com
www.voltechsecurity.com
K5309-1V1 7/02

Advertisement

Table of Contents
loading

Summary of Contents for Honeywell VISTA-20PSeries

  • Page 1: User Guide

    Honeywell/Ademco VISTA-20P / PS Series VISTA – 15P Series Security Systems User Guide Voltech: (800) 371-1130 service@voltechsecurity.com www.voltechsecurity.com K5309-1V1 7/02...
  • Page 2 IMPORTANT! PROPER INTRUSION PROTECTION For proper intrusion coverage, sensors should be located at every possible point of entry to a home or commercial premises. This would include any skylights that may be present, and the upper windows in a multi-level building. In addition, we recommend that radio backup be used in a security system so that alarm signals can still be sent to the Central Monitoring Station in the event that the telephone lines are out of order (alarm signals are normally sent over...
  • Page 3: Table Of Contents

    Table of Contents System Overview ............................5 Introduction ............................5 System Basics ............................ 5 Using the Voice Message Center
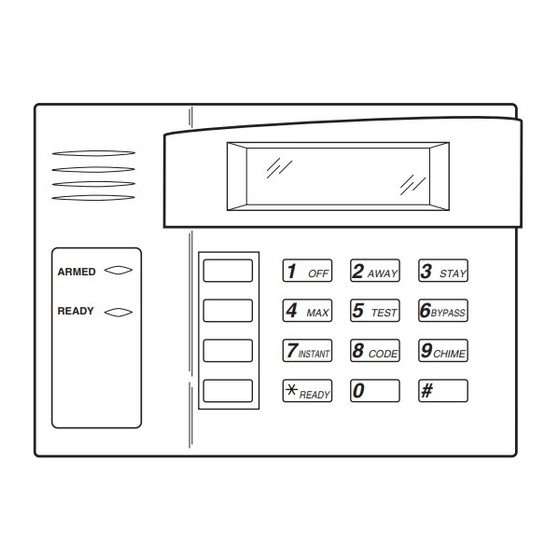
 ...................... 7 About The Keypads ..........................8 General Information.......................... 8 Fixed-Word Display Keypad ......................10 Functions of the Keypads ........................11 Entry/Exit Delays ...........................
  • Page 4 Example of Macro Programming ....................28 Using a Programmed Macro Key....................28 Using Device Commands........................29 About Device Commands ........................ 29 Paging Feature ............................30 About Automatic Paging ......................... 30 About Manual Paging........................31 Latch Key Paging ..........................31 Security Codes & Authority Levels......................32 About Security Codes ........................
  • Page 5: System Overview

    System Overview Introduction Congratulations on your ownership of an ADEMCO Security System. You've made a wise decision in choosing it, for it represents the latest in security protection technology today, and millions of premises are protected by ADEMCO systems. This system provides: •...
  • Page 6 System Overview (cont’d) Zones and Partitions • The system sensing devices have been assigned to various “zones,” which are specific areas of protection (e.g., front door, kitchen window, etc.). • Zone numbers are displayed at the keypad when an alarm or trouble condition occurs on a sensor.
  • Page 7: Using The Voice Message Center

    System Overview (cont’d) Paging Feature • If programmed, the system can automatically send certain system condition messages to up to four (VISTA-20P/PS Series) or two (VISTA-15P Series) pagers. • The display consists of code numbers that indicate the type of condition that has occurred.
  • Page 8: About The Keypads

    About The Keypads General Information Your keypads allow you to control all system functions and feature the following: • A telephone style (digital) keypad • Liquid Crystal Displays (LCD) that show the nature and location of all occurrences • Built-in sounder that sounds during alarms and troubles. The sounder also "beeps" during certain system functions and also when depressing any of the keys (to acknowledge the key press).
  • Page 9 About The Keypads (cont’d) ARMED ARMED AWAY STAY AWAY STAY READY READY TEST BYPASS TEST BYPASS INSTANT CODE CHIME INSTANT CODE CHIME READY READY Standard Alpha Display Keypad Standard Fixed-Word Display Keypad ARMED AWAY STAY RECORD VOLUME PLAY READY TEST BYPASS MESSAGE CODE...
  • Page 10: Fixed-Word Display Keypad

    About The Keypads (Cont’d) FIXED-WORD DISPLAY KEYPAD All burglary zones, interior and AWAY: AWAY NIGHT NO AC perimeter, are armed. PHONE TEST BYPASS Perimeter burglary zones, such as NOT READY STAY: STAY ALARM CHIME BAT protected windows and doors, are FIRE CHECK INSTANT...
  • Page 11: Functions Of The Keypads

    Functions of the Keypads ARMED STAY AWAY RECORD VOLUME PLAY READY TEST BYPASS MESSAGE INSTANT CODE CHIME READY STATUS VOICE FUNCTION Voice-capable 2-line Alpha keypad (shown with flip-down front door removed) IMPORTANT! • Match the numerical callouts in the above graphic with the corresponding number on the following pages for a description of usage.
  • Page 12 Functions of the Keypads (cont’d) [PLAY] On Voice keypads, used in NOTE: The functions printed directly on conjunction with the FUNCTION and the keys indicate their primary purpose; the VOICE keys to play the recorded functions printed under some of the keys message.
  • Page 13 Functions of the Keypads (cont’d) 15. MIC 11. # This key can be used for "Quick voice keypads, microphone Arming" of the system without use of a Message Center recordings. security code (if programmed). 16. MESSAGE LED INDICATOR: (RED) [FUNCTION] On Voice keypads, enables On Voice keypads, flashes red when the desired voice or volume function.
  • Page 14: Entry/Exit Delays

    Entry/Exit Delays Entry Delay Entry Delays give you time to disarm the system when you re-enter through the designated entrance door. You must disarm the system before the entry delay period ends, or an alarm will occur. The keypad beeps during the entry delay period, reminding you to disarm the system.
  • Page 15: Exit Alarms

    Entry/Exit Delays (cont’d) Exit Alarms Whenever you arm the system, the exit delay begins. If an entry/exit door or interior zone is faulted when the exit delay ends (e.g., exit door left open), the system sounds an alarm and starts the entry delay timer. If you disarm the system before the entry delay ends, the alarm sound stops and the message "CANCELED ALARM"...
  • Page 16: Checking For Open Zones

    Checking For Open Zones Using the [∗] Key to Display and Announce System Status efore arming your system, all protected doors, windows and other protection zones must be closed or bypassed; otherwise the keypad will display a "Not Ready" message. Use the READY key to display all faulted zones, making it easier for you to identify and secure any open zone.
  • Page 17: Arming The System

    Arming the System STAY Mode: Arms Perimeter Only, Entry Delay On • Used when you want to arm the system with persons staying inside (or if you have pets that are moving throughout the premises). • The perimeter sensors are armed, but interior sensors are left disarmed. •...
  • Page 18: Arming Commands

    Arming the System (cont’d) Arming Commands Before arming, close all perimeter doors and windows and make sure the Ready to Arm message is displayed. Mode Press these keys… Keypad Confirms By… • three beeps security code + STAY STAY • armed STAY message displayed •...
  • Page 19: Single Button Arming

    Arming the System (cont’d) Single Button Arming The “A”, “B”, “C”, and/or “D” keys on your keypad may have been programmed for single-button arming. Note that while it is not necessary to use a security code for arming (by using the Quick Arm method described previously), a security code must always be used to disarm the system.
  • Page 20: Keyswitch

    Keyswitch Using the Keyswitch Your system may be equipped with a keyswitch for use when arming and disarming. Red and green lights on the keyswitch plate indicate the status of your system as follows: Green Light: Lights when the system is disarmed and ready to be armed (no open zones).
  • Page 21: Disarming And Silencing Alarms

    Disarming and Silencing Alarms Using the [OFF] key The OFF key is used to disarm the system, silence alarm and trouble sounds, and clear alarm memories. IMPORTANT: If you return and the main burglary sounder is on, DO NOT ENTER, but CONTACT THE POLICE from a nearby safe location. If you return after an alarm has occurred and the main sounder has shut itself off, the keypad will beep rapidly upon your entering, indicating that an alarm has occurred during your absence.
  • Page 22: Bypassing Protection Zones

    Bypassing Protection Zones Using the BYPASS Key Use t his key when you want to arm your system with one or more zones intentionally unprotected. The system must be disarmed first. Vent Zones: Your system may have certain windows set as “vent” zones, which are automatically bypassed if left open when arming the system (you do not need to manually bypass them).
  • Page 23: Quick Bypass

    Bypassing Protection Zones (cont’d) Quick Bypass If programmed, "Quick Bypass" allows you to easily bypass all open (faulted) zones without having to enter zone numbers individually. This feature is useful if, for example, you routinely leave certain windows open when arming at night. + [#] Alpha Display: BYPASS...
  • Page 24: Chime Mode

    Chime Mode Using the Chime Mode CHIME mode alerts you to the opening of a perimeter door or window while the system is disarmed. When Chime mode is activated: • Three tones sound at the keypad whenever a perimeter door or window is opened. •...
  • Page 25: Date And Time

    Date and Time Viewing the Current Date and Time The system lets you view its time and date setting on an alpha keypad. + [#] + [6] [3] Alpha Display: ✱✱✱✱ ✱✱✱✱ DISARMED (Security Code) READY TO ARM Press the function key (A, B, C, or D) for viewing current date and time, if programmed.
  • Page 26: Panic Keys

    Panic Keys Using Panic Keys Your system may have been programmed to use special keys to manually activate emergency (panic) functions as follows: This Function Sends This Signal* With This Sounding… Silent Alarm silent alarm no audible alarm; displays, “Press [∗] to show faults,”...
  • Page 27: Macro Key Programming & Usage

    Macro Key Programming & Usage About Macro Keys The “A”, “B”, “C” or “D” keys can be used to automatically activate a series of commands of up to 16 keystrokes, if programmed for this function. These keystrokes, as a group, are called “macros” and are stored in the system's memory. •...
  • Page 28: Example Of Macro Programming

    Macro Key Programming & Usage (cont’d) The keypad beeps to acknowledge your input and Typical Macro Alpha Display: displays the command you entered (followed by “F”). MACRO PGM 4. Enter the next command, followed by press/holding the      *    *  * “D”...
  • Page 29: Using Device Commands

    Using Device Commands About Device Commands Your system may be set up so that it can control certain lights or other devices. • Some devices may be automatically turned on or off by the system. • You may be able to override automatically controlled devices using the commands described below.
  • Page 30: Paging Feature

    Paging Feature About Automatic Paging Your system may be set up to automatically send messages to several pagers (4 pagers for VISTA-20P/PS Series, 2 pagers for VISTA-15P Series) as certain conditions occur in your system. • The following events can be programmed by your installer to be sent to the pagers: arming and disarming , alarms, and trouble conditions.
  • Page 31: About Manual Paging

    Paging Feature (cont’d) About Manual Paging Your system may be set up so you can manually send a message to up to four (VISTA- 20P/PS Series) or two (VISTA-15P Series) pagers. • Your installer programs the paging function key and the pager phone numbers. •...
  • Page 32: Security Codes & Authority Levels

    Security Codes & Authority Levels About Security Codes Your installer assigned a master code that is used to perform all system functions. In addition, you can assign different security codes for use by other users (VISTA- 20P/PS Series provides 46 additional codes; VISTA-15P Series provides 30 additional codes).
  • Page 33: How To Assign User Codes And Attributes

    Security Codes & Authority Levels (cont’d) How to Assign User Codes and Attributes The following lists the various command strings for adding user codes and attributes. Refer to the User Setup chart at the back of this manual for factory defaults of user attributes and to keep a record of user programming.
  • Page 34: Accessing Other Partitions (Vista-20P/Ps Series)

    Accessing Other Partitions (VISTA-20P) About Accessing Partitions (GOTO Command and Multi-Partition Arming) Each keypad is assigned a default partition for display purposes, and will show only that partition's information. • If the user is authorized, a keypad in one partition can be used to perform system functions in the other partition by using the GOTO command.
  • Page 35: Using The Goto Command

    Accessing Other Partitions (cont’d) Using the GoTo Command (VISTA-20P/PS) If the user is authorized, a keypad in one partition can be used to perform system functions in the other partition by using the GOTO command. • You must use an Alpha keypad to access another partition. •...
  • Page 36: Common Zone Operation (Vista-20P/Ps Series)

    Accessing Other Partitions (cont’d) Common Zone Operation (VISTA-20P/PS) Your system may have been set up to use a common zone, which is Ask your installer if a an area shared by users of both partitions, such as a foyer or lobby. "common zone"...
  • Page 37: Scheduling

    Scheduling About Scheduling The system provides end-user schedules (programmable by master/installer only), which can control various types of events. • Each schedule causes a defined event to start and stop (when appropriate) at a specified time. • Schedules can be set to automatically repeat at various intervals. •...
  • Page 38 Scheduling (cont’d 5. For event number “02,” enter the access group GROUP NUMBER number. Otherwise, this prompt is skipped. Press [∗] to continue to the “Start” prompt below. 6. For event numbers “03-07,” enter the partition PARTITION number to be armed or disarmed. 0 = arm all;...
  • Page 39: Event Logging Procedures

    Event Logging Procedures About Event Logging The system records various events in a history log, which can be viewed by the master user on an Alpha Display keypad. • The Event Log holds up to 100 (VISTA-20P/PS Series) or 50 (VISTA-15P Series) events.
  • Page 40 Event Logging Procedures (cont’d) Code Definition Code Definition Clean Me Alarm, Expansion Module ECP Module cover tamper Disarmed, Armed AWAY, Armed STAY Silent Burglary Schedule Arm/Disarm AWAY Alarm, 24-Hour Auxiliary/Monitor zone Cancel by User Carbon Monoxide Remote Arm/Disarm (Downloading) AC Power Quick Arm AWAY Low System Battery/Battery Test Fail...
  • Page 41: Testing The System

    Testing the System About Testing the System Using the Test mode allows each protection point to be checked for proper operation. Testing should be conducted weekly to ensure proper operation. • The keypad sounds a single beep every 60 seconds as a reminder that the system is in the Test mode.
  • Page 42: Trouble Conditions

    Trouble Conditions he word CHECK on the keypad's display, accompanied by a "Check" and "beeping" at the keypad, indicates a trouble condition in the system. "Battery" Displays To silence the beeping for these conditions, press any key. 1. A display of "CHECK" and one or more zone numbers indicates that a problem exists with the displayed zone(s) and requires your attention.
  • Page 43 Trouble Conditions (cont’d) Words or letters in parentheses ( ) are those that are displayed on Fixed-Word Display keypads. COMM. FAILURE Indicates that a failure has occurred in Other Trouble (or FC) the telephone communication portion of Displays your system. CALL FOR SERVICE.
  • Page 44 Trouble Conditions (cont’d) AC LOSS The system is operating on battery power Other Trouble (or NO AC) Displays only due to an AC power failure. (Continued) If only some lights are out on the premises, check circuit breakers and fuses and reset or replace as necessary. If AC power cannot be restored and a “low system battery”...
  • Page 45: Maintaining Your System

    Maintaining Your System The components of your security system are designed to be as Taking Care of maintenance-free as possible. However, to make sure that your Your System system is in reliable working condition, do the following: 1. Test your system weekly . 2.
  • Page 46: Fire Alarm System

    Fire Alarm System THIS SECTION APPLIES ONLY TO RESIDENTIAL SYSTEMS Your fire alarm system (if installed) is on 24 hours a day, for General continuous protection. In the event of an emergency, the strategically located smoke and heat detectors will sound their alarms and automatically send signals to your system, triggering a loud, interrupted pulsed sound* from the Keypad(s) and any external sounders.
  • Page 47 Fire Alarm System (cont’d) THIS SECTION APPLIES ONLY TO RESIDENTIAL SYSTEMS 1. Should you become aware of a fire emergency before your smoke or Manually heat detectors sense the problem, go to your nearest keypad and Initiating manually initiate an alarm by pressing the panic key assigned for a Fire Alarm FIRE emergency for 2 seconds (see below).
  • Page 48: National Fire Protection Association Recommendations On Smoke Detectors

    Fire Alarm System (cont’d) THIS SECTION APPLIES ONLY TO RESIDENTIAL SYSTEMS National Fire Protection Association Recommendations on Smoke Detectors With regard to the number and placement of smoke/heat detectors, we subscribe to the recommendations contained in the National Fire Protection Association's National Fire Alarm Code (NFPA 72) noted below.
  • Page 49: Emergency Evacuation

    Fire Alarm System (cont’d) THIS SECTION APPLIES ONLY TO RESIDENTIAL SYSTEMS Emergency Evacuation Establish and regularly practice a plan of escape in the event of fire. The following steps are recommended by the National Fire Protection Association: 1. Position your detector or your interior and/or exterior sounders so that they can be heard by all occupants.
  • Page 50: Quick Guide To Basic System Functions

    Quick Guide to Basic System Functions FUNCTION PROCEDURE COMMENTS Check Zones Press READY key. View faulted zones when system not ready. Arm System Enter code. Press arming key desired: Arms system in mode selected. (AWAY, STAY, NIGHT-STAY, MAXIMUM, INSTANT) Quick Arm Press #.
  • Page 51: Summary Of Audible/Visual Notifications

    Summary of Audible/Visual Notifications Fixed-Word Display Keypads SOUND CAUSE DISPLAY LOUD, FIRE ALARM FIRE is displayed; zone number of zone in INTERRUPTED * alarm is displayed. If a fire alarm is manually activated, zone number 95 will be Keypad & Ext. displayed.
  • Page 52: Alpha Display Keypads

    Summary of A/V Notifications (cont’d) Alpha Display Keypads SOUND CAUSE DISPLAY LOUD, FIRE ALARM. FIRE is displayed; descriptor of zone in alarm is INTERRUPTED* displayed. If a fire alarm is manually activated, Keypad & Ext. zone number 95 will be displayed. LOUD, BURGLARY/AUDIBLE ALARM is displayed.
  • Page 53: Regulatory Statements And Warnings

    Regulatory Statements and Warnings WARNING: This is a Class A product. In a domestic environment, this product may cause radio interference in which case the user may be required to take adequate measures. RADIO FREQUENCY EMISSIONS Federal Communications Commission (FCC) Part 15 This device complies with part 15 of the FCC rules.
  • Page 54 Regulatory Statements (cont’d) Industrie Canada AVIS: l’é tiquette d’Industrie Canada identifie le maté riel homologué . Cette é tiquette certifie que le maté riel est conforme aux normes de protection, d’exploitation et de sé curité des ré seaux de té lé communications, comme le prescrivent les documents concernant les exigences techniques relatives au maté...
  • Page 55: System Features

    System Features Log Features Comments Exit Delay Part. 1: Part. 2 Entry Delay 1 Part. 1: Part. 2 Entry Delay 2 Part. 1: Part. 2 NIGHT-STAY Zones Zones: Quick Arm Quick Bypass Automatic Paging users: Keyswitch Arming Arm AWAY: steady flash (circle type of LED lighting) Arm STAY:...
  • Page 56: User Setup

    System Features Log (cont’d) User Setup The following chart will help keep track of system users. Copies should be † † distributed to the partition 1 and partition 2 (if applicable) masters for their records. To program a user attribute: Enter system/partition* master code + [8] + user no.
  • Page 57: Paging Setup

    System Features Log (cont’d User Setup (cont’d) Enter system/partition master code + [8] + user no. + “#” command listed in column heading. User User User’s Part(s). Security Auth. Access RF Zone Pager Name (system master only) Code Level Group Number on/off [#] [3] + part(s) + [#]...
  • Page 58: List Of Output Devices

    System Features Log (cont’d Schedules*: master code + [#] + [6] [4] Event Device No. Group No. Partition Start Stop Repeat Random Time/ Time/ (see list below) for “01” events: for “02” events: for “04-06” events: (yes/no) (yes/no) enter 1-8 enter 1, 2, or 3 (see device list below) Events:...
  • Page 59: Limitations Of This System

    LIMITATIONS OF THIS SYSTEM WARNING! THE LIMITATIONS OF THIS ALARM SYSTEM While this system is an advanced design security system, it does not offer guaranteed protection against burglary or other emergency. Any alarm system, whether commercial or residential, is subject to compromise or failure to warn for a variety of reasons.
  • Page 60: Warranty

    WARRANTY ADEMCO Limited Warranty Alarm Device Manufacturing Company, a Division of Pittway Corporation, and its divisions, subsidiaries and affiliates ("Seller"), 165 Eileen Way, Syosset, New York 11791, warrants its product(s) to be in conformance with its own plans and specifications and to be free from defects in materials and workmanship under normal use and service for 24 months from the date stamp control on the product(s) or, for product(s) not having an ADEMCO date stamp, for 12 months from date of original purchase unless the installation instructions or catalog sets forth a shorter period, in which case the...
  • Page 61 NOTES – 61 –...
  • Page 62 NOTES – 62 –...
  • Page 63 NOTES – 63 –...
  • Page 64 165 Eileen Way Syosset, New York 11791 Copyright © 2002 PITTWAY CORPORATION ¬.9Wl K5309-1V1 7/02...

This manual is also suitable for:

Vista – 15p seriesVista-20ps series

Table of Contents