Astralpool Viron Connect 10 Installation And Operating Instructions Manual
Pool and spa controller
Hide thumbs
Also See for Viron Connect 10:
- Installation and operating instructions manual (61 pages) ,
- Installation and operation manual (30 pages)
Table of Contents
Advertisement
INSTALLATION AND OPERATING INSTRUCTIONS
CONNECT
1 0
I OM
I NST
3 14
Melbourne: 03 8796 8600
North Sydney: 02 9853 2100
3100Brisbane: 07 3308 5400
Viron Connect 10
Viron Cartridge Filter
Pool and Spa Controller
INSTALLATION AND
OPERATING INSTRUCTIONS
Gold Coast: 07 5552 2600
South Sydney: 02 8788 9500
Adelaide: 08 8152 7600
I
INSTALLATION AND OPERATING INSTRUCTIONS
Perth: 08 9350 2600
1
Townsville: 07 4750
www.astralpool.com.au
sales@astralpool.com.au
Bolero ND
Cleaner
Advertisement
Table of Contents

Related Manuals for Astralpool Viron Connect 10


Summary of Contents for Astralpool Viron Connect 10
-
Page 1: Operating Instructions
INSTALLATION AND OPERATING INSTRUCTIONS INSTALLATION AND OPERATING INSTRUCTIONS Viron Connect 10 Viron Cartridge Filter Pool and Spa Controller Bolero ND Cleaner INSTALLATION AND OPERATING INSTRUCTIONS CONNECT 1 0 I OM I NST 3 14 Melbourne: 03 8796 8600... - Page 2 Congratulations o n t he p urchase o f y our A stralPool V iron C onnect 1 0 c ontroller. C orrect installation a nd s et u p b y a q ualified a nd/or l icensed t echnician w ill e nsure y ou h ave m any years ...
-
Page 3: Table Of Contents
Table o f C ontents Section 1 O verview .............................. 4 Components .................................. 4 Basic O peration ................................. 4 Section ... - Page 4 Table o f C ontents P art T wo: I nternet G ateway a nd S mart P hone A pp I nstallation Installing t he I nternet G ateWay a nd S mart P hone/Tablet A pp……………………………………….……………………....…..59 ...
-
Page 5: Section 1 O Verview
Section 1 . O verview The i nformation c ontained w ithin t his m anual w ill p rovide i nstructions o n t he o peration a nd i nstallation o f your ... -
Page 6: Section 2 E Quipment O Peration
Section 2 . Equipment O peration All a ppliances o n y our V iron C onnect c ontroller c an b e e asily o perated t hrough t he s pecific p roduct s creens ... -
Page 7: Heating
2.3 Heating ( if a pplicable) Select H eating f rom t he m enu s creen b. The c urrent w ater t emperature a nd t he s et t emperature w ill b e s hown o n t he s creen. Different ... - Page 8 2.5 Favorites Select F avorite o ption f rom t he m enu s creen. b. Activate o ne o f t he p reset f avorites b y s electing f rom t he l ist ( to p rogram f avorite’s s ee p age XX) ...
- Page 9 Section 3 . Setting t he T ime 3.1 To s et t he c urrent t ime o n t he V iron C onnect t ouchscreen, s elect t he S etup i con f rom t he m ain m enu then ...
-
Page 10: Section 4 T Imer P Rogramming
Section 4 . Timer P rogramming 4.1 Your V iron C onnect c ontroller h as 8 p rogrammable t imers t hat c an b e s et t o o perate a t a ny t ime during ... - Page 11 If s ystem i s c onfigured w ith a v ariable ( multi) s peed A stralPool p ump, y ou w ill b e p rompted to ...
- Page 12 Choose h eater s tatus ( if i nstalled) h. Choose a ctive l ighting z ones ( if i nstalled) ...
- Page 13 Select t he “ Disabled” o r t ime o ption n ext t o t he t imer y ou w ish t o s et ...
- Page 14 Repeat a bove p rocess f or e ach a dditional t imer p eriod r equired. ...
- Page 15 ii. Program s tart a nd s top p eriod u sing t he a rrows b eside t he t imes. S elect i f s ystem should ...
-
Page 17: Section 5 F Avourite P Rogramming
Section 5 . Favorite P rogramming 5.1 The A stralPool V iron C onnect c ontrol s ystem a llows y ou t o p rogram i n “ One T ouch” F avorite s ettings so ... - Page 18 The V iron C onnect c ontroller c omes w ith 2 p re-‐configured f avorites, o ne n amed P ool a nd one ...
-
Page 19: Section 6 E Quipment I Nstallation
Finally, s elect E nabled o r D isabled f or e ach f avorite s etting b y t ouching t he w ord t o t he right ... -
Page 20: Control B Ox I Nstallation
b ox i s n ot p ossible, a w ireless l ink m odule c an b e p urchased f rom AstralPool. ... - Page 21 76mm c enters ...
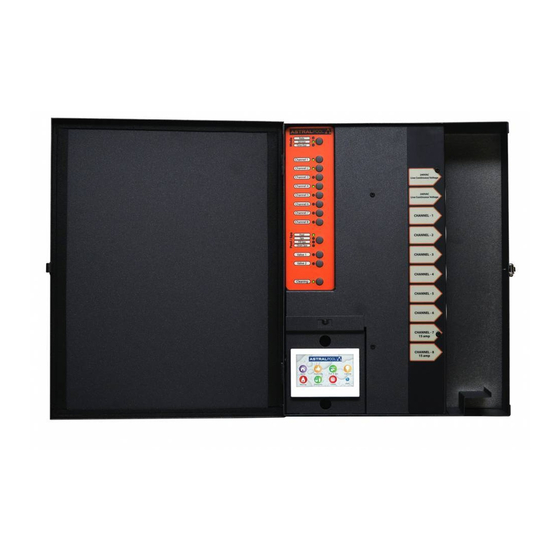
- Page 22 6.3 Appliance I nstallation / C onnection -‐ P ower The V iron C onnect c ontroller c omes w ith 8 x 1 0A G PO’s a nd 2 x 1 5A G PO’s.. T wo o f t he 1 0A outlets ...
- Page 23 6.4 Appliance I nstallation / C onnection – C ommunications The V iron C onnect c ontroller c ommunicates w ith o ther c ompatible A stralPool e quipment through ...
-
Page 24: Section 7 I Nstallation S Etup
Section 7 . Installation S etup 7.1 Touchscreen C ontroller S etup 1) From t he m ain s creen, s elect t he “ Setup” i con. ... - Page 25 s upports m ulti-‐colour l ighting. O nly s elect t he m ulti-‐colour c heck b ox i f y ou a re u sing a n AstralPool D elta l ighting c ontroller. ...
- Page 26 7) Select t he n umber o f c hannels b eing u sed i n t he s ystem. F or C onnect 1 0 c ontrollers, s elect 8 channels ...
- Page 27 i. If Y ES g o f orward t o s tep 9 ; ii. If N O, y ou w ill b e g iven t he o ption o f u sing t he r elay b oard w ithin t he c ontroller t o monitor ...
- Page 28 t emperature. I f y ou h ave a n e xternal h eater ( not m anufactured b y AstralPool) a nd y ou w ant t o c ontrol y our p ool t emperature f rom t he C onnect ...
- Page 29 ii. Select A dvanced o ption i f y ou a re u sing a n A stralPool S olar M odulator ( optional a dd on ...
- Page 30 iv. Select i f y ou r equire t he c ollector t o f lush d aily. A stralPool r ecommend a ctivating this ...
- Page 31 10) If y ou a re o perating a utomatic v alves ( motorized) t o c hange b etween y our s wimming p ool and ...
- Page 32 11) Next y ou m ust c onfigure t he a ppliances o n e ach c hannel o f t he c ontroller. S tart w ith c hannel 1 ...
-
Page 33: Control
iii. POOL E QUIPMENT – s elect t he n ame/purpose o f t he e quipment c onnected t o t his channel. I f a n a ppropriate n ame c annot b e f ound t here i s t he a bility t o s elect “Custom” ... - Page 34 Connect c ontroller. 13) Repeat s tep 1 1 f or e ach a dditional c hannel y ou h ave a llocated i n t he s ystem. ...
- Page 35 16) Depending o n e arlier s ettings y ou m ay b e p rompted f or c leaning i nterlock a nd h eat d emand. ...
- Page 36 Chlorine s etting f or s alt c hlorinators a nd O RP f or l iquid d osing s ystems. 18) A f inal s ummary s creen w ill s how t he c urrent s ettings f or t he c ontroller. I f c orrect, s elect E xit, otherwise ...
- Page 37 8.3 Go t o t he “ Setup” o ption f rom t he m ain m enu t hen s elect “ Configure W ireless” 8.4 Use t he p assword “ 1234” t o e nter t he w ireless c onfiguration m enu. T he c urrent N etwork I D w ill b e shown ...
- Page 38 To e nter t he n ew c ode, f irst s elect “ Clear” t hen e nter t he n umber. 8.7 Once e quipment i s l inked a s s hown a bove, t ouch s elect o n t he s creen. T he t ouchscreen w ill n ow s end the ...
-
Page 39: Favourites
8.9 If y ou a re c onnecting a h andheld ( RF) r emote t o t he s ystem a lso, u se t he “ Connect H andheld Transceivers” ... - Page 40 4) Auxillary v alve c ontrol; i. Turn y our a uxillary v alves o n/off o r A uto 5) Lighting c ontrol; i. With a D elta l ighting s ystem i nstalled, y ou c an u se y our r emote t o t oggle b etween on ...
-
Page 41: Section 7 I Nstallation S Etup 2
Section 9 . External H eater C ontrol ( non-‐Genus) 9.1 If a n on A stralPool h eater i s i nstalled o r a n on G enus c ompliant h eater ( such a s A stralPool heat ... - Page 42 10.3 If t he f ilter p ump i sn't r unning a nd t he s olar c alls f or h eat, t he f ilter p ump w ill s tart and ...
-
Page 43: Section 1 1 T Ouch S Creen I Nstallation
Section 1 1. T ouch S creen I nstallation I nstructions c ont.. ... - Page 44 Section 1 1. T ouch S creen I nstallation I nstructions c ont.. ...
- Page 45 Section 1 1. T ouch S creen I nstallation I nstructions c ont.. ...
- Page 46 Section 1 1. T ouch S creen I nstallation I nstructions c ont.. For a t hick w all, t urn t he m ounting a rms a round a s s hown: ...
- Page 47 Section 1 1. T ouch S creen I nstallation I nstructions c ont.. Turn t he s crew a nti c lockwise s o t hat t he m ounting a rms f old b ack i nto t he S creen B ack s o t hat i t w ill f it i nto the ...
- Page 48 Section 1 1. T ouch S creen I nstallation I nstructions c ont.. Clip t he s creen b ack i n a nd t hen f it t he t op c over. ...
- Page 49 Section 1 1. T ouch S creen I nstallation I nstructions c ont.. Solid W all M ounting To m ount o n a s olid w all w here i t i s t oo d ifficult t o r ecess t he s creen i nto t he w all, u se t he S olid W all M ounting Base ...
- Page 50 Section 1 1. T ouch S creen I nstallation I nstructions c ont.. Once t his i s m ounted t he S creen B ase a nd T op C over c an b e c lipped o n i n t he s ame m anner a s t he f lush mount. ...
- Page 51 Section 1 2. Custom S witching ( from e xternal s ource) 10.1 The V iron C onnect c ontroller h as t he a bility t o a ccept t wo e xternal s witching i nputs t hat a llow f or the ...
-
Page 52: Section 1 3. Service M Ode O Peration
Section 1 3. Service M ode O peration 9.1 If c ontrol o f t he C onnect s ystem i s r equired f rom o utside t he h ouse, a ll e quipment c an b e o perated from ... -
Page 53: Section 1 4 F Unctionality T Ips
Section 1 4. Viron C onnect 1 0 F unctionality T ips 2 x 1 0A c onstant p ower o utlets. C an b e u sed f or A stralPool g as h eaters o r l ighting s ystems w hich r ely o n constant ... - Page 54 Section 15. Troubleshooting SYMPTOM RESOLUTION Check All Auto selected from Home • menu Equipment not activating on time clock Check timer programming • Check for timer periods crossing over • Check isolation switch on • No power to touchscreen Check safety switch •...
- Page 55 Section 1 6. E quipment O utlet N ames Record w hat e quipment i s p lugged i nto t he E quipment C entre. T his w ill e nable you ...
- Page 57 If a defect appears in the Product before the end of the warranty period and AstralPool finds the Product to ...
- Page 58 AstralPool m akes n o e xpress w arranties o r r epresentations o ther t han s et o ut i n t his w arranty. ...
- Page 59 Part T wo: I nstalling t he I nternet G ateway a nd S mart P hone/Tablet The I nternet G ateway i s a n o ptional p urchase t hat a llows t he C onnect 1 0 P ool a nd S pa C ontroller t o c onnect to ...
- Page 60 Option 3 – F M w ireless t ransceiver t o I nternet G ateway t o H ome M odem In a ll c ases t he i nternet c onnection m ust b e p ermanently c onnected t o a b roadband internet ...
- Page 61 Internet G ateway f or s ecurity r easons. T his w ill b e r equired t o r egister t he I nternet Gateway ...
-
Page 62: Section 1 5 T Roubleshooting 5
2. Use t he a rrows t o s croll p ages, a nd t hen p ress o n t he ‘ Internet G ateway’ b utton. ... - Page 63 4. You a re n ow s hown t he ‘ Configure W i-‐Fi” p age. T his p age a llows y ou t o c onfigure t he Wi-‐Fi ...
- Page 64 Stage 2 : R egistering " Pool O wner" a nd a uthorised " Users" o f t he P ool A pp In ...
- Page 65 After t his i s f illed i n a nd " Next" i s p ressed, t he P ool R egistration p age i s s hown: ...
- Page 66 The P ool N ame t hat i s e ntered o n t his p age w ill b e d isplayed o n t he A pp. I f y ou p lan t o b e able ...
- Page 67 After p ressing " Add U ser" y ou w ill b e p rompted t o e nter t he n ew u sers n ame a nd e mail address ...
-
Page 68: Troubleshooting
Go t o t he G oogle P lay s tore o n y our d evice. S earch f or c onnectmypool a nd d ownload t he App. ... - Page 69 If t he s erial n umber i s s hown a s ‘ ???’, t hen t he T ouchscreen c annot c ommunicate w ith t he I nternet G ateway. Check ...
- Page 70 In t he i mage a bove, t he E thernet c onnection i s n o l onger o perating c orrectly, a s t he ‘ Linked’ f ield s hows ‘ No’. Troubleshooting ...
- Page 71 If t he s tatus i s s hown a s ‘ ?’, t hen t he T ouchscreen c annot c ommunicate w ith t he I nternet G ateway. C heck t hat the ...
- Page 72 Code Text Meaning 0 Idle The I G h as n ot y et a ttempted t o c onnect t o t he s erver. W ait f or t he I G t o automatically ...
- Page 73 Internet G ateway S tatus L ights The i mage b elow s hows t he b ottom v iew o f t he I nternet G ateway m odule. RJ12 RJ45 To Pool...
Need help?
Do you have a question about the Viron Connect 10 and is the answer not in the manual?
Questions and answers