
Related Manuals for Paradox PRK-315


Summary of Contents for Paradox PRK-315
- Page 1 Arm / Disarm Wireless Module 433MHz V1.3 (PRK-315) KEELOQ WITH HIGH SECURITY CODE ENCRYPTION Reference & Installation Manual...
-
Page 3: Table Of Contents
TABLE OF CONTENTS INTRODUCTION ........1 Features............ 1 Technical Specifications ......2 INSTALLATION........3 Location & Mounting ......... 3 Power & Communication ......4 Keypad............5 Antennas........... 6 Programmable Outputs (PGMs) ....6 Hand-Held Remote Control....... 7 Remote Control Button Identification ..8 System Reset.......... -
Page 5: Introduction
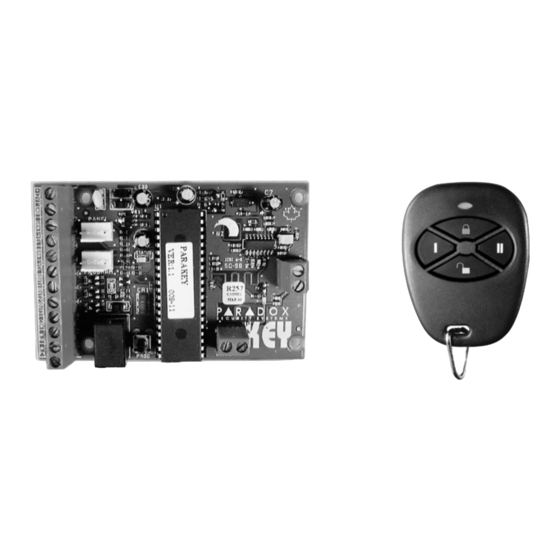
1.0 INTRODUCTION The PARAKEY (PRK-315) is a wireless remote control system that consists of a receiving module and up to eight 4-button remote controls (transmitters). When used in conjunction with any Paradox Esprit Series Control Panel, remote controls can perform actions such as remote... -
Page 6: Technical Specifications
•Stand-alone operation (trigger PGMs only) or in conjunction with a Paradox Esprit Series Control Panel (arm/disarm, panic & PGM activation). •Programming keypad connects directly to the Parakey Receiving Module. •Programmable Installer Code. •Software reset. 1.2 T ECHNICAL PECIFICATIONS 1.2.1 Receiver: Compatible Programming (616 V4.2A &... -
Page 7: Installation
1.2.2 Remote Control: Model # 344: 433MHz Remote Control Model # OMN-RCT1: 433MHz Remote Control Water Resistant Batteries: 2 Lithium 3V (CR2016) Power Transmission: 28mW Current Consumption: 21mA (transmission) Max. Transmission 300 ft. (95m) Range: 2.0 INSTALLATION 2.1 L & M OCATION OUNTING We recommend installing the receiver in a... -
Page 8: Power & Communication
Selecting a site that is not susceptible to drastic changes in temperature and humidity. 2.2 P & C OWER OMMUNICATION 2.2.1 With Esprit Control Panel When used in conjunction with any Paradox Esprit Series Control Panel, auxiliary terminals (12VDC) of the control panel may power the Parakey Receiving Module as shown in Figure 4 (page 11). -
Page 9: Keypad
" connector (see Figure 4 on page 11). PANEL 2.2.2 Stand-Alone When used as a stand-alone system, you will need a Paradox 12VDC Power Supply and a 12VDC backup battery. Connect the power supply and the backup battery as shown in Figure 5 (page 12). -
Page 10: Antennas
2.4 A NTENNAS Firmly screw the vertical and horizontal antennas to the corresponding " " connections on the Receiving Module as shown in Figure 4 (page 11) or Figure 5 (page 12). Use of the horizontal antenna is optional, but is recommended for best results. -
Page 11: Hand-Held Remote Control
Figure 1: PGM Outputs 2.6 H EMOTE ONTROL The Parakey works with either Parakey Remote Controls (#344) or Omnia Remote Controls (OMN-RCT1). Each button on a remote control can perform different actions depending on how the system is programmed. These remote controls can transmit a signal up to a maximum of 95 meters (300ft). -
Page 12: Remote Control Button Identification
2 (page 8). Figure 2: Changing the Batteries 2.7 R EMOTE ONTROL UTTON DENTIFICATION Figure 3 on page 9 displays the 4-button RF transmitter and how the buttons are numbered. 8 Reference & Installation Manual... - Page 13 Figure 3: Remote Control Button Identification Parakey 9...
-
Page 14: System Reset
2.8 S YSTEM ESET Performing a system reset will set the Parakey to default settings. Please note that if connected to a control panel, the reset sequence of the Parakey will not cause the control panel to reset and vice versa. - Page 15 Figure 4: Connection with Control Panel Parakey 11...
- Page 16 Figure 5: Stand-Alone Connection 12 Reference & Installation Manual...
-
Page 17: How To Program
3.0 HOW TO PROGRAM Press the [ ] key at any time to revert to the CLEAR preceding step, unless entering data, in which case you will remain in the section and the current data entry will be erased. 3.0.1 Step 1 - Enter the Programming Mode When in "Normal Mode", the red LED on the Parakey Receiver flashes on and off at 2-second intervals. - Page 18 3.0.3 Step 3 - Key in Desired Section Key in the desired 2-digit [ ] you wish to SECTION program. The [ ] key will remain illuminated. ENTER The [2 ] key will flash if the current section is empty. Pressing the [2 ] key followed by the ] key will clear the contents of the current ENTER...
- Page 19 •Sections [25] [25] to [30] [30] [25] [25] [30] [30] Decimal Select - Each section represents one feature and each key from [0] to [8] represents a specific setting. Unlike feature select programming, only one key can be selected. The selected key will remain illuminated.
-
Page 20: System Programming
4.0 SYSTEM PROGRAMMING 4.1 A CCESS ENGTH Section [35] [35] - Feature Select Programming: [1] [35] [35] The Parakey can be set to accept 6-digit or 4-digit User and Installer Access Codes. Key [1] OFF = 4-digit access codes. Key [1] ON = 6-digit access codes (default). This option must be set to the same access code length as set in the control panel at address 088, key [9]. - Page 21 and each user must be defined with all three of these parameters. • User Access Code • Remote Control Assignment • User Remote Control Options Figure 6: Programming User Parameters Parakey 17...
- Page 22 When a user presses a button, the Parakey transmits the corresponding User Access Code to the control panel. To arm/disarm the system, the Paradox Esprit Series Control Panel must receive a valid access code. Therefore, the programmed User Access Code must be the same as a User Access Code programmed in the Paradox Esprit Series Control Panel.
- Page 23 face, whereas the Parakey remote control has no such label. Remote Control Recognition instructs the receiver module of the remote control type being used. Enter section [35], then set option [3] ON or OFF. Key [3] ON = Omnia Remote Control Key [3] OFF = Parakey Remote Control 4.3.3 Remote Control Assignment Sections [09]...
- Page 24 4.3.4 Remote Control Options Sections [17] [17] to [24] [24] - Feature Select: [1] [1] to [8] [17] [17] [24] [24] As described in Figure 6 (page 17), sections [17] to [24] correspond to users 1 through 8 respectively. By turning keys [1] to [8] on or off, set the desired remote control options as described on the next page and press [ ENTER...
-
Page 25: Panic Output Programming
Key [5] OFF = Disabled Key [5] ON = Button 2 PGM Enabled (Default) Key [6] OFF = Disabled Key [6] ON = Button 3 PGM Enabled (Default) Key [7] OFF = Disabled Key [7] ON = Button 4 PGM Enabled (Default) When the [8] key is enabled, pressing any two buttons simultaneously on the remote control will generate a panic alarm. -
Page 26: Panic Lockout Timer
Section [25] Key [0] ON = No output on panic alarm Key [1] ON = Toggle output 1 on panic alarm Key [2] ON = Toggle output 2 on panic alarm Key [3] ON = Toggle output 3 on panic alarm (default) Key [4] ON = Toggle output 4 on panic alarm 4.5 P... -
Page 27: Pgm Output Timing
Key [4] ON = 120-second signal lockout on panic alarm 4.6 PGM O UTPUT IMING Section [27] [27] to [30] [30] - decimal select: [0] [0] to [8] [27] [27] [30] [30] When any of the PGM outputs are activated (see sections 4.3.3 on page 20 and 4.4 on page 21), the Parakey can latch the output in its opposite state until the output is toggled again or for a... -
Page 28: Button Pgm Options
4.7 B PGM O UTTON PTIONS Section [31] [31] to [34] [34] - feature select: [1] [1] to [4 [4 [4 [4] ] ] ] [31] [31] [34] [34] This feature allows you to determine which PGM outputs a PGM enabled button will activate (see section 4.3.3 on page 20). -
Page 29: Panic Option
4.8 P ANIC PTION Section [35] [35] - feature select: [2] [35] [35] When a remote control-activated panic alarm is generated (see section 4.3.3 on page 20), the Parakey can perform one of two actions: Key [2] OFF = Panics generated from the remote control will only toggle the enabled PGM output (see section 4.4 on page 21) - Page 30 Warranty The Seller warrants its products to be free from defects in materials and workmanship under normal use for a period of one year. Except as specifically stated herein, all express or implied warranties whatsoever, statutory or otherwise, including without limitation, any implied warranty of merchantability and fitness for a particular purpose, are expressly excluded.
Need help?
Do you have a question about the PRK-315 and is the answer not in the manual?
Questions and answers