Table of Contents
Advertisement
Quick Links
Advertisement
Table of Contents

Related Manuals for Britax Steelcraft Agile SH908


Summary of Contents for Britax Steelcraft Agile SH908
- Page 3 • It is unsafe to use accessories other than those tested and approved by Britax. For maximum safety only use accessories designed for this stroller. • Do not place more than 4kg in the basket or 1kg in the Canopy Pocket (if supplied) •...
-
Page 4: Parts List
PARTS LIST NOTES IMPORTANT The upright positions are not suitable for use with children less than six months old. The lowest recline position should be used to transport babies, and the backrest can be adjusted to a more upright position as the child grows older and is able to support its head without assistance. - Page 5 14. TO RELEASE THE INFANT CARRIER (Cont) PARTS LIST Lift and remove the Infant Carrier away from the stroller. To remove the adaptors, press the red lever in on the inside of the adaptor and pull the adaptor up. 1 x Stroller Frame, Seat & Basket 1 x Canopy Adaptors 2 x Rear Wheels...
-
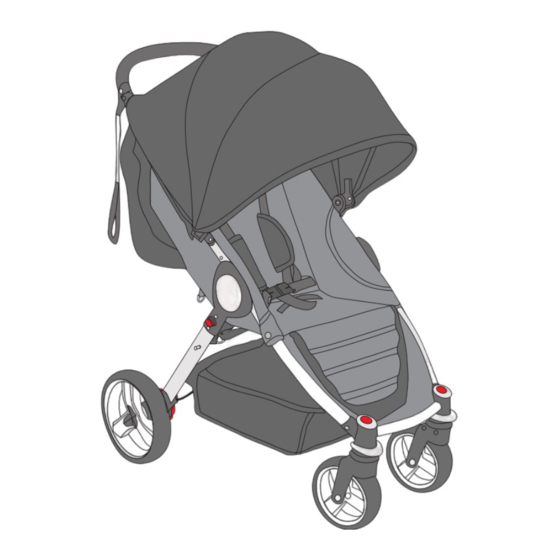
Page 6: Assembled Stroller - Parts List
14. TO RELEASE THE INFANT CARRIER ASSEMBLED STROLLER - PARTS LIST To remove the Infant Carrier, squeeze both handle latches in to release the locks. The indicator will now be RED. Handle Canopy Front canopy tube Tether Strap Upper seat Inner seat Shoulder pads Folding strap... -
Page 7: To Open The Stroller
13. TO INSTALL THE INFANT CARRIER (Cont) 01. TO OPEN THE STROLLER Squeeze and release the handle latches. Then with one hand Release the storage latch (1) located on the rear leg. Open the frame as shown by the arrows (2) until you hear a ‘click’ holding the front of the Infant Carrier, push the Infant Carrier which indicates the frame is fully opened and locked. -
Page 8: To Fit And Remove The Rear Wheels
03. TO FIT AND REMOVE THE REAR WHEELS To fit the rear wheels, insert each wheel axle into the moulding Lower the Infant Carrier into the adaptors. Press down firmly on and push in until locked. You should hear a ‘click’ which indicates both sides. -
Page 9: To Attach And Use The Canopy
13. TO INSTALL THE INFANT CARRIER (Sold Separately) 05. TO ATTACH AND USE THE CANOPY To attach the canopy, insert the canopy mouldings into the frame Stand in front of the stroller and pull the fabric back from the sides mouldings until they connect together. - Page 10 05. TO ATTACH AND USE THE CANOPY (Cont) 12. TO FOLD THE STROLLER (Cont) 13. TO INSTALL THE INFANT CARRIER (Sold Separately) Attach the hook square on the inside of the canopy backflap to the loop strip on the side of the stroller. •...
- Page 11 05. TO ATTACH AND USE THE CANOPY (Cont) 12. TO FOLD THE STROLLER (Cont) To remove the canopy, press in the button on the canopy Press and hold in the RED Sure Lock release button (1) located on moulding and pull out of the frame mouldings. the right hand side of the stroller.
-
Page 12: To Fold The Stroller
05. TO ATTACH AND USE THE CANOPY (Cont) 12. TO FOLD THE STROLLER For additional air circulation the back flap of the canopy can be To prevent the canopy back flap from dragging on the ground removed by opening the zipper. To reattach the back flap to the when the stroller is folded, either (A1)remove the back flap by main canopy secure with the zipper. -
Page 13: To Fit The Rain Cover
• Caution is required when pushing the stroller on a steep slope as the stroller may become unstable. Always hold the handles firmly. Plastic rings • Whenever you stop, always apply the brakes before you leave the stroller. www.britax.com.au www.britax.com.au... -
Page 14: To Use The Tether Strap
If not locked, repeat this step. To release the brakes, push up on either pedal. 10. TO FIT THE RAIN COVER Pull the rain cover over extended canopy and push the back flap of rain cover through the handle opening. www.britax.com.au www.britax.com.au... -
Page 15: To Secure Your Child In The Harness
Crotch strap * Depending on the model Position the shoulder strap tongue (A) on the top of the waist buckle tongue (B) on both sides. www.britax.com.au www.britax.com.au... - Page 16 Tighten or loosen shoulder and crotch straps by sliding up and CAUTION: down the 3 bar sliders. DO NOT SLIDE 3 BAR SLIDER OVER THE SEWN TAB ON SHOULDER HARNESS. www.britax.com.au www.britax.com.au...
Need help?
Do you have a question about the Steelcraft Agile SH908 and is the answer not in the manual?
Questions and answers