
Related Manuals for Casall 1.1T


Summary of Contents for Casall 1.1T
- Page 2 Customer, e are pleased, that you have a chosen Casall Fitness Equipment. This quality product has been designed for in-home use and has been tested and certified according to the European Norm EN 957-1/6. Please carefully read the instructions prior to assembly and first use and be sure to keep the instructions for reference and maintenance.
- Page 3 Model name: Serial number: Waste isposal Casall products are recyclable. At the end of its useful life please dispose of this article correctly and safely (local refuse sites). Batteries and accumulators do not belong in the domestic waste. Please, dispose this article correctly (local refuse sites).
- Page 4 The owner’s manual is only for the customer reference. Casall cannot guarantee for mistakes occurring due to translation or change in technical specification of the product. Precautions Before assembling or using the treadmill, please read the following instructions carefully. They contain important information for use and maintenance of the equipment as well as for your personal safety.
- Page 5 Note: Follow the steps of the assembly instruction carefully. Note: Only use suitable tools for assembly and ask for assistance if necessary. Note: Only use original Casall parts as delivered (see checklist). Note: Tighten all adjustable parts to prevent sudden movement while training.
- Page 6 Note: Only use original Casall replacement parts. Note: Do not under any circumstances carry out electrical repairs or alterations yourself. Always ensure that such work is done by a properly qualified electrician/mechanic or from the advice of the Technical Support team.
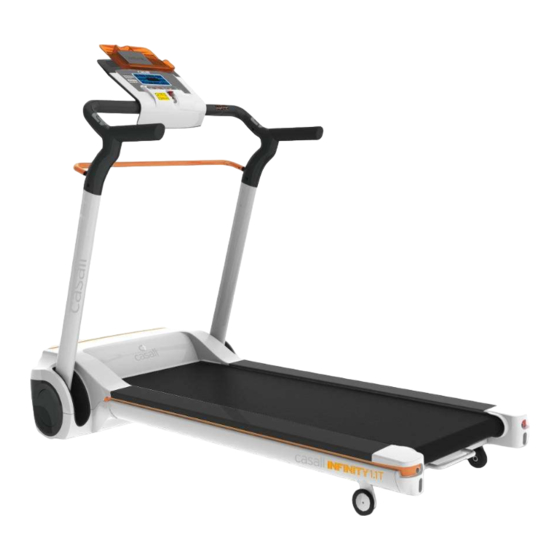
- Page 7 iPad holder Handle pulse sensor Safety key Upright otor Cover upper Side rail Running belt...
- Page 8 ssembly...
- Page 9 Unfold...
-
Page 11: Safety Key
Connecting the power cord for treadmill and turning on the power switch(observe markings). Power plug Power switch Power socket Insert the safety key in safety key base then fold up safety key to light up the screen of console and fold down safety key to turn off the screen of console. Safety key... - Page 12 6. How to assemle the mediaport housing and play music USB Power charge MP3 audio input Audio input connection cable and USB connection cable need to pull out form mediaport housing...
-
Page 13: Play Music
Press down Play music... - Page 14 Folding...
- Page 18 Transport...
- Page 19 Correct Use Correct biomechanical position: Please refer to left picture. Running straight on the treadmill is made easier by focusing on a fixed object in front of you in the room. Run as if you wanted to approach the object. Always keep a distance which you can reach the front handle bar. Major exercise type: This equipment focuses on your lower body, and it can train your thigh and shank muscles Important: Incorrect/excessive training can cause health issues and injuries.
- Page 20 B: DECK LUBRICATION The walking belt has been pre-lubricated at the factory. However, it is recommended that the walking board be checked periodically for lubrication to ensure optimal treadmill performance. Please ensure the lubrication of the running belt is checked every 4-6 weeks after the initial 100 miles/kilometers of use. Every 30 days or 30 hours of operation lift the sides of the walking belt and feel the top surface of the walking board as far as you can reach.
- Page 21 RUNNIN BELT ADJUSTMENT This information forms part of the self maintenance and must be carried out periodically by the user* Proper maintenance is very important to ensure your treadmill is always in top working condition. Improper maintenance could cause damage or shorten the life of your treadmill and exceed the LIMITED WARRANTY coverage.
- Page 22 djust Incline The treadmill has two levels of inclination: The level can be changed by adjusting the inclination leg. Use the handle (A) to lift the treadmill with one hand and adjust the inclination leg with the other hand as shown in the drawing (B).
- Page 23 Exploded view 02 06...
- Page 25 4 2 4 3...
- Page 26 26 2 3 5 02...
- Page 29 Spare Part List art No. art name Console housing -rear computer Safety Key base Safety Key base fix bracket Safety Key Console housing holder Loudspeaker upper cover Console housing -lower Loudspeaker Computer EVA sticker Loudspeaker lower cover Computer display overlay Computer Button overlay P3 socket bracket P3 socket...
- Page 30 Handlebar cover right -inner Handlebar cover right -outside Handelbar cover left -inner Handlebar cover left -outside Side handlebar Folding system connectible plate Stationary pin OD 2X32 ø2X3-ø 5X 6 Spring Fold up grip connect rod . X 4X49X 0 Spring Upright lock pin Fold up grip connector Fold up grip connecting bushing...
- Page 31 Square foot 60X40X 9 X30 bump bolt Rear roller tube Front roller tube ain frame supporting foot assembly-left otor holder bracket end cap ain frame supporting foot assembly-Right Wire clip OD7X 0X24 otor Cover-upper otor hood decorate cover-upper otor Cover-Front otor Cover-Bottom Upright lower cover-right Upright lower cover-left...
- Page 32 Transport wheel bracket Fold up foot cover otor otor holder Driving belt PU Cushion X26X Spring .2X 0.7X6 X33 washer 2 X 3X0.7 side rail front decroate cover -Left side rail front decroate cover -Right Running belt Side rail Side rail decorate cover Side rail end cap-right Side rail end cap-left Rear end cap - right...
- Page 33 4X 5 Screw 4X 9 Screw 4X 2 Screw X4 Bolt X 2 Screw X45 Allen Bolt 5X 4 Screw 5X 4 Screw/washer Round Head Screw 5X 4 0X53 Screw 3X Screw 5X 0 Screw X30 Screw 6X55 Allen Bolt 6X65 Allen Bolt X20 Allen Bolt Outside hex head screw...
- Page 34 0.5X20X .5 Washer 9X35X Curved Washer 0 C-clip 2X25X3 Washer X 4X2 Washer OD X X7 X25 Bolt 5X24 Screw Thin Nut 4X6 Screw 4X 5 Allen head 3X 4 Screw washer 2 X 3X0.7 6X 0 screw Owner manual “C”...
- Page 35 Computer operate instruction...
- Page 36 Before assembling or using your fitness equipment, please carefully read the precautions included in the assembly instructions. isplay C LORIES (1) The calories display range is from 0 to 999. OIL C N (2) The computer will display oil can when the total distance up to 00km. TIME ( ) The TIME display range is from 00:00 to 99:00.
- Page 37 Buttons and Functions ST RT button Press the button to start the computer or start the program. The initial speed of 0.8 km/h STOP / ENTER button Press to confirm a program and preset function values under setting mode. Press to quit preset program and function values after completing a single program. Setting procedure: returns to beginning of setting mode before pressing the START key.
- Page 38 POWER ON After connecting the power cord, please insert and flip up the “Safety Key” then following to turn on the Power Switch. The LCD screen will light up. S FETY KEY The safety key must be inserted into the slot on the console in order to operate the treadmill. Always insert the safety key and attach the clip to your clothing at your waist before beginning your workout.
- Page 39 QUICK ST RT Press the START key directly to start exercise without a function value. PROGR M 1 – M NU L Select the desired program by pressing the FAST/SLO button. Press STOP / ENTER to confirm the program. Press START to begin your exercise. TIME: Accumulates and displays workout time from start of exercise.
- Page 40 DISTANCE: Press SPEED UP/ DO N to preset the distance target values and press START. The distance will count down from preset target value. hile distance counts down to 0 (zero), speed goes down to 0 (zero) by 0.1 km per second (when the preset target is reached). TIME: Accumulates and displays workout time from start of exercise.
- Page 41 PROGR M 4 – C LORIES Select the desired program by pressing the FAST/SLO button. Press STOP / ENTER to confirm the program. Adjust your desired calories by pressing the FAST/SLO button, press STOP/ENTER to confirm. Press START to begin your exercise. CALORIES: Press FAST/SLO keys to preset calories target value and press START.
- Page 42 Level selection and speed profile as below LEVEL TIME 0 ~1 KM/ML 0.8/0.5 .2/2.0 4.8/ .0 6.4/4.0 7.2/4.5 8.0/5.0 KM/ML 0.8/0.5 4.0/2.5 5.6/ .5 7.2/4.5 8.0/5.0 8.8/5.5 KM/ML 0.8/0.5 4.8/ .0 6.4/4.0 8.0/5.0 8.8/5.5 9.6/6.0 KM/ML 0.8/0.5 5.6/ .5 7.2/4.5 8.8/5.5 9.6/6.0 10.4/6.5...
- Page 43 pressing the FAST/SLO button and press STOP/ENTER to confirm. Press START to begin your exercise. TIME: Accumulates and displays workout time from start of exercise. hile time counts up, the speed goes down to 0 (zero) by 0.1 km per second (when the TTIME 30 minutes is reached) DISTANCE: Accumulates and displays workout distance from start of exercise.
- Page 44 pressing the FAST/SLO button and press STOP/ENTER to confirm. Press START to begin your exercise. TIME: Accumulates and displays workout time from start of exercise. hile time counts up, the speed goes down to 0 (zero) by 0.1 km per second (when the TTIME 45 minutes is reached) DISTANCE: Accumulates and displays workout distance from start of exercise.
- Page 45 LEVEL TIME 5~ 6 6~ 8 8~42 42~4 4 ~44 44~45 KM/ML 8.0/5.0 8.8/5.5 6.4/4.0 8.0/5.0 8.8/5.5 .2/1.6 KM/ML 8.8/5.5 9.6/6.0 7.2/4.5 8.8/5.5 9.6/6.0 .2/1.6 KM/ML 9.6/6.0 10.4/6.5 8.0/5.0 9.6/6.0 10.4/6.5 .2/1.6 KM/ML 10.4/6.5 11.2/7.0 8.8/5.5 10.4/6.5 11.2/7.0 .2/1.6 KM/ML 11.2/7 12.0/7.5 9.6/6.0...
- Page 46 mode. Recovery Function Recovery is the feature to let the user test their physical condition after a workout. The recovery rating is determined by measuring how quickly the user’s pulse slows down after the workout to justify the user physical condition. The faster the pulse slows down, the better the user’s physical condition. Users can record their recovery rating as below chart after each workout to use for reference.
- Page 47 Heart Rate Training To maximize your results from training it is essential to monitor the intensity of your workout through your heart rate. It is imperative that you accurately determine the target pulse rate to train under in order to improve your fitness level at a safe, comfortable and sustainable level.
- Page 48 70% of 195 = 1 6.5 80% of 195 = 156 Your target-heartrate should be between 136.5 and 156 beats per minute. This information is for your reference only. To determine your individual training intensity or in case you should have health restrictions please consult your physician before starting exercising.
Need help?
Do you have a question about the 1.1T and is the answer not in the manual?
Questions and answers