Table of Contents
Advertisement
Advertisement
Table of Contents

Related Manuals for Rand McNally RVND 7730 LM


Summary of Contents for Rand McNally RVND 7730 LM
- Page 1 RVGPS RVND 7730...
- Page 2 Intentional or unintentional changes or modifications to the equipment interference to radio communications if not installed and used in not expressly approved by Rand McNally could void the user’s authority accordance with the instructions. However, there is no guarantee that to operate the equipment.
- Page 3 About GPS The Global Positioning System (GPS) is a constellation of satellites that a GPS receiver uses to calculate geographical positions. To determine a position, data from at least three satellites is required. To determine elevation, the data from four or more satellites is required. Accuracy of the positioning varies from 10 feet to several hundred feet, depending on vehicle placement and the surrounding environment.
-
Page 4: Table Of Contents
Tap Map ....................23 Traffic Everywhere (additional) ............50-51 Avoid List ....................24 6. Connect With Rand ..................52 Points of Interest (POIs) ..............25-28 Local Search ...................29 Rand McNally Dock ................52 Confirmation Windows ................30 TripMaker .....................53 ® Toll Costs, Route Compare ..............31 Custom POI Information .............. -
Page 5: Your Device
Do not open the navigation device casing. • Follow navigation system instructions only when local regulations • Do not attempt to replace the battery. Contact Rand McNally and road traffic allow you do so. Customer Support with questions about the battery. •... -
Page 6: What's Included
1. Your Device Install the Mount What’s Included Note: Follow all local regulations governing the placement of the mount. • Rand McNally RVND 7730 ™ • Windshield mount with suction cup 1. Select an area with a line of sight to the sky and GPS satellites. -
Page 7: Your Rvnd ™ 7730
1. Your Device Your Device RVND 7730 ™ Battery Power Indicator A red light indicates the battery is charging and blinks when the battery is low; a green light indicates the battery is fully charged. Power Button Press and hold to turn on or off. While the device is running, the power button can also be used for quick access to certain features with one quick tap. -
Page 8: Settings
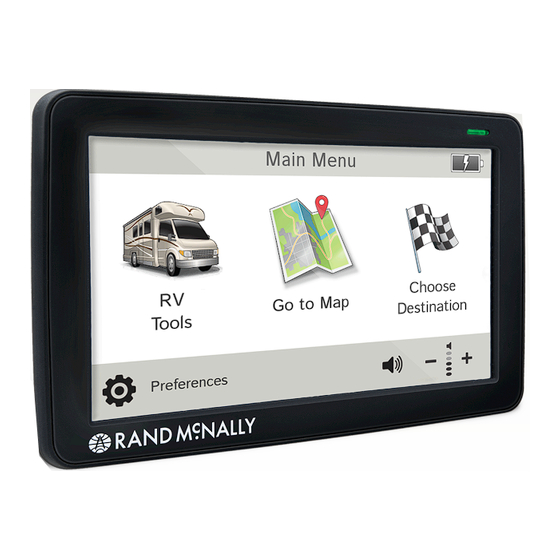
2. Settings Main Menu Battery Power Indicator RV Tools Select to enter RV information, set warnings, and access other tools. (See page 5.) Go To Map Tap to view location on the map. Choose Destination Tap to select an address or point of interest (POI). Preferences Tap to set general, route, or map options. -
Page 9: Guide To Rv Tools And Device Preferences
2. Settings 1. Tap to view the options. State Border Alert ........7 Device Preferences Page Toll Booth Alert ........7 2. Tap the option to be set. Warning/Alert Prompts ......7 3. Enter the new information. Route Cross-Country Borders ......10 4. Tap Back to save changes. -
Page 10: Rv Info
2. Settings RV Info Options RV Info Options RV Type Width Class A Use the + and - buttons or enter a numeric Class A w/Tag Axle value by tapping the calculator. Class B RV ETA Adjustment Class C Increase ETA more Class C (Super) Increase ETA some Fifth Wheel... -
Page 11: Warnings
After 10 seconds RoadWork data distributed through the ™ After 30 seconds Rand McNally Dock. (See page 52.) Height and weight violations will not be auto dismissed. Speed Set warning distance to speed limit changes by using the + and - buttons. -
Page 12: General Preferences
2. Settings General Preferences Options General Preferences Options Skin Style - Day My Custom POIs Tap Manage Custom POIs to specify how Carbon custom POIs are displayed on the map: set Classic image, warning distance, warning type, and street/city/state level map display. Skin Style - Night Tap the “x”... -
Page 13: General Preferences
2. Settings General Preferences Options Clock Setting 12-hour clock 24-hour clock Screen Snapshot Button Shortcut Button Main Menu Got to Map Set the shortcut that appears in the bottom right corner of the screen. Quick Power Press POI along route Screen snapshot Main Menu Show map... -
Page 14: Route Preferences
2. Settings Route Preferences Options Route Preferences Options Note: The default settings for your device are already optimized for Manage Avoid List Roads RV routing. Use the options below to fine-tune these settings. States/Provinces A route may still include a roadway or maneuver set to Avoid if the AREAS only legal route found contains these types of roads or the route is Routes... -
Page 15: Map Preferences
2. Settings Map Preferences Options Map Preferences Options Map Style Light Address Book Icons Dark Map Auto Zoom Address book entries appear as pushpin On, auto scale icons unless they are assigned to a group. On, street scale Grouped entries appear as folders. (See page 19.) On, city scale On, state scale... -
Page 16: Destinations
(See page 25.) Local Search Tap to search for local businesses, restaurants, and more by name or keyword. (Note: Wi-Fi connection required.) (See page 29.) Rand McNally Trips Tap to view Rand McNally Trip content. RVND™ 7730 LM User Manual... -
Page 17: Tips
3. Destinations Helpful Tips on Entering Addresses Auto-Complete Feature: Enter the first few characters in a name and a short list displays a couple of names that start with the typed characters. On the keyboard, the only keys available are for the next valid characters in a search name. - Page 18 3. Destinations New Location Address Tap to route to an address by entering the city, street, and number, or by entering the zip code and street. (See page 15.) City Center Tap to route to a city center. (See page 16.) Intersection Tap to route to two intersecting roads in a city.
- Page 19 3. Destinations > Addresses Search for an Address 1. Tap Choose Destination > New Location > Address. 2. Type the first few characters in the city name. As you type, a short list of matching city names displays. 3. Tap on a city to select it. •...
- Page 20 3. Destinations > Addresses Route to a City Center 1. Tap Choose Destination > New Location > City Center. 2. Type the first few characters in the city name. 3. Tap on the city/state name. The Confirmation Window displays. (See page 30.) 4.
- Page 21 3. Destinations > Addresses Route by Latitude/Longitude 1. Tap Choose Destination > New Location > Enter Lat/Long 2. Tap in the Latitude field. 3. Enter the latitude of the location and tap Enter. 4. Tap in the Longitude field. 5. Enter the longitude of the location and tap Enter. 6.
- Page 22 3. Destinations > Address Book Address Book Add Locations to the Address Book from the Confirmation Window (See page 30.): 1. Tap Save to Address Book. 2. Tap Yes to accept the default name or tap No to display a keyboard. 3.
- Page 23 3. Destinations > Address Book Create a Group 1. Tap Choose Destination > Address Book. 2. Tap on the Groups tab. 3. Tap New Group. 4. Type the group name. 5. To select a different color folder, tap 6. Tap on a color, then tap Close. 7.
- Page 24 3. Destinations > Multi-Stop Trips Create a Multi-Stop Trip 1. Tap Choose Destination > Multi-Stop Trips. 2. Tap New Trip. 3. Type the trip name. 4. To select a different color folder, tap 5. Tap on a color, then tap Close. 6.
- Page 25 3. Destinations > Multi-Stop Trips Reorder Routes Optimize Automatically After all locations have been added to a multi-stop trip, you can run the optimizer wizard to organize your trip. 1. Tap Choose Destination > Multi-Stop Trips. 2. Tap on the route you want to optimize. 3.
- Page 26 3. Destinations > Multi-Stop Trips Select and Run a Saved Route 1. Tap Choose Destination > Multi-Stop Trips. 2. Tap on the route to select it. 3. Tap Start Trip. The Confirmation Window displays. (See page 30.) 4. Tap Begin New Route to navigate to the location. 5.
-
Page 27: Tap Map
3. Destinations > Tap Map Tap on the Map When you tap on the map screen, the crosshairs display. Add as Via Add a via—an interim stop between the origin and the destination. Avoid Tap to avoid the route, road, or area, or to detour. (See page 24.) Set Origin Set the location as the starting point of the route. -
Page 28: Avoid List
3. Destinations > Avoid List Avoid Options Avoid List From the map, set specific locations to avoid. Tap on the map and select Permanent Avoid. Choose Avoid Route, Avoid Road, or Avoid Area. Or, if the location is along an active route, choose Detour. Avoid Route Choose whether to avoid an upcoming distance on an active route, in the left column, or a specific road section, in the right column. -
Page 29: Points Of Interest (Pois)
3. Destinations > POIs Points of Interest (POIs) My RV/Near Car Tap to search for a point of interest near the current vehicle location. City Tap to search for a point of interest in a city. My Route Tap to search for a point of interest along the vehicle route. Destination Tap to search for a point of interest near the route destination. - Page 30 Tap to search for RV parking at rest stops and Walmart locations. Travel Centers Tap to search for a travel center. (See page 28 to filter by amenities.) Rand McNally Editor’s Picks Tap to search for national parks, festivals, and other places to visit. Other Categories Tap to select from a wide range of restaurants, shopping, and other POIs.
- Page 31 3. Destinations > POIs Other Categories 1. Tap Choose Destination > Points of Interest. 2. Select a search type (My RV/My Car, City, My Route, or Destination). 3. Tap Other Categories. 4. Tap on a category (for example, Hospital/Emergency). Or use the Search bar to search by name.
- Page 32 3. Tap Create Comment and type a personal comment on the facility. 4. Tap Enter to save the comment. 5. Tap Back to save changes. Note: You can share ratings with fellow RVers through Rand McNally Dock software for your Mac or PC. (See page 52.) RVND™ 7730 LM User Manual...
-
Page 33: Local Search
3. Destinations > Local Search Note: This feature requires a Wi-Fi connection. (See page 39.) Use Local Search to search the Internet for a restaurant, business, or any type of location by name, keyword, or category. Tap Choose Destination > Local Search. Choose whether to search: near your RV in a specific city... -
Page 34: Confirmation Windows
Add the location to the Address Book or add to Address Book group. (See pages 18-19). Atlas Cross-reference to printed Rand McNally Road Atlas and Motor Carriers’ Road Atlas. (Page numbers apply to the most recent atlas.) Go to Map Tap to view this location on a map. -
Page 35: Toll Costs, Route Compare
3. Destinations > Toll Costs, Route Compare Toll Costs From the destination confirmation screen, tap Begin New Route. If the calculated route includes tolls, a message appears. Use Current Route Show estimated toll costs and continue along the calculated route. Compare Routes Compare the calculated toll route to an alternate route without tolls. -
Page 36: Maps & Routing
4. Maps & Routing Route Map Window Current Mile Marker Tap to open a “Tell Rand” message. Current Information View current information by city, street, or upcoming intersection. Also dis- plays advanced lane guidance and weather overlay key, when enabled. Tap to change. -
Page 37: Exits Quick View
4. Maps & Routing Exits Quick View Slide out to show Points of Interest and amenities at upcoming exits. The list displays the distance to the next exit, exit name and number, and a count of available amenities. 1. Tap on an exit to bring up the notes icon 2. -
Page 38: Directions Slide-Out List
4. Maps & Routing Directions Slide-Out List Highway View Route Display Options 1. When first opened, the slide-out list displays in Detail View, show- ing each maneuver. 2. Use to view the instructions. 3. To change the display option, tap Route Display Options . See Highway View, Trip Summary, and Summary Map View at left. -
Page 39: Virtual Dashboard
4. Maps & Routing Virtual Dashboard To show the Virtual Dashboard, tap the Current Speed. Current speed. Note: Turns red when speed limit warning exceeded. (See page 7 to set speed limit alert.) Sunrise and sunset times based on vehicle location (latitude/longitude) and day. - Page 40 4. Maps & Routing Manually Reset Trip Information 1. Tap on the tab you want to reset. 2. To set the odometer for the selected tab back to zero, tap Reset All. 3. Information is captured as you travel the route. Automatically Reset Trip Information To reset trip information after the vehicle has remained stationary after a specific number of hours:...
-
Page 41: Junction View, Turn View
4. Maps & Routing Junction View When on a route, Junction View displays when you have an upcoming highway maneuver. Set distance in Preferences > Route. Once past the maneuver, Junction View closes and the previous window displays. Signs to follow for the next maneuver. Number and direction of lanes for the next maneuver. -
Page 42: Location And Route Options
4. Maps & Routing Location and Route Options Nearest cross street Current road you’re on, current town you’re in Latitude and longitude at current location Current location by mile marker Return to previous window Detour Around Part of the Route 1. -
Page 43: Tools & Features
5. Tools & Features Wi-Fi For information on setting up a Wi-Fi hotspot through your cellular phone or laptop computer, please visit www.randmcnally.com/wifihelp for basic instructions, or contact your wireless carrier. Note: Wi-Fi connectivity requires a supporting feature and data plan from your wireless service provider. -
Page 44: Weather
5. Tools & Features Weather Notes: • This feature requires a Wi-Fi connection. • The refresh speed of the weather display is dependent on the connection speed. Weather information is updated every few minutes while Wi-Fi connection is active. • Weather display depends on active weather patterns and map zoom level. -
Page 45: Fuel Prices
5. Tools & Features Fuel Prices Note: This feature requires a Wi-Fi connection. To show fuel prices, tap the Wi-Fi icon on the map screen and tap the Fuel Prices tab. Displays stations and prices, with distance as the crow flies. Check to show the icons and prices on the map screen. -
Page 46: Rv Tools
Road Atlas Information View emergency contact and other information. (See page 48.) Tell Rand Compose a message to send to Rand McNally when you connect to the Dock. (See page 52.) Converter Quickly convert distance, weight, and temperature. (See page 49.) Calculator (See page 49.) -
Page 47: Checklists
5. Tools & Features Checklists 1. Tap RV Tools. 2. Tap Checklists, Maintenance, Trails, Fuel. 3. Tap the Checklists tab. To complete a preset checklist: 4. Tap on a checklist to select it. 5. Tap the box next to each task to check it off the list. To add a new checklist: 4. -
Page 48: Maintenance
5. Tools & Features Maintenance Keep track of maintenance performed on your RV. 1. Tap RV Tools. 2. Tap Checklists, Maintenance, Trails, Fuel. 3. Tap the Maintenance tab. 4. Tap Add Note and enter the details. 5. Tap Back to save changes. Tap any note to edit or to change the date. -
Page 49: Trails
5. Tools & Features Trails Use Trails to record a “bread-crumb” path of GPS coordinates where your RV has traveled. 1. Tap RV Tools. 2. Tap Checklists, Maintenance, Trails, Fuel. 3. Tap the Trails tab. 4. To record a trail, tap New Trail. 5. -
Page 50: Fuel Logs
5. Tools & Features Fuel Logs 1. Tap RV Tools. 2. Tap Checklists, Maintenance, Trails, Fuel. 3. Tap the Fuel tab to view a list of fuel logs by quarter. 4. Tap Add Fuel to record the date, location and cost of fuel purchase. 5. -
Page 51: Quick Planner
5. Tools & Features Quick Planner Use this tool to quickly estimate the mileage and time between any two cities or towns. 1. Tap RV Tools. 2. Tap Quick Planner. The revenue or cost per mile used in the last computation displays. 3. -
Page 52: Road Atlas Information
5. Tools & Features Road Atlas Information To reference the Rand McNally Road Atlas and Motor Carriers’ Road Atlas: 1. Tap RV Tools. 2. Tap Road Atlas Information. 3. Select the appropriate country tab. 4. Select the appropriate state/province to view emergency and other key phone numbers. -
Page 53: Unit Converter
5. Tools & Features Unit Converter 1. Tap RV Tools. 2. Tap Converter. 3. Tap on the first field and select the type of conversion to perform. 4. Tap on the second field and enter the value to be converted. 5. -
Page 54: Traffic Everywhere (Additional)
5. Tools & Features Traffic Everywhere Traffic Everywhere is available as an additional service on the Rand McNally Dock. (See page 52.) Note: This feature requires a Wi-Fi connection. To view traffic information, tap the Wi-Fi icon on the map screen and then tap the Traffic tab. - Page 55 5. Tools & Features Traffic Icons Accident Accident Incident Closure Carriageway Exit blocked Entrance blocked Traffic Carpool Road work Obstruction Dangerous Road condition Temperature Chance of precipitation Wind Activities Security Delay Cancel Heavy Moderate Light Travel time Size/weight limit Visibility traffic traffic traffic...
-
Page 56: Connect With Rand
6. Connect With Rand Rand McNally Dock The Rand McNally Dock enables you to receive software upgrades and access map updates, construction updates, and additional features. Simply download the Dock software for your PC or Mac at www.randmcnally.com/dock and connect your device using the USB cable provided. -
Page 57: Tripmaker
® provide RV-specific routing. Your device will calculate a route, based on the vehicle and route settings, at the start of the multi-stop trip.) Access TripMaker on the Rand McNally Dock or go to: ™ randmcnally.com/tripmaker. RVND™ 7730 LM User Manual... -
Page 58: Custom Poi Information
Dr,Skokie,IL,60077,USA • Longitude/latitude only: -87.761039,42.059611,Rand McNally • Address only: ,,Rand McNally,9855 Woods Dr,Skokie,IL,60077,USA (Note: In this example, there are two commas at the beginning. Commas are required as placeholders for fields with no data in them.) RVND™ 7730 LM User Manual... -
Page 59: Custom Poi Information
6. Connect With Rand Custom POI Information To upload custom POI files to your device: 1. Connect your device to the Rand McNally Dock. 2. On the Dock, click Add Locations. You can also upload an Address Book. 3. Click POI (for destinations) or Alert POI (for warnings). -
Page 60: Export Fuel Logs
Use this feature to export fuel purchase information to your computer. The exported file can be in .xls or .csv format. On the Rand McNally Dock: 1. Click on Fuel. 2. Select where you want the file to be downloaded, and click Save. -
Page 61: Tell Rand
While you’re en route with your device, you can enter messages for Rand McNally regarding construction, vehicle restrictions, addresses, your device, and more. The next time you connect to the Rand McNally Dock, you can reopen, edit, and send the message. -
Page 62: More Information
6. Connect With Rand For more information • Rand McNally Website www.randmcnally.com/rvgps • Support www.randmcnally.com/support • GPS accessories store.randmcnally.com • Rand McNally Dock www.randmcnally.com/dock • Facebook www.facebook.com/randmcnally RVND™ 7730 LM User Manual... - Page 63 Neither this manual nor any parts thereof may be reproduced for any purpose whatsoever without the express written consent of Rand McNally, Inc., nor may it be transmitted in any form either electronically or mechanically, including photocopying, and recording.
- Page 64 08/2014...
Need help?
Do you have a question about the RVND 7730 LM and is the answer not in the manual?
Questions and answers